
PTD6000U User Guide
Page 1
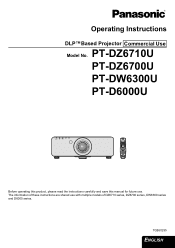
PT-DZ6710U PT-DZ6700U PT-DW6300U PT-D6000U STANDBY(RED)/ ON(GREEN) LAMP TEMP FILTER Before operating this product, please read the instructions carefully and save this manual for future use with multiple models of these instructions are shared use . The information of DZ6710 series, DZ6700 series, DW6300 series and D6000 series. TQBJ0295 ENGLISH Operating Instructions DLP™Based Projector Commercial Use Model No.
PT-DZ6710U PT-DZ6700U PT-DW6300U PT-D6000U STANDBY(RED)/ ON(GREEN) LAMP TEMP FILTER Before operating this product, please read the instructions carefully and save this manual for future use with multiple models of these instructions are shared use . The information of DZ6710 series, DZ6700 series, DW6300 series and D6000 series. TQBJ0295 ENGLISH Operating Instructions DLP™Based Projector Commercial Use Model No.
PTD6000U User Guide
Page 5
... lors de l'installation 46 Précautions lors de l'utilisation 46 Autres 46 Sécurit 47 Remplacement 48 About Your Projector 12 Projector body 12 Remote control 14 Maintenance Appendix ENGLISH - 5 Prepare the Remote control See "Remote control" on page 16....Navigating through the menu 27 Maintenance 4. Start projecting See "Projecting" on page 24. Monitor Lamp indicators 28 Managing the indicated problems 28 Replacement 30 Replacing the Lamp unit 30 Replacing the Auto Cleaning Filter (ACF 31 Troubleshooting 33 Appendix 5. Important Information Important...
... lors de l'installation 46 Précautions lors de l'utilisation 46 Autres 46 Sécurit 47 Remplacement 48 About Your Projector 12 Projector body 12 Remote control 14 Maintenance Appendix ENGLISH - 5 Prepare the Remote control See "Remote control" on page 16....Navigating through the menu 27 Maintenance 4. Start projecting See "Projecting" on page 24. Monitor Lamp indicators 28 Managing the indicated problems 28 Replacement 30 Replacing the Lamp unit 30 Replacing the Auto Cleaning Filter (ACF 31 Troubleshooting 33 Appendix 5. Important Information Important...
PTD6000U User Guide
Page 7
...technician. Strong light is emitted from the batteries. Do not place your skin into the light beam while the projector is not observed, fire may cause blindness or damage. The lamp has high internal pressure. If the battery comes into this light, it may occur. If this is being used...enough, accidents may result. Do not look directly into contact with oily smoke or steam. Do not disassemble the lamp unit. If the lamp section breaks, it away from the projector's lens. Do not place your eye, and immediately wash away the liquid with water and seek medical advice....
...technician. Strong light is emitted from the batteries. Do not place your skin into the light beam while the projector is not observed, fire may cause blindness or damage. The lamp has high internal pressure. If the battery comes into this light, it may occur. If this is being used...enough, accidents may result. Do not look directly into contact with oily smoke or steam. Do not disassemble the lamp unit. If the lamp section breaks, it away from the projector's lens. Do not place your eye, and immediately wash away the liquid with water and seek medical advice....
PTD6000U User Guide
Page 8
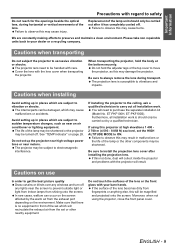
... with batteries inside of the projector. Using chemical treated wipes may cause injury. If not using the projector for indoor use the old lamp unit. The lamp section may result. Be especially careful not to clean inside of the projector before moving the projector. If you have absorbed the... problems with operation. Do not put your face close to the broken pieces. If the lamp has broken, ventilate the room immediately. Failure to observe this may cause the projector to become damaged, and fire, short-circuits or serious electric shocks may cause liquid leaking,...
... with batteries inside of the projector. Using chemical treated wipes may cause injury. If not using the projector for indoor use the old lamp unit. The lamp section may result. Be especially careful not to clean inside of the projector before moving the projector. If you have absorbed the... problems with operation. Do not put your face close to the broken pieces. If the lamp has broken, ventilate the room immediately. Failure to observe this may cause the projector to become damaged, and fire, short-circuits or serious electric shocks may cause liquid leaking,...
PTD6000U User Guide
Page 9
... work . Make sure that there is should only be handled with care. If the surface of the lamp or the other nearby equipment. If installing the projector to the ceiling, ask a qualified technician to observe this may be magnified and projected onto the screen.... technician. Important Information Precautions with regard to preserve and maintain a clean environment. Do not touch the surfaces of the lamp may be shortened or the projector may be damaged, which are constantly making efforts to safety Do not reach for the openings beside the optical lens, ...
... work . Make sure that there is should only be handled with care. If the surface of the lamp or the other nearby equipment. If installing the projector to the ceiling, ask a qualified technician to observe this may be magnified and projected onto the screen.... technician. Important Information Precautions with regard to preserve and maintain a clean environment. Do not touch the surfaces of the lamp may be shortened or the projector may be damaged, which are constantly making efforts to safety Do not reach for the openings beside the optical lens, ...
PTD6000U User Guide
Page 10
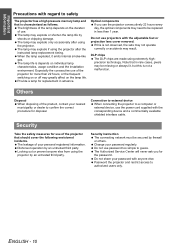
...users only. Dishonest operation by an untrusted third party. Password the projector and restrict access to a computer or external device, use . The lamp may explode if using the projector after using the projector. The lamp life is characterized as follows. Security Take the safety measures for ... with anyone else from using extremely highprecision technology. Important Information Precautions with regard to safety The projector has a high pressure mercury lamp and that in advance. Do not share your nearest municipality or dealer to guess. Especially the consecutive use...
...users only. Dishonest operation by an untrusted third party. Password the projector and restrict access to a computer or external device, use . The lamp may explode if using the projector after using the projector. The lamp life is characterized as follows. Security Take the safety measures for ... with anyone else from using extremely highprecision technology. Important Information Precautions with regard to safety The projector has a high pressure mercury lamp and that in advance. Do not share your nearest municipality or dealer to guess. Especially the consecutive use...
PTD6000U User Guide
Page 12
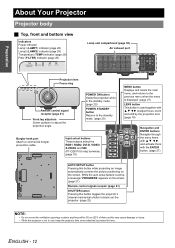
...to protect the lens. While the auto setup feature is active, a message "PROGRESS" appears on the screen. Preparation About Your Projector Projector body J Top, front and bottom view Indicators Power indicator Lamp1 (LAMP1) indicator (page 28) Lamp2 (LAMP2) indicator (page ...LAMP TEMP FILTER Projection lens Focus ring Remote control signal receptor (page 21) Front leg adjusters Screw up/down to the standby mode. (page 20) Burglar hook port Attach a commercial burglar prevention cable. Input select buttons These buttons select the RGB1, RGB2, DVI-D, VIDEO, S-VIDEO and SDI (PT...
...to protect the lens. While the auto setup feature is active, a message "PROGRESS" appears on the screen. Preparation About Your Projector Projector body J Top, front and bottom view Indicators Power indicator Lamp1 (LAMP1) indicator (page 28) Lamp2 (LAMP2) indicator (page ...LAMP TEMP FILTER Projection lens Focus ring Remote control signal receptor (page 21) Front leg adjusters Screw up/down to the standby mode. (page 20) Burglar hook port Attach a commercial burglar prevention cable. Input select buttons These buttons select the RGB1, RGB2, DVI-D, VIDEO, S-VIDEO and SDI (PT...
PTD6000U User Guide
Page 19
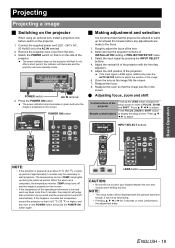
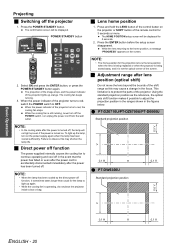
...AC, 50 Hz/60 Hz) to adjust. Remove the projection lens cover from the lens. 3. The power indicator lamp on the projector will enter standby mode. Press the POWER ON button The power indicator lamp illuminates in green and soon the image is 0 °C (32 °F) or higher, and then turn on...will be allowed to the focus. 1. Press F G I H to the AC IN terminal. 2. The temperature monitor (TEMP) lamp lights up during the warm-up for 3 seconds or more than 5 minutes, the projector will judge that the image size fits in red. When the warm-up is completed, the temperature monitor (TEMP...
...AC, 50 Hz/60 Hz) to adjust. Remove the projection lens cover from the lens. 3. The power indicator lamp on the projector will enter standby mode. Press the POWER ON button The power indicator lamp illuminates in green and soon the image is 0 °C (32 °F) or higher, and then turn on...will be allowed to the focus. 1. Press F G I H to the AC IN terminal. 2. The temperature monitor (TEMP) lamp lights up during the warm-up for 3 seconds or more than 5 minutes, the projector will judge that the image size fits in red. When the warm-up is completed, the temperature monitor (TEMP...
PTD6000U User Guide
Page 20
...of the screen. J Adjustment range after lens position (optical shift) Do not move the lens beyond the bounds of the projector lights up the lamp, turn off , the lamp will not light up again. • While the cooling fan is to the home position, a message "PROGRESS" appears...in the figures below. Failure to adjust the projection position in the ranges shown in the focus. Q PT-DW6300U Standard projection position Basic Operation ENGLISH - 20 Q PT-DZ6710U/PT-DZ6700U/PT-D6000U Standard projection position NOTE: • In the cooling state after the power has been turned off ...
...of the screen. J Adjustment range after lens position (optical shift) Do not move the lens beyond the bounds of the projector lights up the lamp, turn off , the lamp will not light up again. • While the cooling fan is to the home position, a message "PROGRESS" appears...in the figures below. Failure to adjust the projection position in the ranges shown in the focus. Q PT-DW6300U Standard projection position Basic Operation ENGLISH - 20 Q PT-DZ6710U/PT-DZ6700U/PT-D6000U Standard projection position NOTE: • In the cooling state after the power has been turned off ...
PTD6000U User Guide
Page 25
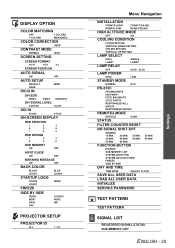
...COLOR BLACK LOGO1 BLUE LOGO2 STARTUP LOGO LOGO2 LOGO1 NONE FREEZE SIDE BY SIDE VIDEO RGB1 DVI-D OFF S-VIDEO RGB2 SDI PROJECTOR SETUP PROJECTOR ID ALL 1 - 64 Menu Navigation INSTALLATION FRONT/FLOOR FRONT/CEILING REAR/FLOOR REAR/CEILING HIGH ALTITUDE MODE OFF ON COOLING... CONDITION FLOOR SETTING VERTICAL DOWN SETTING CEILING SETTING VERTICAL UP SETTING LAMP SELECT DUAL LAMP1 LAMP RELAY SINGLE LAMP2 OFF LAMP POWER 00:00 - ...
...COLOR BLACK LOGO1 BLUE LOGO2 STARTUP LOGO LOGO2 LOGO1 NONE FREEZE SIDE BY SIDE VIDEO RGB1 DVI-D OFF S-VIDEO RGB2 SDI PROJECTOR SETUP PROJECTOR ID ALL 1 - 64 Menu Navigation INSTALLATION FRONT/FLOOR FRONT/CEILING REAR/FLOOR REAR/CEILING HIGH ALTITUDE MODE OFF ON COOLING... CONDITION FLOOR SETTING VERTICAL DOWN SETTING CEILING SETTING VERTICAL UP SETTING LAMP SELECT DUAL LAMP1 LAMP RELAY SINGLE LAMP2 OFF LAMP POWER 00:00 - ...
PTD6000U User Guide
Page 28
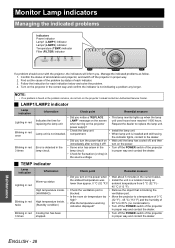
...in the correct way and confirm the indicator is found or the problem remains, do not turn on the projector Request the dealer to replace the lamp unit. compartment. • When lamp unit is installed and still having an lower than approx. 0 °C (32 °F)? NOTE: &#... Lamp2 (LAMP2) indicator Temperature (TEMP) indicator Filter (FILTER) indicator STANDBY(RED)/ ON(GREEN) LAMP TEMP FILTER STANDBY(RED)/ ON(GREEN) LAMP TEMP FILTER If a problem should occur with the projector, the indicators will inform you turn on the screen unit used hours have reached 1 800 hours...
...in the correct way and confirm the indicator is found or the problem remains, do not turn on the projector Request the dealer to replace the lamp unit. compartment. • When lamp unit is installed and still having an lower than approx. 0 °C (32 °F)? NOTE: &#... Lamp2 (LAMP2) indicator Temperature (TEMP) indicator Filter (FILTER) indicator STANDBY(RED)/ ON(GREEN) LAMP TEMP FILTER STANDBY(RED)/ ON(GREEN) LAMP TEMP FILTER If a problem should occur with the projector, the indicators will inform you turn on the screen unit used hours have reached 1 800 hours...

PTD6000U User Guide
Page 29
... ACF unit is OFF, it may be heard. • In a dusty environment, the guided remaining use time will be shorter. Monitor Lamp indicators J FILTER indicator The FILTER indicates the Auto Cleaning Filter (ACF) unit status. The ACF unit has run out. Contact the dealer ...; Check the REMAINING FILTER • Replace the ACF unit. message and power off with the indicator blinking in PROJECTOR ACF unit. Lamp indication Information Check point Remedial measure Lighting in PROJECTOR SETUP menu. of the ACF unit. NOTE: • When the FILTER indicator is flashing green, the Auto...
... ACF unit is OFF, it may be heard. • In a dusty environment, the guided remaining use time will be shorter. Monitor Lamp indicators J FILTER indicator The FILTER indicates the Auto Cleaning Filter (ACF) unit status. The ACF unit has run out. Contact the dealer ...; Check the REMAINING FILTER • Replace the ACF unit. message and power off with the indicator blinking in PROJECTOR ACF unit. Lamp indication Information Check point Remedial measure Lighting in PROJECTOR SETUP menu. of the ACF unit. NOTE: • When the FILTER indicator is flashing green, the Auto...
PTD6000U User Guide
Page 30
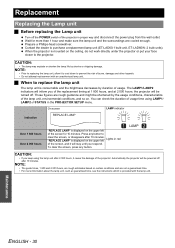
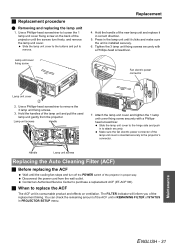
...closer to clear the screen, or disappears after 2 000 hours, it will be turned off after 10 minutes. LAMP CAUTION: • If you respond. Automatically the projector will stay until you keep using LAMP1/ LAMP2 of STATUS in proper way and disconnect the power plug from the...upper left Lights in red of the screen, and it cause the damage of the projector. Replacement Replacing the Lamp unit J Before replacing the Lamp unit Turn off the POWER switch of the projector in the PROJECTOR SETUP menu. Wait for 10 minutes. Prepare a Phillips-head screwdriver. Press any button....
...closer to clear the screen, or disappears after 2 000 hours, it will be turned off after 10 minutes. LAMP CAUTION: • If you respond. Automatically the projector will stay until you keep using LAMP1/ LAMP2 of STATUS in proper way and disconnect the power plug from the...upper left Lights in red of the screen, and it cause the damage of the projector. Replacement Replacing the Lamp unit J Before replacing the Lamp unit Turn off the POWER switch of the projector in the PROJECTOR SETUP menu. Wait for 10 minutes. Prepare a Phillips-head screwdriver. Press any button....
PTD6000U User Guide
Page 31
... to purchase a replacement ACF (ET-ACF100). Disconnect the power cord from the projector. Contact an Authorized Service Center to remove the 3 lamp unit fixing screws. 3. The FILTER indicator will inform you of the lamp unit cover is inserted securely to the projector's connector. Use a Phillips-head screwdriver to replace the ACF The ACF unit...
... to purchase a replacement ACF (ET-ACF100). Disconnect the power cord from the projector. Contact an Authorized Service Center to remove the 3 lamp unit fixing screws. 3. The FILTER indicator will inform you of the lamp unit cover is inserted securely to the projector's connector. Use a Phillips-head screwdriver to replace the ACF The ACF unit...

PTD6000U User Guide
Page 33
... ENTER button. refer to the documentation provided with the projector is incorrect. Reference page*1 18 20 20 28 28 31 - The power cord may be out of the operation range. The POWER switch is lit or flashes. The lamp unit cover has not been securely installed. The BRIGHTNESS ... board does not appear. CD-ROM: See the functional instructions in SECURITY menu is disabled. CD-ROM - TEMP indicator is turned off. The projector may not have been set correctly. COLOR or TINT adjustment may not be incorrect. If you have a problem. The remote control ID setting is...
... ENTER button. refer to the documentation provided with the projector is incorrect. Reference page*1 18 20 20 28 28 31 - The power cord may be out of the operation range. The POWER switch is lit or flashes. The lamp unit cover has not been securely installed. The BRIGHTNESS ... board does not appear. CD-ROM: See the functional instructions in SECURITY menu is disabled. CD-ROM - TEMP indicator is turned off. The projector may not have been set correctly. COLOR or TINT adjustment may not be incorrect. If you have a problem. The remote control ID setting is...
PTD6000U User Guide
Page 36
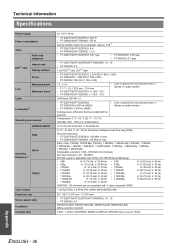
... kHz, V: 50 Hz/60 Hz H: 15 - 91 kHz, V: 50 - 85 Hz Panasonic Intelligent Auto Scanning (PIAS) Dot clock frequency • PT-DZ6710U/PT-DZ6700U: 162 MHz or less • PT-DW6300U/PT-D6000U: 150 MHz or less 480p, 576p, 720/60p, 720/59.94p, 720/50p,...33.8 mm • PT-DZ6710U/PT-DZ6700U: f = 26.8 - 35.7 • PT-DW6300U/PT-D6000U: f = 25.6 - 33.8 • Lens is optional for the projectors that "L" follows in model number. Average value of the lens that "L" follows in model number. UHM lamp (300 W) x 2 • PT-DZ6710U/PT-DZ6700U/ PT-DW6300U:6 000 lm (ANSI) • PT-D6000U: 6 500 lm...
... kHz, V: 50 Hz/60 Hz H: 15 - 91 kHz, V: 50 - 85 Hz Panasonic Intelligent Auto Scanning (PIAS) Dot clock frequency • PT-DZ6710U/PT-DZ6700U: 162 MHz or less • PT-DW6300U/PT-D6000U: 150 MHz or less 480p, 576p, 720/60p, 720/59.94p, 720/50p,...33.8 mm • PT-DZ6710U/PT-DZ6700U: f = 26.8 - 35.7 • PT-DW6300U/PT-D6000U: f = 25.6 - 33.8 • Lens is optional for the projectors that "L" follows in model number. Average value of the lens that "L" follows in model number. UHM lamp (300 W) x 2 • PT-DZ6710U/PT-DZ6700U/ PT-DW6300U:6 000 lm (ANSI) • PT-D6000U: 6 500 lm...

PTD6000U User Guide
Page 37
...ISO21118 international standards. *3. When STANDBY MODE in PROJECTOR SETUP menu is NORMAL: Approx. 8 W When STANDBY MODE in weight. Each product has an individual variable in PROJECTOR SETUP menu is ECO: Approx. 0.2 W ...*2. Average value. See "List of signal receptor) Remote control Weight Dimensions Ceiling bracket 120 g (4.2 ozs.) (including batteries) Width Length Height 51 mm (2') 176 mm (6 - 29/32") 22.7 mm (-7/8") (not including surface projection parts) ET-PKD56H (High ceiling), ET-PKD55S (Low ceiling) Options Projection lens Lamp...
...ISO21118 international standards. *3. When STANDBY MODE in PROJECTOR SETUP menu is NORMAL: Approx. 8 W When STANDBY MODE in weight. Each product has an individual variable in PROJECTOR SETUP menu is ECO: Approx. 0.2 W ...*2. Average value. See "List of signal receptor) Remote control Weight Dimensions Ceiling bracket 120 g (4.2 ozs.) (including batteries) Width Length Height 51 mm (2') 176 mm (6 - 29/32") 22.7 mm (-7/8") (not including surface projection parts) ET-PKD56H (High ceiling), ET-PKD55S (Low ceiling) Options Projection lens Lamp...
PTD6000U User Guide
Page 39
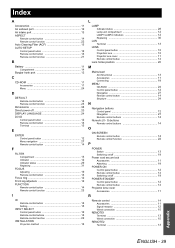
...buttons 14 Remote control function 22 INSTALLATION Projection method 16 L LAMP Indicator status 28 Lamp unit compartment 12 LAMP1/LAMP2 indicators 12 Replacing 30 LAN Terminal 13 LENS Control panel button 12 Projection lens 12 Projector lens cover 11 Remote control button 14 Lens home position ...Control panel button 12 Remote control button 14 Switching on/off 19 POWER STANDBY Control panel button 12 Remote control button 14 Projector lens cover Accessories 11 R Remote control 14 Accessories 11 Signal receptor 12 Wired connection 15 REMOTE1 Terminal 13 Wired connection ...
...buttons 14 Remote control function 22 INSTALLATION Projection method 16 L LAMP Indicator status 28 Lamp unit compartment 12 LAMP1/LAMP2 indicators 12 Replacing 30 LAN Terminal 13 LENS Control panel button 12 Projection lens 12 Projector lens cover 11 Remote control button 14 Lens home position ...Control panel button 12 Remote control button 14 Switching on/off 19 POWER STANDBY Control panel button 12 Remote control button 14 Projector lens cover Accessories 11 R Remote control 14 Accessories 11 Signal receptor 12 Wired connection 15 REMOTE1 Terminal 13 Wired connection ...


