
User Manual
Page 4
... 51 PASSWORD 51 PASSWORD CHANGE 51 DISPLAY SETTING 51 TEXT CHANGE 51 CONTROL DEVICE SETUP 51 Using the serial terminals 52 Examples of connection 52 Pin assignments and signal names 52 Communication conditions 52 Basic format 52 Control commands 53 Cable specifications 53 Using the Remote 2 terminal 53 Indication of lamp monitor 54 Cleaning and replacement of air filter 55 Procedure of cleaning 55 Replacing the lamp unit 56 When to replace the Lamp unit 56 Lamp unit replacement steps 57 Ceiling Mount...
... 51 PASSWORD 51 PASSWORD CHANGE 51 DISPLAY SETTING 51 TEXT CHANGE 51 CONTROL DEVICE SETUP 51 Using the serial terminals 52 Examples of connection 52 Pin assignments and signal names 52 Communication conditions 52 Basic format 52 Control commands 53 Cable specifications 53 Using the Remote 2 terminal 53 Indication of lamp monitor 54 Cleaning and replacement of air filter 55 Procedure of cleaning 55 Replacing the lamp unit 56 When to replace the Lamp unit 56 Lamp unit replacement steps 57 Ceiling Mount...

User Manual
Page 5
... by using the projector for the model. • Use the provided safety wire cable and take the full weight of the projector or on top of a surface which are away from the projector. If you look into a bundle. • If the power cord is emitted from the projector's lens. Installation work , please contact an Authorized Service Center. In addition, turn off the power and disconnect the power cord...
... by using the projector for the model. • Use the provided safety wire cable and take the full weight of the projector or on top of a surface which are away from the projector. If you look into a bundle. • If the power cord is emitted from the projector's lens. Installation work , please contact an Authorized Service Center. In addition, turn off the power and disconnect the power cord...
User Manual
Page 7
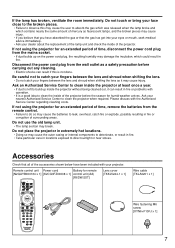
... cause the user to absorb the gas which was released when the lamp broke and which could result in fire or problems with the Authorized Service Center regarding cleaning costs. If not using the projector for humid weather arrives. If not using the projector for remote [N2QAYB000164 x 1] [K2CG3FZ00008 x 1] control unit (AA) [R6DW/2ST] Lens cover [TKKL5244-1 x 1] Wire cable [TKLA3201 x 1] Wire fastening M6 screw [XYN6+F10FJ...
... cause the user to absorb the gas which was released when the lamp broke and which could result in fire or problems with the Authorized Service Center regarding cleaning costs. If not using the projector for humid weather arrives. If not using the projector for remote [N2QAYB000164 x 1] [K2CG3FZ00008 x 1] control unit (AA) [R6DW/2ST] Lens cover [TKKL5244-1 x 1] Wire cable [TKLA3201 x 1] Wire fastening M6 screw [XYN6+F10FJ...
User Manual
Page 8
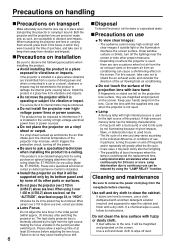
... the life of the product may cause heating focus drift. 8 Disposal To discard the product, call a specialized technician or contact an Authorized Service Center for low ceiling: Model No. Failure to interference if it is installed in which triggers the protection circuit, turning off dust. Keep your dealer. Cover the lens with a kitchen detergent solution (neutral) and squeezed to remove the power cord plug...
... the life of the product may cause heating focus drift. 8 Disposal To discard the product, call a specialized technician or contact an Authorized Service Center for low ceiling: Model No. Failure to interference if it is installed in which triggers the protection circuit, turning off dust. Keep your dealer. Cover the lens with a kitchen detergent solution (neutral) and squeezed to remove the power cord plug...
User Manual
Page 9
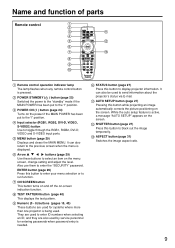
... the screen. SHUTTER button (page 27) Press this button while projecting an image automatically corrects the picture positioning on the menu screen, change setting and adjust the level. Arrow buttons (page 29) Use these buttons to black out the image temporarily. It can also return to enter the "SECURITY" password. POWER STANDBY ( ) button (page 25) Switched the power to the "standby" mode if the MAIN POWER has been put to send information about the projector's status...
... the screen. SHUTTER button (page 27) Press this button while projecting an image automatically corrects the picture positioning on the menu screen, change setting and adjust the level. Arrow buttons (page 29) Use these buttons to black out the image temporarily. It can also return to enter the "SECURITY" password. POWER STANDBY ( ) button (page 25) Switched the power to the "standby" mode if the MAIN POWER has been put to send information about the projector's status...
User Manual
Page 11
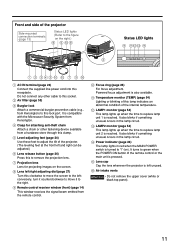
... focus adjustment. Power indicator (page 24) The lamp lights in red when the MAIN POWER switch is reached. Front and side of the projector Side-mounted connection terminals (page 13) Status LED lights (Refer to "l" (on). Air filter (page 55) Burglar lock Attach a commercial burglar prevention cable (e.g., from the remote control. conversely, turn it to this socket. It also blinks if something unusual occurs in the lamp circuit. Clasp for projecting images on the right.) Status LED lights AC...
... focus adjustment. Power indicator (page 24) The lamp lights in red when the MAIN POWER switch is reached. Front and side of the projector Side-mounted connection terminals (page 13) Status LED lights (Refer to "l" (on). Air filter (page 55) Burglar lock Attach a commercial burglar prevention cable (e.g., from the remote control. conversely, turn it to this socket. It also blinks if something unusual occurs in the lamp circuit. Clasp for projecting images on the right.) Status LED lights AC...
User Manual
Page 12
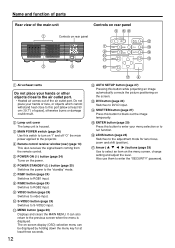
... on the menu screen, change setting and adjust the level. Lamp unit cover The lamp unit is displayed. POWER STANDBY ( ) button (page 25) Switches the power to S-VIDEO input. S-VIDEO button (page 24) Switches to the "standby" mode. Name and function of parts Rear view of the main unit Controls on rear panel Controls on rear panel Air exhaust vents Do not place your hands or other objects close to this port [allow at least three seconds. 12 AUTO SETUP button (page...
... on the menu screen, change setting and adjust the level. Lamp unit cover The lamp unit is displayed. POWER STANDBY ( ) button (page 25) Switches the power to S-VIDEO input. S-VIDEO button (page 24) Switches to the "standby" mode. Name and function of parts Rear view of the main unit Controls on rear panel Controls on rear panel Air exhaust vents Do not place your hands or other objects close to this port [allow at least three seconds. 12 AUTO SETUP button (page...
User Manual
Page 24
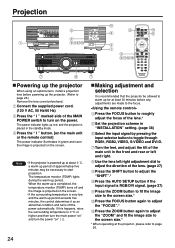
... Powering up the projector When using an optional lens, install a projection lens before any adjustments are made to the focus. Connect the supplied power cord. (120 V AC, 50 Hz/60 Hz) Press the " I " button. [on the main unit or the remote control] The power indicator illuminates in the standby mode. When the warm-up is completed, the temperature monitor (TEMP) turns off the power automatically. Turn the feet, and adjust the tilt of the MAIN POWER switch to turn...
... Powering up the projector When using an optional lens, install a projection lens before any adjustments are made to the focus. Connect the supplied power cord. (120 V AC, 50 Hz/60 Hz) Press the " I " button. [on the main unit or the remote control] The power indicator illuminates in the standby mode. When the warm-up is completed, the temperature monitor (TEMP) turns off the power automatically. Turn the feet, and adjust the tilt of the MAIN POWER switch to turn...
User Manual
Page 27
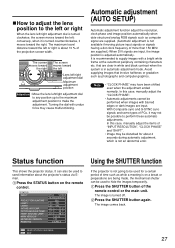
... moving picture input signals or signals having a dot clock frequency of time such as photographs and computer graphics. With Composite sync and G-SYNC sync signals and some types of PCs, it moves toward the left Lens left/right adjustment dial Maximum adjustment position Attention • Move the lens left or right is about 10 % of the remote control or the main unit. STATUS INPUT PROJECTOR RUNTIME LAMP1 LAMP2 INTAKE-AIR TEMP...
... moving picture input signals or signals having a dot clock frequency of time such as photographs and computer graphics. With Composite sync and G-SYNC sync signals and some types of PCs, it moves toward the left Lens left/right adjustment dial Maximum adjustment position Attention • Move the lens left or right is about 10 % of the remote control or the main unit. STATUS INPUT PROJECTOR RUNTIME LAMP1 LAMP2 INTAKE-AIR TEMP...
User Manual
Page 31
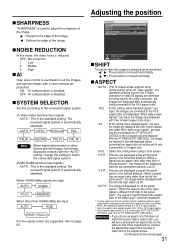
... setting when using a 16:9 screen. The received signal system is automatically identified. When a signal has an aspect ratio taller than that of the image. The received signal system is automatically identified. When VGA60/480p signals are input AUTO VGA60 YCBCR 480pRGB When other unit which are converted to the 4:3 aspect ratio and displayed. Adjusting the position POSITION SHIFT ASPECT ZOOM CLOCK PHASE KEYSTONE 4:3 +16 MENU...
... setting when using a 16:9 screen. The received signal system is automatically identified. When a signal has an aspect ratio taller than that of the image. The received signal system is automatically identified. When VGA60/480p signals are input AUTO VGA60 YCBCR 480pRGB When other unit which are converted to the 4:3 aspect ratio and displayed. Adjusting the position POSITION SHIFT ASPECT ZOOM CLOCK PHASE KEYSTONE 4:3 +16 MENU...
User Manual
Page 32
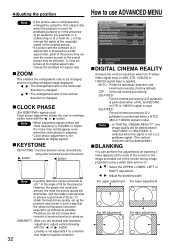
... image projection using the 16:9 aspect ratio when the projector is used for profitable purpose or in the presence of an audience (for the projector. Linearity is not adjustable if no correction was made to use ADVANCED MENU ADVANCED MENU DIGITAL CINEMA REALITY BLANKING INPUT RESOLUTION CLAMP POSITION EDGE BLENDING RASTER POSITION XGA MODE SXGA MODE AUTO 1 OFF XGA SXGA MENU SELECT CHANGE DIGITAL CINEMA REALITY Increase the vertical resolution when the S-Video/ Video signal input...
... image projection using the 16:9 aspect ratio when the projector is used for profitable purpose or in the presence of an audience (for the projector. Linearity is not adjustable if no correction was made to use ADVANCED MENU ADVANCED MENU DIGITAL CINEMA REALITY BLANKING INPUT RESOLUTION CLAMP POSITION EDGE BLENDING RASTER POSITION XGA MODE SXGA MODE AUTO 1 OFF XGA SXGA MENU SELECT CHANGE DIGITAL CINEMA REALITY Increase the vertical resolution when the S-Video/ Video signal input...

User Manual
Page 36
... 0 0 0 0 0 0 MENU SELECT ADJUST The current signal system is input to blue. Note • Separate software is required in the color coordinates of the target data and the values given by the user will not be adjusted and registered for adjusting the adjustment color is automatically displayed. • Set "PICTURE MODE" to maximum. 36 AUTO SIGNAL The position where the screen is displayed can be projected correctly. • When "AUTO TESTPATTERN" is set the colors of red, green, blue...
... 0 0 0 0 0 0 MENU SELECT ADJUST The current signal system is input to blue. Note • Separate software is required in the color coordinates of the target data and the values given by the user will not be adjusted and registered for adjusting the adjustment color is automatically displayed. • Set "PICTURE MODE" to maximum. 36 AUTO SIGNAL The position where the screen is displayed can be projected correctly. • When "AUTO TESTPATTERN" is set the colors of red, green, blue...
User Manual
Page 37
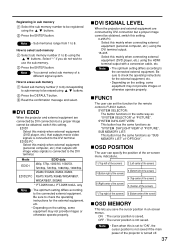
... provide images or otherwise operate properly. OSD POSITION The user can set to check the operating instructions for the remote control's FUNC1 button. Mode EDID1 EDID2:PC EDID data 480p, 576p, 1080/60i, 1080/50i, 720/60p, 720/50p, 1080/60p, 1080/50p VGA60, SVGA60, XGA50, XGA60, XGA70, XGA75, XGA85, WXGA768/50*, WXGA768/60*, SXGA60 * PT-DW5100U, PT-DW5100UL only Note • The optimum setting differs...
... provide images or otherwise operate properly. OSD POSITION The user can set to check the operating instructions for the remote control's FUNC1 button. Mode EDID1 EDID2:PC EDID data 480p, 576p, 1080/60i, 1080/50i, 720/60p, 720/50p, 1080/60p, 1080/50p VGA60, SVGA60, XGA50, XGA60, XGA70, XGA75, XGA85, WXGA768/50*, WXGA768/60*, SXGA60 * PT-DW5100U, PT-DW5100UL only Note • The optimum setting differs...

User Manual
Page 45
... then turn on the air filter. Check the fitting of the lamp unit cover. (page 57) E-mail set value, an E-mail message can enter the location of the E-mail. (maximum 63 characters) The user can modify the threshold temperature for example, the installed projector so that the projector is being used where the ambient temperature is entered. In this projector, if a problem occurs or if the lamp usage time reaches a set...
... then turn on the air filter. Check the fitting of the lamp unit cover. (page 57) E-mail set value, an E-mail message can enter the location of the E-mail. (maximum 63 characters) The user can modify the threshold temperature for example, the installed projector so that the projector is being used where the ambient temperature is entered. In this projector, if a problem occurs or if the lamp usage time reaches a set...
User Manual
Page 51
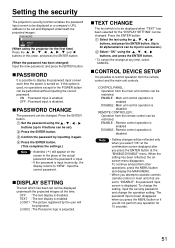
... the ENTER button. ENABLE : Remote control operation is enabled DISABLE : Remote control operation is input incorrectly, the display returns to operate controls (remote control or main unit) that are set and displayed underneath the projected images. To continue and perform other operations, press the MENU button and display the MAIN MENU. • When you do not perform any time, select CANCEL. To change the setting, input the security password and change at the "ENABLE/DISABLE" menu. The password input screen disappears when...
... the ENTER button. ENABLE : Remote control operation is enabled DISABLE : Remote control operation is input incorrectly, the display returns to operate controls (remote control or main unit) that are set and displayed underneath the projected images. To continue and perform other operations, press the MENU button and display the MAIN MENU. • When you do not perform any time, select CANCEL. To change the setting, input the security password and change at the "ENABLE/DISABLE" menu. The password input screen disappears when...
User Manual
Page 54
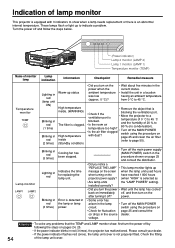
... the power indicator flashes red (once), the lamp unit cover is blocked. • Is the room air temperature too high? • Is the air filter clogged with 3 indicators to 45 °C. High temperature • Check if the ventilation port is not properly fitted. installed correctly? • Did you notice a "REPLACE THE LAMP" • This lamp monitor lights up message on the screen when the lamp unit used hours when turning on pages 24, 25. • If the power indicator blinks...
... the power indicator flashes red (once), the lamp unit cover is blocked. • Is the room air temperature too high? • Is the air filter clogged with 3 indicators to 45 °C. High temperature • Check if the ventilation port is not properly fitted. installed correctly? • Did you notice a "REPLACE THE LAMP" • This lamp monitor lights up message on the screen when the lamp unit used hours when turning on pages 24, 25. • If the power indicator blinks...

User Manual
Page 56
... the lamp has been switched from LAMP POWER "HIGH" to keep a spare lamp unit. Lamp operating time = LAMP POWER "HIGH" operating time + (LAMP POWER "LOW" operating time x 2 ÷ 3). Be careful when handling a light source lamp. Take care not to use the specified lamp. The replacement guideline is 2 000 hours*1, although the lamp may become dead (will be 2 000 hours. If the lamp has only been used . A used lamps, request an industrial waste disposal contractor. On-screen indication Lamp monitor REPLACE THE LAMP LAMP After 1 800 hours*2 After 2 000 hours*1 The...
... the lamp has been switched from LAMP POWER "HIGH" to keep a spare lamp unit. Lamp operating time = LAMP POWER "HIGH" operating time + (LAMP POWER "LOW" operating time x 2 ÷ 3). Be careful when handling a light source lamp. Take care not to use the specified lamp. The replacement guideline is 2 000 hours*1, although the lamp may become dead (will be 2 000 hours. If the lamp has only been used . A used lamps, request an industrial waste disposal contractor. On-screen indication Lamp monitor REPLACE THE LAMP LAMP After 1 800 hours*2 After 2 000 hours*1 The...
Brochure
Page 4
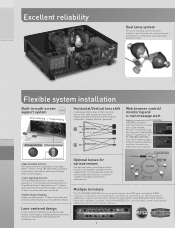
... the supplied lens. Horizontal/Vertical lens shift A wide adjustment range of the horizontal/ vertical lens shift assures distortion free images and adds convenience and versatility. (Horizontal : manual, Vertical : powered) +10% H 0 Screen center -10% 0 V Screen center 50% Optional lenses for various venues Five optional lenses with ease. 3 Web browser control/ monitoring and e-mail message alert Anybody can operate the PT-DW5100U/ DW5100UL by remote control or monitor its status over a LAN network...
... the supplied lens. Horizontal/Vertical lens shift A wide adjustment range of the horizontal/ vertical lens shift assures distortion free images and adds convenience and versatility. (Horizontal : manual, Vertical : powered) +10% H 0 Screen center -10% 0 V Screen center 50% Optional lenses for various venues Five optional lenses with ease. 3 Web browser control/ monitoring and e-mail message alert Anybody can operate the PT-DW5100U/ DW5100UL by remote control or monitor its status over a LAN network...
Brochure
Page 5
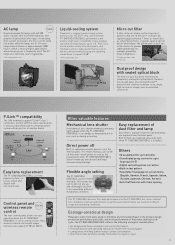
... case and operating manual are made from recycled paper. • Lamp power switching further reduces power consumption. • Auto Power Save activates standby mode when no signal is input. 4 Control with the same specifications is also possible when used in the air intake section traps dust particles that you wait around and helps minimize lamp damage. Control panel and wireless remote NEW control The rear control panel allows for applications where the projector is frequently used. This means...
... case and operating manual are made from recycled paper. • Lamp power switching further reduces power consumption. • Auto Power Save activates standby mode when no signal is input. 4 Control with the same specifications is also possible when used in the air intake section traps dust particles that you wait around and helps minimize lamp damage. Control panel and wireless remote NEW control The rear control panel allows for applications where the projector is frequently used. This means...
Brochure
Page 6
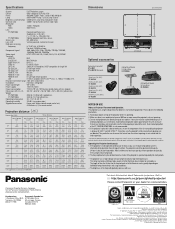
.... Specifications System DLP® Projection system Device 0.65" (diagonal) DLP® chip 15:9 Pixels 983,040 (1,280 x 768) x 1 total of 983,040 pixels Lamp 300 W UHM™ lamp x 2 (Dual Lamp System) Brightness (normal lamp) 5,500 lumens (dual lamp, high power mode) Contrast ratio 2,000:1 (full on/full off, contrast mode: high) Resolution RGB 1,280 x 768 pixels Video 560 TV lines Lens PT-DW5100U Powered zoom/focus lens, Supplied lens: (2.0-2.6:1) F = 1.7-2.0, f = 25.6-33.8 mm PT-DW5100UL Optional powered zoom/focus lenses Screen size 50...
.... Specifications System DLP® Projection system Device 0.65" (diagonal) DLP® chip 15:9 Pixels 983,040 (1,280 x 768) x 1 total of 983,040 pixels Lamp 300 W UHM™ lamp x 2 (Dual Lamp System) Brightness (normal lamp) 5,500 lumens (dual lamp, high power mode) Contrast ratio 2,000:1 (full on/full off, contrast mode: high) Resolution RGB 1,280 x 768 pixels Video 560 TV lines Lens PT-DW5100U Powered zoom/focus lens, Supplied lens: (2.0-2.6:1) F = 1.7-2.0, f = 25.6-33.8 mm PT-DW5100UL Optional powered zoom/focus lenses Screen size 50...


