

Brochure
Page 3
... 10,000-Lumen DLP® Projector* *As of the filter tray ACR brush Air filter Panasonic Original Micro cut filter A new filter in its class. Cleaning occurs either when the system is switched on -screen display. *3 Individual lint particles and pollen are maximum values when replacing all four lamps simultaneously. Dramatically reduced the size, and enabled 120-VAC operation. 1/2 CONCEPT This is easy to continue projecting. See the...
... 10,000-Lumen DLP® Projector* *As of the filter tray ACR brush Air filter Panasonic Original Micro cut filter A new filter in its class. Cleaning occurs either when the system is switched on -screen display. *3 Individual lint particles and pollen are maximum values when replacing all four lamps simultaneously. Dramatically reduced the size, and enabled 120-VAC operation. 1/2 CONCEPT This is easy to continue projecting. See the...

Brochure
Page 4
... 1 connection. Error codes displayed on the 3-digit, 7-segment LED on the side of reliability. Liquid-cooling system Panasonic Original Panasonic's original liquid-cooling system directly cools the DLP® chips, which extends the PT-DW10000U's performance and attains a high level of the projector tell the operator where the problem is also possible when used in brightness of a full 10-bit image processing system provides smooth tonal expression. Lamp LED indicator...
... 1 connection. Error codes displayed on the 3-digit, 7-segment LED on the side of reliability. Liquid-cooling system Panasonic Original Panasonic's original liquid-cooling system directly cools the DLP® chips, which extends the PT-DW10000U's performance and attains a high level of the projector tell the operator where the problem is also possible when used in brightness of a full 10-bit image processing system provides smooth tonal expression. Lamp LED indicator...
Brochure
Page 5
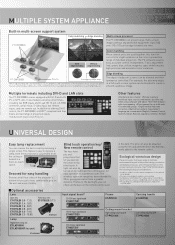
... the screen gain directivity, the brightness of individual projectors. Thanks to differences in the dark. Independent, 7-axis adjustment (red, green, blue, yellow, magenta, cyan, white) ensures high precision and minimizes color variations. In addition to the remote control. Edge blending The edges of projection needs. *High-Bandwidth Digital Content Protection Other features •Mechanical lens shutter •Picture in picture (main/sub input source combinations possible only when using the lens adjustment direct...
... the screen gain directivity, the brightness of individual projectors. Thanks to differences in the dark. Independent, 7-axis adjustment (red, green, blue, yellow, magenta, cyan, white) ensures high precision and minimizes color variations. In addition to the remote control. Edge blending The edges of projection needs. *High-Bandwidth Digital Content Protection Other features •Mechanical lens shutter •Picture in picture (main/sub input source combinations possible only when using the lens adjustment direct...

Brochure
Page 6
... the projector is a fixed short-throw lens, the lens shift function cannot be operated continuously 24 hours a day in four-lamp operation mode,but it is not sucked into the intake openings. 5. Specifications are trademarks of International Business Machines Corporation. UHM is for use the multi-lamp optical system's alternating lamp operation (lamp changer) function. Projection Images simulated. Specifications DLP®chip Panel size 0.95" diagonal (16:9 aspect ratio) Display method DLP® chip x 3 (R, G, B), DLP® projection system...
... the projector is a fixed short-throw lens, the lens shift function cannot be operated continuously 24 hours a day in four-lamp operation mode,but it is not sucked into the intake openings. 5. Specifications are trademarks of International Business Machines Corporation. UHM is for use the multi-lamp optical system's alternating lamp operation (lamp changer) function. Projection Images simulated. Specifications DLP®chip Panel size 0.95" diagonal (16:9 aspect ratio) Display method DLP® chip x 3 (R, G, B), DLP® projection system...

User Manual
Page 3
... lens ...37 Automatic adjustment (AUTO SETUP 39 Registration of input signal data 40 Basic operations using the remote control 43 On-screen menus ...46 Adjusting the picture...49 Adjusting the position...56 How to use network function 84 Using the PJLink™ protocol 98 Setting the security ...99 Using the serial terminals 102 Using the Remote 2 terminal 106 Special Features Information Indication of monitor lamp 107 Cleaning and replacement of air filter 108 Replacement of lamp unit 110 Notes when installing the ceiling mount...
... lens ...37 Automatic adjustment (AUTO SETUP 39 Registration of input signal data 40 Basic operations using the remote control 43 On-screen menus ...46 Adjusting the picture...49 Adjusting the position...56 How to use network function 84 Using the PJLink™ protocol 98 Setting the security ...99 Using the serial terminals 102 Using the Remote 2 terminal 106 Special Features Information Indication of monitor lamp 107 Cleaning and replacement of air filter 108 Replacement of lamp unit 110 Notes when installing the ceiling mount...

User Manual
Page 11
... its instructions. Ɣ Do not clean the lens surface with fuzzy or dusty cloth. If a chemical wipe is used beyond the replacement time. Ŷ Maintenance Be sure to used for the light source of this product. Keep your hands away from the exhaust port depending on the screen affected by not illuminating because of given impacts, flaws, or deterioration due to remove the power cord...
... its instructions. Ɣ Do not clean the lens surface with fuzzy or dusty cloth. If a chemical wipe is used beyond the replacement time. Ŷ Maintenance Be sure to used for the light source of this product. Keep your hands away from the exhaust port depending on the screen affected by not illuminating because of given impacts, flaws, or deterioration due to remove the power cord...

User Manual
Page 12
... buttons to change setting and adjust the level. They are used by service personnel for systems where more than one projector is being used to run function. 12 - Also use them to enter ID numbers when selecting an ID, and they are used for entering passwords when password entry is needed. . Location and function of each part Remote control unit Ŷ Front # $ % 0 & ( 1 ) * 2 3 + 4 - . 5 / 6 7 # Remote control operation indicator lamp The lamp flashes when any remote control button is pressed. $ POWER STANDBY button...
... buttons to change setting and adjust the level. They are used by service personnel for systems where more than one projector is being used to run function. 12 - Also use them to enter ID numbers when selecting an ID, and they are used for entering passwords when password entry is needed. . Location and function of each part Remote control unit Ŷ Front # $ % 0 & ( 1 ) * 2 3 + 4 - . 5 / 6 7 # Remote control operation indicator lamp The lamp flashes when any remote control button is pressed. $ POWER STANDBY button...

User Manual
Page 14
...part (continued) Projector Main Unit Ŷ Front Ŷ Rear # $ % &( ) * 2 * + -. / 0 1 34 56 # Projectin lens cover p. 33) $ Projection lens (optional) Lens for the projection lens (optional). / Air filter p. 108) 0 Air filter cleaning monitor pp. 80-81, 108) This blinks blue while the air filter is being cleaned. It turns to green when the POWER ON button of the internal temperature. ) Power indicator lamp p. 34) The lamp lights in the lamp circuit. ( Temperature monitor (TEMP p. 107) Lighting or blinking of this lamp indicates an abnormal condition of the remote control...
...part (continued) Projector Main Unit Ŷ Front Ŷ Rear # $ % &( ) * 2 * + -. / 0 1 34 56 # Projectin lens cover p. 33) $ Projection lens (optional) Lens for the projection lens (optional). / Air filter p. 108) 0 Air filter cleaning monitor pp. 80-81, 108) This blinks blue while the air filter is being cleaned. It turns to green when the POWER ON button of the internal temperature. ) Power indicator lamp p. 34) The lamp lights in the lamp circuit. ( Temperature monitor (TEMP p. 107) Lighting or blinking of this lamp indicates an abnormal condition of the remote control...

User Manual
Page 25
... Started Example of connecting with VIDEO devices Control PC Control PC Control PC Video deck (TBC built-in) IN OUT REMOTE 1 REMOTE 2 IN RS-232C IN RS-422 IN SERIAL RS-422 OUT LAN IN OUT VIDEO S-VIDEO IN R/PR G/Y SYNC/HD RGB 1 IN B/PB VD RGB 2 IN DVI-D IN Red (connected to PR terminal) Blue (connected to PB terminal) Green (connected to Y terminal) Color monitor Video deck (TBC built-in) High-vision video...
... Started Example of connecting with VIDEO devices Control PC Control PC Control PC Video deck (TBC built-in) IN OUT REMOTE 1 REMOTE 2 IN RS-232C IN RS-422 IN SERIAL RS-422 OUT LAN IN OUT VIDEO S-VIDEO IN R/PR G/Y SYNC/HD RGB 1 IN B/PB VD RGB 2 IN DVI-D IN Red (connected to PR terminal) Blue (connected to PB terminal) Green (connected to Y terminal) Color monitor Video deck (TBC built-in) High-vision video...

User Manual
Page 35
... input selector button to start projection. Powering up takes more . Fit the image size to the screen size. (p. 37) / Adjust the focus. (p. 37) 0 Display the zoom adjustment menu again and adjust the zoom to fit the image size to turn on the screen. The temperature monitor (TEMP) lamp lights up during the warm-up is RGB signal. (p. 44) . When the warm-up period. Note • If the projector is not connected. * Adjust the tilt of the MAIN POWER switch to the screen size...
... input selector button to start projection. Powering up takes more . Fit the image size to the screen size. (p. 37) / Adjust the focus. (p. 37) 0 Display the zoom adjustment menu again and adjust the zoom to fit the image size to turn on the screen. The temperature monitor (TEMP) lamp lights up during the warm-up is RGB signal. (p. 44) . When the warm-up period. Note • If the projector is not connected. * Adjust the tilt of the MAIN POWER switch to the screen size...
User Manual
Page 39
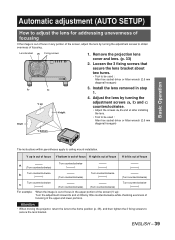
Remove the projection lens cover and lens. (p. 33) 2. Install the lens removed in any portion of the screen, adjust the lens by turning the adjustment screws to obtain evenness of focusing. ENGLISH - 39 Automatic adjustment (AUTO SETUP) How to adjust the lens for addressing unevenness of focusing If the image is out of focus in the upper portion of the screen (V up H left is out of focus a (Turn counterclockwise) Turn counterclockwise ( ) ( ) ( ) b Turn counterclockwise ( ) (Turn counterclockwise) Turn counterclockwise ( ) (Turn counterclockwise) c Turn ...
Remove the projection lens cover and lens. (p. 33) 2. Install the lens removed in any portion of the screen, adjust the lens by turning the adjustment screws to obtain evenness of focusing. ENGLISH - 39 Automatic adjustment (AUTO SETUP) How to adjust the lens for addressing unevenness of focusing If the image is out of focus in the upper portion of the screen (V up H left is out of focus a (Turn counterclockwise) Turn counterclockwise ( ) ( ) ( ) b Turn counterclockwise ( ) (Turn counterclockwise) Turn counterclockwise ( ) (Turn counterclockwise) c Turn ...

User Manual
Page 41
... of image adjustment data even they are determined to be the same signal by the frequency and form of picture quality such as it is not displayed). • A "Check sub-memory registration" screen will appear if sub-memory has not been registered. • The screen will remain as aspect switching and white balance using the same signal source. Press ŻŹ on normal screen (menu is...
... of image adjustment data even they are determined to be the same signal by the frequency and form of picture quality such as it is not displayed). • A "Check sub-memory registration" screen will appear if sub-memory has not been registered. • The screen will remain as aspect switching and white balance using the same signal source. Press ŻŹ on normal screen (menu is...
User Manual
Page 44
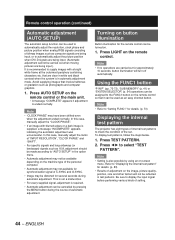
..., manually adjust the items of the set. Turning on button illumination Button illumination for details. (p. 73) Displaying the internal test pattern The projector has eight types of internal test patterns to check the condition of "INPUT RESOLUTION", "CLOCK PHASE" and "SHIFT". • For specific signals and long-sideways (or landscape) signals such as 16:9, adjustment should be made according to "AUTO SETUP" in automatic adjustment mode. Be sure to display...
..., manually adjust the items of the set. Turning on button illumination Button illumination for details. (p. 73) Displaying the internal test pattern The projector has eight types of internal test patterns to check the condition of "INPUT RESOLUTION", "CLOCK PHASE" and "SHIFT". • For specific signals and long-sideways (or landscape) signals such as 16:9, adjustment should be made according to "AUTO SETUP" in automatic adjustment mode. Be sure to display...

User Manual
Page 67
...;ź to display the "OPTION1" menu. Basic Operation Option1 settings MENU ŸźŻŹ ENTER DEFAULT This menu can be used simultaneously, this projector allows the user to correct the difference of picture and projector settings. Press to select "COLOR MATCHING". OPTION1 COLOR MATCHING LARGE SCREEN CORRECTION AUTO SIGNAL AUTO SETUP BACK COLOR DVI EDID AUX DVI EDID P IN P FUNC1 OSD POSITION OSD MEMORY OFF OFF OFF BLUE EDID2(PC) EDID2...
...;ź to display the "OPTION1" menu. Basic Operation Option1 settings MENU ŸźŻŹ ENTER DEFAULT This menu can be used simultaneously, this projector allows the user to correct the difference of picture and projector settings. Press to select "COLOR MATCHING". OPTION1 COLOR MATCHING LARGE SCREEN CORRECTION AUTO SIGNAL AUTO SETUP BACK COLOR DVI EDID AUX DVI EDID P IN P FUNC1 OSD POSITION OSD MEMORY OFF OFF OFF BLUE EDID2(PC) EDID2...

User Manual
Page 70
... SUB MENU 70 - AUTO SETUP MODE CHANGE ENTER EXECUTE DEFAULT 3. OFF ON • If unregistered signals are to be input frequently because the unit is used at conferences or other venues, the screen display position can be adjusted automatically without having to press AUTO SETUP on the remote control each time ŻŹ is pressed. Press Ÿź to select "AUTO SIGNAL". ENGLISH 2. Option1 settings (continued) Auto signal When unregistered signals are input when...
... SUB MENU 70 - AUTO SETUP MODE CHANGE ENTER EXECUTE DEFAULT 3. OFF ON • If unregistered signals are to be input frequently because the unit is used at conferences or other venues, the screen display position can be adjusted automatically without having to press AUTO SETUP on the remote control each time ŻŹ is pressed. Press Ÿź to select "AUTO SIGNAL". ENGLISH 2. Option1 settings (continued) Auto signal When unregistered signals are input when...
User Manual
Page 72
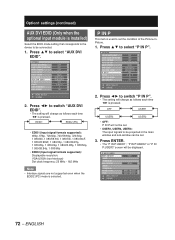
... not be set. • USER1, USER2, USER3: The input signals to be projected in the main window and sub-window can be connected. 1. OPTION1 COLOR MATCHING LARGE SCREEN CORRECTION AUTO SIGNAL AUTO SETUP BACK COLOR DVI EDID AUX DVI EDID P IN P FUNC1 OSD POSITION OSD MEMORY OFF OFF OFF BLUE EDID2(PC) EDID2(PC) OFF P IN P 2 ON MENU SELECT CHANGE 2. OPTION1 COLOR MATCHING LARGE SCREEN CORRECTION AUTO SIGNAL AUTO SETUP BACK COLOR DVI EDID...
... not be set. • USER1, USER2, USER3: The input signals to be projected in the main window and sub-window can be connected. 1. OPTION1 COLOR MATCHING LARGE SCREEN CORRECTION AUTO SIGNAL AUTO SETUP BACK COLOR DVI EDID AUX DVI EDID P IN P FUNC1 OSD POSITION OSD MEMORY OFF OFF OFF BLUE EDID2(PC) EDID2(PC) OFF P IN P 2 ON MENU SELECT CHANGE 2. OPTION1 COLOR MATCHING LARGE SCREEN CORRECTION AUTO SIGNAL AUTO SETUP BACK COLOR DVI EDID...

User Manual
Page 98
...mode off , 1 = Lamp 2 on PJLink™ specifications, refer to control the projector. Using the PJLink™ protocol The network functions of the ET-MD77DV, ET-MD77SD1 or ET-MD77SD3 are returned as follows. 0 = No error known 1 = Warning 2 = Error Lamp status query Input selection list query Parameters 1st digits (1--5 digits): Lamp 1 cumulative operating time 2nd digit: 0 = Lamp 1 off, 1 = Lamp 1 on 3rd digits (1--5 digits): Lamp 2 cumulative operating time 4th digit: 0 = Lamp 2 off, 1 = Lamp 2 on 5th digits (1--5 digits): Lamp 3 cumulative operating time 6th digit: 0 = Lamp...
...mode off , 1 = Lamp 2 on PJLink™ specifications, refer to control the projector. Using the PJLink™ protocol The network functions of the ET-MD77DV, ET-MD77SD1 or ET-MD77SD3 are returned as follows. 0 = No error known 1 = Warning 2 = Error Lamp status query Input selection list query Parameters 1st digits (1--5 digits): Lamp 1 cumulative operating time 2nd digit: 0 = Lamp 1 off, 1 = Lamp 1 on 3rd digits (1--5 digits): Lamp 2 cumulative operating time 4th digit: 0 = Lamp 2 off, 1 = Lamp 2 on 5th digits (1--5 digits): Lamp 3 cumulative operating time 6th digit: 0 = Lamp...

User Manual
Page 110
... switch to slip your hand when using a screwdriver. When the operating time for about 30 seconds as the black screws) other injuries may burst if it is turned on, and the projector will not light) by the time of 2 000 hours depending on lamp unit replacement • Be careful when handling a light source lamp. Take care not to standby mode. The life of used . Replacement Lamp Unit model No.: ET-LAD10000 (single bulb...
... switch to slip your hand when using a screwdriver. When the operating time for about 30 seconds as the black screws) other injuries may burst if it is turned on, and the projector will not light) by the time of 2 000 hours depending on lamp unit replacement • Be careful when handling a light source lamp. Take care not to standby mode. The life of used . Replacement Lamp Unit model No.: ET-LAD10000 (single bulb...

User Manual
Page 113
... window? Symptoms Check point • Is the power cord securely plugged in the receptacle? • Is the MAIN POWER switch put to the "O" position? • Is power supply live at the lock position? • Is adjustment value protection enabled? Power does not turn on • Is the temperature monitor (TEMP) lamp on the projector front lighting or blinking? • Is the lamp monitor (LAMP) lamp on the source side, such as bad video - Remote control...
... window? Symptoms Check point • Is the power cord securely plugged in the receptacle? • Is the MAIN POWER switch put to the "O" position? • Is power supply live at the lock position? • Is adjustment value protection enabled? Power does not turn on • Is the temperature monitor (TEMP) lamp on the projector front lighting or blinking? • Is the lamp monitor (LAMP) lamp on the source side, such as bad video - Remote control...

User Manual
Page 121
... 20 Adjusting the input resolution ...........61 Adjusting the zoom ratio 58 Adjusting Tint 51 Air filter cleaning 80-81 Altitude 76 Automatic adjustment 44, 70 Auto signal 70 AUX DVI EDID 72 B Back Color 71 Basic operations on menu screen ....48 Before asking for service 113 Blanking adjustment 61 C Changing the password 100 Changing the text 101 Cleaning and replacement of air filter 108-109 Clock phase adjustment 58 Compatible RGB/YPBPR/DVI-D Signals 118 Connecting the power cord 34 Connecting...
... 20 Adjusting the input resolution ...........61 Adjusting the zoom ratio 58 Adjusting Tint 51 Air filter cleaning 80-81 Altitude 76 Automatic adjustment 44, 70 Auto signal 70 AUX DVI EDID 72 B Back Color 71 Basic operations on menu screen ....48 Before asking for service 113 Blanking adjustment 61 C Changing the password 100 Changing the text 101 Cleaning and replacement of air filter 108-109 Clock phase adjustment 58 Compatible RGB/YPBPR/DVI-D Signals 118 Connecting the power cord 34 Connecting...


