
Network Camera
Page 2
... information. Digital zoom feature*3 Camera has a 10x digital zoom feature. See page 15 for more information in IPv6-only network. *2 Audio feature does not work in IPv6 you to the ISP's "IPv4/IPv6 Dual-Stack" or "IPv6 over IPv4 Tunneling" service. Operating Instructions Main Features IPv6*1 Network Camera Your Panasonic Network Camera supports IPv6 (Internet Protocol Version 6), IPv6 was created to address the additional IP addresses that will be needed as the Internet continues...
... information. Digital zoom feature*3 Camera has a 10x digital zoom feature. See page 15 for more information in IPv6-only network. *2 Audio feature does not work in IPv6 you to the ISP's "IPv4/IPv6 Dual-Stack" or "IPv6 over IPv4 Tunneling" service. Operating Instructions Main Features IPv6*1 Network Camera Your Panasonic Network Camera supports IPv6 (Internet Protocol Version 6), IPv6 was created to address the additional IP addresses that will be needed as the Internet continues...

Network Camera
Page 7
Camera Feature Locations Front View Operating Instructions Lens Cover Lens (0.5 m [about 20 inches]-Unlimited) Indicator The indicator color shows camera status. Microphone The microphone picks up audio around the camera. (See page 30) Indicator Display Power on Not on the LAN On the LAN Normal Operation*1 Automatic Setting Setup Finished setting Using DHCP Getting IP address*2 Got IP address Updating Firmware Pressing FACTORY DEFAULT RESET button UPnPTM Failure Internal Failure Orange blinking Orange blinking Green blinking Green Green Green blinking Green blinking ...
Camera Feature Locations Front View Operating Instructions Lens Cover Lens (0.5 m [about 20 inches]-Unlimited) Indicator The indicator color shows camera status. Microphone The microphone picks up audio around the camera. (See page 30) Indicator Display Power on Not on the LAN On the LAN Normal Operation*1 Automatic Setting Setup Finished setting Using DHCP Getting IP address*2 Got IP address Updating Firmware Pressing FACTORY DEFAULT RESET button UPnPTM Failure Internal Failure Orange blinking Orange blinking Green blinking Green Green Green blinking Green blinking ...

Network Camera
Page 10
... Viewing Single Camera page 17 Auto Centering the Image (Click to Center 21 Capturing a Still Image 22 Using Operation Bar 23 Zooming In and Out 25 Setting Home Position/Alarm Position/Preset Button 26 Listening to Camera Audio-Talking to the Camera 30 1.4 Viewing Multi-Camera page 33 1.5 Viewing Buffered Image page 35 1.5.1 Deleting Buffered Images 37 1.6 Viewing Still Images on Your Cell Phone 38 2 Various Camera Features 40 2.1 Using Camera Features 40 2.2 Connecting the Camera to Your IPv4 Network 43 2.3 Connecting the Camera...
... Viewing Single Camera page 17 Auto Centering the Image (Click to Center 21 Capturing a Still Image 22 Using Operation Bar 23 Zooming In and Out 25 Setting Home Position/Alarm Position/Preset Button 26 Listening to Camera Audio-Talking to the Camera 30 1.4 Viewing Multi-Camera page 33 1.5 Viewing Buffered Image page 35 1.5.1 Deleting Buffered Images 37 1.6 Viewing Still Images on Your Cell Phone 38 2 Various Camera Features 40 2.1 Using Camera Features 40 2.2 Connecting the Camera to Your IPv4 Network 43 2.3 Connecting the Camera...

Network Camera
Page 11
... the Camera Image in Transport Mode 118 2.19 Transfer the Camera Image in Tunnel Mode 119 2.20 Setting the Motion Detection 120 2.21 Notifying Setup of an Alarm Log 123 2.22 Changing Initial Settings on Your PC 159 3.8 Using Setup Program 160 [For assistance, please call: 1-800-272-7033] 11 Camera page 125 2.23 Configuring Multiple Cameras 128 2.24 Specifying Operation Time 130 2.25 Controlling External Output Terminal 132 2.26 Changing Indicator Display 133 3 Camera Maintenance...
... the Camera Image in Transport Mode 118 2.19 Transfer the Camera Image in Tunnel Mode 119 2.20 Setting the Motion Detection 120 2.21 Notifying Setup of an Alarm Log 123 2.22 Changing Initial Settings on Your PC 159 3.8 Using Setup Program 160 [For assistance, please call: 1-800-272-7033] 11 Camera page 125 2.23 Configuring Multiple Cameras 128 2.24 Specifying Operation Time 130 2.25 Controlling External Output Terminal 132 2.26 Changing Indicator Display 133 3 Camera Maintenance...
Network Camera
Page 15
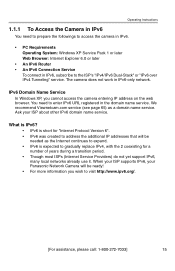
... networks already use it. Ask your Panasonic Network Camera will be ready! • For more information you cannot access the camera entering IP address on the web browser. The camera does not work in IPv6-only network. You need to prepare the followings to access the camera in IPv6. • PC Requirements Operating System: Windows XP Service Pack 1 or later Web Browser: Internet Explorer 6.0 or later • An IPv6 Router • An IPv6 Connection Service To connect...
... networks already use it. Ask your Panasonic Network Camera will be ready! • For more information you cannot access the camera entering IP address on the web browser. The camera does not work in IPv6-only network. You need to prepare the followings to access the camera in IPv6. • PC Requirements Operating System: Windows XP Service Pack 1 or later Web Browser: Internet Explorer 6.0 or later • An IPv6 Router • An IPv6 Connection Service To connect...

Network Camera
Page 18
... Internet Explorer is not a problem. • To reduce the data traffic, the video can be automatically changed to use audio feature, ActiveX® Controls must be displayed. If you cannot install ActiveX Controls or you view a dark image, enable the color night view mode on the Setup CD-ROM. 18 When using Windows XP or Windows 2000, log in as an administrator to install it to display a video for the first time, Security Warning window will be displayed partially. Security Warning window To view a video (Motion...
... Internet Explorer is not a problem. • To reduce the data traffic, the video can be automatically changed to use audio feature, ActiveX® Controls must be displayed. If you cannot install ActiveX Controls or you view a dark image, enable the color night view mode on the Setup CD-ROM. 18 When using Windows XP or Windows 2000, log in as an administrator to install it to display a video for the first time, Security Warning window will be displayed partially. Security Warning window To view a video (Motion...

Network Camera
Page 19
... this may be used for the camera, enter it on Microsoft Windows XP Service Pack 2 To view a video (Motion JPEG) or to use a proxy server, set the web browser not to install ActiveX Controls. 1. Follow the steps shown below to access the proxy server (see page 164). • In some corporate network environments a firewall may prevent motion video from being displayed. Wait for a while. • If you use audio feature, ActiveX Controls must be listened...
... this may be used for the camera, enter it on Microsoft Windows XP Service Pack 2 To view a video (Motion JPEG) or to use a proxy server, set the web browser not to install ActiveX Controls. 1. Follow the steps shown below to access the proxy server (see page 164). • In some corporate network environments a firewall may prevent motion video from being displayed. Wait for a while. • If you use audio feature, ActiveX Controls must be listened...

Network Camera
Page 28
Click the home position, The preset alarm position or registered name will be preset button. reaches an end. Alarm Position UpperLeft Home Position Preset 28 Operating Instructions Viewing the Image 1. displayed • The camera takes when the lens each position, and the image is displayed. Putting the cursor displays the preset name.
Click the home position, The preset alarm position or registered name will be preset button. reaches an end. Alarm Position UpperLeft Home Position Preset 28 Operating Instructions Viewing the Image 1. displayed • The camera takes when the lens each position, and the image is displayed. Putting the cursor displays the preset name.

Network Camera
Page 34
... camera access. The digital zoom can be automatically changed to 4 Mbps bandwidth. When the refresh interval is not displayed. 640 x 480 pixels image cannot be used . • Confirm the settings on the Multi-Camera Setup page (see page 84). To reduce the data traffic, the video can be displayed on the Multi-Camera page, all images are displayed. When viewing video (Motion JPEG), we recommend using the digital zoom. Due to the network...
... camera access. The digital zoom can be automatically changed to 4 Mbps bandwidth. When the refresh interval is not displayed. 640 x 480 pixels image cannot be used . • Confirm the settings on the Multi-Camera Setup page (see page 84). To reduce the data traffic, the video can be displayed on the Multi-Camera page, all images are displayed. When viewing video (Motion JPEG), we recommend using the digital zoom. Due to the network...

Network Camera
Page 39
... the General User page, the buttons related with Panasonic Network Cameras. Some phones may not support password authentication. Operating Instructions Note • Audio feature does not work on cell phones. • If the features are not displayed. (See page 84) • If the image is not displayed properly, try the following 2 URLs. 1. http:// IP address(or URL):Port Number/MobileX for XHTML. (or XXXXX.viewnetcam.com:50000/MobileX) • When pan/tilt reaches...
... the General User page, the buttons related with Panasonic Network Cameras. Some phones may not support password authentication. Operating Instructions Note • Audio feature does not work on cell phones. • If the features are not displayed. (See page 84) • If the image is not displayed properly, try the following 2 URLs. 1. http:// IP address(or URL):Port Number/MobileX for XHTML. (or XXXXX.viewnetcam.com:50000/MobileX) • When pan/tilt reaches...

Network Camera
Page 45
...; the Internet (Automatic Setup Only) Network • Configuration from Setup Program (Static/DHCP Only) Port Number • (Static/DHCP Only) • • • • IP address • • Subnet Mask (Static Only) • • Description Allow Access from changing the network settings, clear the check box. The port number is 80 by using the Setup Program (see page 159). Operating Instructions Note When you do not allow you to use port 80. Set 4 digits...
...; the Internet (Automatic Setup Only) Network • Configuration from Setup Program (Static/DHCP Only) Port Number • (Static/DHCP Only) • • • • IP address • • Subnet Mask (Static Only) • • Description Allow Access from changing the network settings, clear the check box. The port number is 80 by using the Setup Program (see page 159). Operating Instructions Note When you do not allow you to use port 80. Set 4 digits...

Network Camera
Page 64
... changing the settings. (5) Click [Restart]. 2. Register with the DynamicDNS service. Each camera must be called "Address translation", "Static IP Masquerade", "Virtual server" or "Port mapping" in other products. 64 Global IP address of the IP address and port number, since they are required to enable port forwarding on your home network. *1 "Port forwarding" may differ from the Internet with a router not supporting UPnPTM, follow the procedures below. 1. Operating Instructions 2.7.2 Connecting the Camera to a Router Not Supporting UPnP...
... changing the settings. (5) Click [Restart]. 2. Register with the DynamicDNS service. Each camera must be called "Address translation", "Static IP Masquerade", "Virtual server" or "Port mapping" in other products. 64 Global IP address of the IP address and port number, since they are required to enable port forwarding on your home network. *1 "Port forwarding" may differ from the Internet with a router not supporting UPnPTM, follow the procedures below. 1. Operating Instructions 2.7.2 Connecting the Camera to a Router Not Supporting UPnP...

Network Camera
Page 94
... name (1-255 characters). Or set a host name (1-255 characters). Set the sender's E-mail address. Operating Instructions Setting SMTP Server IP • Address or Host Name*1 • Port No. • POP3 Server IP • Address or Host Name*1 • Port No. • Login ID*2 • Password*2 • Reply E-mail • Address*2 Destination E- • mail Address*2 1-3 Subject • Text • Description If you set the server IP address, set to 25. If your...
... name (1-255 characters). Or set a host name (1-255 characters). Set the sender's E-mail address. Operating Instructions Setting SMTP Server IP • Address or Host Name*1 • Port No. • POP3 Server IP • Address or Host Name*1 • Port No. • Login ID*2 • Password*2 • Reply E-mail • Address*2 Destination E- • mail Address*2 1-3 Subject • Text • Description If you set the server IP address, set to 25. If your...
Network Camera
Page 104
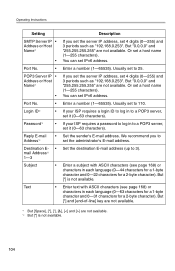
...). But ["] is not available. 104 Operating Instructions Setting SMTP Server IP • Address or Host Name*1 • Port No. • POP3 Server IP • Address or Host Name*1 • Port No. • Login ID*2 • Password*2 • Reply E-mail • Address*2 Destination E- • mail Address*2 1-3 Subject • Text • Description If you set the server IP address, set a host name (1-255 characters). Usually set IPv6 address. But "0.0.0.0" and "255.255...
...). But ["] is not available. 104 Operating Instructions Setting SMTP Server IP • Address or Host Name*1 • Port No. • POP3 Server IP • Address or Host Name*1 • Port No. • Login ID*2 • Password*2 • Reply E-mail • Address*2 Destination E- • mail Address*2 1-3 Subject • Text • Description If you set the server IP address, set a host name (1-255 characters). Usually set IPv6 address. But "0.0.0.0" and "255.255...
Network Camera
Page 115
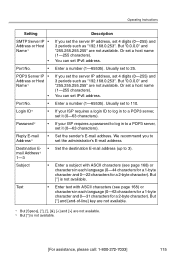
... page 168) or characters in to set a host name (1-255 characters). Operating Instructions Setting SMTP Server IP • Address or Host Name*1 • Port No. • POP3 Server IP • Address or Host Name*1 • Port No. • Login ID*2 • Password*2 • Reply E-mail • Address*2 Destination E- • mail Address*2 1-3 Subject • Text • Description If you set the server IP address, set 4 digits (0-255) and 3 periods such as...
... page 168) or characters in to set a host name (1-255 characters). Operating Instructions Setting SMTP Server IP • Address or Host Name*1 • Port No. • POP3 Server IP • Address or Host Name*1 • Port No. • Login ID*2 • Password*2 • Reply E-mail • Address*2 Destination E- • mail Address*2 1-3 Subject • Text • Description If you set the server IP address, set 4 digits (0-255) and 3 periods such as...

Network Camera
Page 142
... camera settings (user name, password, IP address, subnet mask etc.) are deleted when resetting the camera to AM/ PM mode (see page 147). If the camera is clicked. 1. Reconfigure the camera seeing the Getting Started. Pressing the FACTORY DEFAULT RESET button resets the camera to [Automatic Setup]. Set it again. Do not turn off for default settings. Click [Reset to Factory Default] on the internal memory are reset to factory default. • If the camera is reset to factory default, the network connection mode changes...
... camera settings (user name, password, IP address, subnet mask etc.) are deleted when resetting the camera to AM/ PM mode (see page 147). If the camera is clicked. 1. Reconfigure the camera seeing the Getting Started. Pressing the FACTORY DEFAULT RESET button resets the camera to [Automatic Setup]. Set it again. Do not turn off for default settings. Click [Reset to Factory Default] on the internal memory are reset to factory default. • If the camera is reset to factory default, the network connection mode changes...

Network Camera
Page 143
... connected to 6. Displays support information website (see product information on the Panasonic Network Camera support website. items. Clicking [Help] on the Support page displays the URL, click it. Clicking [Product Information] on the Support page displays the next page. 3.2.2 Seeing Product Information You can see page 144). 3.2.1 Seeing Help page The Help page displays explanations for each feature about the following 1. 3.2 Support page Operating Instructions (1) (2) (3) Support (1) Help (2) Product Information (3) Support Information Displays the Help...
... connected to 6. Displays support information website (see product information on the Panasonic Network Camera support website. items. Clicking [Help] on the Support page displays the URL, click it. Clicking [Product Information] on the Support page displays the next page. 3.2.2 Seeing Product Information You can see page 144). 3.2.1 Seeing Help page The Help page displays explanations for each feature about the following 1. 3.2 Support page Operating Instructions (1) (2) (3) Support (1) Help (2) Product Information (3) Support Information Displays the Help...

Network Camera
Page 164
... accessed via a proxy server, problems may occur. Start up Internet Explorer. (The example is Internet Explorer 6.0.) 2. Click [Tools] [Internet Options...]. 164 Consult your network connected to the Internet. Operating Instructions 3.9 Setting Your PC 3.9.1 Setting the Proxy Server Settings on Web Browser If the proxy server is not used to protect your network administrator. If you are using the proxy server, the following settings are not required. Consult your network administrator before installing the camera. How to Set the Proxy Server Settings...
... accessed via a proxy server, problems may occur. Start up Internet Explorer. (The example is Internet Explorer 6.0.) 2. Click [Tools] [Internet Options...]. 164 Consult your network connected to the Internet. Operating Instructions 3.9 Setting Your PC 3.9.1 Setting the Proxy Server Settings on Web Browser If the proxy server is not used to protect your network administrator. If you are using the proxy server, the following settings are not required. Consult your network administrator before installing the camera. How to Set the Proxy Server Settings...

Network Camera
Page 174
... and Time page 70 Default Setting List 148 Digital zoom feature 2 DynamicDNS 65, 68 E External I/O 145 External Output page 132 F FACTORY DEFAULT RESET Button 147 For IPv4 Connection 5 For IPv6 Connection 6 G General User page 84 H Help page 143 Home Position 26 How to Use This Documentation 4 I Image Display page 125 Indicator Control page 133 IPsec 52 IPv6 Domain Name Service 15 L Listen 30 Load Settings page 141 Login 83 M Maintenance page 134 Motion Detection 107...
... and Time page 70 Default Setting List 148 Digital zoom feature 2 DynamicDNS 65, 68 E External I/O 145 External Output page 132 F FACTORY DEFAULT RESET Button 147 For IPv4 Connection 5 For IPv6 Connection 6 G General User page 84 H Help page 143 Home Position 26 How to Use This Documentation 4 I Image Display page 125 Indicator Control page 133 IPsec 52 IPv6 Domain Name Service 15 L Listen 30 Load Settings page 141 Login 83 M Maintenance page 134 Motion Detection 107...

Network Camera
Page 175
R Reset to Factory Default page 142 Restart page 136 Rotating the mouse wheel 25 S Save Settings page 140 Security: Administrator page 80 Session Status 135 Setup page 40 Setup Program 160 Single Camera page 17 Specifications 170 Status page 135 Support Information page 144 Support page 143 System Requirements for your PC 5 T Talk 30 Timer Image Buffer/Transfer 87 Top page 14 Trademarks 4 Transport mode 55, 118 Tunnel mode 58, 119 U Update Firmware page 137 UPnP page 62 W Web Browser 5, 6 Operating Instructions 175
R Reset to Factory Default page 142 Restart page 136 Rotating the mouse wheel 25 S Save Settings page 140 Security: Administrator page 80 Session Status 135 Setup page 40 Setup Program 160 Single Camera page 17 Specifications 170 Status page 135 Support Information page 144 Support page 143 System Requirements for your PC 5 T Talk 30 Timer Image Buffer/Transfer 87 Top page 14 Trademarks 4 Transport mode 55, 118 Tunnel mode 58, 119 U Update Firmware page 137 UPnP page 62 W Web Browser 5, 6 Operating Instructions 175


