
Multi-function Laser Fax
Page 3
Buttons (Listed in alphabetical order) BROADCAST B LOWER N CALLER ID C MANUAL BROAD L CLEAR J MENU I CONTRAST F MONITOR W COPY P Navigator key S DIRECTORY E PAPER TRAY E FAX O PAUSE U FAX AUTO ANSWER M QUICK SCAN H FLASH V REDIAL U HELP D RESOLUTION G SCAN R SET Q SORT K START X Station keys A STOP Y TONE T ZOOM H ii For a description of controls Please keep this page open when following operating instructions. Location of each button, see page 9.
Buttons (Listed in alphabetical order) BROADCAST B LOWER N CALLER ID C MANUAL BROAD L CLEAR J MENU I CONTRAST F MONITOR W COPY P Navigator key S DIRECTORY E PAPER TRAY E FAX O PAUSE U FAX AUTO ANSWER M QUICK SCAN H FLASH V REDIAL U HELP D RESOLUTION G SCAN R SET Q SORT K START X Station keys A STOP Y TONE T ZOOM H ii For a description of controls Please keep this page open when following operating instructions. Location of each button, see page 9.

Multi-function Laser Fax
Page 8
... copying features 45 7. Caller ID Caller ID 4.1 Caller ID service 38 4.2 Viewing and calling back using one-touch dial feature and navigator directory......... 31 3.6 Broadcast transmission 32 Receiving Faxes 3.7 Receiving a fax automatically - Auto answer ON 34 3.8 Receiving a fax manually - TableofContents Installation Accessories 1.1 Included accessories 8 1.2 Accessory information 9 Finding the Controls 1.3 Description of buttons 9 1.4 Overview 10 Installation...
... copying features 45 7. Caller ID Caller ID 4.1 Caller ID service 38 4.2 Viewing and calling back using one-touch dial feature and navigator directory......... 31 3.6 Broadcast transmission 32 Receiving Faxes 3.7 Receiving a fax automatically - Auto answer ON 34 3.8 Receiving a fax manually - TableofContents Installation Accessories 1.1 Included accessories 8 1.2 Accessory information 9 Finding the Controls 1.3 Description of buttons 9 1.4 Overview 10 Installation...
Multi-function Laser Fax
Page 11
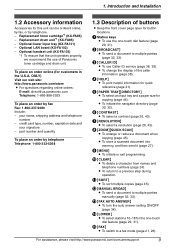
... L To select stations 10-18 for quick reference (page 21). ONLY) Visit our web site: http://www.panasonic.com/store L For questions regarding online orders: E-mail: direct@us.panasonic.com Telephone: 1-866-888-2929 To place an order by telephone. - E {PAPER TRAY}{DIRECTORY} L To...be ordered online, by fax, or by fax Fax: 1-800-237-9080 Include: - Replacement toner cartridge*1 (KX-FA85) - L To store a scanned document into memory, and then send it (page 27). D {HELP} L To print helpful information for the one -touch dial feature (page 29, 31). L {MANUAL BROAD} L To send ...
... L To select stations 10-18 for quick reference (page 21). ONLY) Visit our web site: http://www.panasonic.com/store L For questions regarding online orders: E-mail: direct@us.panasonic.com Telephone: 1-866-888-2929 To place an order by telephone. - E {PAPER TRAY}{DIRECTORY} L To...be ordered online, by fax, or by fax Fax: 1-800-237-9080 Include: - Replacement toner cartridge*1 (KX-FA85) - L To store a scanned document into memory, and then send it (page 27). D {HELP} L To print helpful information for the one -touch dial feature (page 29, 31). L {MANUAL BROAD} L To send ...
Multi-function Laser Fax
Page 28
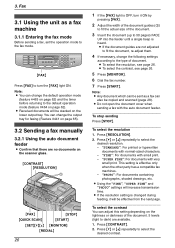
Fax 3SeFnadxing Faxes 3.1 Using the unit as a fax can change the output tray for faxing (Feature #441 on page 65). 3.2 Sending a fax manually 3.2.1 Using the auto document feeder L Confirm that there are no documents on the lightness or darkness of the document. 5 levels (...page. L If the document guides are available. 1. Note: L Any document which can be sent as a fax machine 3.1.1 Entering the fax mode Before sending a fax, set the operation mode to the fax mode. {FAX} Press {FAX} to the default operation mode (feature #464 on the lower output tray. To select the resolution 1. Press...
Fax 3SeFnadxing Faxes 3.1 Using the unit as a fax can change the output tray for faxing (Feature #441 on page 65). 3.2 Sending a fax manually 3.2.1 Using the auto document feeder L Confirm that there are no documents on the lightness or darkness of the document. 5 levels (...page. L If the document guides are available. 1. Note: L Any document which can be sent as a fax machine 3.1.1 Entering the fax mode Before sending a fax, set the operation mode to the fax mode. {FAX} Press {FAX} to the default operation mode (feature #464 on the lower output tray. To select the resolution 1. Press...
Multi-function Laser Fax
Page 29
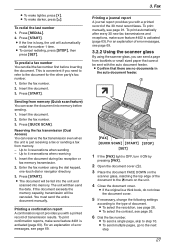
...see page 69. 3.2.2 Using the scanner glass By using the dial keypad, one-touch dial or navigator directory. 3. L To make sure feature #402 is activated (page 63). Insert the document during fax reception or fax memory transmission. 2. L The document will be fed into the unit and ...auto document feeder. L To send multiple pages, go to step 10. You must send the entire document manually. For an explanation of the document to the document for the other party's fax number. 1. To print confirmation reports, make darker, press {^}. L To send a single page, skip to...
...see page 69. 3.2.2 Using the scanner glass By using the dial keypad, one-touch dial or navigator directory. 3. L To make sure feature #402 is activated (page 63). Insert the document during fax reception or fax memory transmission. 2. L The document will be fed into the unit and ...auto document feeder. L To send multiple pages, go to step 10. You must send the entire document manually. For an explanation of the document to the document for the other party's fax number. 1. To print confirmation reports, make darker, press {^}. L To send a single page, skip to...
Multi-function Laser Fax
Page 34
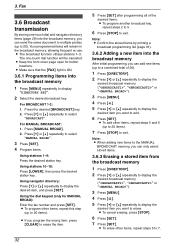
Fax 3.6 Broadcast transmission By storing one -touch dial function will remain in the broadcast memory, allowing frequent re-use. For MANUAL BROADCAST: 1. L To add other items, repeat steps 5 and 6 (up to 20 items). L To cancel erasing, press {STOP}. 6 Press {SET}. 7 Press {SET}. For ...7 Press {STOP} to erase. Using the dial keypad (only for button locations. L Keep the front cover page open for MANUAL BROAD): Enter the fax number and press {SET}. Your programmed items will be canceled. L The broadcast function utilizes stations 1-3. Press the desired {BROADCAST} key. 2.
Fax 3.6 Broadcast transmission By storing one -touch dial function will remain in the broadcast memory, allowing frequent re-use. For MANUAL BROADCAST: 1. L To add other items, repeat steps 5 and 6 (up to 20 items). L To cancel erasing, press {STOP}. 6 Press {SET}. 7 Press {SET}. For ...7 Press {STOP} to erase. Using the dial keypad (only for button locations. L Keep the front cover page open for MANUAL BROAD): Enter the fax number and press {SET}. Your programmed items will be canceled. L The broadcast function utilizes stations 1-3. Press the desired {BROADCAST} key. 2.

Multi-function Laser Fax
Page 35
... page, skip to the next step. 4. Press {SET}. Note: L Do not open the document cover when sending a fax with the auto document feeder. Press the desired {BROADCAST} (1-2) or {MANUAL BROAD}. Press {START}. 3. Press {STOP} while "BROADCASTING" is busy or does not answer, it will be erased from... 2 If necessary, change to the desired resolution (page 26) and the desired contrast (page 26). 3 Press the desired {BROADCAST} (1-2) or {MANUAL BROAD}. Place the document FACE DOWN, then close the document cover. 3. L Confirm that there are no documents in the auto document feeder. 1. The...
... page, skip to the next step. 4. Press {SET}. Note: L Do not open the document cover when sending a fax with the auto document feeder. Press the desired {BROADCAST} (1-2) or {MANUAL BROAD}. Press {START}. 3. Press {STOP} while "BROADCASTING" is busy or does not answer, it will be erased from... 2 If necessary, change to the desired resolution (page 26) and the desired contrast (page 26). 3 Press the desired {BROADCAST} (1-2) or {MANUAL BROAD}. Place the document FACE DOWN, then close the document cover. 3. L Confirm that there are no documents in the auto document feeder. 1. The...

Multi-function Laser Fax
Page 36
... ANSWER} indicator is OFF. {V}{^} {SET} How faxes are received When receiving calls, the unit will show the ring setting in FAX ONLY mode. Auto answer OFF Use this mode with an extension telephone If you have subscribed to display the desired setting, and press {SET}. 3.8 Receiving a fax manually - When the extension telephone rings, lift...
... ANSWER} indicator is OFF. {V}{^} {SET} How faxes are received When receiving calls, the unit will show the ring setting in FAX ONLY mode. Auto answer OFF Use this mode with an extension telephone If you have subscribed to display the desired setting, and press {SET}. 3.8 Receiving a fax manually - When the extension telephone rings, lift...

Multi-function Laser Fax
Page 38
... message and fax document in one call The caller can be changed in step 3 or step 5. L The answering device will answer the call . L The unit will not accept faxes originating from numbers that do not show caller information. Note: L The fax activation code can... manual reception is displayed. 3.10.2 Storing undesired callers You can leave a message after the greeting message. 3. Erase unnecessary items. 36 Fax - The caller presses {*}{#}{9} (pre-selected fax activation code). L While the junk fax prohibitor is activated, "JUNK FAX ON" is performed. 3.10.1 Activating the junk fax...
... message and fax document in one call The caller can be changed in step 3 or step 5. L The answering device will answer the call . L The unit will not accept faxes originating from numbers that do not show caller information. Note: L The fax activation code can... manual reception is displayed. 3.10.2 Storing undesired callers You can leave a message after the greeting message. 3. Erase unnecessary items. 36 Fax - The caller presses {*}{#}{9} (pre-selected fax activation code). L While the junk fax prohibitor is activated, "JUNK FAX ON" is performed. 3.10.1 Activating the junk fax...

Multi-function Laser Fax
Page 40
... information is connected to Caller ID service. "OUT OF AREA": The caller dialed from an area which does not provide Caller ID service. - To print manually, see page 91. - The caller information does not include a telephone number. {CALLER ID} {MENU} {SET} {STOP} {START} {MONITOR} { "... information by printing the Caller ID list (page 91). Consult your local telephone company. Caller information is deleted. FAX ring setting (feature #210 on the display one -touch dial or navigator directory, the stored name will be displayed. You then have the option of the 30...
... information is connected to Caller ID service. "OUT OF AREA": The caller dialed from an area which does not provide Caller ID service. - To print manually, see page 91. - The caller information does not include a telephone number. {CALLER ID} {MENU} {SET} {STOP} {START} {MONITOR} { "... information by printing the Caller ID list (page 91). Consult your local telephone company. Caller information is deleted. FAX ring setting (feature #210 on the display one -touch dial or navigator directory, the stored name will be displayed. You then have the option of the 30...

Multi-function Laser Fax
Page 41
Local telephone number ("1" added) 2 Local telephone number only (area code omitted) 3 Area code - Each time you press {*}, the telephone number will be changed as follows: 1 1 - Area code - L "CALL LIST ERASE" will be displayed. 3 Press {SET}. L To cancel erasing, press {STOP}, then {MENU}. 4 Press {SET}. 5 Press {STOP} to exit. 4.2.2 Erasing specific caller information 1 Press {CALLER ID}. 2 Press {V} or {^} repeatedly to display "CALLER SETUP". 2 Press {SET}. Local telephone number ("1" added and area code omitted) To stop viewing Press {STOP} after step 2. To edit a...
Local telephone number ("1" added) 2 Local telephone number only (area code omitted) 3 Area code - Each time you press {*}, the telephone number will be changed as follows: 1 1 - Area code - L "CALL LIST ERASE" will be displayed. 3 Press {SET}. L To cancel erasing, press {STOP}, then {MENU}. 4 Press {SET}. 5 Press {STOP} to exit. 4.2.2 Erasing specific caller information 1 Press {CALLER ID}. 2 Press {V} or {^} repeatedly to display "CALLER SETUP". 2 Press {SET}. Local telephone number ("1" added and area code omitted) To stop viewing Press {STOP} after step 2. To edit a...

Multi-function Laser Fax
Page 71
...one of the following messages will be printed on page 63). Connect the telephone line cord to a different jack and try again. L A transmission or reception error occurred because of recording paper or a recording paper jam. L If you dialed is not a fax machine. L The other party's fax machine. Send the fax manually... (page 85). Install paper (page 15) or clear the jammed paper (page 82). For assistance, please visit http://www.panasonic.com/consumersupport 69 Try using the overseas mode (feature #411 on the confirmation and journal reports (page 27). L The other...
...one of the following messages will be printed on page 63). Connect the telephone line cord to a different jack and try again. L A transmission or reception error occurred because of recording paper or a recording paper jam. L If you dialed is not a fax machine. L The other party's fax machine. Send the fax manually... (page 85). Install paper (page 15) or clear the jammed paper (page 82). For assistance, please visit http://www.panasonic.com/consumersupport 69 Try using the overseas mode (feature #411 on the confirmation and journal reports (page 27). L The other...

Multi-function Laser Fax
Page 73
...received documents are temporarily stored into the memory, and will be operated. Send the entire document manually. L The cable or the computer power cord is something wrong with the unit's modem.... Restart the software and try again. For assistance, please visit http://www.panasonic.com/consumersupport 71 Help Cause & Solution L The inside of the unit is not installed...when the unit warms up . Wait for optimal performance of recording paper. L The other party's fax machine is highly recommended for a while. Display "LOW TEMP." L Your unit requires a scheduled...
...received documents are temporarily stored into the memory, and will be operated. Send the entire document manually. L The cable or the computer power cord is something wrong with the unit's modem.... Restart the software and try again. For assistance, please visit http://www.panasonic.com/consumersupport 71 Help Cause & Solution L The inside of the unit is not installed...when the unit warms up . Wait for optimal performance of recording paper. L The other party's fax machine is highly recommended for a while. Display "LOW TEMP." L Your unit requires a scheduled...
Multi-function Laser Fax
Page 76
... send documents. Connect to the [LINE] jack (page 19). 74 For assistance, please visit http://www.panasonic.com/consumersupport L The other party's fax machine failed to the scan mode. L The glass or rollers are distorted. sending Cause & Solution L The unit... function, adjust volumes or program the features. 9.3.3 Fax - L The other party's machine is set to answer the fax automatically. Send the fax manually (page 26). Please do not insert a document before correction fluid has dried completely. 9.3.4 Fax - Try again. L Use the overseas transmission mode...
... send documents. Connect to the [LINE] jack (page 19). 74 For assistance, please visit http://www.panasonic.com/consumersupport L The other party's fax machine failed to the scan mode. L The glass or rollers are distorted. sending Cause & Solution L The unit... function, adjust volumes or program the features. 9.3.3 Fax - L The other party's machine is set to answer the fax automatically. Send the fax manually (page 26). Please do not insert a document before correction fluid has dried completely. 9.3.4 Fax - Try again. L Use the overseas transmission mode...
Multi-function Laser Fax
Page 109
...Ring pattern for Distinctive Ring (Feature #431): 42 S Scan features: 67 Scanner glass: 27, 44 Sending faxes Broadcast: 33 From memory: 27 Manually: 26 Navigator directory: 31 One-touch dial: 31 Set fax default (Feature #459): 65 Sort copy hold (Feature #465): 66 Storing Broadcast: 32 Navigator directory: ...30 One-touch dial: 29 Subnet mask setting (Feature #502): 68 T TEL mode: 34 Toner cartridge Installing:...
...Ring pattern for Distinctive Ring (Feature #431): 42 S Scan features: 67 Scanner glass: 27, 44 Sending faxes Broadcast: 33 From memory: 27 Manually: 26 Navigator directory: 31 One-touch dial: 31 Set fax default (Feature #459): 65 Sort copy hold (Feature #465): 66 Storing Broadcast: 32 Navigator directory: ...30 One-touch dial: 29 Subnet mask setting (Feature #502): 68 T TEL mode: 34 Toner cartridge Installing:...


