
User Guide
Page 1
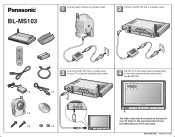
BL-MS103 1 Connect each camera to a power outlet. 2 Connect the BL-WV10A to a power outlet. 3 Connect the BL-WV10A to a video input on the back of your TV if necessary. PSQW2374ZC KK0505CH1056 VIDEO The video input may be located on your TV using the included video cable. 4 Set the TV to the video input corresponding to the video input terminal connected to the operating instructions provided with your TV. Refer to the BL-WV10A.
BL-MS103 1 Connect each camera to a power outlet. 2 Connect the BL-WV10A to a power outlet. 3 Connect the BL-WV10A to a video input on the back of your TV if necessary. PSQW2374ZC KK0505CH1056 VIDEO The video input may be located on your TV using the included video cable. 4 Set the TV to the video input corresponding to the video input terminal connected to the operating instructions provided with your TV. Refer to the BL-WV10A.

User Guide
Page 2
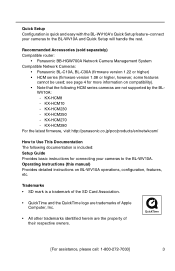
Operating Instructions Wireless Camera Monitoring System Model No. BL-WV10A Please read this manual before using and save this manual for customers in the USA or Puerto Rico Panasonic Network Camera Website: http://www.panasonic.com/netcam for future reference.
Operating Instructions Wireless Camera Monitoring System Model No. BL-WV10A Please read this manual before using and save this manual for customers in the USA or Puerto Rico Panasonic Network Camera Website: http://www.panasonic.com/netcam for future reference.

User Guide
Page 3
...range. When the sensor detects motion, the BL-WV10A can view up to 4 camera images at once and switch to monitor a specific camera if necessary. 2 Pan/Tilt Feature Aim the camera wherever you want camera images to be seen. Wireless cameras such as the BL-C30A can be connected as well, meaning you... motion by sensing temperature changes caused naturally by simply pressing the navigator keys on the included remote control. Main Features Camera Image Monitoring Simply connect the BL-WV10A to your Panasonic home network cameras (sold separately) and to your TV, and you'll be able to view...
...range. When the sensor detects motion, the BL-WV10A can view up to 4 camera images at once and switch to monitor a specific camera if necessary. 2 Pan/Tilt Feature Aim the camera wherever you want camera images to be seen. Wireless cameras such as the BL-C30A can be connected as well, meaning you... motion by sensing temperature changes caused naturally by simply pressing the navigator keys on the included remote control. Main Features Camera Image Monitoring Simply connect the BL-WV10A to your Panasonic home network cameras (sold separately) and to your TV, and you'll be able to view...
User Guide
Page 4
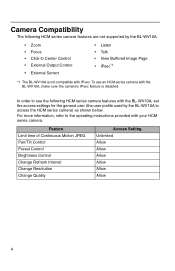
...HCM270 - Quick Setup Configuration is quick and easy with the BL-WV10A's Quick Setup feature-connect your cameras to the BL-WV10A. KX-HCM10 - KX-HCM280 For the latest firmware, visit http://panasonic.co.jp/pcc/products/en/netwkcam/ How to Use This ...supported by the BL- WV10A: - KX-HCM250 - see page 4 for connecting your cameras to the BL-WV10A and Quick Setup will handle the rest. Recommended Accessories (sold separately) Compatible router: • Panasonic BB-HGW700A Network Camera Management System Compatible Network Cameras: • Panasonic BL-C10A, BL-C30A (firmware...
...HCM270 - Quick Setup Configuration is quick and easy with the BL-WV10A's Quick Setup feature-connect your cameras to the BL-WV10A. KX-HCM10 - KX-HCM280 For the latest firmware, visit http://panasonic.co.jp/pcc/products/en/netwkcam/ How to Use This ...supported by the BL- WV10A: - KX-HCM250 - see page 4 for connecting your cameras to the BL-WV10A and Quick Setup will handle the rest. Recommended Accessories (sold separately) Compatible router: • Panasonic BB-HGW700A Network Camera Management System Compatible Network Cameras: • Panasonic BL-C10A, BL-C30A (firmware...
User Guide
Page 5
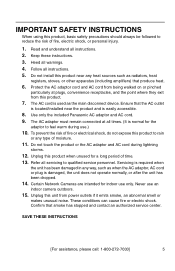
...the operating instructions provided with the BL-WV10A, make sure the camera's IPsec feature is not compatible with IPsec. Camera Compatibility The following HCM series camera features with the BL-WV10A, set the access settings for the general user (the user profile used by the BL-WV10A. • Zoom &#...8226; Talk • View Buffered Image Page • IPsec*1 *1 The BL-WV10A is disabled. To use the following HCM series camera features are not supported by the BL-WV10A to access the HCM series camera) as shown below. Feature Limit time of Continuous Motion JPEG Pan/Tilt ...
...the operating instructions provided with the BL-WV10A, make sure the camera's IPsec feature is not compatible with IPsec. Camera Compatibility The following HCM series camera features with the BL-WV10A, set the access settings for the general user (the user profile used by the BL-WV10A. • Zoom &#...8226; Talk • View Buffered Image Page • IPsec*1 *1 The BL-WV10A is disabled. To use the following HCM series camera features are not supported by the BL-WV10A to access the HCM series camera) as shown below. Feature Limit time of Continuous Motion JPEG Pan/Tilt ...
User Guide
Page 6
... install this product, basic safety precautions should always be followed to rain or any type of time. 13. Certain Network Cameras are intended for indoor use an indoor camera outdoors. 15. Keep these instructions. 3. Protect the AC adaptor cord and AC cord from power outlets if it emits ... being walked on or pinched particularly at all times. (It is normal for a long period of moisture. 11. Use only the included Panasonic AC adaptor and AC cord. 9. Confirm that smoke has stopped and contact an authorized service center. IMPORTANT SAFETY INSTRUCTIONS When using this product...
... install this product, basic safety precautions should always be followed to rain or any type of time. 13. Certain Network Cameras are intended for indoor use an indoor camera outdoors. 15. Keep these instructions. 3. Protect the AC adaptor cord and AC cord from power outlets if it emits ... being walked on or pinched particularly at all times. (It is normal for a long period of moisture. 11. Use only the included Panasonic AC adaptor and AC cord. 9. Confirm that smoke has stopped and contact an authorized service center. IMPORTANT SAFETY INSTRUCTIONS When using this product...
User Guide
Page 7
...; Wireless transmitters (radio transmitters, cellular transmitters, etc.) • Wireless devices which contain aluminium- See the Setup Guide for a period of Panasonic batteries that images do not use this product at a regular rate, become cut off, etc., relocate this product. In the event that...8226; Metal door shutters • Walls made of objects are included with water. 2. Do not take apart or short circuit. 5. Place cameras and this product near the following types of concrete, stone, or brick, or walls which operate at 2.4 GHz (security equipment, POS systems...
...; Wireless transmitters (radio transmitters, cellular transmitters, etc.) • Wireless devices which contain aluminium- See the Setup Guide for a period of Panasonic batteries that images do not use this product at a regular rate, become cut off, etc., relocate this product. In the event that...8226; Metal door shutters • Walls made of objects are included with water. 2. Do not take apart or short circuit. 5. Place cameras and this product near the following types of concrete, stone, or brick, or walls which operate at 2.4 GHz (security equipment, POS systems...
User Guide
Page 10
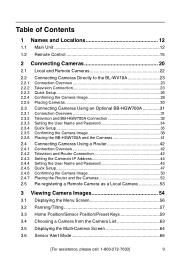
... 1 Names and Locations 12 1.1 Main Unit 12 1.2 Remote Control 15 2 Connecting Cameras 20 2.1 Local and Remote Cameras 22 2.2 2.2.1 2.2.2 2.2.3 2.2.4 2.2.5 2.3 2.3.1 2.3.2 2.3.3 2.3.4 2.3.5 2.3.6 2.4 2.4.1 2.4.2 2.4.3 2.4.4 2.4.5 2.4.6 2.4.7 2.5 Connecting Cameras Directly to the BL-WV10A 23 Connection Overview 23 Television Connection 23 Quick Setup 26 Confirming the Camera Image 28 Placing Cameras 30 Connecting Cameras Using an Optional BB-HGW700A 31 Connection Overview 31 Television and BB...
... 1 Names and Locations 12 1.1 Main Unit 12 1.2 Remote Control 15 2 Connecting Cameras 20 2.1 Local and Remote Cameras 22 2.2 2.2.1 2.2.2 2.2.3 2.2.4 2.2.5 2.3 2.3.1 2.3.2 2.3.3 2.3.4 2.3.5 2.3.6 2.4 2.4.1 2.4.2 2.4.3 2.4.4 2.4.5 2.4.6 2.4.7 2.5 Connecting Cameras Directly to the BL-WV10A 23 Connection Overview 23 Television Connection 23 Quick Setup 26 Confirming the Camera Image 28 Placing Cameras 30 Connecting Cameras Using an Optional BB-HGW700A 31 Connection Overview 31 Television and BB...
User Guide
Page 11
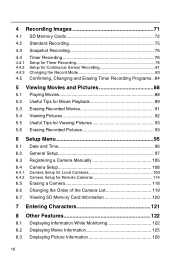
... 5.6 Erasing Recorded Pictures 93 6 Setup Menu 95 6.1 Date and Time 96 6.2 General Setup 97 6.3 Registering a Camera Manually 105 6.4 6.4.1 6.4.2 6.5 Camera Setup 108 Camera Setup for Local Cameras 109 Camera Setup for Remote Cameras 114 Erasing a Camera 118 6.6 Changing the Order of the Camera List 119 6.7 Viewing SD Memory Card Information 120 7 Entering Characters 121 8 Other Features 122 8.1 Displaying Information...
... 5.6 Erasing Recorded Pictures 93 6 Setup Menu 95 6.1 Date and Time 96 6.2 General Setup 97 6.3 Registering a Camera Manually 105 6.4 6.4.1 6.4.2 6.5 Camera Setup 108 Camera Setup for Local Cameras 109 Camera Setup for Remote Cameras 114 Erasing a Camera 118 6.6 Changing the Order of the Camera List 119 6.7 Viewing SD Memory Card Information 120 7 Entering Characters 121 8 Other Features 122 8.1 Displaying Information...
User Guide
Page 12
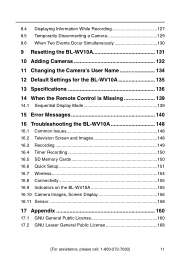
8.4 Displaying Information While Recording 127 8.5 Temporarily Disconnecting a Camera 129 8.6 When Two Events Occur Simultaneously 130 9 Resetting the BL-WV10A 131 10 Adding Cameras 132 11 Changing the Camera's User Name 134 12 Default Settings for the BL-WV10A 135 13 Specifications 136 14 When the Remote Control is Missing ... 16.5 SD Memory Cards 150 16.6 Quick Setup 151 16.7 Wireless 154 16.8 Connectivity 155 16.9 Indicators on the BL-WV10A 155 16.10 Camera Images, Screen Display 156 16.11 Sensor 158 17 Appendix 160 17.1 GNU General Public License 160 17.2 GNU Lesser General...
8.4 Displaying Information While Recording 127 8.5 Temporarily Disconnecting a Camera 129 8.6 When Two Events Occur Simultaneously 130 9 Resetting the BL-WV10A 131 10 Adding Cameras 132 11 Changing the Camera's User Name 134 12 Default Settings for the BL-WV10A 135 13 Specifications 136 14 When the Remote Control is Missing ... 16.5 SD Memory Cards 150 16.6 Quick Setup 151 16.7 Wireless 154 16.8 Connectivity 155 16.9 Indicators on the BL-WV10A 155 16.10 Camera Images, Screen Display 156 16.11 Sensor 158 17 Appendix 160 17.1 GNU General Public License 160 17.2 GNU Lesser General...
User Guide
Page 14
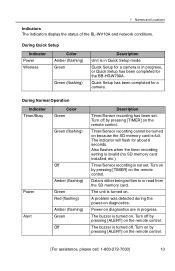
1 Names and Locations Indicators The indicators display the status of the BL-WV10A and network conditions. During Normal Operation Indicator Timer/Busy Color Green ...is not set . Turn on by pressing [TIMER] on the remote control. The indicator will flash for a camera. Also flashes when the timer recording setting is invalid (no SD memory card installed, etc.) Timer/Sensor recording... the SD memory card. The buzzer is in progress, or Quick Setup has been completed for a camera is turned off by pressing [ALERT] on the remote control. Timer/Sensor recording cannot be turned on...
1 Names and Locations Indicators The indicators display the status of the BL-WV10A and network conditions. During Normal Operation Indicator Timer/Busy Color Green ...is not set . Turn on by pressing [TIMER] on the remote control. The indicator will flash for a camera. Also flashes when the timer recording setting is invalid (no SD memory card installed, etc.) Timer/Sensor recording... the SD memory card. The buzzer is in progress, or Quick Setup has been completed for a camera is turned off by pressing [ALERT] on the remote control. Timer/Sensor recording cannot be turned on...
User Guide
Page 15
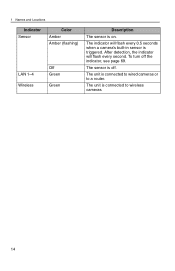
The indicator will flash every second. After detection, the indicator will flash every 0.5 seconds when a camera's built-in sensor is on. To turn off . 1 Names and Locations Indicator Sensor LAN 1-4 Wireless Color Amber Amber (flashing) Off Green Green Description The sensor is triggered. The unit is connected to a router. The sensor is connected to wired cameras or to wireless cameras. 14 The unit is off the indicator, see page 69.
The indicator will flash every second. After detection, the indicator will flash every 0.5 seconds when a camera's built-in sensor is on. To turn off . 1 Names and Locations Indicator Sensor LAN 1-4 Wireless Color Amber Amber (flashing) Off Green Green Description The sensor is triggered. The unit is connected to a router. The sensor is connected to wired cameras or to wireless cameras. 14 The unit is off the indicator, see page 69.
User Guide
Page 16
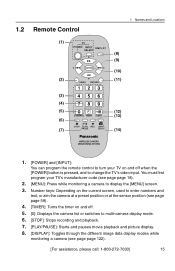
...sensor position (see page page 59). 4. [TIMER]: Turns the timer on and off . 5. [0]: Displays the camera list or switches to multi-camera display mode. 6. [STOP]: Stops recording and playback. 7. [PLAY/PAUSE]: Starts and pauses movie playback and picture... display. 8. [DISPLAY]: Toggles through the different image data display modes while monitoring a camera (see page page 18). 2. [MENU]: Press while monitoring a camera to display the [MENU] screen. 3. 1.2 Remote Control (1) (2) (3) (4) (5) (6) (7) 1 Names and Locations (8) (9) (10) (...
...sensor position (see page page 59). 4. [TIMER]: Turns the timer on and off . 5. [0]: Displays the camera list or switches to multi-camera display mode. 6. [STOP]: Stops recording and playback. 7. [PLAY/PAUSE]: Starts and pauses movie playback and picture... display. 8. [DISPLAY]: Toggles through the different image data display modes while monitoring a camera (see page page 18). 2. [MENU]: Press while monitoring a camera to display the [MENU] screen. 3. 1.2 Remote Control (1) (2) (3) (4) (5) (6) (7) 1 Names and Locations (8) (9) (10) (...
User Guide
Page 17
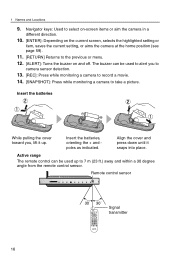
... orienting the + and poles as indicated. Insert the batteries While pulling the cover toward you to camera sensor detection. 13. [REC]: Press while monitoring a camera to record a movie. 14. [SNAPSHOT]: Press while monitoring a camera to alert you , lift it snaps into place. Remote control sensor 30˚ 30˚... or menu. 12. [ALERT]: Turns the buzzer on the current screen, selects the highlighted setting or item, saves the current setting, or aims the camera at the home position (see page 59). 11. [RETURN] Returns to 7 m (23 ft.) away and within a 30 degree angle from the ...
... orienting the + and poles as indicated. Insert the batteries While pulling the cover toward you to camera sensor detection. 13. [REC]: Press while monitoring a camera to record a movie. 14. [SNAPSHOT]: Press while monitoring a camera to alert you , lift it snaps into place. Remote control sensor 30˚ 30˚... or menu. 12. [ALERT]: Turns the buzzer on the current screen, selects the highlighted setting or item, saves the current setting, or aims the camera at the home position (see page 59). 11. [RETURN] Returns to 7 m (23 ft.) away and within a 30 degree angle from the ...
User Guide
Page 20
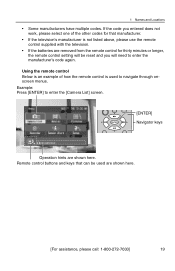
Example: Press [ENTER] to enter the [Camera List] screen. [ENTER] Navigator keys Operation hints are shown here. [For assistance, please call: 1-800-272-7033] 19 Remote control buttons and keys that manufacturer. &#...
Example: Press [ENTER] to enter the [Camera List] screen. [ENTER] Navigator keys Operation hints are shown here. [For assistance, please call: 1-800-272-7033] 19 Remote control buttons and keys that manufacturer. &#...
User Guide
Page 21
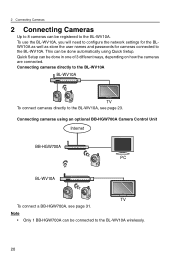
... wirelessly. 20 This can be done in one of 3 different ways, depending on how the cameras are connected. 2 Connecting Cameras 2 Connecting Cameras Up to 8 cameras can be registered to the BL-WV10A. To use the BL-WV10A, you will need to configure the network settings for the BLWV10A as well as store the user names and...
... wirelessly. 20 This can be done in one of 3 different ways, depending on how the cameras are connected. 2 Connecting Cameras 2 Connecting Cameras Up to 8 cameras can be registered to the BL-WV10A. To use the BL-WV10A, you will need to configure the network settings for the BLWV10A as well as store the user names and...
User Guide
Page 22
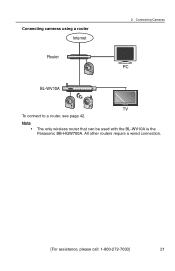
All other routers require a wired connection. [For assistance, please call: 1-800-272-7033] 21 Note • The only wireless router that can be used with the BL-WV10A is the Panasonic BB-HGW700A. Connecting cameras using a router Internet Router 2 Connecting Cameras PC BL-WV10A TV To connect to a router, see page 42.
All other routers require a wired connection. [For assistance, please call: 1-800-272-7033] 21 Note • The only wireless router that can be used with the BL-WV10A is the Panasonic BB-HGW700A. Connecting cameras using a router Internet Router 2 Connecting Cameras PC BL-WV10A TV To connect to a router, see page 42.

User Guide
Page 23
... Name: AAAAAA Password: BBBBBB User Name: WWWWWW Password: XXXXXX Local Camera Camera's User Name and Password is out of date] will be displayed and the camera will be registered as a remote camera. Password Admin. Password: BBBBBB Local Area Network (LAN) Local Camera Cameras configured using the BL-WV10A's Quick Setup utility (some exceptions apply) Note • •...
... Name: AAAAAA Password: BBBBBB User Name: WWWWWW Password: XXXXXX Local Camera Camera's User Name and Password is out of date] will be displayed and the camera will be registered as a remote camera. Password Admin. Password: BBBBBB Local Area Network (LAN) Local Camera Cameras configured using the BL-WV10A's Quick Setup utility (some exceptions apply) Note • •...
User Guide
Page 24
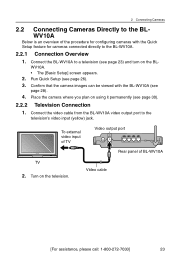
...the procedure for cameras connected directly to the BL-WV10A. 2.2.1 Connection Overview 1. Confirm that the camera images can be viewed with the Quick Setup feature for configuring cameras with the BL-WV10A (see page 26). 3. Turn on the BL- Run Quick Setup (see page 28). 4. Place the camera where you ...plan on using it permanently (see page 23) and turn on the television. Connect the video cable from the BL-WV10A video ...
...the procedure for cameras connected directly to the BL-WV10A. 2.2.1 Connection Overview 1. Confirm that the camera images can be viewed with the Quick Setup feature for configuring cameras with the BL-WV10A (see page 26). 3. Turn on the BL- Run Quick Setup (see page 28). 4. Place the camera where you ...plan on using it permanently (see page 23) and turn on the television. Connect the video cable from the BL-WV10A video ...
User Guide
Page 25
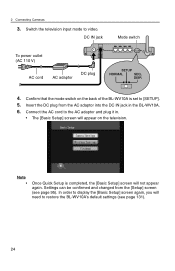
...the DC IN jack in . • The [Basic Setup] screen will appear on the back of the BL-WV10A is completed, the [Basic Setup] screen will need to video. 2 Connecting Cameras 3. In order to display the [Basic Setup] screen again, you will not appear again. Switch the television... input mode to restore the BL-WV10A's default settings (see page 95). Confirm that the mode switch on the ...
...the DC IN jack in . • The [Basic Setup] screen will appear on the back of the BL-WV10A is completed, the [Basic Setup] screen will need to video. 2 Connecting Cameras 3. In order to display the [Basic Setup] screen again, you will not appear again. Switch the television... input mode to restore the BL-WV10A's default settings (see page 95). Confirm that the mode switch on the ...


