

User Guide
Page 2
BL-WV10A Please read this manual before using and save this manual for customers in the USA or Puerto Rico Panasonic Network Camera Website: http://www.panasonic.com/netcam for future reference. Operating Instructions Wireless Camera Monitoring System Model No.
BL-WV10A Please read this manual before using and save this manual for customers in the USA or Puerto Rico Panasonic Network Camera Website: http://www.panasonic.com/netcam for future reference. Operating Instructions Wireless Camera Monitoring System Model No.

User Guide
Page 3
...the camera's lens when you don't want by the BL-WV10A. Main Features Camera Image Monitoring Simply connect the BL-WV10A to your Panasonic home network cameras (sold separately) and to your TV, and you'll be seen. Wireless cameras such as the BL-C30A can be connected as well, meaning you to ...multiple cameras are registered, you by sounding its built-in sensor detects motion by sensing temperature changes caused naturally by displaying the image from the BL-WV10A to play back movies and view pictures on your TV. Later you want camera images to be able to monitor a specific camera ...
...the camera's lens when you don't want by the BL-WV10A. Main Features Camera Image Monitoring Simply connect the BL-WV10A to your Panasonic home network cameras (sold separately) and to your TV, and you'll be seen. Wireless cameras such as the BL-C30A can be connected as well, meaning you to ...multiple cameras are registered, you by sounding its built-in sensor detects motion by sensing temperature changes caused naturally by displaying the image from the BL-WV10A to play back movies and view pictures on your TV. Later you want camera images to be able to monitor a specific camera ...
User Guide
Page 7
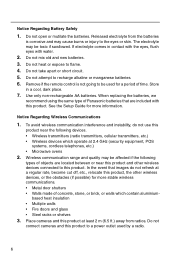
.... 7. Use only non-rechargeable AA batteries. See the Setup Guide for more stable wireless communications. • Metal door shutters • Walls made of Panasonic batteries that images do not use this product to be toxic if swallowed. To avoid wireless communication interference and instability, do not refresh at a regular rate, become cut off...
.... 7. Use only non-rechargeable AA batteries. See the Setup Guide for more stable wireless communications. • Metal door shutters • Walls made of Panasonic batteries that images do not use this product to be toxic if swallowed. To avoid wireless communication interference and instability, do not refresh at a regular rate, become cut off...

User Guide
Page 9
... provided instructions and a minimum 20 cm (8 inches) spacing must be provided between antenna and all person's body (excluding extremities of hands, wrist and feet) during wireless modes of operation. • This transmitter must accept any interference received, including interference that may not cause harmful interference, and (2) this device.
... provided instructions and a minimum 20 cm (8 inches) spacing must be provided between antenna and all person's body (excluding extremities of hands, wrist and feet) during wireless modes of operation. • This transmitter must accept any interference received, including interference that may not cause harmful interference, and (2) this device.
User Guide
Page 12
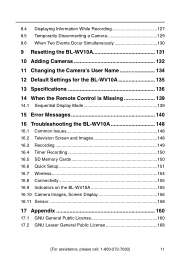
... 135 13 Specifications 136 14 When the Remote Control is Missing 139 14.1 Sequential Display Mode 139 15 Error Messages 140 16 Troubleshooting the BL-WV10A 148 16.1 Common Issues 148 16.2 Television Screen and Images 148 16.3 Recording 149 16.4 Timer Recording 150 16.5 SD Memory Cards 150 16....6 Quick Setup 151 16.7 Wireless 154 16.8 Connectivity 155 16.9 Indicators on the BL-WV10A 155 16.10 Camera Images, Screen Display 156 16.11 Sensor 158 17 Appendix 160 17.1 GNU General Public License...
... 135 13 Specifications 136 14 When the Remote Control is Missing 139 14.1 Sequential Display Mode 139 15 Error Messages 140 16 Troubleshooting the BL-WV10A 148 16.1 Common Issues 148 16.2 Television Screen and Images 148 16.3 Recording 149 16.4 Timer Recording 150 16.5 SD Memory Cards 150 16....6 Quick Setup 151 16.7 Wireless 154 16.8 Connectivity 155 16.9 Indicators on the BL-WV10A 155 16.10 Camera Images, Screen Display 156 16.11 Sensor 158 17 Appendix 160 17.1 GNU General Public License...
User Guide
Page 13
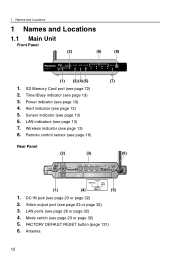
... RESET button (page 131) 6. Antenna 12 DC IN jack (see page 23 or page 32) 5. Alert indicator (see page 13) 7. LAN indicators (see page 13) 5. Wireless indicator (see page 13) 3. Timer/Busy indicator (see page 13) 8.
... RESET button (page 131) 6. Antenna 12 DC IN jack (see page 23 or page 32) 5. Alert indicator (see page 13) 7. LAN indicators (see page 13) 5. Wireless indicator (see page 13) 3. Timer/Busy indicator (see page 13) 8.
User Guide
Page 14
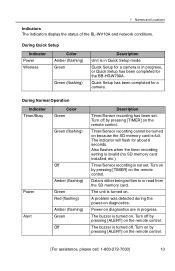
... (flashing) Green Off Description Timer/Sensor recording has been set . A problem was detected during the power-on the remote control. During Quick Setup Indicator Power Wireless Color Amber (flashing) Green Green (flashing) Description Unit is turned off by pressing [ALERT] on diagnostics are in Quick Setup mode. Power-on the remote... control. Turn on by pressing [TIMER] on diagnostics. The unit is not set . 1 Names and Locations Indicators The indicators display the status of the BL-WV10A and network conditions.
... (flashing) Green Off Description Timer/Sensor recording has been set . A problem was detected during the power-on the remote control. During Quick Setup Indicator Power Wireless Color Amber (flashing) Green Green (flashing) Description Unit is turned off by pressing [ALERT] on diagnostics are in Quick Setup mode. Power-on the remote... control. Turn on by pressing [TIMER] on diagnostics. The unit is not set . 1 Names and Locations Indicators The indicators display the status of the BL-WV10A and network conditions.
User Guide
Page 15
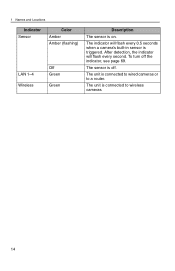
The sensor is triggered. The indicator will flash every second. The unit is on. To turn off . 1 Names and Locations Indicator Sensor LAN 1-4 Wireless Color Amber Amber (flashing) Off Green Green Description The sensor is connected to a router. After detection, the indicator will flash every 0.5 seconds when a camera's built-in sensor is off the indicator, see page 69. The unit is connected to wired cameras or to wireless cameras. 14
The sensor is triggered. The indicator will flash every second. The unit is on. To turn off . 1 Names and Locations Indicator Sensor LAN 1-4 Wireless Color Amber Amber (flashing) Off Green Green Description The sensor is connected to a router. After detection, the indicator will flash every 0.5 seconds when a camera's built-in sensor is off the indicator, see page 69. The unit is connected to wired cameras or to wireless cameras. 14
User Guide
Page 21
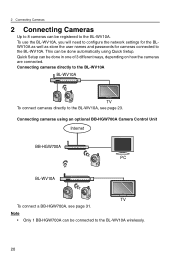
This can be connected to the BL-WV10A wirelessly. 20 Connecting cameras directly to the BL-WV10A BL-WV10A TV To connect cameras directly to the BL-WV10A. Note • Only 1 BB-HGW700A can be done automatically using an optional BB-HGW700A Camera Control Unit Internet BB-HGW700A PC BL-WV10A TV To connect a BB-HGW700A, see...
This can be connected to the BL-WV10A wirelessly. 20 Connecting cameras directly to the BL-WV10A BL-WV10A TV To connect cameras directly to the BL-WV10A. Note • Only 1 BB-HGW700A can be done automatically using an optional BB-HGW700A Camera Control Unit Internet BB-HGW700A PC BL-WV10A TV To connect a BB-HGW700A, see...
User Guide
Page 22
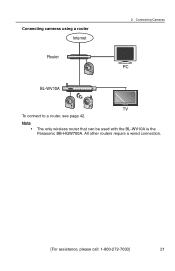
Note • The only wireless router that can be used with the BL-WV10A is the Panasonic BB-HGW700A. All other routers require a wired connection. [For assistance, please call: 1-800-272-7033] 21 Connecting cameras using a router Internet Router 2 Connecting Cameras PC BL-WV10A TV To connect to a router, see page 42.
Note • The only wireless router that can be used with the BL-WV10A is the Panasonic BB-HGW700A. All other routers require a wired connection. [For assistance, please call: 1-800-272-7033] 21 Connecting cameras using a router Internet Router 2 Connecting Cameras PC BL-WV10A TV To connect to a router, see page 42.
User Guide
Page 27
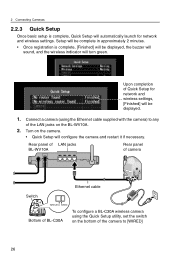
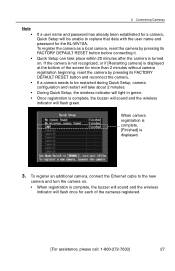
... the Ethernet cable supplied with the camera) to any of the camera to [WIRED] 26 Upon completion of Quick Setup for network and wireless settings. Turn on the BL-WV10A. 2. Setup will be complete in approximately 2 minutes. • Once registration is complete, Quick Setup will be displayed. 1. 2 Connecting Cameras 2.2.3 Quick Setup Once...
... the Ethernet cable supplied with the camera) to any of the camera to [WIRED] 26 Upon completion of Quick Setup for network and wireless settings. Turn on the BL-WV10A. 2. Setup will be complete in approximately 2 minutes. • Once registration is complete, Quick Setup will be displayed. 1. 2 Connecting Cameras 2.2.3 Quick Setup Once...
User Guide
Page 28
...20 minutes after the camera is displayed. 3. Once registration is complete, the buzzer will sound and the wireless indicator will flash once for each of the screen for the BL-WV10A. To register an additional camera, connect the Ethernet cable to replace that data with the user ... 2 minutes. When camera registration is complete, [Finished] is turned on . • When registration is complete, the buzzer will sound and the wireless indicator will light in green. If the camera is not recognized, or if [Restarting camera] is displayed at the bottom of the cameras registered. ...
...20 minutes after the camera is displayed. 3. Once registration is complete, the buzzer will sound and the wireless indicator will flash once for each of the screen for the BL-WV10A. To register an additional camera, connect the Ethernet cable to replace that data with the user ... 2 minutes. When camera registration is complete, [Finished] is turned on . • When registration is complete, the buzzer will sound and the wireless indicator will light in green. If the camera is not recognized, or if [Restarting camera] is displayed at the bottom of the cameras registered. ...

User Guide
Page 29
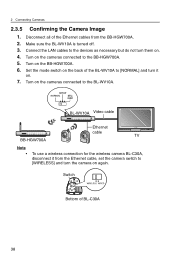
... 3, turn the camera on . LAN jacks Rear panel of BL-WV10A Ethernet cable (included) Rear panel of BL-C30A 28 BL-WV10A Video cable Ethernet cable TV Note • To use a wireless connection for the BL-C30A wireless camera, disconnect it from the Ethernet cable, set the camera ...switch to [WIRELESS] and turn the BL- 2 Connecting Cameras • Cameras must ...
... 3, turn the camera on . LAN jacks Rear panel of BL-WV10A Ethernet cable (included) Rear panel of BL-C30A 28 BL-WV10A Video cable Ethernet cable TV Note • To use a wireless connection for the BL-C30A wireless camera, disconnect it from the Ethernet cable, set the camera ...switch to [WIRELESS] and turn the BL- 2 Connecting Cameras • Cameras must ...

User Guide
Page 31
Turn on . 4. Set the mode switch on the back of the BL-WV10A to the signal strength displayed on-screen for proper placement. 2. Transmission problems can be displayed by pressing [DISPLAY] while monitoring a camera. When placing a wireless camera, refer to [NORMAL] and turn it on the cameras. 5. Signal strength Strongest signal Weakest signal...
Turn on . 4. Set the mode switch on the back of the BL-WV10A to the signal strength displayed on-screen for proper placement. 2. Transmission problems can be displayed by pressing [DISPLAY] while monitoring a camera. When placing a wireless camera, refer to [NORMAL] and turn it on the cameras. 5. Signal strength Strongest signal Weakest signal...
User Guide
Page 32
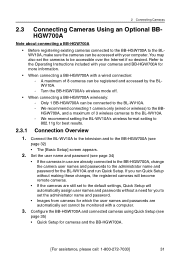
... be monitored with a wired connection: - We recommend setting the BL-WV10A's wireless format setting to the BL-WV10A. - Connect the BL-WV10A to the television and to the administrator name and password for the BL-WV10A and run Quick Setup without making these changes, the registered ...to the Operating Instructions included with your computer. A maximum of 3 wireless cameras to 802.11g for best results. 2.3.1 Connection Overview 1. Turn the BB-HGW700A's wireless mode off. • When connecting a BB-HGW700A wirelessly: - Only 1 BB-HGW700A can be accessed with your cameras and...
... be monitored with a wired connection: - We recommend setting the BL-WV10A's wireless format setting to the BL-WV10A. - Connect the BL-WV10A to the television and to the administrator name and password for the BL-WV10A and run Quick Setup without making these changes, the registered ...to the Operating Instructions included with your computer. A maximum of 3 wireless cameras to 802.11g for best results. 2.3.1 Connection Overview 1. Turn the BB-HGW700A's wireless mode off. • When connecting a BB-HGW700A wirelessly: - Only 1 BB-HGW700A can be accessed with your cameras and...

User Guide
Page 36
... • Cameras registered to the BB-HGW700A will turn green. Select [Yes] and press [ENTER]. • Quick Setup will return to the BL-WV10A. [For assistance, please call: 1-800-272-7033] 35 Enter the password and press [ENTER]. 6. Press [RETURN]. • You will start... . • Setup will appear. 8. Note • The administrator name and password must be displayed, the buzzer will sound, and the wireless indicator will be complete in length. The following characters cannot be used: " < > : &. 2.3.4 Quick Setup After completing Basic Setup, Quick Setup ...
... • Cameras registered to the BB-HGW700A will turn green. Select [Yes] and press [ENTER]. • Quick Setup will return to the BL-WV10A. [For assistance, please call: 1-800-272-7033] 35 Enter the password and press [ENTER]. 6. Press [RETURN]. • You will start... . • Setup will appear. 8. Note • The administrator name and password must be displayed, the buzzer will sound, and the wireless indicator will be complete in length. The following characters cannot be used: " < > : &. 2.3.4 Quick Setup After completing Basic Setup, Quick Setup ...

User Guide
Page 37
... Rear panel of LAN jacks BL-WV10A Switch Ethernet cable Bottom of BL-C30A To configure a BLC30A wireless camera Rear of camera using ...the Ethernet cables provided with them to any of the LAN jacks on the cameras. • Quick Setup will be restarted during Quick Setup, camera configuration and restart will take about 2 minutes. Turn on the BL...BB-HGW700A is connected to [WIRED] Ethernet cable Rear panel of the camera to the BL- WV10A. Connect the cameras using the Quick Setup utility, set the switch on the...
... Rear panel of LAN jacks BL-WV10A Switch Ethernet cable Bottom of BL-C30A To configure a BLC30A wireless camera Rear of camera using ...the Ethernet cables provided with them to any of the LAN jacks on the cameras. • Quick Setup will be restarted during Quick Setup, camera configuration and restart will take about 2 minutes. Turn on the BL...BB-HGW700A is connected to [WIRED] Ethernet cable Rear panel of the camera to the BL- WV10A. Connect the cameras using the Quick Setup utility, set the switch on the...
User Guide
Page 38
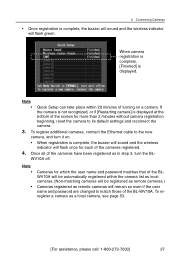
...cameras will be automatically registered within 20 minutes of turning on . • When registration is complete, the buzzer will sound and the wireless indicator will flash once for which the user name and password matches that of the BLWV10A will be registered as remote cameras.) Cameras registered... as remote cameras will flash green. To register additional cameras, connect the Ethernet cable to the new camera, and turn the BL- If the camera is not recognized, or if [Restarting camera] is displayed. Once all of the cameras have been registered as a local...
...cameras will be automatically registered within 20 minutes of turning on . • When registration is complete, the buzzer will sound and the wireless indicator will flash once for which the user name and password matches that of the BLWV10A will be registered as remote cameras.) Cameras registered... as remote cameras will flash green. To register additional cameras, connect the Ethernet cable to the new camera, and turn the BL- If the camera is not recognized, or if [Restarting camera] is displayed. Once all of the cameras have been registered as a local...
User Guide
Page 39
... cable BB-HGW700A Ethernet cable TV Note • To use a wireless connection for the wireless camera BL-C30A, disconnect it on . 4. Turn on the cameras connected to [WIRELESS] and turn the camera on again. Switch Bottom of the Ethernet cables from the Ethernet cable, set the camera switch to the BB-...HGW700A. 5. Connect the LAN cables to [NORMAL] and turn them on . 7. Set the mode switch on the back of the BL-WV10A to...
... cable BB-HGW700A Ethernet cable TV Note • To use a wireless connection for the wireless camera BL-C30A, disconnect it on . 4. Turn on the cameras connected to [WIRELESS] and turn the camera on again. Switch Bottom of the Ethernet cables from the Ethernet cable, set the camera switch to the BB-...HGW700A. 5. Connect the LAN cables to [NORMAL] and turn them on . 7. Set the mode switch on the back of the BL-WV10A to...
User Guide
Page 42
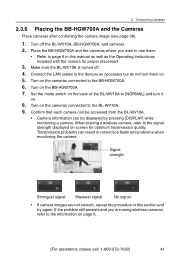
...HGW700A and the Cameras Place cameras after confirming the camera image (see page 38). 1. Set the mode switch on the back of the BL-WV10A to the signal strength displayed on-screen for proper placement. 3. If the problem still persists and you wish to page 6 in...and turn them . • Refer to use them on . 8. Signal strength Strongest signal Weakest signal No signal • If camera images are using wireless cameras, refer to the devices as the Operating Instructions included with the camera for optimum transmission quality. Turn on page 6. [For assistance, please call:...
...HGW700A and the Cameras Place cameras after confirming the camera image (see page 38). 1. Set the mode switch on the back of the BL-WV10A to the signal strength displayed on-screen for proper placement. 3. If the problem still persists and you wish to page 6 in...and turn them . • Refer to use them on . 8. Signal strength Strongest signal Weakest signal No signal • If camera images are using wireless cameras, refer to the devices as the Operating Instructions included with the camera for optimum transmission quality. Turn on page 6. [For assistance, please call:...
