
User Guide
Page 5
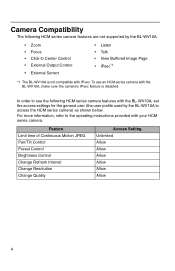
.... Feature Limit time of Continuous Motion JPEG Pan/Tilt Control Preset Control Brightness Control Change Refresh Interval Change Resolution Change Quality Access Setting Unlimited Allow Allow Allow Allow Allow Allow 4 Camera Compatibility The following HCM series camera features with the BL-WV10A, set the access settings for the general user (the user profile used by the BL-WV10A. • Zoom • Focus • Click to Center Control • External Output Control • External Sensor • Listen • Talk • View Buffered Image Page...
.... Feature Limit time of Continuous Motion JPEG Pan/Tilt Control Preset Control Brightness Control Change Refresh Interval Change Resolution Change Quality Access Setting Unlimited Allow Allow Allow Allow Allow Allow 4 Camera Compatibility The following HCM series camera features with the BL-WV10A, set the access settings for the general user (the user profile used by the BL-WV10A. • Zoom • Focus • Click to Center Control • External Output Control • External Sensor • Listen • Talk • View Buffered Image Page...

User Guide
Page 23
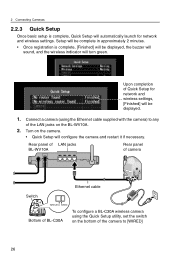
... well as zoom cameras, can be used in which they are configured. INTERNET Remote Camera Cameras connected via an Internet connection Router BL-WV10A User Name: AAAAAA Password: BBBBBB User Name: WWWWWW Password: XXXXXX Local Camera Camera's User Name and Password is different from the BL-WV10A's Admin. User Name: AAAAAA Admin. User names and passwords shown here are examples only. 22 User Name and Admin. 2 Connecting Cameras 2.1 Local and Remote Cameras Cameras accessed by the BL-WV10A are referred to not only monitor images, but certain BL-WV10A...
... well as zoom cameras, can be used in which they are configured. INTERNET Remote Camera Cameras connected via an Internet connection Router BL-WV10A User Name: AAAAAA Password: BBBBBB User Name: WWWWWW Password: XXXXXX Local Camera Camera's User Name and Password is different from the BL-WV10A's Admin. User Name: AAAAAA Admin. User names and passwords shown here are examples only. 22 User Name and Admin. 2 Connecting Cameras 2.1 Local and Remote Cameras Cameras accessed by the BL-WV10A are referred to not only monitor images, but certain BL-WV10A...
User Guide
Page 27
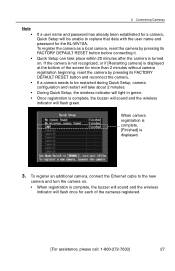
... of Quick Setup for network and wireless settings. Connect a camera (using the Quick Setup utility, set the switch on the bottom of the camera to any of BL-C30A To configure a BL-C30A wireless camera using the Ethernet cable supplied with the camera) to [WIRED] 26 Turn on the BL-WV10A. 2. 2 Connecting Cameras 2.2.3 Quick Setup Once basic setup is complete, [Finished] will configure the camera and restart it if necessary. Rear panel of LAN jacks BL-WV10A Rear panel of camera Switch Ethernet cable Bottom of...
... of Quick Setup for network and wireless settings. Connect a camera (using the Quick Setup utility, set the switch on the bottom of the camera to any of BL-C30A To configure a BL-C30A wireless camera using the Ethernet cable supplied with the camera) to [WIRED] 26 Turn on the BL-WV10A. 2. 2 Connecting Cameras 2.2.3 Quick Setup Once basic setup is complete, [Finished] will configure the camera and restart it if necessary. Rear panel of LAN jacks BL-WV10A Rear panel of camera Switch Ethernet cable Bottom of...
User Guide
Page 28
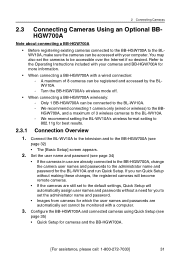
... cable to replace that data with the user name and password for more than 2 minutes without camera registration beginning, reset the camera by pressing its FACTORY DEFAULT RESET button and reconnect the camera. 2 Connecting Cameras Note • • • • • If a user name and password has already been established for a camera, Quick Setup will be restarted during Quick Setup, camera configuration and restart will take place within 20 minutes after the camera is turned...
... cable to replace that data with the user name and password for more than 2 minutes without camera registration beginning, reset the camera by pressing its FACTORY DEFAULT RESET button and reconnect the camera. 2 Connecting Cameras Note • • • • • If a user name and password has already been established for a camera, Quick Setup will be restarted during Quick Setup, camera configuration and restart will take place within 20 minutes after the camera is turned...
User Guide
Page 32
... connecting 1 camera only (wired or wireless) to the BBHGW700A, and a maximum of 8 cameras can be accessible over the Internet if so desired. Configure the BB-HGW700A and connected cameras using Quick Setup (see page 32) • The [Basic Setup] screen appears. 2. You may also set cannot be monitored with a computer. 3. Turn the BB-HGW700A's wireless mode off. • When connecting a BB-HGW700A wirelessly: - If you to set the administrator name and password. • Images from cameras...
... connecting 1 camera only (wired or wireless) to the BBHGW700A, and a maximum of 8 cameras can be accessible over the Internet if so desired. Configure the BB-HGW700A and connected cameras using Quick Setup (see page 32) • The [Basic Setup] screen appears. 2. You may also set cannot be monitored with a computer. 3. Turn the BB-HGW700A's wireless mode off. • When connecting a BB-HGW700A wirelessly: - If you to set the administrator name and password. • Images from cameras...

User Guide
Page 43
... Internet if so desired. Connect the video cable from the BL-WV10A video output port to the Operating Instructions included with your cameras and router for the BL-WV10A and run Quick Setup without making these changes, the registered cameras will become remote cameras. • If the cameras are already connected to a router, change the camera user names and passwords to the administrator name and password for more information. 2.4.1 Connection Overview 1. Confirm the camera images (see page 52) 2.4.2 Television and Router Connection 1. Set...
... Internet if so desired. Connect the video cable from the BL-WV10A video output port to the Operating Instructions included with your cameras and router for the BL-WV10A and run Quick Setup without making these changes, the registered cameras will become remote cameras. • If the cameras are already connected to a router, change the camera user names and passwords to the administrator name and password for more information. 2.4.1 Connection Overview 1. Confirm the camera images (see page 52) 2.4.2 Television and Router Connection 1. Set...
User Guide
Page 46
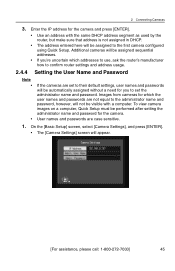
...; If you're uncertain which addresses to use, ask the router's manufacturer how to set the administrator name and password. 2 Connecting Cameras 3. User names and passwords are set to the first camera configured using Quick Setup. Additional cameras will be assigned to their default settings, user names and passwords will be visible with the same DHCP address segment as used by the router, but make sure that address is not assigned in DHCP. •...
...; If you're uncertain which addresses to use, ask the router's manufacturer how to set the administrator name and password. 2 Connecting Cameras 3. User names and passwords are set to the first camera configured using Quick Setup. Additional cameras will be assigned to their default settings, user names and passwords will be visible with the same DHCP address segment as used by the router, but make sure that address is not assigned in DHCP. •...
User Guide
Page 48
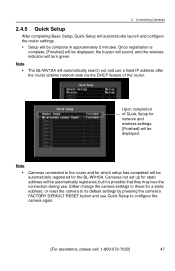
... during use Quick Setup to configure the camera again. [For assistance, please call: 1-800-272-7033] 47 Note • Cameras connected to its default settings by pressing the camera's FACTORY DEFAULT RESET button and use . 2 Connecting Cameras 2.4.5 Quick Setup After completing Basic Setup, Quick Setup will automatically launch and configure the router settings. • Setup will be displayed. Either change the camera settings to those for a static address, or reset the camera to the router and for network and wireless settings, [Finished] will turn green. Note • The BL...
... during use Quick Setup to configure the camera again. [For assistance, please call: 1-800-272-7033] 47 Note • Cameras connected to its default settings by pressing the camera's FACTORY DEFAULT RESET button and use . 2 Connecting Cameras 2.4.5 Quick Setup After completing Basic Setup, Quick Setup will automatically launch and configure the router settings. • Setup will be displayed. Either change the camera settings to those for a static address, or reset the camera to the router and for network and wireless settings, [Finished] will turn green. Note • The BL...
User Guide
Page 65
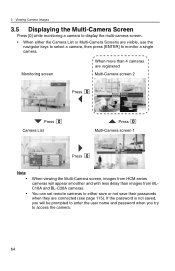
... BL-C30A cameras. If the password is not saved, you try to monitor a single camera. 3 Viewing Camera Images 3.5 Displaying the Multi-Camera Screen Press [0] while monitoring a camera to display the multi-camera screen. • When either save or not save their passwords when they are connected (see page 115). You can set remote cameras to either the Camera List or Multi-Camera Screens are visible, use the navigator keys to select a camera, then press [ENTER] to access...
... BL-C30A cameras. If the password is not saved, you try to monitor a single camera. 3 Viewing Camera Images 3.5 Displaying the Multi-Camera Screen Press [0] while monitoring a camera to display the multi-camera screen. • When either save or not save their passwords when they are connected (see page 115). You can set remote cameras to either the Camera List or Multi-Camera Screens are visible, use the navigator keys to select a camera, then press [ENTER] to access...
User Guide
Page 100
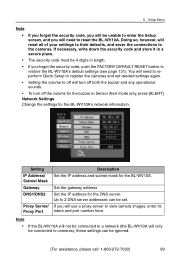
... DNS server. Network Settings Change the settings for the buzzer in length. • If you forget the security code, push the FACTORY DEFAULT RESET button to restore the BL-WV10A's default settings (see page 131). 6 Setup Menu Note • If you forget the security code, you will be unable to enter the Setup screen, and you will use a proxy server to view camera images, enter its name and port number here. If you will need to reperform Quick Setup to reset the BL...
... DNS server. Network Settings Change the settings for the buzzer in length. • If you forget the security code, push the FACTORY DEFAULT RESET button to restore the BL-WV10A's default settings (see page 131). 6 Setup Menu Note • If you forget the security code, you will be unable to enter the Setup screen, and you will use a proxy server to view camera images, enter its name and port number here. If you will need to reperform Quick Setup to reset the BL...

User Guide
Page 101
... Quick Setup, you may lose access to the network. • If you make a mistake while changing these settings, use the FACTORY DEFAULT RESET button to be between 6 and 15 alphanumeric characters in length. This password is configured using Quick Setup after connecting a BB-HGW700A, the starting address will be set desired settings again. 6 Setup Menu Note • Please be used: " < > : &. • When you re-register cameras using Quick Setup. Setting Starting Address Admin User Name Admin Password Description Set the IP address to restore the BL-WV10A's default settings...
... Quick Setup, you may lose access to the network. • If you make a mistake while changing these settings, use the FACTORY DEFAULT RESET button to be between 6 and 15 alphanumeric characters in length. This password is configured using Quick Setup after connecting a BB-HGW700A, the starting address will be set desired settings again. 6 Setup Menu Note • Please be used: " < > : &. • When you re-register cameras using Quick Setup. Setting Starting Address Admin User Name Admin Password Description Set the IP address to restore the BL-WV10A's default settings...
User Guide
Page 108
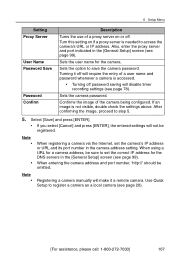
... camera being configured. Select [Save] and press [ENTER]. • If you select [Cancel] and press [ENTER], the entered settings will disable timer recording settings (see page 99). 6 Setup Menu Setting Proxy Server User Name Password Save Password Confirm Description Turns the use of a proxy server on if a proxy server is needed to access the camera's URL or IP address. When entering the camera address and port number, 'http://' should be registered. Use Quick Setup to set the camera's IP address or URL...
... camera being configured. Select [Save] and press [ENTER]. • If you select [Cancel] and press [ENTER], the entered settings will disable timer recording settings (see page 99). 6 Setup Menu Setting Proxy Server User Name Password Save Password Confirm Description Turns the use of a proxy server on if a proxy server is needed to access the camera's URL or IP address. When entering the camera address and port number, 'http://' should be registered. Use Quick Setup to set the camera's IP address or URL...

User Guide
Page 132
... the BL-WV10A is turned on, set the mode switch on the back to default settings. After returning to default settings, you hear 2 beeping sounds. • After re-launching, the [Basic Setup] screen will need to the camera. 9 Resetting the BL-WV10A 9 Resetting the BL-WV10A Press the FACTORY DEFAULT RESET button to return to Setup. 2. Press and hold the FACTORY DEFAULT RESET button for 3 seconds and then release it. • The reset will be able to connect to...
... the BL-WV10A is turned on, set the mode switch on the back to default settings. After returning to default settings, you hear 2 beeping sounds. • After re-launching, the [Basic Setup] screen will need to the camera. 9 Resetting the BL-WV10A 9 Resetting the BL-WV10A Press the FACTORY DEFAULT RESET button to return to Setup. 2. Press and hold the FACTORY DEFAULT RESET button for 3 seconds and then release it. • The reset will be able to connect to...

User Guide
Page 133
Reset the camera to become local cameras. Rear panel of BL-WV10A LAN jacks Switch Ethernet cable Bottom of BL-C30A To configure a BLRear of camera C30A wireless camera using the Quick Setup utility, set the switch on the bottom of 8 cameras can be connected. 1. For HCM series camera users, the camera's firmware must be version 1.22 or higher in order to function properly with the camera, connect it back on again. • When connecting to the Panasonic camera control unit, BB...
Reset the camera to become local cameras. Rear panel of BL-WV10A LAN jacks Switch Ethernet cable Bottom of BL-C30A To configure a BLRear of camera C30A wireless camera using the Quick Setup utility, set the switch on the bottom of 8 cameras can be connected. 1. For HCM series camera users, the camera's firmware must be version 1.22 or higher in order to function properly with the camera, connect it back on again. • When connecting to the Panasonic camera control unit, BB...
User Guide
Page 136
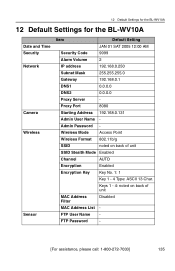
Wireless Mode Access Point Wireless Format 802.11b/g SSID noted on back of unit SSID Stealth Mode Enabled Channel AUTO Encryption Enabled Encryption Key Key No. 1: 1 Key 1 - 4 Type: ASCII 13 Char. Keys 1 - 4: noted on back of unit MAC Address Filter Disabled MAC Address List - Admin Password - FTP User Name - FTP Password - [For assistance, please call: 1-800-272-7033] 135 12 Default Settings for the BL-WV10A 12 Default Settings for the BL-WV10A Date and Time Security Network Camera Wireless Sensor Item...
Wireless Mode Access Point Wireless Format 802.11b/g SSID noted on back of unit SSID Stealth Mode Enabled Channel AUTO Encryption Enabled Encryption Key Key No. 1: 1 Key 1 - 4 Type: ASCII 13 Char. Keys 1 - 4: noted on back of unit MAC Address Filter Disabled MAC Address List - Admin Password - FTP User Name - FTP Password - [For assistance, please call: 1-800-272-7033] 135 12 Default Settings for the BL-WV10A 12 Default Settings for the BL-WV10A Date and Time Security Network Camera Wireless Sensor Item...
User Guide
Page 141
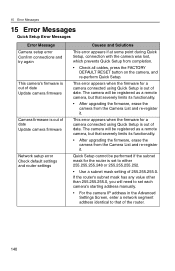
... FACTORY DEFAULT RESET button on the camera, and re-perform Quick Setup. The camera will need to set to that of date Update camera firmware Network setup error Check default settings and router settings Causes and Solutions This error appears if at some point during Quick Setup, connection with the camera was lost, which prevents Quick Setup from the Camera List and re-register it . This error appears when the firmware for the router is set each camera's starting address manually. • For the camera IP address...
... FACTORY DEFAULT RESET button on the camera, and re-perform Quick Setup. The camera will need to set to that of date Update camera firmware Network setup error Check default settings and router settings Causes and Solutions This error appears if at some point during Quick Setup, connection with the camera was lost, which prevents Quick Setup from the Camera List and re-register it . This error appears when the firmware for the router is set each camera's starting address manually. • For the camera IP address...
User Guide
Page 142
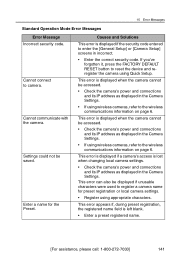
15 Error Messages Standard Operation Mode Error Messages Error Message Incorrect security code. Cannot communicate with the camera. If you've forgotten it, press the FACTORY DEFAULT RESET button to camera. Enter a name for preset registration or local camera settings. • Register using Quick Setup. This error can also be saved. This error is displayed if a camera's access is lost when changing local camera settings. • Check the camera's power and connections and its IP address as displayed in the Camera Settings. • If using wireless cameras, refer...
15 Error Messages Standard Operation Mode Error Messages Error Message Incorrect security code. Cannot communicate with the camera. If you've forgotten it, press the FACTORY DEFAULT RESET button to camera. Enter a name for preset registration or local camera settings. • Register using Quick Setup. This error can also be saved. This error is displayed if a camera's access is lost when changing local camera settings. • Check the camera's power and connections and its IP address as displayed in the Camera Settings. • If using wireless cameras, refer...

User Guide
Page 149
.../or security code. Did the buzzer sound 3 or more times? The camera image doesn't appear. Reset the BL-WV10A to [NORMAL] and turn the power on page 6. 148 Causes and Solutions Check the video cable connection and the TV's input mode switch. The remote control doesn't work . 16 Troubleshooting the BL-WV10A 16 Troubleshooting the BL-WV10A 16.1 Common Issues Issue Causes and Solutions The unit doesn't turn on ? Is it .If this doesn't resolve the problem...
.../or security code. Did the buzzer sound 3 or more times? The camera image doesn't appear. Reset the BL-WV10A to [NORMAL] and turn the power on page 6. 148 Causes and Solutions Check the video cable connection and the TV's input mode switch. The remote control doesn't work . 16 Troubleshooting the BL-WV10A 16 Troubleshooting the BL-WV10A 16.1 Common Issues Issue Causes and Solutions The unit doesn't turn on ? Is it .If this doesn't resolve the problem...
User Guide
Page 156
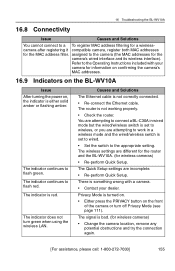
... attempting to connect a BL-C30A in a wireless mode and the wired/wireless switch is bad. (for information on confirming the camera's MAC addresses. 16.9 Indicators on the BL-WV10A Issue After turning the power on the front of the camera or turn green when using the wireless LAN. The Quick Setup settings are incomplete. • Re-perform Quick Setup. The signal is set to the Operating Instructions included with a camera. • Contact your camera for wireless cameras) • Change the camera location...
... attempting to connect a BL-C30A in a wireless mode and the wired/wireless switch is bad. (for information on confirming the camera's MAC addresses. 16.9 Indicators on the BL-WV10A Issue After turning the power on the front of the camera or turn green when using the wireless LAN. The Quick Setup settings are incomplete. • Re-perform Quick Setup. The signal is set to the Operating Instructions included with a camera. • Contact your camera for wireless cameras) • Change the camera location...

User Guide
Page 181
... Power Frequency 109 Address Port 115 Admin Password 100 Admin User Name 100 Alarm Volume 98 Auto Return 110 B Date and Time 96 DC IN Jack 12 E Encryption 102 Encryption Key 102 Entering Characters 121 Error Messages 140 Battery Safety 6 BL-WV10A Default Settings List 135 Specifications 136 Brightness 124 Buzzer Stopping 69 Turning off 69 F FACTORY DEFAULT RESET Button 131 FCC and Other Information 7 FTP Password 104 FTP User Name 104 G C General Setup 97 Camera Compatibility 4 Camera...
... Power Frequency 109 Address Port 115 Admin Password 100 Admin User Name 100 Alarm Volume 98 Auto Return 110 B Date and Time 96 DC IN Jack 12 E Encryption 102 Encryption Key 102 Entering Characters 121 Error Messages 140 Battery Safety 6 BL-WV10A Default Settings List 135 Specifications 136 Brightness 124 Buzzer Stopping 69 Turning off 69 F FACTORY DEFAULT RESET Button 131 FCC and Other Information 7 FTP Password 104 FTP User Name 104 G C General Setup 97 Camera Compatibility 4 Camera...


