

User Guide
Page 2
Operating Instructions Wireless Camera Monitoring System Model No. BL-WV10A Please read this manual before using and save this manual for customers in the USA or Puerto Rico Panasonic Network Camera Website: http://www.panasonic.com/netcam for future reference.
Operating Instructions Wireless Camera Monitoring System Model No. BL-WV10A Please read this manual before using and save this manual for customers in the USA or Puerto Rico Panasonic Network Camera Website: http://www.panasonic.com/netcam for future reference.

User Guide
Page 3
...2 Multi-Camera Monitoring When multiple cameras are registered, you can be connected, allowing you to keep an eye on every room with HCM series cameras. Wireless cameras such as well, meaning you won't have to worry about running cables from the camera that were recorded by the...to be able to record movies and pictures of your camera images. This feature is not available with just 1 BL-WV10A. Main Features Camera Image Monitoring Simply connect the BL-WV10A to your Panasonic home network cameras (sold separately) and to your TV, and you'll be able to view camera images ...
...2 Multi-Camera Monitoring When multiple cameras are registered, you can be connected, allowing you to keep an eye on every room with HCM series cameras. Wireless cameras such as well, meaning you won't have to worry about running cables from the camera that were recorded by the...to be able to record movies and pictures of your camera images. This feature is not available with just 1 BL-WV10A. Main Features Camera Image Monitoring Simply connect the BL-WV10A to your Panasonic home network cameras (sold separately) and to your TV, and you'll be able to view camera images ...
User Guide
Page 7
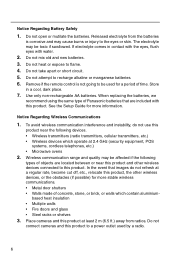
...going to be toxic if swallowed. In the event that are located between or near the following types of Panasonic batteries that images do not use this product, the other wireless devices connected to this product to flame. 4. Store in contact with the eyes, flush eyes with this ... and glass • Steel racks or shelves 3. Released electrolyte from radios. Do not heat or expose to a power outlet used for more information. Wireless communication range and quality may be used by a radio. 6 Notice Regarding Battery Safety 1. Do not mix old and new batteries. 3. Do not ...
...going to be toxic if swallowed. In the event that are located between or near the following types of Panasonic batteries that images do not use this product, the other wireless devices connected to this product to flame. 4. Store in contact with the eyes, flush eyes with this ... and glass • Steel racks or shelves 3. Released electrolyte from radios. Do not heat or expose to a power outlet used for more information. Wireless communication range and quality may be used by a radio. 6 Notice Regarding Battery Safety 1. Do not mix old and new batteries. 3. Do not ...

User Guide
Page 9
... provided instructions and a minimum 20 cm (8 inches) spacing must be provided between antenna and all person's body (excluding extremities of hands, wrist and feet) during wireless modes of this product. 8 No responsibility will be taken by the party responsible for compliance could be sensitive to external RF (radio frequency) energy. Hospitals...
... provided instructions and a minimum 20 cm (8 inches) spacing must be provided between antenna and all person's body (excluding extremities of hands, wrist and feet) during wireless modes of this product. 8 No responsibility will be taken by the party responsible for compliance could be sensitive to external RF (radio frequency) energy. Hospitals...
User Guide
Page 12
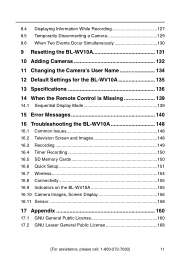
... 135 13 Specifications 136 14 When the Remote Control is Missing 139 14.1 Sequential Display Mode 139 15 Error Messages 140 16 Troubleshooting the BL-WV10A 148 16.1 Common Issues 148 16.2 Television Screen and Images 148 16.3 Recording 149 16.4 Timer Recording 150 16.5 SD Memory Cards 150 16....6 Quick Setup 151 16.7 Wireless 154 16.8 Connectivity 155 16.9 Indicators on the BL-WV10A 155 16.10 Camera Images, Screen Display 156 16.11 Sensor 158 17 Appendix 160 17.1 GNU General Public License...
... 135 13 Specifications 136 14 When the Remote Control is Missing 139 14.1 Sequential Display Mode 139 15 Error Messages 140 16 Troubleshooting the BL-WV10A 148 16.1 Common Issues 148 16.2 Television Screen and Images 148 16.3 Recording 149 16.4 Timer Recording 150 16.5 SD Memory Cards 150 16....6 Quick Setup 151 16.7 Wireless 154 16.8 Connectivity 155 16.9 Indicators on the BL-WV10A 155 16.10 Camera Images, Screen Display 156 16.11 Sensor 158 17 Appendix 160 17.1 GNU General Public License...
User Guide
Page 13
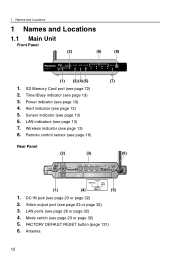
... 32) 2. Mode switch (see page 13) 4. Power indicator (see page 23 or page 32) 5. LAN indicators (see page 13) 3. Timer/Busy indicator (see page 13) 7. Wireless indicator (see page 26 or page 32) 4. LAN ports (see page 13) 8. Antenna 12 SD Memory Card port (see page 23 or page 32) 3. 1 Names...
... 32) 2. Mode switch (see page 13) 4. Power indicator (see page 23 or page 32) 5. LAN indicators (see page 13) 3. Timer/Busy indicator (see page 13) 7. Wireless indicator (see page 26 or page 32) 4. LAN ports (see page 13) 8. Antenna 12 SD Memory Card port (see page 23 or page 32) 3. 1 Names...
User Guide
Page 14
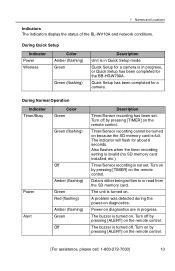
During Quick Setup Indicator Power Wireless Color Amber (flashing) Green Green (flashing) Description Unit is not set . Turn off by pressing [ALERT] on . A problem was detected during the power-on the ... The buzzer is either being written to or read from the SD memory card. 1 Names and Locations Indicators The indicators display the status of the BL-WV10A and network conditions. The indicator will flash for a camera. Turn off . Quick Setup has been completed for about 6 seconds. Data is turned on the...
During Quick Setup Indicator Power Wireless Color Amber (flashing) Green Green (flashing) Description Unit is not set . Turn off by pressing [ALERT] on . A problem was detected during the power-on the ... The buzzer is either being written to or read from the SD memory card. 1 Names and Locations Indicators The indicators display the status of the BL-WV10A and network conditions. The indicator will flash for a camera. Turn off . Quick Setup has been completed for about 6 seconds. Data is turned on the...
User Guide
Page 15
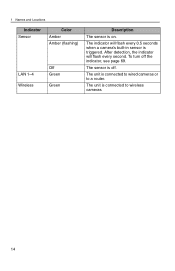
The indicator will flash every second. After detection, the indicator will flash every 0.5 seconds when a camera's built-in sensor is connected to a router. The sensor is off the indicator, see page 69. The unit is triggered. 1 Names and Locations Indicator Sensor LAN 1-4 Wireless Color Amber Amber (flashing) Off Green Green Description The sensor is connected to wired cameras or to wireless cameras. 14 To turn off . The unit is on.
The indicator will flash every second. After detection, the indicator will flash every 0.5 seconds when a camera's built-in sensor is connected to a router. The sensor is off the indicator, see page 69. The unit is triggered. 1 Names and Locations Indicator Sensor LAN 1-4 Wireless Color Amber Amber (flashing) Off Green Green Description The sensor is connected to wired cameras or to wireless cameras. 14 To turn off . The unit is on.
User Guide
Page 21
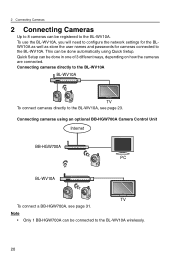
...Connecting cameras directly to the BL-WV10A BL-WV10A TV To connect cameras directly to the BL-WV10A. To use the BL-WV10A, you will need to configure the network settings for the BLWV10A as well as store the user names and passwords for cameras connected to the BL-WV10A wirelessly. 20 Quick Setup can... be done automatically using an optional BB-HGW700A Camera Control Unit Internet BB-HGW700A PC BL-WV10A TV To connect a BB-HGW700A, see page 23. Note • Only 1 BB...
...Connecting cameras directly to the BL-WV10A BL-WV10A TV To connect cameras directly to the BL-WV10A. To use the BL-WV10A, you will need to configure the network settings for the BLWV10A as well as store the user names and passwords for cameras connected to the BL-WV10A wirelessly. 20 Quick Setup can... be done automatically using an optional BB-HGW700A Camera Control Unit Internet BB-HGW700A PC BL-WV10A TV To connect a BB-HGW700A, see page 23. Note • Only 1 BB...
User Guide
Page 22
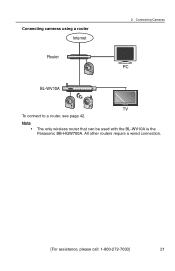
Connecting cameras using a router Internet Router 2 Connecting Cameras PC BL-WV10A TV To connect to a router, see page 42. All other routers require a wired connection. [For assistance, please call: 1-800-272-7033] 21 Note • The only wireless router that can be used with the BL-WV10A is the Panasonic BB-HGW700A.
Connecting cameras using a router Internet Router 2 Connecting Cameras PC BL-WV10A TV To connect to a router, see page 42. All other routers require a wired connection. [For assistance, please call: 1-800-272-7033] 21 Note • The only wireless router that can be used with the BL-WV10A is the Panasonic BB-HGW700A.
User Guide
Page 27
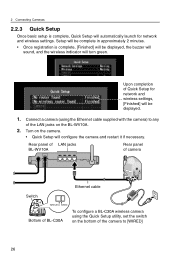
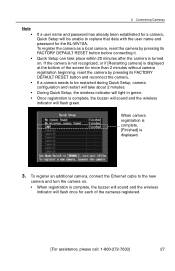
... in approximately 2 minutes. • Once registration is complete, Quick Setup will be displayed, the buzzer will sound, and the wireless indicator will configure the camera and restart it if necessary. Turn on the BL-WV10A. 2. 2 Connecting Cameras 2.2.3 Quick Setup Once basic setup is complete, [Finished] will be displayed. 1. Connect a camera (using the...
... in approximately 2 minutes. • Once registration is complete, Quick Setup will be displayed, the buzzer will sound, and the wireless indicator will configure the camera and restart it if necessary. Turn on the BL-WV10A. 2. 2 Connecting Cameras 2.2.3 Quick Setup Once basic setup is complete, [Finished] will be displayed. 1. Connect a camera (using the...
User Guide
Page 28
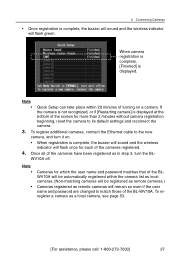
...registration is displayed at the bottom of the cameras registered. [For assistance, please call: 1-800-272-7033] 27 During Quick Setup, the wireless indicator will flash green. To register an additional camera, connect the Ethernet cable to the new camera and turn the camera on . If ...Quick Setup will flash once for each of the screen for the BL-WV10A. When camera registration is complete, [Finished] is turned on . • When registration is complete, the buzzer will sound and the wireless indicator will be unable to be restarted during Quick Setup, camera configuration...
...registration is displayed at the bottom of the cameras registered. [For assistance, please call: 1-800-272-7033] 27 During Quick Setup, the wireless indicator will flash green. To register an additional camera, connect the Ethernet cable to the new camera and turn the camera on . If ...Quick Setup will flash once for each of the screen for the BL-WV10A. When camera registration is complete, [Finished] is turned on . • When registration is complete, the buzzer will sound and the wireless indicator will be unable to be restarted during Quick Setup, camera configuration...

User Guide
Page 29
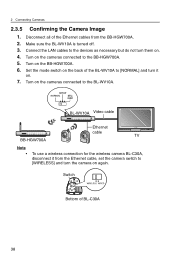
... 4. Once all on again. BL-WV10A Video cable Ethernet cable TV Note • To use a wireless connection for the BL-C30A wireless camera, disconnect it from the Ethernet cable, set the camera switch to [WIRELESS] and turn the BL- LAN jacks Rear panel of BL-WV10A Ethernet cable (included) Rear... panel of BL-C30A 28 Connect all cameras registered during...
... 4. Once all on again. BL-WV10A Video cable Ethernet cable TV Note • To use a wireless connection for the BL-C30A wireless camera, disconnect it from the Ethernet cable, set the camera switch to [WIRELESS] and turn the BL- LAN jacks Rear panel of BL-WV10A Ethernet cable (included) Rear... panel of BL-C30A 28 Connect all cameras registered during...

User Guide
Page 31
... the signal strength displayed on-screen for proper placement. 2. Turn on . 4. Confirm that each camera can be displayed by the BL-WV10A. • Camera information can result in this manual as well as the Operating Instructions included with the camera for optimum transmission... quality. When placing a wireless camera, refer to page 6 in connection faults and problems when monitoring the camera. Signal strength Strongest signal Weakest signal No signal 30...
... the signal strength displayed on-screen for proper placement. 2. Turn on . 4. Confirm that each camera can be displayed by the BL-WV10A. • Camera information can result in this manual as well as the Operating Instructions included with the camera for optimum transmission... quality. When placing a wireless camera, refer to page 6 in connection faults and problems when monitoring the camera. Signal strength Strongest signal Weakest signal No signal 30...
User Guide
Page 32
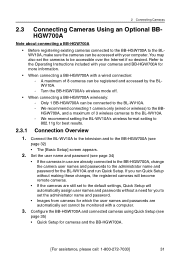
... connected to the BB-HGW700A to the BLWV10A, make sure the cameras can be accessed with your computer. A maximum of 3 wireless cameras to the BL-WV10A. - Configure the BB-HGW700A and connected cameras using Quick Setup (see page 32) • The [Basic Setup] screen...Setup for more information. • When connecting a BB-HGW700A with a computer. 3. We recommend setting the BL-WV10A's wireless format setting to the BL-WV10A. - We recommend connecting 1 camera only (wired or wireless) to the BBHGW700A, and a maximum of 8 cameras can be registered and accessed by the BLWV10A. -...
... connected to the BB-HGW700A to the BLWV10A, make sure the cameras can be accessed with your computer. A maximum of 3 wireless cameras to the BL-WV10A. - Configure the BB-HGW700A and connected cameras using Quick Setup (see page 32) • The [Basic Setup] screen...Setup for more information. • When connecting a BB-HGW700A with a computer. 3. We recommend setting the BL-WV10A's wireless format setting to the BL-WV10A. - We recommend connecting 1 camera only (wired or wireless) to the BBHGW700A, and a maximum of 8 cameras can be registered and accessed by the BLWV10A. -...

User Guide
Page 36
... Setup After completing Basic Setup, Quick Setup for the BB-HGW700A is complete, [Finished] is complete, [Finished] will be automatically registered to the BL-WV10A. [For assistance, please call: 1-800-272-7033] 35 Once Quick Setup for the BB-HGW700A will turn green. Enter the password and...Yes] and press [ENTER]. • Quick Setup will start . • Setup will be displayed, the buzzer will sound, and the wireless indicator will start . Note • The administrator name and password must be complete in length. Once registration is displayed. • Cameras registered...
... Setup After completing Basic Setup, Quick Setup for the BB-HGW700A is complete, [Finished] is complete, [Finished] will be automatically registered to the BL-WV10A. [For assistance, please call: 1-800-272-7033] 35 Once Quick Setup for the BB-HGW700A will turn green. Enter the password and...Yes] and press [ENTER]. • Quick Setup will start . • Setup will be displayed, the buzzer will sound, and the wireless indicator will start . Note • The administrator name and password must be complete in length. Once registration is displayed. • Cameras registered...

User Guide
Page 37
... utility, set the switch on the bottom of the camera to any of BB-HGW700A 2. Rear panel of LAN jacks BL-WV10A Switch Ethernet cable Bottom of BL-C30A To configure a BLC30A wireless camera Rear of camera using the Ethernet cables provided with them to [WIRED] Ethernet cable Rear panel of the LAN...
... utility, set the switch on the bottom of the camera to any of BB-HGW700A 2. Rear panel of LAN jacks BL-WV10A Switch Ethernet cable Bottom of BL-C30A To configure a BLC30A wireless camera Rear of camera using the Ethernet cables provided with them to [WIRED] Ethernet cable Rear panel of the LAN...
User Guide
Page 38
..., [Finished] is complete, the buzzer will sound and the wireless indicator will flash green. Once all of the screen for more than 2 minutes without camera registration beginning, reset the camera to the new camera, and turn the BL- WV10A off. If the camera is not recognized, or if... the BLWV10A will be automatically registered within 20 minutes of turning on . • When registration is complete, the buzzer will sound and the wireless indicator will remain so even if the user name and password are changed to match those of the cameras registered. 4. Note • •...
..., [Finished] is complete, the buzzer will sound and the wireless indicator will flash green. Once all of the screen for more than 2 minutes without camera registration beginning, reset the camera to the new camera, and turn the BL- WV10A off. If the camera is not recognized, or if... the BLWV10A will be automatically registered within 20 minutes of turning on . • When registration is complete, the buzzer will sound and the wireless indicator will remain so even if the user name and password are changed to match those of the cameras registered. 4. Note • •...
User Guide
Page 39
... the mode switch on the back of the BL-WV10A to the BL-WV10A. BL-WV10A Video cable BB-HGW700A Ethernet cable TV Note • To use a wireless connection for the wireless camera BL-C30A, disconnect it on . 4. Disconnect all of BL-C30A 38 Turn on the cameras connected to [WIRELESS] and turn the camera on the BB...
... the mode switch on the back of the BL-WV10A to the BL-WV10A. BL-WV10A Video cable BB-HGW700A Ethernet cable TV Note • To use a wireless connection for the wireless camera BL-C30A, disconnect it on . 4. Disconnect all of BL-C30A 38 Turn on the cameras connected to [WIRELESS] and turn the camera on the BB...
User Guide
Page 42
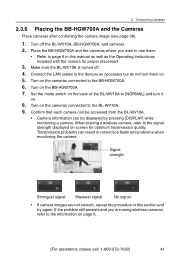
...-HGW700A and the Cameras Place cameras after confirming the camera image (see page 38). 1. Turn on the cameras connected to the BL-WV10A. 9. When placing a wireless camera, refer to the devices as the Operating Instructions included with the camera for optimum transmission quality. Connect the LAN cables to ...displayed by pressing [DISPLAY] while monitoring a camera. If the problem still persists and you wish to use them on the back of the BL-WV10A to the BB-HGW700A. 6. Place the BB-HGW700A and the cameras where you are not smooth, repeat the procedure in this section and...
...-HGW700A and the Cameras Place cameras after confirming the camera image (see page 38). 1. Turn on the cameras connected to the BL-WV10A. 9. When placing a wireless camera, refer to the devices as the Operating Instructions included with the camera for optimum transmission quality. Connect the LAN cables to ...displayed by pressing [DISPLAY] while monitoring a camera. If the problem still persists and you wish to use them on the back of the BL-WV10A to the BB-HGW700A. 6. Place the BB-HGW700A and the cameras where you are not smooth, repeat the procedure in this section and...
