
Network Camera
Page 1
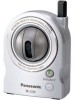
BL-C30A Please read this manual before using and save this manual for customers in the USA or Puerto Rico Panasonic Network Camera Website: http://www.panasonic.com/netcam for future reference. Operating Instructions Network Camera Model No.
BL-C30A Please read this manual before using and save this manual for customers in the USA or Puerto Rico Panasonic Network Camera Website: http://www.panasonic.com/netcam for future reference. Operating Instructions Network Camera Model No.

Network Camera
Page 2
... touch. Encryption establishes the security on IEEE 802.11b/g. Various remote monitoring features • Pyroelectric infrared sensor*1 detects temperature differences caused by a human body or animals. • Detection can let camera transfer images by mistake, or the detection ... +50 ° and vertically from -40 ° to transfer images depending on the network condition. *3 1 lx is also available. Operating Instructions Main Features Wireless Communication Network Camera corresponds to protect privacy. • Pressing the privacy button on the front of environment temperature...
... touch. Encryption establishes the security on IEEE 802.11b/g. Various remote monitoring features • Pyroelectric infrared sensor*1 detects temperature differences caused by a human body or animals. • Detection can let camera transfer images by mistake, or the detection ... +50 ° and vertically from -40 ° to transfer images depending on the network condition. *3 1 lx is also available. Operating Instructions Main Features Wireless Communication Network Camera corresponds to protect privacy. • Pressing the privacy button on the front of environment temperature...
Network Camera
Page 3
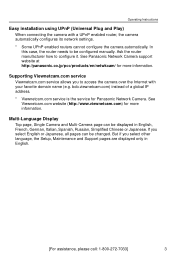
See Viewnetcam.com website (http://www.viewnetcam.com) for Panasonic Network Camera. Multi-Language Display Top page, Single Camera and Multi-Camera page can be changed. Supporting Viewnetcam.com service Viewnetcam.com service allows you to be displayed in English. [For ... (Universal Plug and Play) When connecting the camera with your favorite domain name (e.g. bob.viewnetcam.com) instead of a global IP address. * Viewnetcam.com service is the service for more information. See Panasonic Network Camera support website at http://panasonic.co.jp/pcc/products/en/netwkcam/ for more...
See Viewnetcam.com website (http://www.viewnetcam.com) for Panasonic Network Camera. Multi-Language Display Top page, Single Camera and Multi-Camera page can be changed. Supporting Viewnetcam.com service Viewnetcam.com service allows you to be displayed in English. [For ... (Universal Plug and Play) When connecting the camera with your favorite domain name (e.g. bob.viewnetcam.com) instead of a global IP address. * Viewnetcam.com service is the service for more information. See Panasonic Network Camera support website at http://panasonic.co.jp/pcc/products/en/netwkcam/ for more...
Network Camera
Page 4
...Web Browser Internet Explorer 6.0 or later (Not included on the Setup CDROM) Note See Panasonic Network Camera support website at http://panasonic.co.jp/pcc/products/en/netwkcam/ for the camera to work properly. Item Description Operating System Microsoft® Windows® XP, Microsoft®... registered trademark of their respective owners. Abbreviations • UPnP is the abbreviation for Universal Plug and Play. • "Network Camera" is called "Camera" in the United States and other countries. • Screen shots reprinted with permission from Microsoft Corporation. • All...
...Web Browser Internet Explorer 6.0 or later (Not included on the Setup CDROM) Note See Panasonic Network Camera support website at http://panasonic.co.jp/pcc/products/en/netwkcam/ for the camera to work properly. Item Description Operating System Microsoft® Windows® XP, Microsoft®... registered trademark of their respective owners. Abbreviations • UPnP is the abbreviation for Universal Plug and Play. • "Network Camera" is called "Camera" in the United States and other countries. • Screen shots reprinted with permission from Microsoft Corporation. • All...

Network Camera
Page 5
... warnings. 4. After taking away the dust on or pinched particularly at plugs, convenience receptacles, and the point where they exit from accessing the camera. The camera is damaged, the unit does not operate normally, or has been dropped. 12. Read and understand all instructions. 5. Do not touch the ...tool that produce heat. 7. User Name and Password Protection The use of time. 11. Protect the AC adaptor cord from being walked on the lens, wipe the lens with a cotton bud. 6. If you operate the camera, the power outlet should always be near any way, such as radiators, heat ...
... warnings. 4. After taking away the dust on or pinched particularly at plugs, convenience receptacles, and the point where they exit from accessing the camera. The camera is damaged, the unit does not operate normally, or has been dropped. 12. Read and understand all instructions. 5. Do not touch the ...tool that produce heat. 7. User Name and Password Protection The use of time. 11. Protect the AC adaptor cord from being walked on the lens, wipe the lens with a cotton bud. 6. If you operate the camera, the power outlet should always be near any way, such as radiators, heat ...

Network Camera
Page 6
...1.5 Viewing Still Images on Your Mobile Phone 25 2 Various Camera Features 27 2.1 Using Camera Features 27 2.2 Connecting the Camera to Your Network 30 2.3 Using Wireless LAN 34 2.4 Using UPnP (Universal Plug and Play 37 ...2.5 Registering with the Viewnetcam.com service 38 2.6 Setting Date and Time 40 2.7 Changing Camera Settings 42 2.8 Changing Authentication Setting and Administrator User Name and Password 46 2.9 Logging in to the Camera 49 2.10 Creating, Modifying or Deleting General Users 50 2.11...
...1.5 Viewing Still Images on Your Mobile Phone 25 2 Various Camera Features 27 2.1 Using Camera Features 27 2.2 Connecting the Camera to Your Network 30 2.3 Using Wireless LAN 34 2.4 Using UPnP (Universal Plug and Play 37 ...2.5 Registering with the Viewnetcam.com service 38 2.6 Setting Date and Time 40 2.7 Changing Camera Settings 42 2.8 Changing Authentication Setting and Administrator User Name and Password 46 2.9 Logging in to the Camera 49 2.10 Creating, Modifying or Deleting General Users 50 2.11...

Network Camera
Page 7
...Status 79 Confirming the Wireless Status 79 Restarting the Camera 80 Updating the Camera Firmware 81 Creating Configuration File 84 Loading Settings from a Configuration File 85 Resetting the Camera to Factory Default 86 Support page 87 Seeing Help page 87 Seeing Wireless Help page 88 Seeing...100 3.8 3.8.1 3.8.2 3.8.3 3.9 Setting Your PC 103 Setting the Proxy Server Settings on Web Browser 103 Setting UPnP to Display Camera Shortcut in My Network Places ........ 106 Setting the Internet Temporary File Setting on Web Browser 106 ASCII Character Table 107 3.10 File Size and Number...
...Status 79 Confirming the Wireless Status 79 Restarting the Camera 80 Updating the Camera Firmware 81 Creating Configuration File 84 Loading Settings from a Configuration File 85 Resetting the Camera to Factory Default 86 Support page 87 Seeing Help page 87 Seeing Wireless Help page 88 Seeing...100 3.8 3.8.1 3.8.2 3.8.3 3.9 Setting Your PC 103 Setting the Proxy Server Settings on Web Browser 103 Setting UPnP to Display Camera Shortcut in My Network Places ........ 106 Setting the Internet Temporary File Setting on Web Browser 106 ASCII Character Table 107 3.10 File Size and Number...

Network Camera
Page 8
... users] is desired, the port number will be changed because some ISPs block port 80. See page 32 for details about port number, and page 11 in the order from 50000 to 50050. E.g. http://192.168.0.253 (or http://XXXXX.viewnetcam.com) • When port number is 80 (default), you do... not need to the camera is set on the keyboard. Enter the administrator's or the general user's user name and password, and the Top page is changed in the Installation...
... users] is desired, the port number will be changed because some ISPs block port 80. See page 32 for details about port number, and page 11 in the order from 50000 to 50050. E.g. http://192.168.0.253 (or http://XXXXX.viewnetcam.com) • When port number is 80 (default), you do... not need to the camera is set on the keyboard. Enter the administrator's or the general user's user name and password, and the Top page is changed in the Installation...

Network Camera
Page 9
Click the following tabs to display. A To Single Camera page (page 10) C To Buffered Image page (page 23) E To Maintenance page (page 78) G To log in to the camera (page 49) B To Multi-Camera page (page 21) D To Setup page (page 27) F To Support page (page 87) Note When users other than ...an administrator are accessing the camera, [Setup] and [Maintenance] tab will not be displayed. Additionally, When [Prohibiting unregistered users] is set on the Security: Administrator page, [Login] tab will not ...
Click the following tabs to display. A To Single Camera page (page 10) C To Buffered Image page (page 23) E To Maintenance page (page 78) G To log in to the camera (page 49) B To Multi-Camera page (page 21) D To Setup page (page 27) F To Support page (page 87) Note When users other than ...an administrator are accessing the camera, [Setup] and [Maintenance] tab will not be displayed. Additionally, When [Prohibiting unregistered users] is set on the Security: Administrator page, [Login] tab will not ...
Network Camera
Page 10
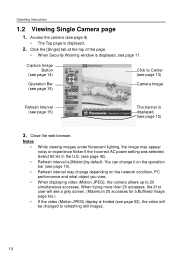
... viewing images under florescent lighting, the image may change it on the network condition, PC performance and what object you view. • When displaying video (Motion JPEG), the camera allows up to Center (see page 13) Camera Image Refresh Interval (see page 15) The banner is displayed, see ...page 12) 3. Operating Instructions 1.2 Viewing Single Camera page 1. Click the [Single] tab at the top of the page. • When Security Warning window is displayed. (see page 11. Capture Image Button (see page 14) Operation Bar (see page 15) Click ...
... viewing images under florescent lighting, the image may change it on the network condition, PC performance and what object you view. • When displaying video (Motion JPEG), the camera allows up to Center (see page 13) Camera Image Refresh Interval (see page 15) The banner is displayed, see ...page 12) 3. Operating Instructions 1.2 Viewing Single Camera page 1. Click the [Single] tab at the top of the page. • When Security Warning window is displayed. (see page 11. Capture Image Button (see page 14) Operation Bar (see page 15) Click ...
Network Camera
Page 11
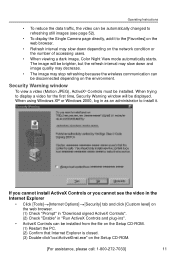
...Controls or you cannot see page 52). • To display the Single Camera page directly, add it to install it. When using Windows XP or ..."ocx\ActiveXInst.exe" on the Setup CD-ROM. [For assistance, please call: 1-800-272-7033] 11 Operating Instructions • To reduce the data traffic, the video can be automatically changed to refreshing still ...the web browser. • Refresh interval may stop refreshing because the wireless communication can be installed. The image will be disconnected depending on the network condition or the number of accessing users. • When viewing ...
...Controls or you cannot see page 52). • To display the Single Camera page directly, add it to install it. When using Windows XP or ..."ocx\ActiveXInst.exe" on the Setup CD-ROM. [For assistance, please call: 1-800-272-7033] 11 Operating Instructions • To reduce the data traffic, the video can be automatically changed to refreshing still ...the web browser. • Refresh interval may stop refreshing because the wireless communication can be installed. The image will be disconnected depending on the network condition or the number of accessing users. • When viewing ...
Network Camera
Page 12
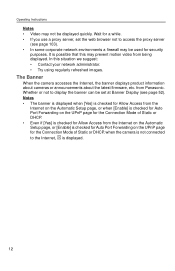
... regularly refreshed images. It is displayed. 12 Wait for the Connection Mode of Static or DHCP, when the camera is not connected to access the proxy server (see page 103). • In some corporate network environments a firewall may not be displayed quickly. Notes • The banner is displayed when [Yes] is checked... Auto Port Forwarding on the UPnP page for the Connection Mode of Static or DHCP. • Even if [Yes] is checked for Allow Access from Panasonic. Operating Instructions Notes • Video may be set at Banner Display (see page 52).
... regularly refreshed images. It is displayed. 12 Wait for the Connection Mode of Static or DHCP, when the camera is not connected to access the proxy server (see page 103). • In some corporate network environments a firewall may not be displayed quickly. Notes • The banner is displayed when [Yes] is checked... Auto Port Forwarding on the UPnP page for the Connection Mode of Static or DHCP. • Even if [Yes] is checked for Allow Access from Panasonic. Operating Instructions Notes • Video may be set at Banner Display (see page 52).

Network Camera
Page 13
... work. [For assistance, please call: 1-800-272-7033] 13 Cursor 2. Operating Instructions 1.2.1 Image Auto Centering (Click to Center) When you click a certain point on the camera image, the point is centered on the lens direction. • If a user is centered. • See page 16 for the pan/tilt operation.
... work. [For assistance, please call: 1-800-272-7033] 13 Cursor 2. Operating Instructions 1.2.1 Image Auto Centering (Click to Center) When you click a certain point on the camera image, the point is centered on the lens direction. • If a user is centered. • See page 16 for the pan/tilt operation.

Network Camera
Page 14
Operating Instructions 1.2.2 Capturing a Still Image A still image can be saved on your PC. 1. Capture Image Button • The camera image opens in another window. 3. Right-click the image, and select [Save Picture As...]. • Save as dialog box is saved at that location. 5. Click the capture image button. Specify the location, and click [Save]. • Camera image is displayed. 4. Click [Close]. 14 Operate pan/tilt and select a resolution to display an image. 2.
Operating Instructions 1.2.2 Capturing a Still Image A still image can be saved on your PC. 1. Capture Image Button • The camera image opens in another window. 3. Right-click the image, and select [Save Picture As...]. • Save as dialog box is saved at that location. 5. Click the capture image button. Specify the location, and click [Save]. • Camera image is displayed. 4. Click [Close]. 14 Operate pan/tilt and select a resolution to display an image. 2.

Network Camera
Page 15
...throughout the horizontal ( ) or vertical ( ) range, and returns to a preset position. Sensor Position: When the sensor detects a temperature difference, the camera can be refreshed. [For assistance, please call: 1-800-272-7033] 15 Brightness: Changes brightness in nine steps including [STD] (Standard). The image ...will be set up to turn to this position. Note When the camera image is not displayed correctly, click [Refresh] at the tool bar on the web browser. When clicking a preset button, the preset name...
...throughout the horizontal ( ) or vertical ( ) range, and returns to a preset position. Sensor Position: When the sensor detects a temperature difference, the camera can be refreshed. [For assistance, please call: 1-800-272-7033] 15 Brightness: Changes brightness in nine steps including [STD] (Standard). The image ...will be set up to turn to this position. Note When the camera image is not displayed correctly, click [Refresh] at the tool bar on the web browser. When clicking a preset button, the preset name...

Network Camera
Page 16
Each pan/tilt arrow moves the lens Up, Down, Right or Left, and the home position button moves it to the pan/tilt portion of the camera. Any forced movement can damage the internal mechanism. 16 Pan/Tilt Range Pan/Tilt Scan Pan/Tilt Pan: -50 ˚ to +50 ˚ Tilt: -40 ˚ to +10 ˚ Note Do not apply pressure to the home position. Operating Instructions Pan/Tilt Operation Pan/tilt scan buttons automatically move the lens horizontally from -50 ° to +50 ° and vertically from -40 ° to +10 ° and return the lens to the original position.
Each pan/tilt arrow moves the lens Up, Down, Right or Left, and the home position button moves it to the pan/tilt portion of the camera. Any forced movement can damage the internal mechanism. 16 Pan/Tilt Range Pan/Tilt Scan Pan/Tilt Pan: -50 ˚ to +50 ˚ Tilt: -40 ˚ to +10 ˚ Note Do not apply pressure to the home position. Operating Instructions Pan/Tilt Operation Pan/tilt scan buttons automatically move the lens horizontally from -50 ° to +50 ° and vertically from -40 ° to +10 ° and return the lens to the original position.

Network Camera
Page 17
... sensor position and 8 preset buttons can be registered. Preset buttons (1-4) are shown in white. Pan and tilt the camera to [Cancel]. Click [Program]. • [Program] switches to a desired Pan/Tilt position. 3. These buttons can be changed (see page 65),... temperature differences. Click the home position button or the Program sensor position button. 4. Registering Home Position/Sensor Position 1. When restarted, the camera takes a home position. If the Lens Position When Triggered setting is set (see page 20). • Registered buttons are shown in blue...
... sensor position and 8 preset buttons can be registered. Preset buttons (1-4) are shown in white. Pan and tilt the camera to [Cancel]. Click [Program]. • [Program] switches to a desired Pan/Tilt position. 3. These buttons can be changed (see page 65),... temperature differences. Click the home position button or the Program sensor position button. 4. Registering Home Position/Sensor Position 1. When restarted, the camera takes a home position. If the Lens Position When Triggered setting is set (see page 20). • Registered buttons are shown in blue...

Network Camera
Page 18
...• Enter ASCII characters (see page 107) or characters in each language. Notes • When registering preset buttons, the camera also saves brightness and white balance settings. • Only an administrator can register preset buttons. is displayed. Setting a name &#...8226; Clicking [Back] takes you back to quit without changing the settings. 6. Pan and tilt the camera to [Cancel]. But [Space and [>] are not available. 5. Pan/Tilt 3. Preset number • When finished, "Success!" Operating Instructions Registering...
...• Enter ASCII characters (see page 107) or characters in each language. Notes • When registering preset buttons, the camera also saves brightness and white balance settings. • Only an administrator can register preset buttons. is displayed. Setting a name &#...8226; Clicking [Back] takes you back to quit without changing the settings. 6. Pan and tilt the camera to [Cancel]. But [Space and [>] are not available. 5. Pan/Tilt 3. Preset number • When finished, "Success!" Operating Instructions Registering...

Network Camera
Page 19
Click the home position, sensor position or registered preset button. • The camera takes each position, and the image is displayed. Home Position Pan/Tilt Putting the cursor displays the preset name. Sensor Position UpperLeft [For assistance, please call: 1-800-272-7033] 19 Viewing the Image Operating Instructions 1.
Click the home position, sensor position or registered preset button. • The camera takes each position, and the image is displayed. Home Position Pan/Tilt Putting the cursor displays the preset name. Sensor Position UpperLeft [For assistance, please call: 1-800-272-7033] 19 Viewing the Image Operating Instructions 1.

Network Camera
Page 20
Pan and tilt the camera to the previous page. 5. is displayed. • Clicking [Back] takes you back to a desired position. 3. Note The home position or the sensor position cannot be ...
Pan and tilt the camera to the previous page. 5. is displayed. • Clicking [Back] takes you back to a desired position. 3. Note The home position or the sensor position cannot be ...


