Ip Camera
Page 4
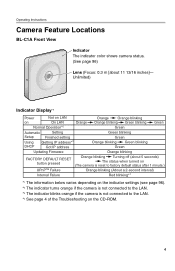
Operating Instructions Camera Feature Locations BL-C1A Front View Indicator The indicator color shows camera status. (See page 96) Lens (Focus: 0.3 m [about 5 seconds) The status when turned on (The camera is reset to factory default status after 1 minute.) UPnPTM Failure Orange blinking (About a 2-second interval) Internal ...settings (see page 96). *2 The indicator turns orange if the camera is not connected to the LAN. *3 The indicator blinks orange if the camera is not connected to the LAN. *4 See page 4 of the Troubleshooting on the CD-ROM. 4 Unlimited) Indicator Display*1 Power on...
Operating Instructions Camera Feature Locations BL-C1A Front View Indicator The indicator color shows camera status. (See page 96) Lens (Focus: 0.3 m [about 5 seconds) The status when turned on (The camera is reset to factory default status after 1 minute.) UPnPTM Failure Orange blinking (About a 2-second interval) Internal ...settings (see page 96). *2 The indicator turns orange if the camera is not connected to the LAN. *3 The indicator blinks orange if the camera is not connected to the LAN. *4 See page 4 of the Troubleshooting on the CD-ROM. 4 Unlimited) Indicator Display*1 Power on...
Ip Camera
Page 10
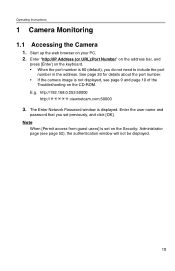
Operating Instructions 1 Camera Monitoring 1.1 Accessing the Camera 1. Note When [Permit access from guest users] is displayed. Enter "http://IP Address (or URL):Port Number" on the address bar, and press [Enter] on ... Enter Network Password window is set previously, and click [OK]. Start up the web browser on the CD-ROM. See page 33 for details about the port number. • If the camera image is 80 (default), you set on the Security: Administrator page (see page 9 and page 10 of the Troubleshooting on your...
Operating Instructions 1 Camera Monitoring 1.1 Accessing the Camera 1. Note When [Permit access from guest users] is displayed. Enter "http://IP Address (or URL):Port Number" on the address bar, and press [Enter] on ... Enter Network Password window is set previously, and click [OK]. Start up the web browser on the CD-ROM. See page 33 for details about the port number. • If the camera image is 80 (default), you set on the Security: Administrator page (see page 9 and page 10 of the Troubleshooting on your...

Ip Camera
Page 21
... When you may need 3 to 4 Mbps bandwidth. The video (Motion JPEG) can be used while using an Ethernet switching hub instead of Troubleshooting on the CD-ROM) • Confirm the settings on the Security: Administrator page • An authentication window is too long, restrict the bandwidth... hub to refreshing still images. Enter the administrator's or general user's user name and password registered for each camera that the global IP address is connected to network congestion or the number of moving subject are displayed in video display. To reduce the data traffic, set up...
... When you may need 3 to 4 Mbps bandwidth. The video (Motion JPEG) can be used while using an Ethernet switching hub instead of Troubleshooting on the CD-ROM) • Confirm the settings on the Security: Administrator page • An authentication window is too long, restrict the bandwidth... hub to refreshing still images. Enter the administrator's or general user's user name and password registered for each camera that the global IP address is connected to network congestion or the number of moving subject are displayed in video display. To reduce the data traffic, set up...
Ip Camera
Page 35
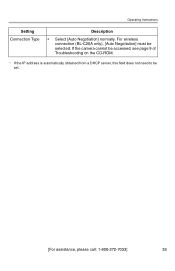
Operating Instructions Setting Connection Type Description • Select [Auto Negotiation] normally. For wireless connection (BL-C20A only), [Auto Negotiation] must be set. [For assistance, please call: 1-800-272-7033] 35 If the camera cannot be accessed, see page 9 of Troubleshooting on the CD-ROM. *1 If the IP address is automatically obtained from a DHCP server, this field does not need to be selected.
Operating Instructions Setting Connection Type Description • Select [Auto Negotiation] normally. For wireless connection (BL-C20A only), [Auto Negotiation] must be set. [For assistance, please call: 1-800-272-7033] 35 If the camera cannot be accessed, see page 9 of Troubleshooting on the CD-ROM. *1 If the IP address is automatically obtained from a DHCP server, this field does not need to be selected.

Ip Camera
Page 96
... indicator. There are saved. • When finished, "Success!" Turn indicator • on . is on. • Turn indicator on during camera access. Never turn indicator on ] keeps indicator always off . • Clicking [Cancel] cancels your settings without saving changes. The indicator always turns...Turn indicator on when camera is displayed. 4. Operating Instructions 5.4 Changing the Indicator Display The Indicator Control page allows you to Indicator Control page]. • The Indicator Control page is being accessed. See page 3 and page 4 of Troubleshooting on or blinks. ...
... indicator. There are saved. • When finished, "Success!" Turn indicator • on . is on. • Turn indicator on during camera access. Never turn indicator on ] keeps indicator always off . • Clicking [Cancel] cancels your settings without saving changes. The indicator always turns...Turn indicator on when camera is displayed. 4. Operating Instructions 5.4 Changing the Indicator Display The Indicator Control page allows you to Indicator Control page]. • The Indicator Control page is being accessed. See page 3 and page 4 of Troubleshooting on or blinks. ...
Ip Camera
Page 98
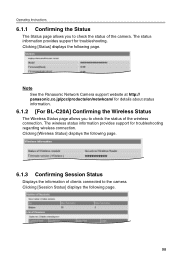
Note See the Panasonic Network Camera support website at http:// panasonic.co.jp/pcc/products/en/netwkcam/ for details about status information. 6.1.2 [For BL-C20A] Confirming the Wireless Status The Wireless Status page allows you to the camera. Clicking [Status] displays the following page. 98 The wireless status information provides support for troubleshooting. Clicking [Session Status] displays the following...
Note See the Panasonic Network Camera support website at http:// panasonic.co.jp/pcc/products/en/netwkcam/ for details about status information. 6.1.2 [For BL-C20A] Confirming the Wireless Status The Wireless Status page allows you to the camera. Clicking [Status] displays the following page. 98 The wireless status information provides support for troubleshooting. Clicking [Session Status] displays the following...

Ip Camera
Page 126
When you cannot access the camera, see page 9 of the Troubleshooting on the UPnP™ page (see page 39). 2. If you are using a router that the camera can be accessed from the Internet (see page 42). 3. Enable the Auto Port Forwarding feature on the CD-ROM. When you will ...enable Internet access to the camera, follow the procedures...
When you cannot access the camera, see page 9 of the Troubleshooting on the UPnP™ page (see page 39). 2. If you are using a router that the camera can be accessed from the Internet (see page 42). 3. Enable the Auto Port Forwarding feature on the CD-ROM. When you will ...enable Internet access to the camera, follow the procedures...