
Network Camera
Page 4
...Windows Me, Microsoft Windows XP CPU Pentium® III (500 MHz or greater is recommended.) Protocol TCP/IP protocol (HTTP, TCP, UDP, IP, DNS, ARP, ICMP) Interface 10/100 Mbps network card installed Web Browser Internet Explorer 6.0 or later (Not included on the Setup CDROM) Note See Panasonic Network Camera support website at http://panasonic....co.jp/pcc/products/en/netwkcam/ for the camera to work properly. Trademarks • Adobe and Acrobat are either registered...
...Windows Me, Microsoft Windows XP CPU Pentium® III (500 MHz or greater is recommended.) Protocol TCP/IP protocol (HTTP, TCP, UDP, IP, DNS, ARP, ICMP) Interface 10/100 Mbps network card installed Web Browser Internet Explorer 6.0 or later (Not included on the Setup CDROM) Note See Panasonic Network Camera support website at http://panasonic....co.jp/pcc/products/en/netwkcam/ for the camera to work properly. Trademarks • Adobe and Acrobat are either registered...

Network Camera
Page 8
... changed in the Installation/ Troubleshooting. • If the Internet access to the camera is 80 (default), you do not need to 50050. Operating Instructions 1 Camera Monitoring 1.1 Accessing the Camera 1. http://192.168.0.253 (or http://XXXXX.viewnetcam.com) • When ...port number is desired, the port number will be changed because some ISPs block port 80. E.g. Note When [Prohibiting unregistered users] is set on the Security: Administrator page, authentication window...
... changed in the Installation/ Troubleshooting. • If the Internet access to the camera is 80 (default), you do not need to 50050. Operating Instructions 1 Camera Monitoring 1.1 Accessing the Camera 1. http://192.168.0.253 (or http://XXXXX.viewnetcam.com) • When ...port number is desired, the port number will be changed because some ISPs block port 80. E.g. Note When [Prohibiting unregistered users] is set on the Security: Administrator page, authentication window...

Network Camera
Page 10
...(see page 37). • Refresh interval is displayed, see page 14) Click to the [Favorites] on the network condition or the number of the page. • When Security Warning window is [Motion] by default. The image will be changed to refreshing still images (see page 47). • ...To display the Single Camera page directly, add it on the network condition, PC performance and what object you view. •...
...(see page 37). • Refresh interval is displayed, see page 14) Click to the [Favorites] on the network condition or the number of the page. • When Security Warning window is [Motion] by default. The image will be changed to refreshing still images (see page 47). • ...To display the Single Camera page directly, add it on the network condition, PC performance and what object you view. •...

Network Camera
Page 11
... for a while. • If you cannot see page 92). • In some corporate network environments a firewall may prevent motion video from being displayed. Operating Instructions Security Warning window To view a video (Motion JPEG), ActiveX® Controls must be displayed quickly. If you cannot... (1) Restart the PC. (2) Confirm that Internet Explorer is possible that this situation we suggest: • Contact your network administrator. • Try using Windows 2000 or Windows XP, log in "Run ActiveX Controls and plug-ins". • ActiveX Controls can be displayed. When trying to ...
... for a while. • If you cannot see page 92). • In some corporate network environments a firewall may prevent motion video from being displayed. Operating Instructions Security Warning window To view a video (Motion JPEG), ActiveX® Controls must be displayed quickly. If you cannot... (1) Restart the PC. (2) Confirm that Internet Explorer is possible that this situation we suggest: • Contact your network administrator. • Try using Windows 2000 or Windows XP, log in "Run ActiveX Controls and plug-ins". • ActiveX Controls can be displayed. When trying to ...

Network Camera
Page 13
Specify the location, and click [Save]. • Camera image is displayed. 4. Click the capture image button. Capture Image Button • The camera image opens in another window. 3. Right-click the image, and select [Save Picture As...]. • Save as dialog box is saved at that location. 5. Operating Instructions 1.2.2 Capturing a Still Image A still image can be saved on your PC. 1. Operate pan/tilt and select a resolution to display an image. 2. Click [Close]. [For assistance, please call: 1-800-272-7033] 13
Specify the location, and click [Save]. • Camera image is displayed. 4. Click the capture image button. Capture Image Button • The camera image opens in another window. 3. Right-click the image, and select [Save Picture As...]. • Save as dialog box is saved at that location. 5. Operating Instructions 1.2.2 Capturing a Still Image A still image can be saved on your PC. 1. Operate pan/tilt and select a resolution to display an image. 2. Click [Close]. [For assistance, please call: 1-800-272-7033] 13

Network Camera
Page 20
...) cannot be displayed on the Multi-Camera page. 20 When clicking the camera name, the Single Camera page is displayed. 2. If you need to 12 camera images. Click the [Multi] tab at the top of the page. • Multi-Camera page can display up to configure each camera on another window. 3. Selects a refresh interval (Motion-60-second...
...) cannot be displayed on the Multi-Camera page. 20 When clicking the camera name, the Single Camera page is displayed. 2. If you need to 12 camera images. Click the [Multi] tab at the top of the page. • Multi-Camera page can display up to configure each camera on another window. 3. Selects a refresh interval (Motion-60-second...

Network Camera
Page 21
... images (see page 47). • When viewing 4 cameras on the Multi-Camera page, you may need 3 to the network congestion or the number of the configured cameras are not playing images on the Buffered Image page, if you view the images on the Multi-Camera page, all authentication windows of accesses, the refresh interval may slow...
... images (see page 47). • When viewing 4 cameras on the Multi-Camera page, you may need 3 to the network congestion or the number of the configured cameras are not playing images on the Buffered Image page, if you view the images on the Multi-Camera page, all authentication windows of accesses, the refresh interval may slow...

Network Camera
Page 24
...and execute [Disable Privacy Mode] (see page 70). 24 E.g. http://192.168.0.253:50000/mobile (or XXXXX.viewnetcam.com:50000/mobile) • When an authentication window is displayed, enter the administrator's or the general user's user name and password. • A still image is not required. Pressing 1, 3, 7 or 9...at the first access. Executing [Home Position] moves the lens to 320 x 240. If you execute [Privacy Mode] here, the camera switches to pan or tilt the camera in four directions: Left, Up, Down or Right. Enter "http://IP address (or URL):Port Number/mobile" on the keypad ...
...and execute [Disable Privacy Mode] (see page 70). 24 E.g. http://192.168.0.253:50000/mobile (or XXXXX.viewnetcam.com:50000/mobile) • When an authentication window is displayed, enter the administrator's or the general user's user name and password. • A still image is not required. Pressing 1, 3, 7 or 9...at the first access. Executing [Home Position] moves the lens to 320 x 240. If you execute [Privacy Mode] here, the camera switches to pan or tilt the camera in four directions: Left, Up, Down or Right. Enter "http://IP address (or URL):Port Number/mobile" on the keypad ...

Network Camera
Page 25
.../products/en/netwkcam/ for a mobile phone model list, and the compatibility level which has been verified with Panasonic Network Cameras. E.g.: The pan reaches the left end. Some phones may not support password authentication. Stopping E-mail Transfer by the Mobile Phone... for HTML. (or XXXXX.viewnetcam.com:50000/mobileh) 2. Execute [Privacy Mode] (see page 41), an authentication window is not displayed properly, try the following 2 URLs. 1. Operating Instructions Notes • If the image is displayed. See the Panasonic Network Camera support website at a decreased size.
.../products/en/netwkcam/ for a mobile phone model list, and the compatibility level which has been verified with Panasonic Network Cameras. E.g.: The pan reaches the left end. Some phones may not support password authentication. Stopping E-mail Transfer by the Mobile Phone... for HTML. (or XXXXX.viewnetcam.com:50000/mobileh) 2. Execute [Privacy Mode] (see page 41), an authentication window is not displayed properly, try the following 2 URLs. 1. Operating Instructions Notes • If the image is displayed. See the Panasonic Network Camera support website at a decreased size.
Network Camera
Page 32
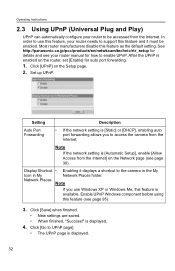
.... • New settings are saved. • When finished, "Success!" In order to use Windows XP or Windows Me, this feature and it displays a shortcut to the camera in the My Icon in My Network Places folder. After the UPnP is available. Setting Description Auto Port Forwarding • If the...your router needs to support this feature is enabled on the Network page (see your router manual for auto port forwarding. 1. Display Shortcut • Enabling it must be accessed from the Internet. See http://panasonic.co.jp/pcc/products/en/netwkcam/technic/rtr_setup for details and ...
.... • New settings are saved. • When finished, "Success!" In order to use Windows XP or Windows Me, this feature and it displays a shortcut to the camera in the My Icon in My Network Places folder. After the UPnP is available. Setting Description Auto Port Forwarding • If the...your router needs to support this feature is enabled on the Network page (see your router manual for auto port forwarding. 1. Display Shortcut • Enabling it must be accessed from the Internet. See http://panasonic.co.jp/pcc/products/en/netwkcam/technic/rtr_setup for details and ...

Network Camera
Page 41
The authentication window is displayed. Click [Administrator] on the Setup page. 2. Make a note of the user name and password so that you will not forget them. • The ...: 1-800-272-7033] 41 Set each parameter. • Clicking [Cancel] cancels your own responsibility. Pay attention to access the camera. Notes • If you access the camera for the first time, the window to change authentication, administrator user name and password. Operating Instructions 2.7 Changing Authentication Setting and Administrator User Name and Password The...
The authentication window is displayed. Click [Administrator] on the Setup page. 2. Make a note of the user name and password so that you will not forget them. • The ...: 1-800-272-7033] 41 Set each parameter. • Clicking [Cancel] cancels your own responsibility. Pay attention to access the camera. Notes • If you access the camera for the first time, the window to change authentication, administrator user name and password. Operating Instructions 2.7 Changing Authentication Setting and Administrator User Name and Password The...
Network Camera
Page 42
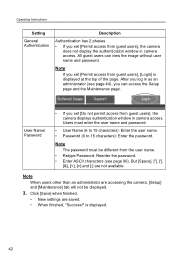
... not available. All guest users can access the Setup page and the Maintenance page. Note If you set [Permit access from guest users], the camera displays authentication window in camera access. User Name/ Password • If you can view the image without user name and password. is displayed at the top of the...
... not available. All guest users can access the Setup page and the Maintenance page. Note If you set [Permit access from guest users], the camera displays authentication window in camera access. User Name/ Password • If you can view the image without user name and password. is displayed at the top of the...

Network Camera
Page 43
...be set for each general user (see page 45). Operating Instructions 4. Notes • When the user name and password have been changed, the camera displays an authentication window. Items User Name and Password Number of Users Accessible Pages Access Level 1-3 Administrator Required 1 All Pages All Operations General Users Required Guest Users ...1-800-272-7033] 43 Enter the user name and password, and click [OK]. Note Guest users mean unregistered users. Administrator/General Users/Guest Users The camera has 3 user levels (administrator, general users and guest users).
...be set for each general user (see page 45). Operating Instructions 4. Notes • When the user name and password have been changed, the camera displays an authentication window. Items User Name and Password Number of Users Accessible Pages Access Level 1-3 Administrator Required 1 All Pages All Operations General Users Required Guest Users ...1-800-272-7033] 43 Enter the user name and password, and click [OK]. Note Guest users mean unregistered users. Administrator/General Users/Guest Users The camera has 3 user levels (administrator, general users and guest users).

Network Camera
Page 44
Enter the user name and password. 3. Operating Instructions 2.8 Logging in to the camera. 44 Check the login mode, and click [Login]. Click [Login] at the top of the page. 2. After you log in to the Camera If you can log in as an administrator, you set [Permit access from guest users] on the Security: Administrator page, [Login] is displayed. Note The authentication window is displayed at the top of the page. Enter the user name and password, and click [OK]. • You can access the Setup page and the Maintenance page. 1.
Enter the user name and password. 3. Operating Instructions 2.8 Logging in to the camera. 44 Check the login mode, and click [Login]. Click [Login] at the top of the page. 2. After you log in to the Camera If you can log in as an administrator, you set [Permit access from guest users] on the Security: Administrator page, [Login] is displayed. Note The authentication window is displayed at the top of the page. Enter the user name and password, and click [OK]. • You can access the Setup page and the Maintenance page. 1.

Network Camera
Page 89
... Dial-up Connections] [Local Area Connection] in use [Properties] Select Internet Protocol [TCP/IP] [Properties] [Use the following IP address] Windows XP [Start] ( [Settings]) [Control Panel] [Network and Internet Connections] [Network Connections] [Local Area Connection] in use [Properties] Select Internet Protocol [TCP/IP] [Properties] [Use the following procedures. 1. Class Class A Class B Class C Subnet...
... Dial-up Connections] [Local Area Connection] in use [Properties] Select Internet Protocol [TCP/IP] [Properties] [Use the following IP address] Windows XP [Start] ( [Settings]) [Control Panel] [Network and Internet Connections] [Network Connections] [Local Area Connection] in use [Properties] Select Internet Protocol [TCP/IP] [Properties] [Use the following procedures. 1. Class Class A Class B Class C Subnet...
Network Camera
Page 90
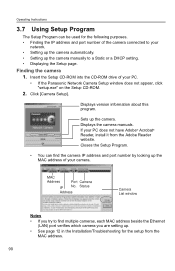
Insert the Setup CD-ROM into the CD-ROM drive of your PC. • If the Panasonic Network Camera Setup window does not appear, click "setup.exe" on the Setup CD-ROM. 2. Sets up . • See page 12 in the Installation/Troubleshooting for the following purposes. ...have Adobe® Acrobat® Reader, install it from the MAC address. 90 MAC Address Port Camera IP No. Click [Camera Setup]. If your network. • Setting up the camera automatically. • Setting up the MAC address of your camera. Closes the Setup Program. • You can be used for the setup from the Adobe...
Insert the Setup CD-ROM into the CD-ROM drive of your PC. • If the Panasonic Network Camera Setup window does not appear, click "setup.exe" on the Setup CD-ROM. 2. Sets up . • See page 12 in the Installation/Troubleshooting for the following purposes. ...have Adobe® Acrobat® Reader, install it from the MAC address. 90 MAC Address Port Camera IP No. Click [Camera Setup]. If your network. • Setting up the camera automatically. • Setting up the MAC address of your camera. Closes the Setup Program. • You can be used for the setup from the Adobe...
Network Camera
Page 91
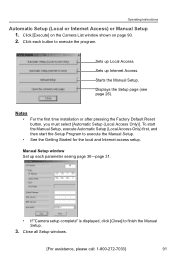
... pressing the Factory Default Reset button, you must select [Automatic Setup (Local Access Only)]. Manual Setup window Set up each button to execute the program. Click each parameter seeing page 30-page 31. • If "Camera setup complete" is displayed, click [Close] to execute the Manual Setup. • See the Getting Started...
... pressing the Factory Default Reset button, you must select [Automatic Setup (Local Access Only)]. Manual Setup window Set up each button to execute the program. Click each parameter seeing page 30-page 31. • If "Camera setup complete" is displayed, click [Close] to execute the Manual Setup. • See the Getting Started...

Network Camera
Page 95
...below . [Tools] [Internet Options] [General] tab [Settings] in the Temporary Internet files Check [Every visit to Display Camera Shortcut in My Network Places To display the camera shortcut in the Check for newer versions of stored pages [OK] [OK] Complete [For assistance, please call: 1-800-...272-7033] 95 Operating Instructions 3.8.2 Setting UPnP to the page] in the My Network Places folder, Windows component should be displayed....
...below . [Tools] [Internet Options] [General] tab [Settings] in the Temporary Internet files Check [Every visit to Display Camera Shortcut in My Network Places To display the camera shortcut in the Check for newer versions of stored pages [OK] [OK] Complete [For assistance, please call: 1-800-...272-7033] 95 Operating Instructions 3.8.2 Setting UPnP to the page] in the My Network Places folder, Windows component should be displayed....