

Brochure
Page 4
...combines the advantages of ATW/3200K/5600K and two manual settings (A/B). • iA Mode: The AG-AC90 detects the shooting conditions and automatically switches to a... extremely clear image rendering. Shooting Angles, Image Quality, Mobility, Operating Ease - Panasonic's unique Nano Surface Coating minimizes ghosts and flaring, and the high-speed F1.5...User button). Focus Assist and Push AF The Focus Assist (Focus in Red) button shows when your subject is equipped with the Focus Assist press of speedy, intuitive camera work. 5-Axis Hybrid Hand-Shake Correction The AG-AC90...
...combines the advantages of ATW/3200K/5600K and two manual settings (A/B). • iA Mode: The AG-AC90 detects the shooting conditions and automatically switches to a... extremely clear image rendering. Shooting Angles, Image Quality, Mobility, Operating Ease - Panasonic's unique Nano Surface Coating minimizes ghosts and flaring, and the high-speed F1.5...User button). Focus Assist and Push AF The Focus Assist (Focus in Red) button shows when your subject is equipped with the Focus Assist press of speedy, intuitive camera work. 5-Axis Hybrid Hand-Shake Correction The AG-AC90...
Brochure
Page 7
UHS-Ⅰcompatible memory cards can be used for products that display the SDXC logo mark either on the product itself, or in the User's Manual. to 1/2000 sec. (auto slow shutter ON) 1/50 sec. to 1/2000 sec. (auto slow shutter ON) 1/60 sec. Max. If you... Cards. AG-AC90 Specifications General Specification Supply Voltage: DC 12 V (when the AC adaptor is used) DC 7.2 V (when the battery is 6 hours regardless of the recording mode. Still Picture Recording Format: JPEG corresponding (Design rule for Camera File system, based on the product or in the User's Manual, or ...
UHS-Ⅰcompatible memory cards can be used for products that display the SDXC logo mark either on the product itself, or in the User's Manual. to 1/2000 sec. (auto slow shutter ON) 1/50 sec. to 1/2000 sec. (auto slow shutter ON) 1/60 sec. Max. If you... Cards. AG-AC90 Specifications General Specification Supply Voltage: DC 12 V (when the AC adaptor is used) DC 7.2 V (when the battery is 6 hours regardless of the recording mode. Still Picture Recording Format: JPEG corresponding (Design rule for Camera File system, based on the product or in the User's Manual, or ...
Operating Instructions Basic
Page 11
...pictures 30 Using the zoom 31 Intelligent Auto Mode/Manual Mode ..... 31 Manual Recording 32 Focus 32 White Balance 32 Iris adjustment 32 Manual shutter speed 33 USER button 33 Setting the USER button 33 Using the USER button 34 Functions of Adobe Systems Incorporated. Please download... it from the homepage of the USER button .......... 34 Playback Motion picture/Still picture ...
...pictures 30 Using the zoom 31 Intelligent Auto Mode/Manual Mode ..... 31 Manual Recording 32 Focus 32 White Balance 32 Iris adjustment 32 Manual shutter speed 33 USER button 33 Setting the USER button 33 Using the USER button 34 Functions of Adobe Systems Incorporated. Please download... it from the homepage of the USER button .......... 34 Playback Motion picture/Still picture ...

Operating Instructions Basic
Page 15
... lamp 22 Speaker 23 Lens (l 18) 24 Lens hood 25 INPUT 1, 2 (LINE/MIC) switches 26 INPUT 1, 2 (+48V) switches 27 User 1, 2, 3 buttons [USER1, USER2, USER3] (l 33) 28 Intelligent auto/Manual switch [iA/MANU] (l 31) 29 Quick start button [QUICK START] 30 Quick start lamp 31 Focus ring (l 32) 32 Zoom ring... (l 31) 33 Iris ring (l 32) 34 Focus assist button [FOCUS ASSIST] 35 Iris auto/Manual button [IRIS A/M] (l 32) 36 Focus auto/Manual/¶ button [FOCUS A/M/¶] (l 32) 34 35 41 36 42 37 43 38 44 39 40 37 Optical image stabilizer button [O.I.S.] ...
... lamp 22 Speaker 23 Lens (l 18) 24 Lens hood 25 INPUT 1, 2 (LINE/MIC) switches 26 INPUT 1, 2 (+48V) switches 27 User 1, 2, 3 buttons [USER1, USER2, USER3] (l 33) 28 Intelligent auto/Manual switch [iA/MANU] (l 31) 29 Quick start button [QUICK START] 30 Quick start lamp 31 Focus ring (l 32) 32 Zoom ring... (l 31) 33 Iris ring (l 32) 34 Focus assist button [FOCUS ASSIST] 35 Iris auto/Manual button [IRIS A/M] (l 32) 36 Focus auto/Manual/¶ button [FOCUS A/M/¶] (l 32) 34 35 41 36 42 37 43 38 44 39 40 37 Optical image stabilizer button [O.I.S.] ...

Operating Instructions Basic
Page 33
... from the 12 available functions. ≥ There are three USER buttons (USER1 to USER3) on the main body and four USER button icons (USER4 to complete the setting. 33 VQT4M90 Setting the USER button 1 Select the menu. Manual shutter speed Adjust the shutter speed when recording fast-moving subjects.... ≥ Switch to Manual Mode. (l 31) 1 Touch the LCD monitor ...
... from the 12 available functions. ≥ There are three USER buttons (USER1 to USER3) on the main body and four USER button icons (USER4 to complete the setting. 33 VQT4M90 Setting the USER button 1 Select the menu. Manual shutter speed Adjust the shutter speed when recording fast-moving subjects.... ≥ Switch to Manual Mode. (l 31) 1 Touch the LCD monitor ...
Operating Instructions Advanced
Page 3
...42 Manual shutter speed 44 Audio Input 45 Microphone setup 45 Switching Audio Input 46 Adjusting the audio input level 49 Counter display 51 Setting the Time Code 52 Setting the User Information 53 Setting the Recording Counter 54 USER button 55 Setting the USER button 55 Using the USER button... 56 Functions of the USER button 57 Useful functions 61 Quick Start 61 Zebra 62 Color Bar ...
...42 Manual shutter speed 44 Audio Input 45 Microphone setup 45 Switching Audio Input 46 Adjusting the audio input level 49 Counter display 51 Setting the Time Code 52 Setting the User Information 53 Setting the Recording Counter 54 USER button 55 Setting the USER button 55 Using the USER button... 56 Functions of the USER button 57 Useful functions 61 Quick Start 61 Zebra 62 Color Bar ...

Operating Instructions Advanced
Page 6
...23 Lens (l 10) 24 Lens hood 25 INPUT 1, 2 (LINE/MIC) switches (l 47) 26 INPUT 1, 2 (+48V) switches (l 47) 27 User 1, 2, 3 buttons [USER1, USER2, USER3] (l 55) 28 Intelligent auto/Manual switch [iA/MANU] (l 33) 29 Quick start button [QUICK START] (l 61) 30 Quick start lamp (l 61) 31 Focus ring (l 38)... 32 Zoom ring (l 35) 33 Iris ring (l 42) 34 Focus assist button [FOCUS ASSIST] (l 39) 35 Iris auto/Manual button [IRIS A/M] (l 42) 38 44 39 40 36 Focus auto/Manual/¶ button [FOCUS A/M/¶] (l 38) 37 Optical image stabilizer button [O.I.S.] (l 37) 38 White balance button [W.B.] (l 40) ...
...23 Lens (l 10) 24 Lens hood 25 INPUT 1, 2 (LINE/MIC) switches (l 47) 26 INPUT 1, 2 (+48V) switches (l 47) 27 User 1, 2, 3 buttons [USER1, USER2, USER3] (l 55) 28 Intelligent auto/Manual switch [iA/MANU] (l 33) 29 Quick start button [QUICK START] (l 61) 30 Quick start lamp (l 61) 31 Focus ring (l 38)... 32 Zoom ring (l 35) 33 Iris ring (l 42) 34 Focus assist button [FOCUS ASSIST] (l 39) 35 Iris auto/Manual button [IRIS A/M] (l 42) 38 44 39 40 36 Focus auto/Manual/¶ button [FOCUS A/M/¶] (l 38) 37 Optical image stabilizer button [O.I.S.] (l 37) 38 White balance button [W.B.] (l 40) ...
Operating Instructions Advanced
Page 39
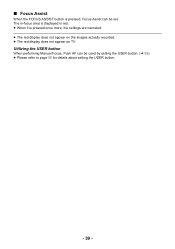
Utilizing the USER button When performing Manual Focus, Push AF can be used by setting the USER button. (l 55) ≥ Please refer to page 55 for details about setting the USER button. - 39 - The in-focus area is displayed in red. ≥ When it is pressed, Focus Assist can be set. ∫ Focus Assist When the FOCUS ASSIST button is pressed once more, the settings are canceled. ≥ The red display does not appear on the images actually recorded. ≥ The red display does not appear on TV.
Utilizing the USER button When performing Manual Focus, Push AF can be used by setting the USER button. (l 55) ≥ Please refer to page 55 for details about setting the USER button. - 39 - The in-focus area is displayed in red. ≥ When it is pressed, Focus Assist can be set. ∫ Focus Assist When the FOCUS ASSIST button is pressed once more, the settings are canceled. ≥ The red display does not appear on the images actually recorded. ≥ The red display does not appear on TV.

Operating Instructions Advanced
Page 40
Switch the modes of White Balance by switching the iA/ MANU switch. ≥ ATW and ATW Lock can adjust the White Balance manually. If so, you can also be set to the USER button. (l 55) - 40 - A W.B. button W.B. Mode ATW ATW Lock P3.2k* P5.6k* Ach* Bch* Settings It will ...lock the setting for outdoors Setting in accordance to the recording scenes can be set. (l 41) * Only displayed when Manual Mode is in accordance with ...
Switch the modes of White Balance by switching the iA/ MANU switch. ≥ ATW and ATW Lock can adjust the White Balance manually. If so, you can also be set to the USER button. (l 55) - 40 - A W.B. button W.B. Mode ATW ATW Lock P3.2k* P5.6k* Ach* Bch* Settings It will ...lock the setting for outdoors Setting in accordance to the recording scenes can be set. (l 41) * Only displayed when Manual Mode is in accordance with ...

Operating Instructions Advanced
Page 43
...to complete the setting. Switches to automatic iris control for details about setting the USER button. Utilizing the USER button It is convenient to use following functions of the USER button when it is set to Manual Iris. ≥ Please refer to prevent getting dark when a backlight is ...MENU : [CAMERA SETUP] # [AUTO IRIS LEVEL] 2 Touch / to adjust settings. 3 Touch [EXIT] to compensate the backlight. This will allow to Manual Mode. (l 33) 1 Select the menu. ∫ Adjusting brightness during the Auto Iris Mode ≥ Switch to clearly record an extremely bright subject. - 43 -...
...to complete the setting. Switches to automatic iris control for details about setting the USER button. Utilizing the USER button It is convenient to use following functions of the USER button when it is set to Manual Iris. ≥ Please refer to prevent getting dark when a backlight is ...MENU : [CAMERA SETUP] # [AUTO IRIS LEVEL] 2 Touch / to adjust settings. 3 Touch [EXIT] to compensate the backlight. This will allow to Manual Mode. (l 33) 1 Select the menu. ∫ Adjusting brightness during the Auto Iris Mode ≥ Switch to clearly record an extremely bright subject. - 43 -...

Operating Instructions Advanced
Page 57
...8805; The focus position set to compensate the backlight. Backlight Compensation Switches to automatic iris control to Manual Focus. (l 38) Press and hold the USER button, or touch and hold the USER button icon in the recording screen. ≥ It will be maintained when canceled. This makes the... image brighter to prevent darkening of USER button function Icon [P.AF] [B.Light] [S.Light] [B.FD] [W.FD] [ATW] [ATW.L] [D.ZM] [HIST] [REC.C] [LstDel] [MENU] Item [PUSH AF] [BACKLIGHT] [SPOTLIGHT] [BLACK ...
...8805; The focus position set to compensate the backlight. Backlight Compensation Switches to automatic iris control to Manual Focus. (l 38) Press and hold the USER button, or touch and hold the USER button icon in the recording screen. ≥ It will be maintained when canceled. This makes the... image brighter to prevent darkening of USER button function Icon [P.AF] [B.Light] [S.Light] [B.FD] [W.FD] [ATW] [ATW.L] [D.ZM] [HIST] [REC.C] [LstDel] [MENU] Item [PUSH AF] [BACKLIGHT] [SPOTLIGHT] [BLACK ...
Operating Instructions Advanced
Page 95
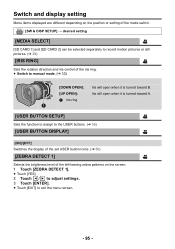
...] Sets the rotation direction and iris control of the iris ring. ≥ Switch to manual mode. (l 33) A B [DOWN OPEN]: [UP OPEN]: 1 Iris ring Iris will open when it is turned toward A. [USER BUTTON SETUP] Sets the function to assign to exit the menu screen. - 95 -...screen. 1 Touch [ZEBRA DETECT 1]. ≥ Touch [YES]. 2 Touch / to adjust settings. 3 Touch [ENTER]. ≥ Touch [EXIT] to the USER buttons. (l 55) [USER BUTTON DISPLAY] [ON]/[OFF] Switches the display of the set USER button icons. (l 56) [ZEBRA DETECT 1] Selects the brightness level of the mode switch.
...] Sets the rotation direction and iris control of the iris ring. ≥ Switch to manual mode. (l 33) A B [DOWN OPEN]: [UP OPEN]: 1 Iris ring Iris will open when it is turned toward A. [USER BUTTON SETUP] Sets the function to assign to exit the menu screen. - 95 -...screen. 1 Touch [ZEBRA DETECT 1]. ≥ Touch [YES]. 2 Touch / to adjust settings. 3 Touch [ENTER]. ≥ Touch [EXIT] to the USER buttons. (l 55) [USER BUTTON DISPLAY] [ON]/[OFF] Switches the display of the set USER button icons. (l 56) [ZEBRA DETECT 1] Selects the brightness level of the mode switch.


