Panasonic AG-HPX600PJ Support and Manuals
Get Help and Manuals for this Panasonic item
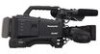
View All Support Options Below
Free Panasonic AG-HPX600PJ manuals!
Problems with Panasonic AG-HPX600PJ?
Ask a Question
Free Panasonic AG-HPX600PJ manuals!
Problems with Panasonic AG-HPX600PJ?
Ask a Question
Popular Panasonic AG-HPX600PJ Manual Pages
AG-HPX600 Wireless Quick Setup Guide - Page 7
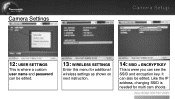
It can see the SSID and encryption key. Camera Settings
Camera Setup
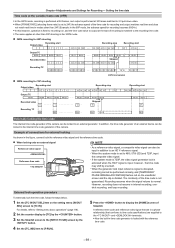
12: USER SETTINGS
This is were you can also be edited. Like the IP address, changing SSID is needed for additional wireless settings as shown on next instruction.
14: SSID + ENCRYPTKEY
This is where a custom user name and password can be edited.
13: WIRELESS SETTINGS
Enter this menu for multi cam shoots.
Brochure - Page 5

...AG-HPX600 records proxy files onto SD/SDHC memory cards or onto P2 cards.* It supports high-quality video (Quick Time/H.264) and audio formats at a low bit rate.
This allows the use of undercranking and overcranking to review... AJ-SFU601G Upgrade Software
Key and AJ-WM30 Wireless Module)
These options enable use proxy video. *2: For the latest information, see "Service and Support" on a...
Operating Instructions - Page 13

... in peripheral images. rr 14-bit digital circuit The camera has in-built high performance DSP (digital signal processor) for greater breadth in the instruction manual of 1/7200 seconds*. rr Slow/synchro/high-speed shutter The shutter speed can select from the setting menu [SYSTEM SETUP] screen. rr Shooting assist function ff buttons (//):
Frequently used...
Operating Instructions - Page 17
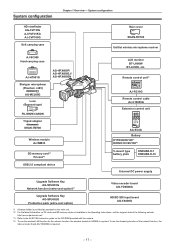
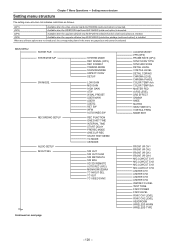
System configuration
Chapter 1 Overview - System configuration
+'YLHZILQGHU $*&9)* $-+9).* $-&9)*
6RIWFDUU\LQJFDVH
5DLQFRYHU 6+$15& 8QL6ORWZLUHOHVVPLFURSKRQHUHFHLYHU
$-6&
+DUGFDUU\LQJFDVH
$-+7
*
6KRWJXQPLFURSKRQH
3KDQWRP9
$*0&*
/HQV
%D\RQHWW\SH
$*+3;3 $*+3;(- $*+3;(1
)8-,121&$121 7ULSRGDGDSWRU 6+$170
:LUHOHVVPRGXOH $-:0
6'...
Operating Instructions - Page 38
...Set the [VFR] item on the setting menu [SCENE FILE] screen to match your specific shooting requirement.
3 Press the button. Also, the time code can be set the [FRAME RATE] item to [ON], and set , audio can be played back. ffIt can be set on the [CAM03:SETUP...Recording is set the [FRAME RATE] item to the P2 card. ...Audio cannot be achieved by installing the production pack (extra-cost...
Operating Instructions - Page 69
..., the video signal generator lock is activated when the HD-Y signal is not guaranteed. tt When the generator lock input reference signal is set to normal.
However, recording does not resume in a phase relationship (that conforms to time code specifications) are supplied to the recording time code. ffWhen [FRAME RATE] (shooting frame rate) is disrupted...
Operating Instructions - Page 93
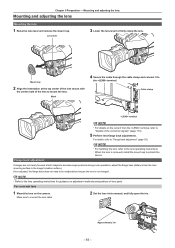
...manual, and fully open the iris.
Make sure to connect the lens cable.
2 Set the lens iris to firmly clamp the lens. Mark
4 Secure the cable through the cable clamp and connect it to the lens operating instructions... as long as the lens is removed, install the mount cap to protect the
device. ...the camera. tt When the lens is not changed.
@@NOTE
tt Refer to the lens operating instructions for...
Operating Instructions - Page 120
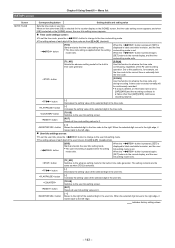
... setting menu structure list indicates restrictions as follows.
(OP1)
Available when the video encoder board AG‑YDX600G (extra-cost option) is mounted.
(OP2)
Available when the HD/SD SDI input board AG‑YA600G (extra-cost option) is mounted.
(OP3)
Available when the upgrade software key AG‑SFU601G (network function (extra-cost option)) is installed...
Operating Instructions - Page 143
... time or externally lock the time code. ffThe user bits setting is set the user bits, press the button to change to 0. button
[+] Increases the setting value of the P2 card recording operation. When the button is pressed again, [SET] returns to the user bits setting screen. button
[+] Increases the setting value of the time code are the same as when [TCG...
Operating Instructions - Page 146
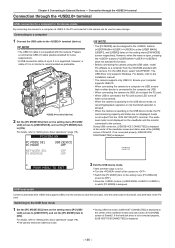
... of the camera to the installation manual. Connecting to a computer
1 Connect the USB cable to [OFF].
For the USB driver, select "AG‑HPX600".
tt Before connecting the camera using the USB cable, install P2 software to the P2 card. tt When connecting the camera to a computer via USB 2.0, the P2 card inserted in the device mode
By connecting the camera to "Setting menu...
Operating Instructions - Page 154
... orange access LED for the P2 card slot of the P2 card inserted first (the one .
9 9 min B 9 0 %
1 -CL I P
USER - 1
CAC DZ x 2
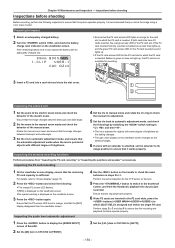
ffEnsure that P2 card is not available for objects with different degree of brightness.
4 Set the iris to manual mode and rotate the iris ring to check the manual iris adjustment.
5 Set the iris back to automatic...
Operating Instructions - Page 172
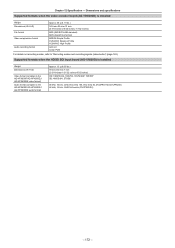
...‑Intra 100, AVC‑Intra 50, DVCPRO HD, DVCPRO50) 48 kHz, 16 bits, CH2/CH4 switch (DVCPRO/DV)
- 172 - Dimensions and specifications Supported formats when the video encoder board (AG‑YDX600G) is installed
Weight Dimensions (W×H×D)
Video format (complies to the AG‑HPX600P/AG‑HPX600EJ/ AG‑HPX600EN video format) Audio format (complies to...
Studio System 300 Installation Guide - Page 6
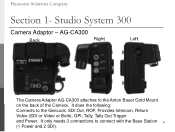
... Video or Both), GPI, Tally, Tally Out Trigger and Power. It does the following: Connects to connect with the Base Station 6 (1 Power and 2 SDI). Panasonic Solutions Company
Section 1- Studio System 300
Camera Adaptor - AG-CA300
Back
Right
Left
The Camera Adaptor AG-CA300 attaches to the Anton Bauer Gold Mount on the back of the...
Studio System 300 Installation Guide - Page 15
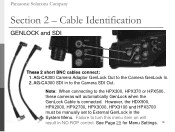
Panasonic Solutions Company
Section 2 - AG-CA300 SDI in the System Menu. Failure to the HPX300, HPX370 or HPX500, these cameras will result in NO ROP control. Cable .... See Page 29 for Menu Settings. 15 AG-CA300 Camera Adaptor GenLock Out to the Camera SDI Out. However, the HDX900, HPX2000, HPX2700, HPX3000, HPX3100 and HPX3700 must be manually set to External GenLock in to the...
Studio System 300 Installation Guide - Page 27
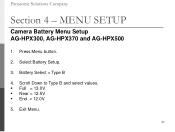
MENU SETUP
Camera Battery Menu Setup AG-HPX300, AG-HPX370 and AG-HPX500
1. Select Battery Setup.
3. Battery Select = Type B
4. Panasonic Solutions Company
Section 4 - Exit Menu.
27 Scroll Down to Type B and select values. Full = 13.0V Near = 12.5V End = 12.0V
5. Press Menu button.
2.
Panasonic AG-HPX600PJ Reviews
We have not received any reviews for Panasonic yet.