Owner Manual
Page 4
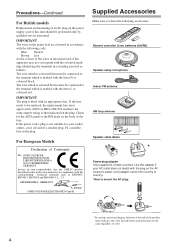
...Right Zone 2 Right Zone 2 Right Supplied Accessories Make sure you have the same ampere rating as that the ONKYO product described in this instruction manual is fitted with the following accessories: Remote controller & two batteries (AA/R6) Speaker setup microphone Indoor FM antenna AM loop antenna 1 2 3 ..., GERMANY declare in compliance with the coloured markings identifying the terminals in your AC outlet does not match with the plug on the AV receiver's power cord (adapter varies from country to country). *How to mount the AC plug: * In catalogs and on the power supply...
...Right Zone 2 Right Zone 2 Right Supplied Accessories Make sure you have the same ampere rating as that the ONKYO product described in this instruction manual is fitted with the following accessories: Remote controller & two batteries (AA/R6) Speaker setup microphone Indoor FM antenna AM loop antenna 1 2 3 ..., GERMANY declare in compliance with the coloured markings identifying the terminals in your AC outlet does not match with the plug on the AV receiver's power cord (adapter varies from country to country). *How to mount the AC plug: * In catalogs and on the power supply...

Owner Manual
Page 5
...2006 XM Satellite Radio Inc. patents and other trademarks are trademarks of Onkyo Corporation. sion • Composite video to S-Video and S-Video to ...remote controller for home and other countries. All rights reserved. U.S. Apple and iPod are trademarks or registered trademarks of Niles Audio Corporation. "CinemaFILTER" is intended for use with other AV components TX-SR674/674E and TX-SR8467 Only • 95 watts per channel...er • 7-channel amplifier • Optimum Gain Volume Circuitry • Zone 2 capability • 24-bit/192 kHz D/A converters • WRAT ...
...2006 XM Satellite Radio Inc. patents and other trademarks are trademarks of Onkyo Corporation. sion • Composite video to S-Video and S-Video to ...remote controller for home and other countries. All rights reserved. U.S. Apple and iPod are trademarks or registered trademarks of Niles Audio Corporation. "CinemaFILTER" is intended for use with other AV components TX-SR674/674E and TX-SR8467 Only • 95 watts per channel...er • 7-channel amplifier • Optimum Gain Volume Circuitry • Zone 2 capability • 24-bit/192 kHz D/A converters • WRAT ...
Owner Manual
Page 6
...Front & Rear Panels 7 Remote Controller 12 About Home Theater 17 Connecting the AV Receiver About AV Connections 18 Connecting Your Speakers 19 Connecting Antenna 21 Connecting Your TV or Projector 24 Connecting AV Components 25 Connecting Audio Components 33 Connecting Onkyo Components .........36 Connecting the Power...Displaying Source Information 50 Setting the Display Brightness 51 Muting the AV Receiver 51 Using the Sleep Timer 51 Using Headphones 51 Using the Tuner 52 Presetting AM/FM Stations & XM Channels....53 Using RDS (European models only 54 6 Listening to XM ...
...Front & Rear Panels 7 Remote Controller 12 About Home Theater 17 Connecting the AV Receiver About AV Connections 18 Connecting Your Speakers 19 Connecting Antenna 21 Connecting Your TV or Projector 24 Connecting AV Components 25 Connecting Audio Components 33 Connecting Onkyo Components .........36 Connecting the Power...Displaying Source Information 50 Setting the Display Brightness 51 Muting the AV Receiver 51 Using the Sleep Timer 51 Using Headphones 51 Using the Tuner 52 Presetting AM/FM Stations & XM Channels....53 Using RDS (European models only 54 6 Listening to XM ...
Owner Manual
Page 7
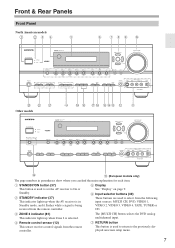
... DVD analog multichannel input. B STANDBY indicator (37) This indicator lights up when Zone 2 is being received from the remote controller. F Input selector buttons (49) These buttons are used to select from the remote controller. D Remote control sensor (12) This sensor receives control signals from the following input sources: MULTI CH, DVD, VIDEO 1, VIDEO 2, VIDEO 3, VIDEO...
... DVD analog multichannel input. B STANDBY indicator (37) This indicator lights up when Zone 2 is being received from the remote controller. F Input selector buttons (49) These buttons are used to select from the remote controller. D Remote control sensor (12) This sensor receives control signals from the following input sources: MULTI CH, DVD, VIDEO 1, VIDEO 2, VIDEO 3, VIDEO...
Owner Manual
Page 10
...This switched AC outlet can be used to other components with a coaxial digital audio output. The type of sight between the AV receiver and the remote controller is for connecting an FM antenna. E AM ANTENNA (21) These push terminals are for connecting an XM antenna, sold ...Multimedia Interface) connections carry digital audio and digital video. N PRE OUT SUBWOOFER (19) The SUBWOOFER jack is obstructed, a commercially available IR receiver can be connected here. G MONITOR OUT The S-Video or composite video jack should be used to a video input on your front, center,...
...This switched AC outlet can be used to other components with a coaxial digital audio output. The type of sight between the AV receiver and the remote controller is for connecting an FM antenna. E AM ANTENNA (21) These push terminals are for connecting an XM antenna, sold ...Multimedia Interface) connections carry digital audio and digital video. N PRE OUT SUBWOOFER (19) The SUBWOOFER jack is obstructed, a commercially available IR receiver can be connected here. G MONITOR OUT The S-Video or composite video jack should be used to a video input on your front, center,...
Owner Manual
Page 11
... digitally. Q VIDEO 1 IN/OUT Here you must make an analog audio connection (RCA) between the AV receiver and the other AV component, even if they are for connecting a recorder with component video outputs, such as...player. U CD IN This analog audio input is for connection information. 11 The AV receiver's remote controller can then be connected to a line input on another Onkyo AV component. You can connect a video source (VCR, set-top box, etc.). Input..., etc.). P DVD IN Here you can connect a DVD player's 2-channel analog audio output or 7.1-channel analog audio output.
... digitally. Q VIDEO 1 IN/OUT Here you must make an analog audio connection (RCA) between the AV receiver and the other AV component, even if they are for connecting a recorder with component video outputs, such as...player. U CD IN This analog audio input is for connection information. 11 The AV receiver's remote controller can then be connected to a line input on another Onkyo AV component. You can connect a video source (VCR, set-top box, etc.). Input..., etc.). P DVD IN Here you can connect a DVD player's 2-channel analog audio output or 7.1-channel analog audio output.
Owner Manual
Page 12
... batteries should be pressed inadvertently, thereby draining the batteries. • The remote controller may not work if there's an obstacle between it and the AV receiver's remote control sensor. 12 Notes: • If the remote controller doesn't work reliably. • Don't put anything, such as ... accordance with the polarity diagram inside the battery compartment. 3 Put the cover onto the remote controller and slide it at the AV receiver's remote control sensor, as a book, on the remote controller, because the buttons may not work reliably, try replacing the batteries. • ...
... batteries should be pressed inadvertently, thereby draining the batteries. • The remote controller may not work if there's an obstacle between it and the AV receiver's remote control sensor. 12 Notes: • If the remote controller doesn't work reliably. • Don't put anything, such as ... accordance with the polarity diagram inside the battery compartment. 3 Put the cover onto the remote controller and slide it at the AV receiver's remote control sensor, as a book, on the remote controller, because the buttons may not work reliably, try replacing the batteries. • ...

Owner Manual
Page 13
... HDD player or recorder. I TV, VCR and SAT/CABLE Modes With these modes, you can control RECEIVER the AV receiver and an Onkyo cassette TAPE recorder connected via . 1 2 3 4 1 5 2 36 7 4 8 9 J ON/STANDBY ZONE2 REMOTE MODE RECEIVER TAPE INPUT SELECTOR 1 2 3 V1 V2 V3 DVD M D/CDR CD HDD 4 5 6 TV ..., and satellite or cable receiver. Remote Controller-Continued Using the Remote Controller The remote controller can be used to control the compo- DVD M D/CDR C D HDD I DVD and CD/MD/CDR/HDD Modes With these modes, you can control Onkyo components or components made by...
... HDD player or recorder. I TV, VCR and SAT/CABLE Modes With these modes, you can control RECEIVER the AV receiver and an Onkyo cassette TAPE recorder connected via . 1 2 3 4 1 5 2 36 7 4 8 9 J ON/STANDBY ZONE2 REMOTE MODE RECEIVER TAPE INPUT SELECTOR 1 2 3 V1 V2 V3 DVD M D/CDR CD HDD 4 5 6 TV ..., and satellite or cable receiver. Remote Controller-Continued Using the Remote Controller The remote controller can be used to control the compo- DVD M D/CDR C D HDD I DVD and CD/MD/CDR/HDD Modes With these modes, you can control Onkyo components or components made by...
Owner Manual
Page 14
... setup menus. STEREO button Selects the Stereo listening mode. J DISPLAY button (50) Displays various information about the selected input source. K REMOTE MODE buttons (13) Used to On or Standby. L SLEEP button (51) Used with the CinemaFILTER function. B ON/STANDBY button (37) Sets the AV...North American models only For XM, the Up and Down [ ]/[ ] buttons are used to select channels, and the [ENTER] button is selected To select the Tuner (AM/FM/XM) as the input source, press: RECEIVER 7 TAPE 4 Playback buttons On twin cassette decks, only deck B can be controlled. P CINE...
... setup menus. STEREO button Selects the Stereo listening mode. J DISPLAY button (50) Displays various information about the selected input source. K REMOTE MODE buttons (13) Used to On or Standby. L SLEEP button (51) Used with the CinemaFILTER function. B ON/STANDBY button (37) Sets the AV...North American models only For XM, the Up and Down [ ]/[ ] buttons are used to select channels, and the [ENTER] button is selected To select the Tuner (AM/FM/XM) as the input source, press: RECEIVER 7 TAPE 4 Playback buttons On twin cassette decks, only deck B can be controlled. P CINE...
Owner Manual
Page 15
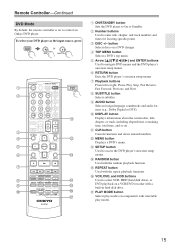
To select your DVD player as the input source, press: RECEIVER 6 DVD or 5 MULTI CH 1 2 3 4 5 6 7 8 9 J ON/STANDBY ZONE2 REMOTE MODE RECEIVER TAPE INPUT SELECTOR 1 2 3 V1 V2 V3 DVD M D/CDR C D HDD 4 5 6 TV V4 MULTI CH DVD 7 8 9 VCR TAPE TUNER 10 11 +10 0 C D.../STANDBY button Sets the DVD player to right: Pause, Play, Stop, Fast Reverse, Fast Forward, Previous, and Next. B Number buttons Used to control an Onkyo DVD player. button Selects discs on . N RANDOM button Used with the repeat playback functions. O REPEAT button Used with the random playback function...
To select your DVD player as the input source, press: RECEIVER 6 DVD or 5 MULTI CH 1 2 3 4 5 6 7 8 9 J ON/STANDBY ZONE2 REMOTE MODE RECEIVER TAPE INPUT SELECTOR 1 2 3 V1 V2 V3 DVD M D/CDR C D HDD 4 5 6 TV V4 MULTI CH DVD 7 8 9 VCR TAPE TUNER 10 11 +10 0 C D.../STANDBY button Sets the DVD player to right: Pause, Play, Stop, Fast Reverse, Fast Forward, Previous, and Next. B Number buttons Used to control an Onkyo DVD player. button Selects discs on . N RANDOM button Used with the repeat playback functions. O REPEAT button Used with the random playback function...

Owner Manual
Page 16
...component TAPE V3 * If you're using an MD, CDR, or HDD component, you must change the input display (see page 47). 1 2 3 4 E F ON/STANDBY ZONE2 REMOTE MODE RECEIVER TAPE INPUT SELECTOR 1 2 3 V1 V2 V3 DVD M D/CDR C D HDD 4 5 6 TV V4 MULTI CH DVD 7 8 9 VCR TAPE TUNER 10 11 +10 0 ...J RANDOM button Used with selectable play modes on components with the random/shuffle playback function. E Playback buttons From left to control an Onkyo CD player. L PLAY MODE button Used to navigate menus on CD/MD players. H MENU button Used to select play modes. 16 B ...
...component TAPE V3 * If you're using an MD, CDR, or HDD component, you must change the input display (see page 47). 1 2 3 4 E F ON/STANDBY ZONE2 REMOTE MODE RECEIVER TAPE INPUT SELECTOR 1 2 3 V1 V2 V3 DVD M D/CDR C D HDD 4 5 6 TV V4 MULTI CH DVD 7 8 9 VCR TAPE TUNER 10 11 +10 0 ...J RANDOM button Used with selectable play modes on components with the random/shuffle playback function. E Playback buttons From left to control an Onkyo CD player. L PLAY MODE button Used to navigate menus on CD/MD players. H MENU button Used to select play modes. 16 B ...
Owner Manual
Page 34
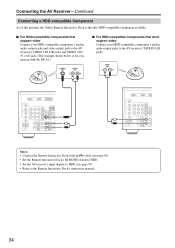
... As of this printing, the Onkyo Remote Interactive Dock is for connection with an cable (see page 36). • Set the Remote Interactive Dock's RI MODE switch to HDD. • Set the AV receiver's input display to HDD (see page 47). • Refer to the AV receiver's TAPE IN L/R jacks. AUDIO... OUT L R Notes: • Connect the Remote Interactive Dock with the DS-A1.) S ...
... As of this printing, the Onkyo Remote Interactive Dock is for connection with an cable (see page 36). • Set the Remote Interactive Dock's RI MODE switch to HDD. • Set the AV receiver's input display to HDD (see page 47). • Refer to the AV receiver's TAPE IN L/R jacks. AUDIO... OUT L R Notes: • Connect the Remote Interactive Dock with the DS-A1.) S ...
Owner Manual
Page 36
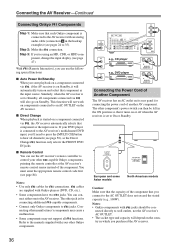
...component connected via , if the AV receiver is on Standby, it turns on or off when the AV receiver is set to control your other -capable Onkyo components, pointing the remote controller at the AV receiver's remote control sensor instead of the component. ...Onkyo Components Step 1: Make sure that each Onkyo component is connected to the AV receiver with an analog audio cable (connection a in the hookup examples) (see pages 24 to an AC OUTLET on the AV receiver. The other manufacturer's components may cause a malfunction. • Some components may not support all channels...
...component connected via , if the AV receiver is on Standby, it turns on or off when the AV receiver is set to control your other -capable Onkyo components, pointing the remote controller at the AV receiver's remote control sensor instead of the component. ...Onkyo Components Step 1: Make sure that each Onkyo component is connected to the AV receiver with an analog audio cable (connection a in the hookup examples) (see pages 24 to an AC OUTLET on the AV receiver. The other manufacturer's components may cause a malfunction. • Some components may not support all channels...
Owner Manual
Page 37
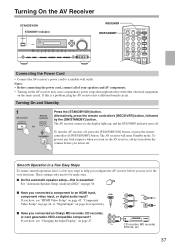
...Setup" on page 45, "Component Video Setup" on page 46, or "Digital Input" on page 47. Turning On and Standby 1 AV receiver Remote controller STANDBY/ON RECEIVER or ON/STANDBY Press the [STANDBY/ON] button. I Do the automatic speaker setup-this is essential! If you have , see "Changing the... need to a suitable wall outlet. I Have you turn down the volume before you connected an Onkyo MD recorder, CD recorder, OUT IN or next generation HDD-compatible component? To turn the AV receiver off . TAPE CD recorder, MD recorder, RI Dock, etc. 37 Notes: • Before ...
...Setup" on page 45, "Component Video Setup" on page 46, or "Digital Input" on page 47. Turning On and Standby 1 AV receiver Remote controller STANDBY/ON RECEIVER or ON/STANDBY Press the [STANDBY/ON] button. I Do the automatic speaker setup-this is essential! If you have , see "Changing the... need to a suitable wall outlet. I Have you turn down the volume before you connected an Onkyo MD recorder, CD recorder, OUT IN or next generation HDD-compatible component? To turn the AV receiver off . TAPE CD recorder, MD recorder, RI Dock, etc. 37 Notes: • Before ...
Owner Manual
Page 38
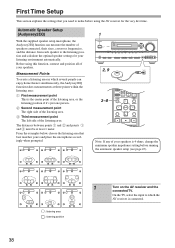
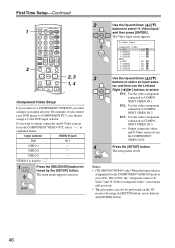
... ohms, change the minimum speaker impVeCRdanDVcDe seHDtDting before using this function, connect and position all of the listening area. TV TV TV 1 2, 9 3-8 ON/STANDBY ZONE2 REMOTE MODE RECEIVER TAPE INPUT SELECTOR 1 2 3 V1 V2 V3 DVD M D/CDR C D HDD 4 5 6 TV V4 MULTI CH DVD 7 8 9 VCR TAPE TUNER 10 11... listening area: A First measurement point This is connected. 38 Measurement Points To create a listening area in which the AV receiver is the center point of the listening area. RC-651M TV TV TV TV TV TV : listening area : listening position 1 Turn...
... ohms, change the minimum speaker impVeCRdanDVcDe seHDtDting before using this function, connect and position all of the listening area. TV TV TV 1 2, 9 3-8 ON/STANDBY ZONE2 REMOTE MODE RECEIVER TAPE INPUT SELECTOR 1 2 3 V1 V2 V3 DVD M D/CDR C D HDD 4 5 6 TV V4 MULTI CH DVD 7 8 9 VCR TAPE TUNER 10 11... listening area: A First measurement point This is connected. 38 Measurement Points To create a listening area in which the AV receiver is the center point of the listening area. RC-651M TV TV TV TV TV TV : listening area : listening position 1 Turn...
Owner Manual
Page 43
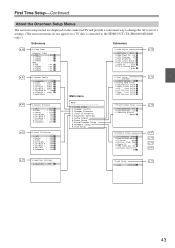
... TV and provide a convenient way to change the AV receiver's settings. (The onscreen menus do not appear on a TV that's connected to the HDMI OUT (TX-SR604/604E/8460 only).) Submenus Submenus p. 45 0.Video Input Component Video a.DVD : IN1 b.VIDEO1 : --- d.VIDEO3 : --- Step: 9kHz e.Remote ID :1 f.HDMI Audio Out :On g.SW Input Sensitivity : 0dB...
... TV and provide a convenient way to change the AV receiver's settings. (The onscreen menus do not appear on a TV that's connected to the HDMI OUT (TX-SR604/604E/8460 only).) Submenus Submenus p. 45 0.Video Input Component Video a.DVD : IN1 b.VIDEO1 : --- d.VIDEO3 : --- Step: 9kHz e.Remote ID :1 f.HDMI Audio Out :On g.SW Input Sensitivity : 0dB...
Owner Manual
Page 46
... to COMPONENT VIDEO IN 1. VIDEO 2 --- VIDEO 3 --- Notes: • (TX-SR674/674E/8467 only) When the input selector assignment for the COMPONENT VIDEO IN jacks is fixed to "---." 1 RECEIVER Press the [RECEIVER] button followed by using its [SETUP] button, arrow buttons, and [ENTER] button... the [SETUP] button. If you must assign it to an input selector. The setup menu closes. First Time Setup-Continued 1 2 ON/STANDBY ZONE2 REMOTE MODE RECEIVER TAPE INPUT SELECTOR 1 2 3 V1 V2 V3 DVD M D/CDR C D HDD 4 5 6 TV V4 MULTI CH DVD 7 8 9 VCR TAPE TUNER 10 11...
... to COMPONENT VIDEO IN 1. VIDEO 2 --- VIDEO 3 --- Notes: • (TX-SR674/674E/8467 only) When the input selector assignment for the COMPONENT VIDEO IN jacks is fixed to "---." 1 RECEIVER Press the [RECEIVER] button followed by using its [SETUP] button, arrow buttons, and [ENTER] button... the [SETUP] button. If you must assign it to an input selector. The setup menu closes. First Time Setup-Continued 1 2 ON/STANDBY ZONE2 REMOTE MODE RECEIVER TAPE INPUT SELECTOR 1 2 3 V1 V2 V3 DVD M D/CDR C D HDD 4 5 6 TV V4 MULTI CH DVD 7 8 9 VCR TAPE TUNER 10 11...
Owner Manual
Page 47
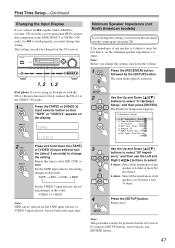
...:1 f.HDMI Audio Out :Off g.SW Input Sensitivity : 0dB 2 TAPE VIDEO 3 Press and hold down the volume. 1 RECEIVER Press the [RECEIVER] button, followed by using an iPod photo with the DS-A1 Remote Interactive Dock, connect the DS-A1 to the VIDEO 3 IN jacks. 1 TAPE Press the [TAPE] or [VIDEO 3] ...input selector button so that "TAPE" or "VIDEO 3" appears on the display. First Time Setup-Continued Changing the Input Display If you connect an -capable Onkyo MiniDisc recorder,...
...:1 f.HDMI Audio Out :Off g.SW Input Sensitivity : 0dB 2 TAPE VIDEO 3 Press and hold down the volume. 1 RECEIVER Press the [RECEIVER] button, followed by using an iPod photo with the DS-A1 Remote Interactive Dock, connect the DS-A1 to the VIDEO 3 IN jacks. 1 TAPE Press the [TAPE] or [VIDEO 3] ...input selector button so that "TAPE" or "VIDEO 3" appears on the display. First Time Setup-Continued Changing the Input Display If you connect an -capable Onkyo MiniDisc recorder,...

Owner Manual
Page 48
... procedure can also be performed on the AV receiver by using its [SETUP] button, arrow buttons, and [ENTER] button. 4 SETUP Press the [SETUP] button. The Hardware Setup menu appears. 8.Hardware Setup a.SP Impedance :6ohms b.PoweredZone2:NotAct c.TV Format :Auto d.AM Freq. Step: 9kHz e.Remote ID :1 f.HDMI Audio Out :Off g.SW Input Sensitivity...
... procedure can also be performed on the AV receiver by using its [SETUP] button, arrow buttons, and [ENTER] button. 4 SETUP Press the [SETUP] button. The Hardware Setup menu appears. 8.Hardware Setup a.SP Impedance :6ohms b.PoweredZone2:NotAct c.TV Format :Auto d.AM Freq. Step: 9kHz e.Remote ID :1 f.HDMI Audio Out :Off g.SW Input Sensitivity...
Owner Manual
Page 49
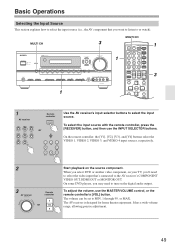
... may need to select the video input that you want to listen to MIN, 1 through 99, or MAX. MULTI CH 1 3 1 MULTI CH ON/STANDBY ZONE2 REMOTE MODE RECEIVER TAPE INPUT SELECTOR 1 2 3 V1 V2 V3 DVD M D/CDR C D HDD 4 5 6 TV V4 MULTI CH DVD 7 8 9 VCR TAPE TUNER 10 11 ... It has a wide volume range, allowing precise adjustment. 49 To select the input source with the remote controller, press the [RECEIVER] button, and then use the MASTER VOLUME control, or the remote controller's [VOL] button. To adjust the volume, use the INPUT SELECTOR buttons. On some DVD ...
... may need to select the video input that you want to listen to MIN, 1 through 99, or MAX. MULTI CH 1 3 1 MULTI CH ON/STANDBY ZONE2 REMOTE MODE RECEIVER TAPE INPUT SELECTOR 1 2 3 V1 V2 V3 DVD M D/CDR C D HDD 4 5 6 TV V4 MULTI CH DVD 7 8 9 VCR TAPE TUNER 10 11 ... It has a wide volume range, allowing precise adjustment. 49 To select the input source with the remote controller, press the [RECEIVER] button, and then use the MASTER VOLUME control, or the remote controller's [VOL] button. To adjust the volume, use the INPUT SELECTOR buttons. On some DVD ...


