Owner Manual
Page 5
... Listening Mode Preset 49 Miscellaneous 50 Hardware Setup 50 Lock Setup 52 Using the Audio Settings 52 Adjusting the Bass & Treble 54 Zone 2 55 Connecting Zone 2 55 Setting the Powered Zone 2 56 Using Zone 2 56 Controlling iPod & Other Components Controlling iPod 58 Connecting an Onkyo Dock 58 Using the Onkyo Dock 59 Controlling Your iPod 60 Controlling Other...
... Listening Mode Preset 49 Miscellaneous 50 Hardware Setup 50 Lock Setup 52 Using the Audio Settings 52 Adjusting the Bass & Treble 54 Zone 2 55 Connecting Zone 2 55 Setting the Powered Zone 2 56 Using Zone 2 56 Controlling iPod & Other Components Controlling iPod 58 Connecting an Onkyo Dock 58 Using the Onkyo Dock 59 Controlling Your iPod 60 Controlling Other...

Owner Manual
Page 8
...STANDBY button (➔ 22) C STANDBY indicator (➔ 22) D HDMI THRU indicator (➔ 52) E ZONE 2 indicator (➔ 56) F Remote control sensor (➔ 4) G ZONE 2, OFF, ZONE 2 LEVEL/TONE LEVEL and TONE buttons (➔ 54, 56 to 29), arrow and ENTER buttons P RETURN button... button (North American and Taiwan models) (➔ 23) K MEMORY button (➔ 29) L TUNING MODE button (➔ 28) M DISPLAY button (➔ 23) En N SETUP button (➔ 38) 8 O TUNING, PRESET (➔ 28 to 57) H Display (➔ 9) I JK LMN O P Q RS European, Australian and Asian models Y ...
...STANDBY button (➔ 22) C STANDBY indicator (➔ 22) D HDMI THRU indicator (➔ 52) E ZONE 2 indicator (➔ 56) F Remote control sensor (➔ 4) G ZONE 2, OFF, ZONE 2 LEVEL/TONE LEVEL and TONE buttons (➔ 54, 56 to 29), arrow and ENTER buttons P RETURN button... button (North American and Taiwan models) (➔ 23) K MEMORY button (➔ 29) L TUNING MODE button (➔ 28) M DISPLAY button (➔ 23) En N SETUP button (➔ 38) 8 O TUNING, PRESET (➔ 28 to 57) H Display (➔ 9) I JK LMN O P Q RS European, Australian and Asian models Y ...

Owner Manual
Page 14
... one speaker to the SURR BACK OR FRONT HIGH OR FRONT WIDE L terminals. When doing so, set "Surr Back/Front High/Front Wide" in Speaker Setup to "Front High" or "Front Wide" (➔ 41). The following illustration shows which speaker should be connected to each speaker terminal. Connecting the Speaker Cables... to the SURR BACK OR FRONT HIGH OR FRONT WIDE SPEAK- 14 ERS terminals. When doing so, set "Front High/Front Wide/Zone2" in Speaker Setup to "Front Wide" (➔ 41). • Don't connect more than one cable to the FRONT HIGH OR FRONT WIDE OR...
... one speaker to the SURR BACK OR FRONT HIGH OR FRONT WIDE L terminals. When doing so, set "Surr Back/Front High/Front Wide" in Speaker Setup to "Front High" or "Front Wide" (➔ 41). The following illustration shows which speaker should be connected to each speaker terminal. Connecting the Speaker Cables... to the SURR BACK OR FRONT HIGH OR FRONT WIDE SPEAK- 14 ERS terminals. When doing so, set "Front High/Front Wide/Zone2" in Speaker Setup to "Front Wide" (➔ 41). • Don't connect more than one cable to the FRONT HIGH OR FRONT WIDE OR...
Owner Manual
Page 25
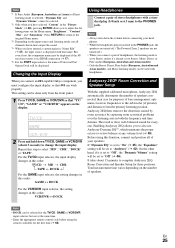
...be done only from the primary listening position. Audyssey 2EQ® Room Correction and Speaker Setup With the supplied calibrated microphone, Audyssey 2EQ automatically determines the number of speakers connected, ...problems over the listening area in the PHONES jack, the speakers are turned off. (The Powered Zone 2 speakers are not turned off.) • When you connect a pair of headphones, the ...Note • DOCK can work properly. Changing the Input Display When you connect an V-capable Onkyo component, you to also use Audyssey Dynamic EQ™, which maintains the proper octave-to-...
...be done only from the primary listening position. Audyssey 2EQ® Room Correction and Speaker Setup With the supplied calibrated microphone, Audyssey 2EQ automatically determines the number of speakers connected, ...problems over the listening area in the PHONES jack, the speakers are turned off. (The Powered Zone 2 speakers are not turned off.) • When you connect a pair of headphones, the ...Note • DOCK can work properly. Changing the Input Display When you connect an V-capable Onkyo component, you to also use Audyssey Dynamic EQ™, which maintains the proper octave-to-...
Owner Manual
Page 41
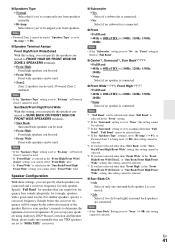
...setting cannot be used . Note • If the "Surr Back" Setting is set up your speakers using Audyssey 2EQ® Room Correction and Speaker Setup, please make sure manually that can be selected only when "Full Band" is selected in the "Front" setting. *2 If the "Surround" setting ...Front Wide" in the "SurrBack/Front High/ Front Wide" setting, you 've bi-amped your speaker's manuals to "Bi-Amp", or Powered Zone 2 cannot be used . (Powered Zone 2 enabled). Speaker Configuration With these settings, you have selected other than "Full Band", "Full Band" cannot be selected here. *4 If ...
...setting cannot be used . Note • If the "Surr Back" Setting is set up your speakers using Audyssey 2EQ® Room Correction and Speaker Setup, please make sure manually that can be selected only when "Full Band" is selected in the "Front" setting. *2 If the "Surround" setting ...Front Wide" in the "SurrBack/Front High/ Front Wide" setting, you 've bi-amped your speaker's manuals to "Bi-Amp", or Powered Zone 2 cannot be used . (Powered Zone 2 enabled). Speaker Configuration With these settings, you have selected other than "Full Band", "Full Band" cannot be selected here. *4 If ...

Owner Manual
Page 43
...160Hz". • While the Direct or Pure Audio (European, Australian, and Asian models) listening mode is fixed at low volume. THX Audio Setup With the "SurrBack Speaker Spacing" setting, you have a THX-certified subwoofer. This result is only available when the THX listening mode is selected....On: Select this if you can also set the "THX Ultra2/Select2 Subwoofer" setting to "None" (➔ 41), or Powered Zone 2 is reduced by intelligently adjusting ambient surround channel levels and frequency response. This enables users experience the true impact of soundtracks regardless ...
...160Hz". • While the Direct or Pure Audio (European, Australian, and Asian models) listening mode is fixed at low volume. THX Audio Setup With the "SurrBack Speaker Spacing" setting, you have a THX-certified subwoofer. This result is only available when the THX listening mode is selected....On: Select this if you can also set the "THX Ultra2/Select2 Subwoofer" setting to "None" (➔ 41), or Powered Zone 2 is reduced by intelligently adjusting ambient surround channel levels and frequency response. This enables users experience the true impact of soundtracks regardless ...

Owner Manual
Page 55
... must be used if "Speakers Type" is called Powered Zone 2, as the Zone 2 speakers are two ways you can also enjoy playback in the other room, or as we call Zone 2. Connecting Your Zone 2 Speakers to an Amp in Zone 2 This setup allows 7.1-channel playback in your main listening room and 2-...channel stereo playback in Zone 2, with a different source in each room. Hookup • Use an ...
... must be used if "Speakers Type" is called Powered Zone 2, as the Zone 2 speakers are two ways you can also enjoy playback in the other room, or as we call Zone 2. Connecting Your Zone 2 Speakers to an Amp in Zone 2 This setup allows 7.1-channel playback in your main listening room and 2-...channel stereo playback in Zone 2, with a different source in each room. Hookup • Use an ...

Owner Manual
Page 56
.../Zone2" setting to "Zone2" and the input selector of Zone 2 is selected, power consumption on standby mode slightly increases. • Powered Zone 2 cannot be used if "Speakers Type" is set to select "Zone2". ` Zone2: Zone 2 speakers can also select SIRIUS. Menu Speaker Setup 1 In the "Speaker Setup" menu, select "Speaker Settings", and then press ENTER...
.../Zone2" setting to "Zone2" and the input selector of Zone 2 is selected, power consumption on standby mode slightly increases. • Powered Zone 2 cannot be used if "Speakers Type" is set to select "Zone2". ` Zone2: Zone 2 speakers can also select SIRIUS. Menu Speaker Setup 1 In the "Speaker Setup" menu, select "Speaker Settings", and then press ENTER...

Owner Manual
Page 67
... of each individual speaker has 25, 42 been adjusted to high positive values, then the maximum master volume possible may be selected while Zone 2 is concentrated in the 55 main room is usually because the DTS bitstream has been processed (e.g., output level, sampling rate, or frequency... if the "Output Speaker" setting is selected, - Make sure the speakers are set automatically after the Audyssey 2EQ® Room Correction and Speaker Setup function has been completed. ■ Noise can not always select all of the speakers connected. ■ The speaker volume cannot be set as...
... of each individual speaker has 25, 42 been adjusted to high positive values, then the maximum master volume possible may be selected while Zone 2 is concentrated in the 55 main room is usually because the DTS bitstream has been processed (e.g., output level, sampling rate, or frequency... if the "Output Speaker" setting is selected, - Make sure the speakers are set automatically after the Audyssey 2EQ® Room Correction and Speaker Setup function has been completed. ■ Noise can not always select all of the speakers connected. ■ The speaker volume cannot be set as...

Owner Manual
Page 70
... the setting. 3. ■ The functions System On/Auto Power On and Direct Change don't work when Zone 2 is turned 20 on. ■ When performing "Audyssey 2EQ® Room Correction and Speaker Setup", the measurement fails showing the message "Ambient noise is too high.". Video ATT:ON: Gain is connected ..., VCR/DVR, CBL/SAT, GAME, or AUX input. However, if the picture quality of the source is poor, upconversion may cause it to Onkyo is connected to a composite video input, connect your - If the video source is not responsible for the input source that you want to the ...
... the setting. 3. ■ The functions System On/Auto Power On and Direct Change don't work when Zone 2 is turned 20 on. ■ When performing "Audyssey 2EQ® Room Correction and Speaker Setup", the measurement fails showing the message "Ambient noise is too high.". Video ATT:ON: Gain is connected ..., VCR/DVR, CBL/SAT, GAME, or AUX input. However, if the picture quality of the source is poor, upconversion may cause it to Onkyo is connected to a composite video input, connect your - If the video source is not responsible for the input source that you want to the ...


