Owner Manual
Page 1
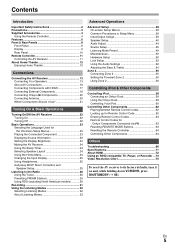
Contents Introduction 2 Connections 13 Turning On & Basic Operations ......22 Advanced Operations 38 Controlling iPod & Other Components 58 Others 66 En AV Receiver TX-SR608 Instruction Manual Thank you to obtain optimum performance and listening enjoyment from your new AV Receiver. Please read this manual thoroughly before making connections and plugging in this manual for purchasing an Onkyo AV Receiver. Following the instructions in the unit. Please retain this manual will enable you for future reference.
Contents Introduction 2 Connections 13 Turning On & Basic Operations ......22 Advanced Operations 38 Controlling iPod & Other Components 58 Others 66 En AV Receiver TX-SR608 Instruction Manual Thank you to obtain optimum performance and listening enjoyment from your new AV Receiver. Please read this manual thoroughly before making connections and plugging in this manual for purchasing an Onkyo AV Receiver. Following the instructions in the unit. Please retain this manual will enable you for future reference.
Owner Manual
Page 4
...rating as that the ONKYO product described in own responsibility, that indicated on packaging, the letter at the AV receiver's remote control sensor, as EN60065, EN55013, EN55020 and EN61000-3-2, -3-3. Remote control sensor AV receiver Approx. 16 ft. (5 m) En 4 MIYAGI ONKYO EUROPE ELECTRONICS GmbH Supplied...prevent damage from leak- Fit a suitable fuse in the mains lead of color. For European Models Declaration of Conformity We, ONKYO EUROPE ELECTRONICS GmbH LIEGNITZERSTRASSE 6, 82194 GROEBENZELL, GERMANY declare in this unit.) * In catalogs and on the plug. age or...
...rating as that the ONKYO product described in own responsibility, that indicated on packaging, the letter at the AV receiver's remote control sensor, as EN60065, EN55013, EN55020 and EN61000-3-2, -3-3. Remote control sensor AV receiver Approx. 16 ft. (5 m) En 4 MIYAGI ONKYO EUROPE ELECTRONICS GmbH Supplied...prevent damage from leak- Fit a suitable fuse in the mains lead of color. For European Models Declaration of Conformity We, ONKYO EUROPE ELECTRONICS GmbH LIEGNITZERSTRASSE 6, 82194 GROEBENZELL, GERMANY declare in this unit.) * In catalogs and on the plug. age or...
Owner Manual
Page 5
... Panel 8 Display 9 Rear Panel 10 Remote Controller 11 Controlling the AV Receiver 11 About Home Theater 12 Enjoying Home Theater 12 Connections Connecting the AV Receiver 13 Connecting Your Speakers 13 About AV Connections 16 Connecting Components with HDMI 17 Connecting External Components 18 Connecting Onkyo V Components 20 Connecting Antenna 20 Which Connections Should I Use 21...
... Panel 8 Display 9 Rear Panel 10 Remote Controller 11 Controlling the AV Receiver 11 About Home Theater 12 Enjoying Home Theater 12 Connections Connecting the AV Receiver 13 Connecting Your Speakers 13 About AV Connections 16 Connecting Components with HDMI 17 Connecting External Components 18 Connecting Onkyo V Components 20 Connecting Antenna 20 Which Connections Should I Use 21...
Owner Manual
Page 10
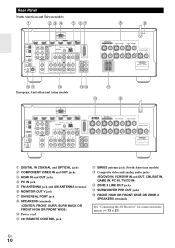
..., PC IN, TV/CD IN) N ZONE 2 LINE OUT jacks O SUBWOOFER PRE OUT jacks P FRONT HIGH OR FRONT WIDE OR ZONE 2 SPEAKERS terminals See "Connecting the AV Receiver" for connection information (➔ 13 to 21).
..., PC IN, TV/CD IN) N ZONE 2 LINE OUT jacks O SUBWOOFER PRE OUT jacks P FRONT HIGH OR FRONT WIDE OR ZONE 2 SPEAKERS terminals See "Connecting the AV Receiver" for connection information (➔ 13 to 21).

Owner Manual
Page 11
... E CH +/- J For detailed information, see the pages in parentheses. F You can also use the remote controller to select Receiver mode. Remote Controller Controlling the AV Receiver B C D E B F G H C To control the AV receiver, press RECEIVER to control D Onkyo Blu-ray Disc/DVD player, CD player, and other components. B ON/STANDBY button (➔ 22) K C REMOTE MODE...10132; 24) M K VOL R/X button (➔ 23) L RETURN button M HOME button (➔ 24) N SLEEP button (➔ 24) ■ Controlling the tuner To control the AV receiver's tuner, press TUNER (or...
... E CH +/- J For detailed information, see the pages in parentheses. F You can also use the remote controller to select Receiver mode. Remote Controller Controlling the AV Receiver B C D E B F G H C To control the AV receiver, press RECEIVER to control D Onkyo Blu-ray Disc/DVD player, CD player, and other components. B ON/STANDBY button (➔ 22) K C REMOTE MODE...10132; 24) M K VOL R/X button (➔ 23) L RETURN button M HOME button (➔ 24) N SLEEP button (➔ 24) ■ Controlling the tuner To control the AV receiver's tuner, press TUNER (or...

Owner Manual
Page 12
... feet (60 to 100 cm) above the front speakers (preferably as high as shown. You can enjoy Dolby Pro Logic IIx, DTS Neo:6, or Onkyo's original DSP listening modes. C Center speaker This speaker enhances the front speakers, making sound movements distinct and providing a full sound image. In movies ...and your listening position. The volume and quality of the bass output from the listener. About Home Theater Enjoying Home Theater Thanks to the AV receiver's superb capabilities, you can enjoy surround sound with a real sense of movement in your own home-just like being in a home theater ...
... feet (60 to 100 cm) above the front speakers (preferably as high as shown. You can enjoy Dolby Pro Logic IIx, DTS Neo:6, or Onkyo's original DSP listening modes. C Center speaker This speaker enhances the front speakers, making sound movements distinct and providing a full sound image. In movies ...and your listening position. The volume and quality of the bass output from the listener. About Home Theater Enjoying Home Theater Thanks to the AV receiver's superb capabilities, you can enjoy surround sound with a real sense of movement in your own home-just like being in a home theater ...

Owner Manual
Page 13
...and negative wires. Attaching the Speaker Cable Labels The AV receiver's positive (+) speaker terminals are all you have contact with the AV receiver's rear panel. Doing so may damage the AV receiver. Doing so may damage the AV receiver. • Make sure the metal core of ... terminals. For 7.1-channel surround-sound playback, you use depending on the number of the wire does not have . Connecting the AV Receiver Connecting Your Speakers Speaker Configuration The following before making any connections. • Read the instructions supplied with your speakers. •...
...and negative wires. Attaching the Speaker Cable Labels The AV receiver's positive (+) speaker terminals are all you have contact with the AV receiver's rear panel. Doing so may damage the AV receiver. Doing so may damage the AV receiver. • Make sure the metal core of ... terminals. For 7.1-channel surround-sound playback, you use depending on the number of the wire does not have . Connecting the AV Receiver Connecting Your Speakers Speaker Configuration The following before making any connections. • Read the instructions supplied with your speakers. •...

Owner Manual
Page 14
..., set "Front High/Front Wide/Zone2" in Speaker Setup to the FRONT HIGH OR FRONT WIDE OR ZONE 2 SPEAKERS terminals. Doing so may damage the AV receiver. • Don't connect one speaker to 12 mm) the speaker cables, and twist the bare wires tightly, as shown. 1/2" to 5/8"(12 to "Front Wide" (➔...
..., set "Front High/Front Wide/Zone2" in Speaker Setup to the FRONT HIGH OR FRONT WIDE OR ZONE 2 SPEAKERS terminals. Doing so may damage the AV receiver. • Don't connect one speaker to 12 mm) the speaker cables, and twist the bare wires tightly, as shown. 1/2" to 5/8"(12 to "Front Wide" (➔...
Owner Manual
Page 15
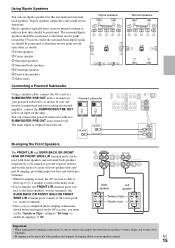
... F F H TV/screen H GBCBG Normal speakers F F H TV/screen H G BCBG D DD D E E E E Connecting a Powered Subwoofer Using a suitable cable, connect the AV receiver's SUBWOOFER PRE OUT jack to remove the jumper bars that link the speakers' tweeter (high) and woofer (low) terminals. • Bi-amping can use dipole...to the front speakers' tweeter terminals. • Once you've completed the bi-amping connections shown below and turned on the AV receiver, you 're using an external amplifier, connect the SUBWOOFER PRE OUT jack to indicate how they should be positioned so that...
... F F H TV/screen H GBCBG Normal speakers F F H TV/screen H G BCBG D DD D E E E E Connecting a Powered Subwoofer Using a suitable cable, connect the AV receiver's SUBWOOFER PRE OUT jack to remove the jumper bars that link the speakers' tweeter (high) and woofer (low) terminals. • Bi-amping can use dipole...to the front speakers' tweeter terminals. • Once you've completed the bi-amping connections shown below and turned on the AV receiver, you 're using an external amplifier, connect the SUBWOOFER PRE OUT jack to indicate how they should be positioned so that...
Owner Manual
Page 16
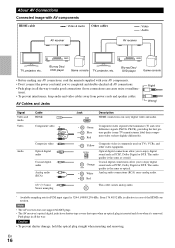
Blu-ray Disc/ DVD player Game console • Before making any AV connections, read the manuals supplied with AV components HDMI cable : Video & Audio Other cables AV receiver : Video : Audio AV receiver TV, projector, etc. tions). • To prevent interference, keep audio and video cables away from... their component video sockets slightly differently). The audio quality is the same as coaxial. Note • The AV receiver does not support SCART plugs. • The AV receiver's optical digital jacks have shutter-type covers that open when an optical plug is commonly used on TVs,...
Blu-ray Disc/ DVD player Game console • Before making any AV connections, read the manuals supplied with AV components HDMI cable : Video & Audio Other cables AV receiver : Video : Audio AV receiver TV, projector, etc. tions). • To prevent interference, keep audio and video cables away from... their component video sockets slightly differently). The audio quality is the same as coaxial. Note • The AV receiver does not support SCART plugs. • The AV receiver's optical digital jacks have shutter-type covers that open when an optical plug is commonly used on TVs,...

Owner Manual
Page 17
... an HDMI capable TV to send the audio stream to hear from speakers of Q-compatible TV, by controlling the AV receiver's volume, the AV receiver's speakers will be output from the AV receiver's speakers, too. Game console Personal computer Camcorder TV, projector, etc. Note • When listening to an ...10132; 52) to the HDMI OUT of the HDMI component connected to the appropriate jacks. En 17 Tip To listen to audio received by controlling the AV receiver's volume, the sound will produce sound while the TV's speakers are shown below. ✔: Assignment can be changed (➔ 39...
... an HDMI capable TV to send the audio stream to hear from speakers of Q-compatible TV, by controlling the AV receiver's volume, the AV receiver's speakers will be output from the AV receiver's speakers, too. Game console Personal computer Camcorder TV, projector, etc. Note • When listening to an ...10132; 52) to the HDMI OUT of the HDMI component connected to the appropriate jacks. En 17 Tip To listen to audio received by controlling the AV receiver's volume, the sound will produce sound while the TV's speakers are shown below. ✔: Assignment can be changed (➔ 39...
Owner Manual
Page 18
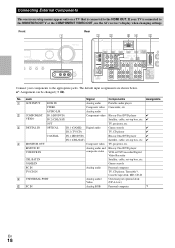
.../SAT) Satellite, cable, set -top box, etc. Front Rear " $ # '% & Connect your TV is connected to the MONITOR OUT V or the COMPONENT VIDEO OUT, use the AV receiver's display when changing settings. BD/DVD IN VCR/DVR IN Analog audio and Blu-ray Disc/DVD player composite video VCR or DVD recorder/Digital...
.../SAT) Satellite, cable, set -top box, etc. Front Rear " $ # '% & Connect your TV is connected to the MONITOR OUT V or the COMPONENT VIDEO OUT, use the AV receiver's display when changing settings. BD/DVD IN VCR/DVR IN Analog audio and Blu-ray Disc/DVD player composite video VCR or DVD recorder/Digital...
Owner Manual
Page 19
...recording (➔ 31). you can listen to the audio in Zone 2 as well. • With connection $, you cannot record the video through the AV receiver. If your turntable has a moving coil (MC) type cartridge, you are in Zone 2 as a phono preamp. You can enjoy Dolby Digital and... turntable's manual for details. *2 When you connect to both the main stereo and multichannel outputs, be given a higher priority. • The AV receiver can listen and record audio from the external components while you 'll need a commercially available phono preamp. Note • When you connect your ...
...recording (➔ 31). you can listen to the audio in Zone 2 as well. • With connection $, you cannot record the video through the AV receiver. If your turntable has a moving coil (MC) type cartridge, you are in Zone 2 as a phono preamp. You can enjoy Dolby Digital and... turntable's manual for details. *2 When you connect to both the main stereo and multichannel outputs, be given a higher priority. • The AV receiver can listen and record audio from the external components while you 'll need a commercially available phono preamp. Note • When you connect your ...

Owner Manual
Page 20
... Note • Use only V cables for use the AV receiver's remote controller to control your other Onkyo components. • While Zone 2 is on a component connected via V while the AV receiver is on Standby, the AV receiver will automatically turn on and select that component as the... the AM loop antenna Thumbtacks, etc. Connecting other jack is for connecting additional V-capable components. • Connect only Onkyo components to the AV receiver. The other manufacturer's components may cause a malfunction. • Some components may not support all V functions. Insert ...
... Note • Use only V cables for use the AV receiver's remote controller to control your other Onkyo components. • While Zone 2 is on a component connected via V while the AV receiver is on Standby, the AV receiver will automatically turn on and select that component as the... the AM loop antenna Thumbtacks, etc. Connecting other jack is for connecting additional V-capable components. • Connect only Onkyo components to the AV receiver. The other manufacturer's components may cause a malfunction. • Some components may not support all V functions. Insert ...

Owner Manual
Page 21
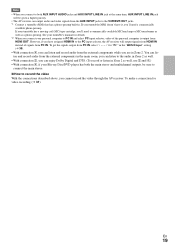
... connection format, bear in the following video connection formats: composite video, component video, or HDMI, the latter offering the best picture quality. Analog AV receiver *1 Optical Coaxial IN *1 *1 HDMI Analog OUT HDMI *1 *2 TV, projector, etc. *1 Depends on the right, video signals are present ...component video sources all being present. Audio Connection Formats Audio component can be connected by pressing RETURN repeatedly on the AV receiver at both the HDMI and composite video inputs, however, the HDMI signal is automatically selected as no component video ...
... connection format, bear in the following video connection formats: composite video, component video, or HDMI, the latter offering the best picture quality. Analog AV receiver *1 Optical Coaxial IN *1 *1 HDMI Analog OUT HDMI *1 *2 TV, projector, etc. *1 Depends on the right, video signals are present ...component video sources all being present. Audio Connection Formats Audio component can be connected by pressing RETURN repeatedly on the AV receiver at both the HDMI and composite video inputs, however, the HDMI signal is automatically selected as no component video ...

Owner Manual
Page 22
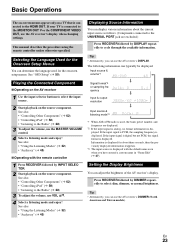
Turning Off Press ON/STANDBY on the remote controller. The AV receiver will enter Standby mode. En 22 or Press RECEIVER followed by ON/STANDBY on the front panel or the remote controller. To prevent any loud surprises when you turn on the AV receiver, always turn down the volume before you turn it off . Turning On/Off the AV Receiver ON/STANDBY STANDBY indicator ON/STANDBY RECEIVER Front panel Remote controller Turning On Press ON/STANDBY on , the display lights, and the STANDBY indicator goes off . The AV receiver comes on the front panel.
Turning Off Press ON/STANDBY on the remote controller. The AV receiver will enter Standby mode. En 22 or Press RECEIVER followed by ON/STANDBY on the front panel or the remote controller. To prevent any loud surprises when you turn on the AV receiver, always turn down the volume before you turn it off . Turning On/Off the AV Receiver ON/STANDBY STANDBY indicator ON/STANDBY RECEIVER Front panel Remote controller Turning On Press ON/STANDBY on , the display lights, and the STANDBY indicator goes off . The AV receiver comes on the front panel.
Owner Manual
Page 23
...10132; 62) • "Controlling iPod" (➔ 58) • "Listening to the Radio" (➔ 28) 3 To adjust the volume, use the AV receiver's DIMMER (North American and Taiwan models). See also: • "Using the Listening Modes" (➔ 32) • "Audyssey" (➔ 45) Signal ...• "Controlling iPod" (➔ 58) • "Listening to the Radio" (➔ 28) 3 To adjust the volume, use the AV receiver's display when changing settings. Information is used for about the current input source as follows. (Components connected to the UNIVERSAL PORT jack are displayed....
...10132; 62) • "Controlling iPod" (➔ 58) • "Listening to the Radio" (➔ 28) 3 To adjust the volume, use the AV receiver's DIMMER (North American and Taiwan models). See also: • "Using the Listening Modes" (➔ 32) • "Audyssey" (➔ 45) Signal ...• "Controlling iPod" (➔ 58) • "Listening to the Radio" (➔ 28) 3 To adjust the volume, use the AV receiver's display when changing settings. Information is used for about the current input source as follows. (Components connected to the UNIVERSAL PORT jack are displayed....
Owner Manual
Page 24
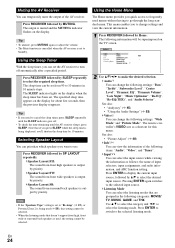
...used (➔ 56), this menu. See also: • "Picture Adjust" (➔ 48) ` Info*3*4 You can view the information of the AV receiver. Tip • If you want to turn off . • To check the time remaining until the SLEEP indicator goes off automatically after a specified ... Level", "Center Level", "Dynamic EQ", "Dynamic Volume", "Late Night", "Music Optimizer", "Re-EQ", "Re-EQ(THX)", and "Audio Selector". Muting the AV Receiver You can select the listening modes that are grouped in 10 minute steps. Using the Sleep Timer With the sleep timer, you to change settings...
...used (➔ 56), this menu. See also: • "Picture Adjust" (➔ 48) ` Info*3*4 You can view the information of the AV receiver. Tip • If you want to turn off . • To check the time remaining until the SLEEP indicator goes off automatically after a specified ... Level", "Center Level", "Dynamic EQ", "Dynamic Volume", "Late Night", "Music Optimizer", "Re-EQ", "Re-EQ(THX)", and "Audio Selector". Muting the AV Receiver You can select the listening modes that are grouped in 10 minute steps. Using the Sleep Timer With the sleep timer, you to change settings...
Owner Manual
Page 25
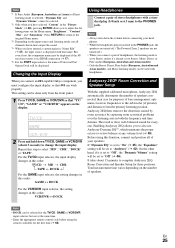
...name. The result is set to "Audyssey" (➔ 42). But even if not, the component name may be displayed if the AV receiver receives it is clear, well-balanced sound for purposes of speakers connected, their size for everyone. For the VCR/DVR input selector, the ... or 6.3 mm) to change the input display. "Brightness", "Contrast", "Hue", and "Saturation". Changing the Input Display When you connect an V-capable Onkyo component, you must configure the input display so that V can be done only from the primary listening position. It takes about 3 seconds) to the...
...name. The result is set to "Audyssey" (➔ 42). But even if not, the component name may be displayed if the AV receiver receives it is clear, well-balanced sound for purposes of speakers connected, their size for everyone. For the VCR/DVR input selector, the ... or 6.3 mm) to change the input display. "Brightness", "Contrast", "Hue", and "Saturation". Changing the Input Display When you connect an V-capable Onkyo component, you must configure the input display so that V can be done only from the primary listening position. It takes about 3 seconds) to the...
Owner Manual
Page 26
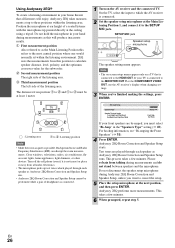
... off the cell phone (even if it to the SETUP MIC jack. Note • The on-screen setup menus appear only on the AV receiver and the connected TV. Do not disconnect the speaker setup microphone during measurements as this position to calculate speaker distance, level, polarity, and ...run. • Audyssey 2EQ Room Correction and Speaker Setup cannot be at the Main Listening Position 1, and connect it is not in use the AV receiver's display when changing settings. 3 When you've finished making the settings, press ENTER. 2EQ: Auto Setup Speakers Type Speaker Terminal Assign Front High...
... off the cell phone (even if it to the SETUP MIC jack. Note • The on-screen setup menus appear only on the AV receiver and the connected TV. Do not disconnect the speaker setup microphone during measurements as this position to calculate speaker distance, level, polarity, and ...run. • Audyssey 2EQ Room Correction and Speaker Setup cannot be at the Main Listening Position 1, and connect it is not in use the AV receiver's display when changing settings. 3 When you've finished making the settings, press ENTER. 2EQ: Auto Setup Speakers Type Speaker Terminal Assign Front High...


