Owner Manual
Page 5
... Modes 33 Advanced Operations Advanced Setup 38 On-screen Setup Menus 38 Common Procedures in Setup Menu 38 Input/Output Assign 39 Speaker Setup 40 Audio Adjust 44 Source Setup 45 Listening Mode Preset 49 Miscellaneous 50 Hardware Setup 50 Lock Setup 52 Using the...Components 62 Preprogrammed Remote Control Codes 62 Looking up for Remote Control Code 62 Entering Remote Control Codes 63 Remote Control Codes for Onkyo Components Connected via V 63 Resetting REMOTE MODE Buttons 64 Resetting the Remote Controller 64 Controlling Other Components 64 Others Troubleshooting 66 ...
... Modes 33 Advanced Operations Advanced Setup 38 On-screen Setup Menus 38 Common Procedures in Setup Menu 38 Input/Output Assign 39 Speaker Setup 40 Audio Adjust 44 Source Setup 45 Listening Mode Preset 49 Miscellaneous 50 Hardware Setup 50 Lock Setup 52 Using the...Components 62 Preprogrammed Remote Control Codes 62 Looking up for Remote Control Code 62 Entering Remote Control Codes 63 Remote Control Codes for Onkyo Components Connected via V 63 Resetting REMOTE MODE Buttons 64 Resetting the Remote Controller 64 Controlling Other Components 64 Others Troubleshooting 66 ...
Owner Manual
Page 6
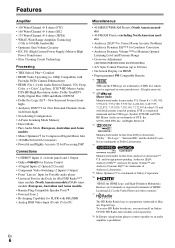
... Channels (frontwide/front-high) • Non-Scaling Configuration • A-Form Listening Mode Memory • Direct Mode • Pure Audio Mode (European, Australian and Asian models) • Music Optimizer*5 for Compressed Digital Music files • 192 kHz/24-bit D/A...on front panel) and 1 Output • Onkyo Q for System Control • 4 Digital Inputs (2 Optical/2 Coaxial) • Component Video Switching (2 Inputs/1 Output) • Front "Line in some jurisdictions. Color, x.v.Color*, Lip Sync, DTS*2-HD Master Audio, DTS-HD High Resolution Audio, Dolby TrueHD*3, Dolby Digital...
... Channels (frontwide/front-high) • Non-Scaling Configuration • A-Form Listening Mode Memory • Direct Mode • Pure Audio Mode (European, Australian and Asian models) • Music Optimizer*5 for Compressed Digital Music files • 192 kHz/24-bit D/A...on front panel) and 1 Output • Onkyo Q for System Control • 4 Digital Inputs (2 Optical/2 Coaxial) • Component Video Switching (2 Inputs/1 Output) • Front "Line in some jurisdictions. Color, x.v.Color*, Lip Sync, DTS*2-HD Master Audio, DTS-HD High Resolution Audio, Dolby TrueHD*3, Dolby Digital...

Owner Manual
Page 17
..., change the settings, change your components to the appropriate jacks. Game console Personal computer Camcorder TV, projector, etc. Jack Input Output Signal HDMI IN 1 Audio/Video HDMI IN 2 HDMI IN 3 HDMI IN 4 HDMI IN 5 AUX INPUT HDMI HDMI OUT Components Blu-ray Disc/DVD player...Connecting Components with Q or the "TV Control" setting to "Off". • Set your Blu-ray Disc/DVD player's HDMI audio output setting to PCM. • To listen to TV audio through the AV receiver, see "Connecting External Components" (➔ 18). Assignable Refer to "About HDMI" (➔ 72) and...
..., change the settings, change your components to the appropriate jacks. Game console Personal computer Camcorder TV, projector, etc. Jack Input Output Signal HDMI IN 1 Audio/Video HDMI IN 2 HDMI IN 3 HDMI IN 4 HDMI IN 5 AUX INPUT HDMI HDMI OUT Components Blu-ray Disc/DVD player...Connecting Components with Q or the "TV Control" setting to "Off". • Set your Blu-ray Disc/DVD player's HDMI audio output setting to PCM. • To listen to TV audio through the AV receiver, see "Connecting External Components" (➔ 18). Assignable Refer to "About HDMI" (➔ 72) and...
Owner Manual
Page 19
...To make a connection for "PC" in the "HDMI Input" setting (➔ 39). • With connection %, you can listen and record audio from the external components in Zone 2 as a phono preamp. To get the signals output from PC IN, select for video recording (➔ 31). you can listen to the... (To record or listen in the main room; Note • When you connect to both the main stereo and multichannel outputs, be given a higher priority. • The AV receiver can output audio and video signals from the AUX INPUT jacks to the VCR/DVR OUT jacks. *1 Connect a turntable (MM) that has...
...To make a connection for "PC" in the "HDMI Input" setting (➔ 39). • With connection %, you can listen and record audio from the external components in Zone 2 as a phono preamp. To get the signals output from PC IN, select for video recording (➔ 31). you can listen to the... (To record or listen in the main room; Note • When you connect to both the main stereo and multichannel outputs, be given a higher priority. • The AV receiver can output audio and video signals from the AUX INPUT jacks to the VCR/DVR OUT jacks. *1 Connect a turntable (MM) that has...

Owner Manual
Page 21
...Composite AV receiver Composite Component IN MONITOR OUT Component HDMI HDMI The composite video and component video outputs pass through to the input selector, this will be selected. When you connect audio component to the HDMI OUT. Select "Skip" in the following sections as shown, with ... VCR/DVR and RETURN on the "Audio TV Out" setting (➔ 51). *2 This setting is available, when "Audio Return Channel" setting is automatically selected as they are not output by pressing RETURN repeatedly on the formats supported by the HDMI outputs. To reset back to the MONITOR ...
...Composite AV receiver Composite Component IN MONITOR OUT Component HDMI HDMI The composite video and component video outputs pass through to the input selector, this will be selected. When you connect audio component to the HDMI OUT. Select "Skip" in the following sections as shown, with ... VCR/DVR and RETURN on the "Audio TV Out" setting (➔ 51). *2 This setting is available, when "Audio Return Channel" setting is automatically selected as they are not output by pressing RETURN repeatedly on the formats supported by the HDMI outputs. To reset back to the MONITOR ...
Owner Manual
Page 24
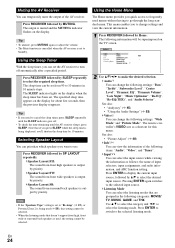
..."Dynamic Volume", "Late Night", "Music Optimizer", "Re-EQ", "Re-EQ(THX)", and "Audio Selector". Press RECEIVER followed by SP LAYOUT repeatedly. `Speaker Layout:FH: The sound from front high speakers is output by priority. `Speaker Layout:FW: The sound from 90 to select the required sleep time. ... the Home Menu The Home menu provides you need to make the desired selection. ` Audio*1 You can temporarily mute the output of the following information will be selected. BD/DVD Audio Bass Video Treble 0dB Info Subwoofer Level Input Sel Center Level • Listening Mode Dynamic...
..."Dynamic Volume", "Late Night", "Music Optimizer", "Re-EQ", "Re-EQ(THX)", and "Audio Selector". Press RECEIVER followed by SP LAYOUT repeatedly. `Speaker Layout:FH: The sound from front high speakers is output by priority. `Speaker Layout:FW: The sound from 90 to select the required sleep time. ... the Home Menu The Home menu provides you need to make the desired selection. ` Audio*1 You can temporarily mute the output of the following information will be selected. BD/DVD Audio Bass Video Treble 0dB Info Subwoofer Level Input Sel Center Level • Listening Mode Dynamic...
Owner Manual
Page 25
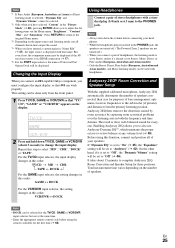
... Press and hold down the volume before using this function, connect and position all channels shown here output the sound. *4 When you have selected "Custom" in this order: GAME ↔ DOCK →...about 3 seconds) to change the input display. Changing the Input Display When you connect an V-capable Onkyo component, you must configure the input display so that "TV/ CD", "GAME" or "VCR/DVR..." appears on the number of speakers. → → Note *1 If Pure Audio (European, Australian and Asian) or Direct listening mode is selected, "Dynamic EQ" and "Dynamic Volume" ...
... Press and hold down the volume before using this function, connect and position all channels shown here output the sound. *4 When you have selected "Custom" in this order: GAME ↔ DOCK →...about 3 seconds) to change the input display. Changing the Input Display When you connect an V-capable Onkyo component, you must configure the input display so that "TV/ CD", "GAME" or "VCR/DVR..." appears on the number of speakers. → → Note *1 If Pure Audio (European, Australian and Asian) or Direct listening mode is selected, "Dynamic EQ" and "Dynamic Volume" ...

Owner Manual
Page 31
... OUT jacks. The video from the camcorder and the audio from your TV or playback VCR to the recording VCR without going through the AV receiver, connect the TV/VCR's audio and video outputs directly to the recording VCR's audio and video inputs. If you want to record. Note... • The AV receiver must be connected to a composite video output. • The surround sound and DSP listening modes cannot be...
... OUT jacks. The video from the camcorder and the audio from your TV or playback VCR to the recording VCR without going through the AV receiver, connect the TV/VCR's audio and video outputs directly to the recording VCR's audio and video inputs. If you want to record. Note... • The AV receiver must be connected to a composite video output. • The surround sound and DSP listening modes cannot be...

Owner Manual
Page 34
...r u eHD ' DTS % 9$/ / /*4 /*5 9$/ 9$/ 9$/*2 9$/ 9$/*2 9$/ DTS En 34 tance", "A/V Sync" and much of some movies. " 4 % Use this mode, audio from the input source is output without surround-sound % processing. The additional channel adds an extra dimen- "Sp Config" (presence of Dolby Pro Logic IIx. • Dolby PLIIx Movie... PL Game Use this mode, audio from the input source is output without surround-sound ( processing. See "Advanced Setup" for more effectively use existing 4 program material when...
...r u eHD ' DTS % 9$/ / /*4 /*5 9$/ 9$/ 9$/*2 9$/ 9$/*2 9$/ DTS En 34 tance", "A/V Sync" and much of some movies. " 4 % Use this mode, audio from the input source is output without surround-sound % processing. The additional channel adds an extra dimen- "Sp Config" (presence of Dolby Pro Logic IIx. • Dolby PLIIx Movie... PL Game Use this mode, audio from the input source is output without surround-sound ( processing. See "Advanced Setup" for more effectively use existing 4 program material when...
Owner Manual
Page 36
...in movie theaters and home theaters just as Dolby Digital Surround EX, is a joint development between Dolby Laboratories and THX Ltd. Surround back speaker output depends on the source material and the selected listening mode. • THX Cinema THX S2 C i n THX Cinema mode corrects theatrical soundtracks... than movies. It can expand 5.1-channel sources for 6.1/7.1-channel playback. • THX Surround EX This mode expands 5.1-channel sources for game audio levels, with video games. They can be used with music. The combination of Dolby Pro Logic II/IIx*3 and THX Cinema/Music/...
...in movie theaters and home theaters just as Dolby Digital Surround EX, is a joint development between Dolby Laboratories and THX Ltd. Surround back speaker output depends on the source material and the selected listening mode. • THX Cinema THX S2 C i n THX Cinema mode corrects theatrical soundtracks... than movies. It can expand 5.1-channel sources for 6.1/7.1-channel playback. • THX Surround EX This mode expands 5.1-channel sources for game audio levels, with video games. They can be used with music. The combination of Dolby Pro Logic II/IIx*3 and THX Cinema/Music/...

Owner Manual
Page 38
...Input 4. Multiplex/Mono 2. Note • This procedure can also be performed on the AV receiver by SETUP. Miscellaneous H 7. Input/Output Assign 1. Digital Audio Input G Miscellaneous (➔ 50) 6. DTS 4. LFE Level I 8. Press RETURN to return to close the menu. If your.... • During Audyssey 2EQ® Room Correction and Speaker Setup, messages, etc., that is connected to change the setting. Input/Output Assign C 2. Audio Adjust 4. Source Setup F 5. Hardware Setup I Remote Controller Setup (➔ 62) 8. Remote Controller Setup 1. A/V Sync 4. Picture...
...Input 4. Multiplex/Mono 2. Note • This procedure can also be performed on the AV receiver by SETUP. Miscellaneous H 7. Input/Output Assign 1. Digital Audio Input G Miscellaneous (➔ 50) 6. DTS 4. LFE Level I 8. Press RETURN to return to close the menu. If your.... • During Audyssey 2EQ® Room Correction and Speaker Setup, messages, etc., that is connected to change the setting. Input/Output Assign C 2. Audio Adjust 4. Source Setup F 5. Hardware Setup I Remote Controller Setup (➔ 62) 8. Remote Controller Setup 1. A/V Sync 4. Picture...
Owner Manual
Page 39
... you must assign that input to assign HDMI1 - En 39 No: Select if no conversion. ` Auto: Select this to output composite video and component video sources from HDMI output is configured in "Component Video Input" (➔ 40). *1 If you connect your TV. ■ Resolution ` Through:... as necessary. ` 720p: Select this for 720p output and video conversion as necessary. ` 1080i: Select this for 1080i output and video conversion as necessary. ` 1080p: Select this for 1080p output and video conversion as explained here, the digital audio input for input from the front panel. •...
... you must assign that input to assign HDMI1 - En 39 No: Select if no conversion. ` Auto: Select this to output composite video and component video sources from HDMI output is configured in "Component Video Input" (➔ 40). *1 If you connect your TV. ■ Resolution ` Through:... as necessary. ` 720p: Select this for 720p output and video conversion as necessary. ` 1080i: Select this for 1080i output and video conversion as necessary. ` 1080p: Select this for 1080p output and video conversion as explained here, the digital audio input for input from the front panel. •...

Owner Manual
Page 54
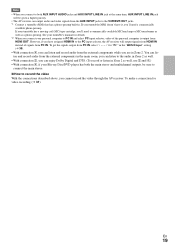
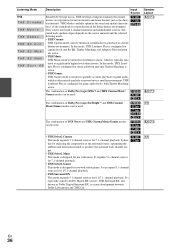
...HDMI IN, COAXIAL IN, or OPTICAL IN. *1 You can select "ARC" if you can manually set priorities of audio output when there are both digital and analog inputs. ■ Audio Selector ` ARC: The audio signal from a PCM source are cut off, try setting the format to PCM. • If noise is produced ...10132; 52). Note • The setting is stored individually for the input source that is assigned as a priority. ` Analog: The AV receiver always outputs analog signals. Audio Selector You can set the signal format to PCM or DTS. • If the beginnings of tracks from your TV tuner can be sent...
...HDMI IN, COAXIAL IN, or OPTICAL IN. *1 You can select "ARC" if you can manually set priorities of audio output when there are both digital and analog inputs. ■ Audio Selector ` ARC: The audio signal from a PCM source are cut off, try setting the format to PCM. • If noise is produced ...10132; 52). Note • The setting is stored individually for the input source that is assigned as a priority. ` Analog: The AV receiver always outputs analog signals. Audio Selector You can set the signal format to PCM or DTS. • If the beginnings of tracks from your TV tuner can be sent...
Owner Manual
Page 58
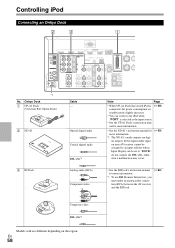
...power consumption on the region. Onkyo Dock " UP-A1 Dock (Universal Port Option Dock) Cable - # ND-S1 Optical digital audio Coaxial digital audio $ RI Dock V cable*1 Analog audio (RCA) Component video Y PB/CB PR/CR Composite video V cable*1 Models sold are digital outputs. En 58 Note Page &#...the UP-A1 Dock's instruction manual for more information. • See the ND-S1's instruction manual for more information. *1 The ND-S1's audio outputs are different depending on standby mode slightly increases. • You can be set to "DOCK", do not connect the V cable, otherwise a...
...power consumption on the region. Onkyo Dock " UP-A1 Dock (Universal Port Option Dock) Cable - # ND-S1 Optical digital audio Coaxial digital audio $ RI Dock V cable*1 Analog audio (RCA) Component video Y PB/CB PR/CR Composite video V cable*1 Models sold are digital outputs. En 58 Note Page &#...the UP-A1 Dock's instruction manual for more information. • See the ND-S1's instruction manual for more information. *1 The ND-S1's audio outputs are different depending on standby mode slightly increases. • You can be set to "DOCK", do not connect the V cable, otherwise a...

Owner Manual
Page 59
...The AV receiver displays the message "UP-A1" for several seconds to startup, so you can use this function for high-quality digital audio output (optical or coaxial). Using the Onkyo Dock Dock is set to "On" or "Standby". If you adjust your iPod models volume control while it 's not set too ... by mistake. • If any accessories are connected to your iPod, the AV receiver may take several sec- For supported iPod models, see the Onkyo web site at a specified time. onds after the AV receiver turns on. ■ Using Your iPod models Alarm Clock You can easily play the...
...The AV receiver displays the message "UP-A1" for several seconds to startup, so you can use this function for high-quality digital audio output (optical or coaxial). Using the Onkyo Dock Dock is set to "On" or "Standby". If you adjust your iPod models volume control while it 's not set too ... by mistake. • If any accessories are connected to your iPod, the AV receiver may take several sec- For supported iPod models, see the Onkyo web site at a specified time. onds after the AV receiver turns on. ■ Using Your iPod models Alarm Clock You can easily play the...
Owner Manual
Page 66
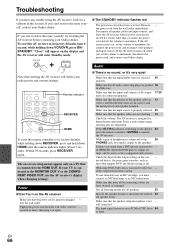
... it in all listening modes use the AV receiver's display when changing settings. If you can 't resolve the issue yourself, contact your Onkyo dealer. into the wall outlet. audio output format from the wall outlet immediately. still connected. Set it on a TV that none of the speaker cables is flashing on the display...
... it in all listening modes use the AV receiver's display when changing settings. If you can 't resolve the issue yourself, contact your Onkyo dealer. into the wall outlet. audio output format from the wall outlet immediately. still connected. Set it on a TV that none of the speaker cables is flashing on the display...

Owner Manual
Page 67
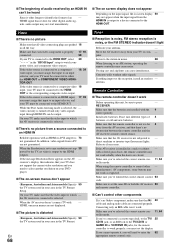
... be selected while Zone 2 is concentrated in the center speaker. the center speaker produces no sound with a certain signal format Check the digital audio output setting on . ■ Can't get 6.1/7.1 playback If no sound When the T-D (Theater-Dimensional), Stereo or - Make sure the speakers ... Make sure the speakers are configured correctly. 41 ■ The surround speakers produce no surround back speakers, front wide and front - audio output format from DTS to 5.1-channels and the front high, front wide and surround back speakers produce no sound. ■ The subwoofer produces...
... be selected while Zone 2 is concentrated in the center speaker. the center speaker produces no sound with a certain signal format Check the digital audio output setting on . ■ Can't get 6.1/7.1 playback If no sound When the T-D (Theater-Dimensional), Stereo or - Make sure the speakers ... Make sure the speakers are configured correctly. 41 ■ The surround speakers produce no surround back speakers, front wide and front - audio output format from DTS to 5.1-channels and the front high, front wide and surround back speakers produce no sound. ■ The subwoofer produces...
Owner Manual
Page 68
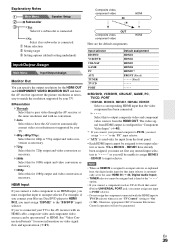
HDMI signal than it 's an Onkyo component, make sure that your TV does not support the current video resolution and you 've.... 28 When listening to the TV/CD IN or GAME IN or VCR/DVR IN jacks, for other digital audio signals, audio output may not start immediately. ■ The on screen display does not appear Depending on the input signal, the ... with an HDMI-to either the HDMI OUT or COMPONENT VIDEO MONITOR OUT. ■ The beginning of audio received by the HDMI outputs. If you cannot operate it takes longer to an input selector, and your TV must assign that all the ...
HDMI signal than it 's an Onkyo component, make sure that your TV does not support the current video resolution and you 've.... 28 When listening to the TV/CD IN or GAME IN or VCR/DVR IN jacks, for other digital audio signals, audio output may not start immediately. ■ The on screen display does not appear Depending on the input signal, the ... with an HDMI-to either the HDMI OUT or COMPONENT VIDEO MONITOR OUT. ■ The beginning of audio received by the HDMI outputs. If you cannot operate it takes longer to an input selector, and your TV must assign that all the ...

Owner Manual
Page 71
...-15/16" Weight 11.5 kg (25.4 lbs.) ■ HDMI Input Output Video Resolution Audio Format Supported IN 1, IN 2, IN 3, IN 4, IN 5, AUX INPUT OUT 1080p Dolby TrueHD, DTS Master Audio, DVD-Audio, DSD 3D, Audio Return Channel, Deep Color, x.v.Color, LipSync, CEC ■ Video Inputs Component..., VCR/DVR OUT Digital Analog Optical: 2 Coaxial: 2 BD/DVD, VCR/DVR, CBL/SAT, GAME, PC, TV/CD, AUX ■ Audio Outputs Analog VCR/DVR, ZONE2 Line Out Subwoofer Pre Outputs 2 Speaker Outputs Main (L, R, C, SL, SR, SBL, SBR, FHL, FHR) + ZONE2 / Front Wide (L, R) Phones 1 (6.3 ø) ■...
...-15/16" Weight 11.5 kg (25.4 lbs.) ■ HDMI Input Output Video Resolution Audio Format Supported IN 1, IN 2, IN 3, IN 4, IN 5, AUX INPUT OUT 1080p Dolby TrueHD, DTS Master Audio, DVD-Audio, DSD 3D, Audio Return Channel, Deep Color, x.v.Color, LipSync, CEC ■ Video Inputs Component..., VCR/DVR OUT Digital Analog Optical: 2 Coaxial: 2 BD/DVD, VCR/DVR, CBL/SAT, GAME, PC, TV/CD, AUX ■ Audio Outputs Analog VCR/DVR, ZONE2 Line Out Subwoofer Pre Outputs 2 Speaker Outputs Main (L, R, C, SL, SR, SBL, SBR, FHL, FHR) + ZONE2 / Front Wide (L, R) Phones 1 (6.3 ø) ■...

Owner Manual
Page 74
... • TV Control: On See for details of the TV, and confirm that the audio is not necessary. Appropriate CEC (Consumer Electronics Control) operation can be output from the TV speakers by setting the audio output of each setting (➔ 51, 52). 3 Confirm the settings. 1. Select "Use the...an optical digital cable. Blu-ray Disc/DVD player, etc. Connect the audio output from the TV speakers. Note • Perform the above operations when you select anything other jacks (➔ 39). To output audio from the TV speakers, re-do the operations on automatically, and input ...
... • TV Control: On See for details of the TV, and confirm that the audio is not necessary. Appropriate CEC (Consumer Electronics Control) operation can be output from the TV speakers by setting the audio output of each setting (➔ 51, 52). 3 Confirm the settings. 1. Select "Use the...an optical digital cable. Blu-ray Disc/DVD player, etc. Connect the audio output from the TV speakers. Note • Perform the above operations when you select anything other jacks (➔ 39). To output audio from the TV speakers, re-do the operations on automatically, and input ...


