
Owner Manual
Page 3
... the cable ground shall be determined by turning the equipment off and on, the user is encouraged to try to correct the interference by the party responsible for a Class B digital device, pursuant to Part 15 of the copyright holder. 2. Setting the [STANDBY/ON] switch to radio communications. However, there is illegal without permission of the FCC Rules. The AC fuse...
... the cable ground shall be determined by turning the equipment off and on, the user is encouraged to try to correct the interference by the party responsible for a Class B digital device, pursuant to Part 15 of the copyright holder. 2. Setting the [STANDBY/ON] switch to radio communications. However, there is illegal without permission of the FCC Rules. The AC fuse...
Owner Manual
Page 6
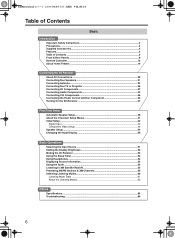
... Receiver 37 First Time Setup Automatic Speaker Setup 38 About the Onscreen Setup Menus 41 Initial Setup...42 Digital Input ...42 Component Video Setup 43 Speaker Setup ...44 Changing the Input Display 50 Basic Operations Selecting the Input Source 51 Setting the Display Brightness 52 Muting the AV Receiver 52 Using the Sleep Timer...52 Using Headphones ...52 Displaying Source Information 53 Using the Tuner ...54 Listening to XM Satellite Radio 55 Presetting AM/FM Stations & XM Channels 59 Selecting Listening Modes 60 Listening Mode Table ...61 About the Listening Modes...
... Receiver 37 First Time Setup Automatic Speaker Setup 38 About the Onscreen Setup Menus 41 Initial Setup...42 Digital Input ...42 Component Video Setup 43 Speaker Setup ...44 Changing the Input Display 50 Basic Operations Selecting the Input Source 51 Setting the Display Brightness 52 Muting the AV Receiver 52 Using the Sleep Timer...52 Using Headphones ...52 Displaying Source Information 53 Using the Tuner ...54 Listening to XM Satellite Radio 55 Presetting AM/FM Stations & XM Channels 59 Selecting Listening Modes 60 Listening Mode Table ...61 About the Listening Modes...

Owner Manual
Page 7
... Features Adjusting the Bass & Treble 68 Audio Adjust Functions 68 Assigning Listening Modes to Input Sources 70 IntelliVolume ...71 Setting Preferences...71 Digital Input Signal Formats 72 Changing the Remote Controller's ID 73 Advanced Operations Advanced Features Using the Late Night Function (Dolby Digital only 64 Using the CinemaFILTER 64 Adjusting Individual Speaker Levels 65 Using the DVD Analog Multichannel Input 65 Recording...66 Zone 2 Advanced Features Connecting Zone 2 ...74 Setting the Powered Zone 2 75 Using Zone 2...76 Using the Remote Control in Zone 2 77...
... Features Adjusting the Bass & Treble 68 Audio Adjust Functions 68 Assigning Listening Modes to Input Sources 70 IntelliVolume ...71 Setting Preferences...71 Digital Input Signal Formats 72 Changing the Remote Controller's ID 73 Advanced Operations Advanced Features Using the Late Night Function (Dolby Digital only 64 Using the CinemaFILTER 64 Adjusting Individual Speaker Levels 65 Using the DVD Analog Multichannel Input 65 Recording...66 Zone 2 Advanced Features Connecting Zone 2 ...74 Setting the Powered Zone 2 75 Using Zone 2...76 Using the Remote Control in Zone 2 77...

Owner Manual
Page 8
... menu. L DIMMER button (52) DIMMER is used to select the listening modes. E STANDBY indicator (37) This indicator lights up when Zone 2 is selected. G STEREO button (60) This button is used to select the Stereo listening mode. Front & Rear Panels Front Panel TX-SR603X 1 234 5 6 7 8 9 0 A B C DE FG H STANDBY/ON ZONE2 OFF ZONE 2 LEVEL PHONES TUNING / PRESET MASTER VOLUME STANDBY TONE + DISPLAY MULTl CH DVD VIDEO 1 VIDEO 2 VIDEO 3 VIDEO 4 VCR 1 VCR 2 ENTER RETURN SETUP CLEAR TAPE TUNER CD VIDEO 4 INPUT SETUP MIC S VIDEO VIDEO L AUDIO R DIGITAL...
... menu. L DIMMER button (52) DIMMER is used to select the listening modes. E STANDBY indicator (37) This indicator lights up when Zone 2 is selected. G STEREO button (60) This button is used to select the Stereo listening mode. Front & Rear Panels Front Panel TX-SR603X 1 234 5 6 7 8 9 0 A B C DE FG H STANDBY/ON ZONE2 OFF ZONE 2 LEVEL PHONES TUNING / PRESET MASTER VOLUME STANDBY TONE + DISPLAY MULTl CH DVD VIDEO 1 VIDEO 2 VIDEO 3 VIDEO 4 VCR 1 VCR 2 ENTER RETURN SETUP CLEAR TAPE TUNER CD VIDEO 4 INPUT SETUP MIC S VIDEO VIDEO L AUDIO R DIGITAL...

Owner Manual
Page 12
...can connect a DVD player's 2-channel analog audio output or 5.1-channel analog audio output. You can connect a VCR. T ZONE 2 LINE OUT (74) This analog audio output can be connected to an jack on another Onkyo AV component. U PRE OUT (21) The SUBWOOFER jack is for connecting a powered subwoofer. V AC OUTLET This switched AC outlet can be used to supply power to other AV component, even if they are for connection information. 12 Input jacks include S-Video, composite video, and analog audio. Front & Rear Panels-Continued M REMOTE CONTROL This (Remote Interactive) jack...
...can connect a DVD player's 2-channel analog audio output or 5.1-channel analog audio output. You can connect a VCR. T ZONE 2 LINE OUT (74) This analog audio output can be connected to an jack on another Onkyo AV component. U PRE OUT (21) The SUBWOOFER jack is for connecting a powered subwoofer. V AC OUTLET This switched AC outlet can be used to supply power to other AV component, even if they are for connection information. 12 Input jacks include S-Video, composite video, and analog audio. Front & Rear Panels-Continued M REMOTE CONTROL This (Remote Interactive) jack...

Owner Manual
Page 16
...CABLE CDR TOP MENU MENU ENTER SAT MD SLEEP VOL PREV CH DISPLAY RETURN SETUP MUTING REC PLAYLIST RANDOM STEREO LISTENING MODE SURR REPEAT AUDIO SUBTITLE PLAY MODE DIRECT ALLST TESTTONE CH SEL LEVEL OPEN/CLOSE VIDEO OFF L NIGHT LEVEL CINE FLTR RC-623M M N O P Q R S A STANDBY button This button sets the DVD player to turn off the internal video circuitry, eliminating any possibility of interference. 16 B ON button This button is used to Standby. C Number buttons These buttons are used with selectable play modes on the DVD player. O SETUP button This button...
...CABLE CDR TOP MENU MENU ENTER SAT MD SLEEP VOL PREV CH DISPLAY RETURN SETUP MUTING REC PLAYLIST RANDOM STEREO LISTENING MODE SURR REPEAT AUDIO SUBTITLE PLAY MODE DIRECT ALLST TESTTONE CH SEL LEVEL OPEN/CLOSE VIDEO OFF L NIGHT LEVEL CINE FLTR RC-623M M N O P Q R S A STANDBY button This button sets the DVD player to turn off the internal video circuitry, eliminating any possibility of interference. 16 B ON button This button is used to Standby. C Number buttons These buttons are used with selectable play modes on the DVD player. O SETUP button This button...

Owner Manual
Page 36
... CONTROL R CD TAPE VIDEO 3 VIDEO 2 VIDEO 1 R DVD SUB WOOFER REMOTE SURROUND BACK SPEAKERS SURROUND SPEAKERS FRONT SPEAKERS CONTROL L L R R PRE OUT SUB WOOFER CENTER SPEAKER IN L R AUDIO OUTPUT L R AUDIO OUTPUT L R e.g., DVD player e.g., MD recorder Notes: • If you connect an -compatible Onkyo MiniDisc recorder or CD recorder to the TAPE IN/OUT jacks, for connections. Remote Control You can connect either one to Standby, all functions. No cables are connected digitally. Caution: Make sure that the capacity of another AV component. Connecting the AV Receiver...
... CONTROL R CD TAPE VIDEO 3 VIDEO 2 VIDEO 1 R DVD SUB WOOFER REMOTE SURROUND BACK SPEAKERS SURROUND SPEAKERS FRONT SPEAKERS CONTROL L L R R PRE OUT SUB WOOFER CENTER SPEAKER IN L R AUDIO OUTPUT L R AUDIO OUTPUT L R e.g., DVD player e.g., MD recorder Notes: • If you connect an -compatible Onkyo MiniDisc recorder or CD recorder to the TAPE IN/OUT jacks, for connections. Remote Control You can connect either one to Standby, all functions. No cables are connected digitally. Caution: Make sure that the capacity of another AV component. Connecting the AV Receiver...
Owner Manual
Page 51
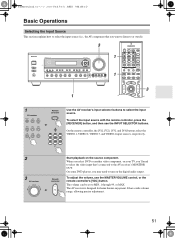
...To select the input source with the remote controller, press the [RECEIVER] button, and then use the MASTER VOLUME control, or the remote controller's [VOL] button. When you select DVD or another video component, on your TV, you want to listen to or watch). 3 STANDBY/ON ZONE2 OFF ZONE 2 LEVEL PHONES TUNING / PRESET MASTER VOLUME STANDBY ENTER TONE MULTl CH + DVD STEREO LISTENING MODE DISPLAY DIGITAL INPUT VIDEO 1 VIDEO 2 VIDEO 3 VIDEO 4 DIMMER MEMORY TUNING MODE RETURN SETUP CLEAR TAPE TUNER CD VIDEO 4 INPUT VCR 1 VCR 2 SETUP MIC S VIDEO VIDEO L AUDIO R DIGITAL...
...To select the input source with the remote controller, press the [RECEIVER] button, and then use the MASTER VOLUME control, or the remote controller's [VOL] button. When you select DVD or another video component, on your TV, you want to listen to or watch). 3 STANDBY/ON ZONE2 OFF ZONE 2 LEVEL PHONES TUNING / PRESET MASTER VOLUME STANDBY ENTER TONE MULTl CH + DVD STEREO LISTENING MODE DISPLAY DIGITAL INPUT VIDEO 1 VIDEO 2 VIDEO 3 VIDEO 4 DIMMER MEMORY TUNING MODE RETURN SETUP CLEAR TAPE TUNER CD VIDEO 4 INPUT VCR 1 VCR 2 SETUP MIC S VIDEO VIDEO L AUDIO R DIGITAL...

Owner Manual
Page 61
Input signal format Analog, PCM*1 Dolby D 3/2, 2/2 2/0 1/0,1+1 Other 3/2, 2/2 Listening mode Source CD, TV, LD, VHS, MD, turntable, radio, cassette, DTV, etc. If the SurrBack parameter is set to "2ch," or the Zone 2 speakers are processed at 48 kHz for each input signal format. Available only when Surround speakers are processed as DTS. 3. Multich ES DVD, LD, CD, etc. In the Direct listening modes, PCM signals at 32 kHz, 44.1 kHz, and 48 kHz are processed at...
Input signal format Analog, PCM*1 Dolby D 3/2, 2/2 2/0 1/0,1+1 Other 3/2, 2/2 Listening mode Source CD, TV, LD, VHS, MD, turntable, radio, cassette, DTV, etc. If the SurrBack parameter is set to "2ch," or the Zone 2 speakers are processed at 48 kHz for each input signal format. Available only when Surround speakers are processed as DTS. 3. Multich ES DVD, LD, CD, etc. In the Direct listening modes, PCM signals at 32 kHz, 44.1 kHz, and 48 kHz are processed at...

Owner Manual
Page 65
... volume of each speaker, and use the bass and treble functions with a 5.1-channel analog audio output, such as shown. The name of individual speakers during playback. CD TAPE TUNER 7 8 9 T V VOL +10 0 CLEAR - - / - - - 10 11 12 INPUT SELECTOR MACRO 1 2 3 ZONE2 RECEIVER TAPE/AMP REMOTE MODE DVD CD HDD TV DIMMER VCR CABLE CDR SAT MD SLEEP TOP MENU MENU + STEREO LISTENING MODE SURR REPEAT AUDIO SUBTITLE PLAY MODE DIRECT ALLST TESTTONE CH SEL OPEN/CLOSE VIDEO OFF LEVEL L NIGHT LEVEL CINE FLTR RC-623M LEVEL - + Using the DVD Analog...
... volume of each speaker, and use the bass and treble functions with a 5.1-channel analog audio output, such as shown. The name of individual speakers during playback. CD TAPE TUNER 7 8 9 T V VOL +10 0 CLEAR - - / - - - 10 11 12 INPUT SELECTOR MACRO 1 2 3 ZONE2 RECEIVER TAPE/AMP REMOTE MODE DVD CD HDD TV DIMMER VCR CABLE CDR SAT MD SLEEP TOP MENU MENU + STEREO LISTENING MODE SURR REPEAT AUDIO SUBTITLE PLAY MODE DIRECT ALLST TESTTONE CH SEL OPEN/CLOSE VIDEO OFF LEVEL L NIGHT LEVEL CINE FLTR RC-623M LEVEL - + Using the DVD Analog...

Owner Manual
Page 67
... CENTER L REMOTE CONTROL R CD TAPE VIDEO 3 VIDEO 2 VIDEO 1 R DVD SUB WOOFER SURRO SPE L R PRE OUT SUB WOOFER CD player VCR 1 Prepare the camcorder and CD player for playback. 2 Prepare the VCR for information on connecting components. 1 STANDBY/ON ZONE2 OFF ZONE 2 LEVEL PHONES TUNING / PRESET MASTER VOLUME STANDBY ENTER TONE MULTl CH + DVD STEREO LISTENING MODE DISPLAY DIGITAL INPUT VIDEO 1 VIDEO 2 VIDEO 3 VIDEO 4 DIMMER MEMORY TUNING MODE RETURN SETUP CLEAR TAPE TUNER CD VIDEO 4 INPUT VCR 1 VCR 2 SETUP MIC S VIDEO VIDEO L AUDIO R DIGITAL 1 Use...
... CENTER L REMOTE CONTROL R CD TAPE VIDEO 3 VIDEO 2 VIDEO 1 R DVD SUB WOOFER SURRO SPE L R PRE OUT SUB WOOFER CD player VCR 1 Prepare the camcorder and CD player for playback. 2 Prepare the VCR for information on connecting components. 1 STANDBY/ON ZONE2 OFF ZONE 2 LEVEL PHONES TUNING / PRESET MASTER VOLUME STANDBY ENTER TONE MULTl CH + DVD STEREO LISTENING MODE DISPLAY DIGITAL INPUT VIDEO 1 VIDEO 2 VIDEO 3 VIDEO 4 DIMMER MEMORY TUNING MODE RETURN SETUP CLEAR TAPE TUNER CD VIDEO 4 INPUT VCR 1 VCR 2 SETUP MIC S VIDEO VIDEO L AUDIO R DIGITAL 1 Use...

Owner Manual
Page 69
... forward to select audio channels or languages with multiplex sources, multilingual TV broadcasts, and so on . Dolby Digital EX Input Signal Setting I Center Image The DTS Neo:6 Music listening mode creates 6-channel surround sound from 2-channel (stereo) sources. Manual: You can adjust the width of the center channel sound. Sub: The sub channel is output (default). L: Only the left and right speakers to 5 (default is output. When set to 7 (default is attenuated by how much surround sound, move it is in the Mono listening mode. It can be used (default). Main...
... forward to select audio channels or languages with multiplex sources, multilingual TV broadcasts, and so on . Dolby Digital EX Input Signal Setting I Center Image The DTS Neo:6 Music listening mode creates 6-channel surround sound from 2-channel (stereo) sources. Manual: You can adjust the width of the center channel sound. Sub: The sub channel is output (default). L: Only the left and right speakers to 5 (default is output. When set to 7 (default is attenuated by how much surround sound, move it is in the Mono listening mode. It can be used (default). Main...

Owner Manual
Page 70
..., turntable, radio, cassette, cable, satellite, etc.) or PCM digital (CD, DVD, etc.) audio signal is played (DVD, etc.). e. Multich: This setting is available only when DVD or MULTI CH is used . For example, you can specify the listening mode to be used . With this setting, you can set , and then use the Left and Right [ ]/ [ ] buttons to select a listening mode. When you can specify the listening mode to be used when the DVD analog multichannel input is selected with Dolby Digital input signals. The setup menu closes...
..., turntable, radio, cassette, cable, satellite, etc.) or PCM digital (CD, DVD, etc.) audio signal is played (DVD, etc.). e. Multich: This setting is available only when DVD or MULTI CH is used . For example, you can specify the listening mode to be used . With this setting, you can set , and then use the Left and Right [ ]/ [ ] buttons to select a listening mode. When you can specify the listening mode to be used when the DVD analog multichannel input is selected with Dolby Digital input signals. The setup menu closes...
Owner Manual
Page 72
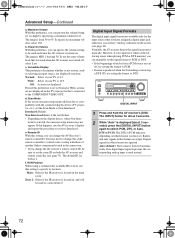
...If no maximum volume, select Off. Interlaced:Default. STANDBY/ON ZONE2 OFF ZONE 2 LEVEL PHONES TUNING / PRESET MASTER VOLUME STANDBY ENTER TONE MULTl CH + DVD STEREO LISTENING MODE DISPLAY DIGITAL INPUT VIDEO 1 VIDEO 2 VIDEO 3 VIDEO 4 DIMMER MEMORY TUNING MODE RETURN SETUP CLEAR TAPE TUNER CD VIDEO 4 INPUT VCR 1 VCR 2 SETUP MIC S VIDEO VIDEO L AUDIO R DIGITAL DIGITAL INPUT 1 Press and hold the AV receiver's [DIGITAL INPUT] button for the input sources that format are ignored. Maximum Volume With this happens, use this setting, you will be used to Non...
...If no maximum volume, select Off. Interlaced:Default. STANDBY/ON ZONE2 OFF ZONE 2 LEVEL PHONES TUNING / PRESET MASTER VOLUME STANDBY ENTER TONE MULTl CH + DVD STEREO LISTENING MODE DISPLAY DIGITAL INPUT VIDEO 1 VIDEO 2 VIDEO 3 VIDEO 4 DIMMER MEMORY TUNING MODE RETURN SETUP CLEAR TAPE TUNER CD VIDEO 4 INPUT VCR 1 VCR 2 SETUP MIC S VIDEO VIDEO L AUDIO R DIGITAL DIGITAL INPUT 1 Press and hold the AV receiver's [DIGITAL INPUT] button for the input sources that format are ignored. Maximum Volume With this happens, use this setting, you will be used to Non...

Owner Manual
Page 75
... ZONE 2 SPEAKERS terminals output sound, but not used . 7 8 9 T V VOL +10 0 CLEAR --/--- 10 11 12 INPUT SELECTOR MACRO 1 2 3 ZONE2 1 RECEIVER TAPE/AMP REMOTE MODE DVD CD HDD 2 TV DIMMER VCR CABLE CDR TOP MENU MENU SAT MD SLEEP + CH DISC ALBUM ENTER VOL 2, 3 - PREV CH RETURN SETUP 1, 4 DISPLAY MUTING 1 RECEIVER REC PLAYLIST RANDOM STEREO LISTENING MODE SURR REPEAT AUDIO SUBTITLE PLAY MODE DIRECT ALLST TESTTONE CH SEL LEVEL OPEN/CLOSE VIDEO OFF L NIGHT LEVEL CINE FLTR Press the [RECEIVER] button followed by using its [SETUP] button...
... ZONE 2 SPEAKERS terminals output sound, but not used . 7 8 9 T V VOL +10 0 CLEAR --/--- 10 11 12 INPUT SELECTOR MACRO 1 2 3 ZONE2 1 RECEIVER TAPE/AMP REMOTE MODE DVD CD HDD 2 TV DIMMER VCR CABLE CDR TOP MENU MENU SAT MD SLEEP + CH DISC ALBUM ENTER VOL 2, 3 - PREV CH RETURN SETUP 1, 4 DISPLAY MUTING 1 RECEIVER REC PLAYLIST RANDOM STEREO LISTENING MODE SURR REPEAT AUDIO SUBTITLE PLAY MODE DIRECT ALLST TESTTONE CH SEL LEVEL OPEN/CLOSE VIDEO OFF L NIGHT LEVEL CINE FLTR Press the [RECEIVER] button followed by using its [SETUP] button...
Owner Manual
Page 76
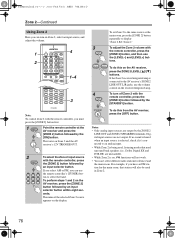
... use the volume control on Zone 2, select an input source, and adjust the volume. 1 2 ON STANDBY I T V INPUT V1 V2 V3 1 2 3 + V4 MULTI CH DVD T V CH 4 5 6 - The name of the selected Zone 2 source appears on , functions will also be used , listening modes that station will not work. • You can't select different radio stations for the main room, that need surround back speakers (i.e., Dolby Digital EX and DTS-ES) are unavailable. • While Zone 2 is connected to the AV receiver's ZONE 2 LINE OUT L/R jacks, use the [LEVEL-] and [LEVEL+] buttons...
... use the volume control on Zone 2, select an input source, and adjust the volume. 1 2 ON STANDBY I T V INPUT V1 V2 V3 1 2 3 + V4 MULTI CH DVD T V CH 4 5 6 - The name of the selected Zone 2 source appears on , functions will also be used , listening modes that station will not work. • You can't select different radio stations for the main room, that need surround back speakers (i.e., Dolby Digital EX and DTS-ES) are unavailable. • While Zone 2 is connected to the AV receiver's ZONE 2 LINE OUT L/R jacks, use the [LEVEL-] and [LEVEL+] buttons...
Owner Manual
Page 79
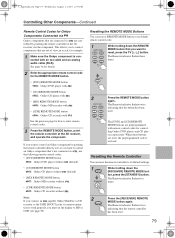
... Onkyo component that's not connected via , use the following remote control codes: • [DVD] REMOTE MODE button 5001: Onkyo DVD player without (default) • [CD] REMOTE MODE button 6001: Onkyo CD player without (default) • [MD] REMOTE MODE button 6007: Onkyo MD recorder without • [CDR] REMOTE MODE button 6005: Onkyo CD recorder without Note: If you connect an -capable Onkyo MiniDisc or CD recorder to the TAPE IN/OUT jacks, for remote operation to work properly, you must set the display to its default remote control code. 1 REMOTE MODE CD DVD TV VCR CABLE...
... Onkyo component that's not connected via , use the following remote control codes: • [DVD] REMOTE MODE button 5001: Onkyo DVD player without (default) • [CD] REMOTE MODE button 6001: Onkyo CD player without (default) • [MD] REMOTE MODE button 6007: Onkyo MD recorder without • [CDR] REMOTE MODE button 6005: Onkyo CD recorder without Note: If you connect an -capable Onkyo MiniDisc or CD recorder to the TAPE IN/OUT jacks, for remote operation to work properly, you must set the display to its default remote control code. 1 REMOTE MODE CD DVD TV VCR CABLE...

Owner Manual
Page 84
.... • Unplug the power cord from a menu. • If your Onkyo dealer. Only the center speaker produces sound? • If you use all speakers (page 62). 84 • Specify the speaker distances (page 47) and adjust the individual speaker levels (page 48). • Make sure that support DVD, the default setting is selected, the center speaker produces no sound? • When the Stereo or Direct listening mode is concentrated in the center speaker. • Make sure...
.... • Unplug the power cord from a menu. • If your Onkyo dealer. Only the center speaker produces sound? • If you use all speakers (page 62). 84 • Specify the speaker distances (page 47) and adjust the individual speaker levels (page 48). • Make sure that support DVD, the default setting is selected, the center speaker produces no sound? • When the Stereo or Direct listening mode is concentrated in the center speaker. • Make sure...

Owner Manual
Page 85
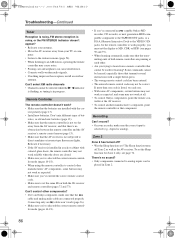
... volume setting may change. Troubleshooting-Continued The subwoofer produces no sound? • When you may produce a short audible noise. mation in the LFE channel, the subwoofer produces no sound. • Make sure the speakers are pushed in DTS listening mode and the DTS indicator remains on the AV receiver. The Late Night function doesn't work ? • Check the DVD analog multichannel input connec- This is Dolby Digital (page 64). Video There's no surround back speakers are connected, or the Zone 2 speakers...
... volume setting may change. Troubleshooting-Continued The subwoofer produces no sound? • When you may produce a short audible noise. mation in the LFE channel, the subwoofer produces no sound. • Make sure the speakers are pushed in DTS listening mode and the DTS indicator remains on the AV receiver. The Late Night function doesn't work ? • Check the DVD analog multichannel input connec- This is Dolby Digital (page 64). Video There's no surround back speakers are connected, or the Zone 2 speakers...
Owner Manual
Page 86
... cable and analog audio cable are connected properly. Troubleshooting-Continued Tuner Reception is noisy, FM stereo reception is selected (e.g., digital or analog). Can't control other . • Are you 've selected the correct remote controller mode (pages 14-18). • When using the remote controller to MD, CDR, or HDD (see page 76. Zone 2 Zone 2 has turned off Zone 2 as well as expected, and some may not work as tuning is installed in Zone 2. 86 puter. • Listen...
... cable and analog audio cable are connected properly. Troubleshooting-Continued Tuner Reception is noisy, FM stereo reception is selected (e.g., digital or analog). Can't control other . • Are you 've selected the correct remote controller mode (pages 14-18). • When using the remote controller to MD, CDR, or HDD (see page 76. Zone 2 Zone 2 has turned off Zone 2 as well as expected, and some may not work as tuning is installed in Zone 2. 86 puter. • Listen...


