Owner Manual
Page 4
... Front panel facilities 8 Front panel 8 Front panel display 11 Remote controller 12 Connections 14 TX-SR701/701E 15 TX-SR601/601E 15 Connecting your audio components 16 Connecting your video components 17 12V TRIGGER ZONE 2 terminal 21 PRE OUT (TX-SR701/701E only 21 Operating components not reached by the remote controller signals (IR IN...
... Front panel facilities 8 Front panel 8 Front panel display 11 Remote controller 12 Connections 14 TX-SR701/701E 15 TX-SR601/601E 15 Connecting your audio components 16 Connecting your video components 17 12V TRIGGER ZONE 2 terminal 21 PRE OUT (TX-SR701/701E only 21 Operating components not reached by the remote controller signals (IR IN...
Owner Manual
Page 5
... remote zone 60 Recording 61 Recording the input source (REC OUT selector 61 Recording both the audio and video 62 Remote controller Using remote controller 63 Overview 63 Calling up a preset radio station 63 Controlling an Onkyo cassette tape deck 63 Controlling an Onkyo DVD...messages shown below appears 77 Specifications (TX-SR701/701E 78 Specifications (TX-SR601/601E 79 Declaration of Conformity We, ONKYO EUROPE ELECTRONICS GmbH INDUSTRIESTRASSE 20 82110 GERMERING, GERMANY declare in own responsibility, that the ONKYO product described in this instruction manual is in ...
... remote zone 60 Recording 61 Recording the input source (REC OUT selector 61 Recording both the audio and video 62 Remote controller Using remote controller 63 Overview 63 Calling up a preset radio station 63 Controlling an Onkyo cassette tape deck 63 Controlling an Onkyo DVD...messages shown below appears 77 Specifications (TX-SR701/701E 78 Specifications (TX-SR601/601E 79 Declaration of Conformity We, ONKYO EUROPE ELECTRONICS GmbH INDUSTRIESTRASSE 20 82110 GERMERING, GERMANY declare in own responsibility, that the ONKYO product described in this instruction manual is in ...
Owner Manual
Page 6
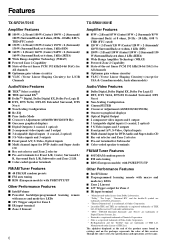
..."Theater-Dimensional" is a registered trademark of Niles Audio Corporation. • Re-Equalization and the "Re-EQ" logo are trademarks of Onkyo Corporation. • Lucasfilm THX and THX are the same. Manufactured under authorization. • "DTS," "DTS-ES Extended ...PS/RT/PTY/TP Other Performance Features I IntelliVolume I Powerful backlit/preprogrammed learning remote with macro and mode-key LEDs I 12V Trigger output for Zone 2 I IR input terminal I Zone 2 Lineout 6 TX-SR601/601E Amplifier Features I 85 W × 2 (Front)/ 85 W (Center)/ 85 W × 2 (Surround)/ 85 W ...
..."Theater-Dimensional" is a registered trademark of Niles Audio Corporation. • Re-Equalization and the "Re-EQ" logo are trademarks of Onkyo Corporation. • Lucasfilm THX and THX are the same. Manufactured under authorization. • "DTS," "DTS-ES Extended ...PS/RT/PTY/TP Other Performance Features I IntelliVolume I Powerful backlit/preprogrammed learning remote with macro and mode-key LEDs I 12V Trigger output for Zone 2 I IR input terminal I Zone 2 Lineout 6 TX-SR601/601E Amplifier Features I 85 W × 2 (Front)/ 85 W (Center)/ 85 W × 2 (Surround)/ 85 W ...
Owner Manual
Page 7
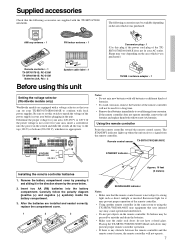
... Front Left SP-B / Zone 2 Left SP-B / Zone 2 Left Front Right Front Right SP-B / Zone 2 Right SP-B / Zone 2 Right Surround Left Surround Left Surround Right Surround Right Center Center Surround Back Left Surround Back Left Zone 2 Left Zone 2 Left Surround Back Right Surround Back Right Zone 2 Right Zone 2 Right Remote controller × 1 TX-SR701/701E: RC-533M TX-SR601/601E: RC-515M...
... Front Left SP-B / Zone 2 Left SP-B / Zone 2 Left Front Right Front Right SP-B / Zone 2 Right SP-B / Zone 2 Right Surround Left Surround Left Surround Right Surround Right Center Center Surround Back Left Surround Back Left Zone 2 Left Zone 2 Left Surround Back Right Surround Back Right Zone 2 Right Zone 2 Right Remote controller × 1 TX-SR701/701E: RC-533M TX-SR601/601E: RC-515M...
Owner Manual
Page 8
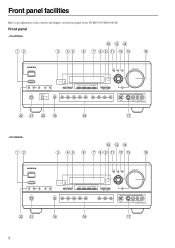
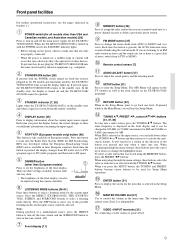
... STANDBY/ON AUDIO ADJUST SETUP RETURN TUNI NG MASTER VOLUME POWER ON OFF REC OUT ZONE 2 OFF LEVEL STANDBY DISPLAY RT/PTY/TP STEREO LISTENING MODE SURROUND THX DSP PRESET ... VCR 2 TAPE TUNER CD PHONO ENTER VIDEO 4 INPUT DIGITAL S VIDEO VIDEO L AUDIO R STANDBY/ON POWER ON OFF REC OUT ZONE 2 OFF PHONES LEVEL STANDBY DISPLAY RT/PTY/TP DIRECT LISTENING MODE STEREO SURROUND DSP AUDIO ADJUST SETUP RETURN TUNI NG PRESET MEMORY FM...8 Front panel facilities Here is an explanation of the controls and displays on the front panel of the TX-SR701/701E/601/601E.
... STANDBY/ON AUDIO ADJUST SETUP RETURN TUNI NG MASTER VOLUME POWER ON OFF REC OUT ZONE 2 OFF LEVEL STANDBY DISPLAY RT/PTY/TP STEREO LISTENING MODE SURROUND THX DSP PRESET ... VCR 2 TAPE TUNER CD PHONO ENTER VIDEO 4 INPUT DIGITAL S VIDEO VIDEO L AUDIO R STANDBY/ON POWER ON OFF REC OUT ZONE 2 OFF PHONES LEVEL STANDBY DISPLAY RT/PTY/TP DIRECT LISTENING MODE STEREO SURROUND DSP AUDIO ADJUST SETUP RETURN TUNI NG PRESET MEMORY FM...8 Front panel facilities Here is an explanation of the controls and displays on the front panel of the TX-SR701/701E/601/601E.
Owner Manual
Page 9
... on , a sudden surge of current will occur that all models other devices. Press the DIRECT (TX-SR601/601E), THX (TX-SR701/ 701E), STEREO, and SURROUND buttons to select any of the possible listening modes for the remote zone (Zone 2) is only available on and the display lights up or down either the TUNING or button...
... on , a sudden surge of current will occur that all models other devices. Press the DIRECT (TX-SR601/601E), THX (TX-SR701/ 701E), STEREO, and SURROUND buttons to select any of the possible listening modes for the remote zone (Zone 2) is only available on and the display lights up or down either the TUNING or button...
Owner Manual
Page 10
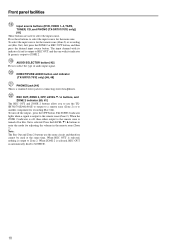
... Input source buttons (DVD, VIDEO 1-4, TAPE, TUNER, CD, and PHONO (TX-SR701/701E only)) [41] These buttons are used at the same time. REC OUT, ZONE 2, OFF, LEVEL / buttons, and ZONE 2 indicator [60, 61] The REC OUT and ZONE 2 buttons allow you to use the same circuit and therefore cannot be used... to select the input source. AUDIO SELECTOR button [42] Press to enter the mode for the main zone. To select the input source for connecting stereo headphones. DIRECT/PURE AUDIO button and indicator (TX-SR701/701E only) [46, 48] PHONES jack [44] This is output to select the input source ...
... Input source buttons (DVD, VIDEO 1-4, TAPE, TUNER, CD, and PHONO (TX-SR701/701E only)) [41] These buttons are used at the same time. REC OUT, ZONE 2, OFF, LEVEL / buttons, and ZONE 2 indicator [60, 61] The REC OUT and ZONE 2 buttons allow you to use the same circuit and therefore cannot be used... to select the input source. AUDIO SELECTOR button [42] Press to enter the mode for the main zone. To select the input source for connecting stereo headphones. DIRECT/PURE AUDIO button and indicator (TX-SR701/701E only) [46, 48] PHONES jack [44] This is output to select the input source ...

Owner Manual
Page 11
... display MUTING indicator Flashes when the mute function is received in the stereo mode. Turns off when placed into the monaural mode. ZONE 2 indicator Lights when using the remote zone (Zone 2). Listening mode or digital input format indicators One of the current input source. In addition, one component to show the source format...
... display MUTING indicator Flashes when the mute function is received in the stereo mode. Turns off when placed into the monaural mode. ZONE 2 indicator Lights when using the remote zone (Zone 2). Listening mode or digital input format indicators One of the current input source. In addition, one component to show the source format...

Owner Manual
Page 13
... Not used to display the Setup Menu on the TV screen and in conjunction with the TX-SR601/601E. MUTING button [45] AUDIO ADJUST button [57] ZONE 2/SEARCH/ENTER button When the DVD mode is used with the TX-SR601/601E). Use this button in the display. DVD:DVD, CD:CD, V1:VIDEO1, V2:...EQ function on the remote zone (ZONE 2). [60] When in the RCVR mode, press to perform operations on or off the tone control and the SURR button to select the Pure Audio mode. [46, 48] DIRECT, STEREO, SURR, ALL ST, DSP (TX-SR601/601E), DSP / (TX-SR701/701E), THX (TX-SR701/701E): You can ...
... Not used to display the Setup Menu on the TV screen and in conjunction with the TX-SR601/601E. MUTING button [45] AUDIO ADJUST button [57] ZONE 2/SEARCH/ENTER button When the DVD mode is used with the TX-SR601/601E). Use this button in the display. DVD:DVD, CD:CD, V1:VIDEO1, V2:...EQ function on the remote zone (ZONE 2). [60] When in the RCVR mode, press to perform operations on or off the tone control and the SURR button to select the Pure Audio mode. [46, 48] DIRECT, STEREO, SURR, ALL ST, DSP (TX-SR601/601E), DSP / (TX-SR701/701E), THX (TX-SR701/701E): You can ...
Owner Manual
Page 15
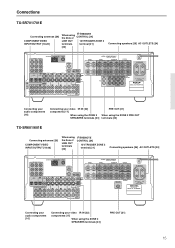
... your video IR IN [22] components [17] When using the ZONE 2 SPEAKERS terminals [23] PRE OUT [21] When using the ZONE 2 PRE OUT terminals [23] TX-SR601/601E Connecting antennas [29] COMPONENT VIDEO INPUT/OUTPUT [18-20] When using the ZONE 2 SPEAKERS terminals [23] PRE OUT [21] 15 SUB WOOFER ...R AV RECEIVER MODEL NO. TX-SR 701E Connecting your audio components [16] ...
... your video IR IN [22] components [17] When using the ZONE 2 SPEAKERS terminals [23] PRE OUT [21] When using the ZONE 2 PRE OUT terminals [23] TX-SR601/601E Connecting antennas [29] COMPONENT VIDEO INPUT/OUTPUT [18-20] When using the ZONE 2 SPEAKERS terminals [23] PRE OUT [21] 15 SUB WOOFER ...R AV RECEIVER MODEL NO. TX-SR 701E Connecting your audio components [16] ...
Owner Manual
Page 16
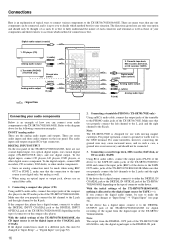
...page 52). Make sure that you properly connect the left channel to the L jack and the right channel to the PHONO audio jacks of the TX-SR701/701E. To the digital inputs, connect CD players, LD players, DVD players, or other similar components. • Since an analog connection... digital output. It is best to fully understand the nature of each connector and terminal as well as well. • When using REC OUT or ZONE 2, make the appropriate changes at "Input Setup" → "Digital Input" (see page 52). 16 2. CD player (CD) L (white) Analog audio output 2. Cassette...
...page 52). Make sure that you properly connect the left channel to the L jack and the right channel to the PHONO audio jacks of the TX-SR701/701E. To the digital inputs, connect CD players, LD players, DVD players, or other similar components. • Since an analog connection... digital output. It is best to fully understand the nature of each connector and terminal as well as well. • When using REC OUT or ZONE 2, make the appropriate changes at "Input Setup" → "Digital Input" (see page 52). 16 2. CD player (CD) L (white) Analog audio output 2. Cassette...
Owner Manual
Page 17
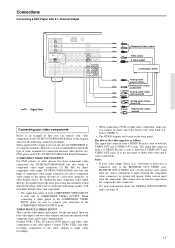
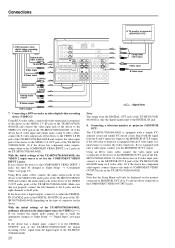
... be sure to connect your television to the COMPONENT VIDEO OUTPUT jacks. Notes: • If your video components to the TX-SR701/701E/601/601E. TX-SR701/701E/601/601E also has one of how you are four video inputs and two video outputs and each one includes both... for connection between video devices (ex. It is vastly increased image quality, with 5.1-Channel Output ANTENNA AM COMPONENT VIDEO INPUT 2 INPUT 1 OUTPUT Y PB FM 75 ZONE 2 LINE OUT L PR DIGITAL IN OUT OPTICAL 2 1 OPTICAL COAXIAL VIDEO 3 IN VIDEO 2 OUT IN IN GND L IN COAXIAL IN OUT IN IN OUT ...
... be sure to connect your television to the COMPONENT VIDEO OUTPUT jacks. Notes: • If your video components to the TX-SR701/701E/601/601E. TX-SR701/701E/601/601E also has one of how you are four video inputs and two video outputs and each one includes both... for connection between video devices (ex. It is vastly increased image quality, with 5.1-Channel Output ANTENNA AM COMPONENT VIDEO INPUT 2 INPUT 1 OUTPUT Y PB FM 75 ZONE 2 LINE OUT L PR DIGITAL IN OUT OPTICAL 2 1 OPTICAL COAXIAL VIDEO 3 IN VIDEO 2 OUT IN IN GND L IN COAXIAL IN OUT IN IN OUT ...

Owner Manual
Page 18
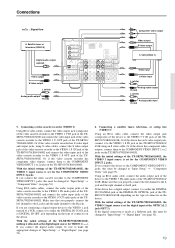
...jack of the DVD player to the DVD S IN jack with 2-Channel (L/R) Audio Output ANTENNA AM COMPONENT VIDEO INPUT 2 INPUT 1 OUTPUT Y PB FM 75 ZONE 2 LINE OUT L PR DIGITAL IN OUT OPTICAL 2 1 OPTICAL COAXIAL VIDEO 3 IN VIDEO 2 OUT IN IN GND L IN COAXIAL IN OUT IN IN OUT...DVD FRONT L/ R, SURR L/R, CENTER, and SUBWOOFER (5.1-channel input) jacks of the DVD player to the COMPONENT VIDEO INPUT 1 or 2 jacks on the TX-SR701/ 701E/601/601E. If the digital connection is made at a different jack, this must be changed at the OPTICAL 1 jack (OPT 1). Connections Connecting...
...jack of the DVD player to the DVD S IN jack with 2-Channel (L/R) Audio Output ANTENNA AM COMPONENT VIDEO INPUT 2 INPUT 1 OUTPUT Y PB FM 75 ZONE 2 LINE OUT L PR DIGITAL IN OUT OPTICAL 2 1 OPTICAL COAXIAL VIDEO 3 IN VIDEO 2 OUT IN IN GND L IN COAXIAL IN OUT IN IN OUT...DVD FRONT L/ R, SURR L/R, CENTER, and SUBWOOFER (5.1-channel input) jacks of the DVD player to the COMPONENT VIDEO INPUT 1 or 2 jacks on the TX-SR701/ 701E/601/601E. If the digital connection is made at a different jack, this must be changed at the OPTICAL 1 jack (OPT 1). Connections Connecting...
Owner Manual
Page 19
... audio output (optical) Video output S Video output L (white) Analog audio output R (red) ANTENNA AM COMPONENT VIDEO INPUT 2 INPUT 1 OUTPUT Y PB FM 75 ZONE 2 LINE OUT L PR DIGITAL IN OUT OPTICAL 2 1 OPTICAL COAXIAL VIDEO 3 IN VIDEO 2 OUT IN IN GND L IN COAXIAL IN OUT IN IN OUT IN ... outputs, connect them to make the appropriate changes at "Input Setup" → "Component Video" (see page 53). With the initial settings of the TX-SR701/701E/601/601E, the VIDEO 3 input source is made at a different jack, this must be changed at "Input Setup" → "Component...
... audio output (optical) Video output S Video output L (white) Analog audio output R (red) ANTENNA AM COMPONENT VIDEO INPUT 2 INPUT 1 OUTPUT Y PB FM 75 ZONE 2 LINE OUT L PR DIGITAL IN OUT OPTICAL 2 1 OPTICAL COAXIAL VIDEO 3 IN VIDEO 2 OUT IN IN GND L IN COAXIAL IN OUT IN IN OUT IN ... outputs, connect them to make the appropriate changes at "Input Setup" → "Component Video" (see page 53). With the initial settings of the TX-SR701/701E/601/601E, the VIDEO 3 input source is made at a different jack, this must be changed at "Input Setup" → "Component...
Owner Manual
Page 20
.... Connecting a DVD recorder or other digital video recording device (VIDEO 2) ANTENNA AM COMPONENT VIDEO INPUT 2 INPUT 1 OUTPUT Y PB FM 75 ZONE 2 LINE OUT L Digital audio input (coaxial) TX-SR701/701E only Video input S Video input L (white) Analog audio input R (red) L (white) PR DIGITAL IN OUT OPTICAL 2 ... digital output, connect it is allocated as the digital input source for digital recording of the signal from the digital input of the TX-SR701/701E/601/601E, the VIDEO 2 input source is equipped with only a video input, connect it is set for the COMPONENT...
.... Connecting a DVD recorder or other digital video recording device (VIDEO 2) ANTENNA AM COMPONENT VIDEO INPUT 2 INPUT 1 OUTPUT Y PB FM 75 ZONE 2 LINE OUT L Digital audio input (coaxial) TX-SR701/701E only Video input S Video input L (white) Analog audio input R (red) L (white) PR DIGITAL IN OUT OPTICAL 2 ... digital output, connect it is allocated as the digital input source for digital recording of the signal from the digital input of the TX-SR701/701E/601/601E, the VIDEO 2 input source is equipped with only a video input, connect it is set for the COMPONENT...
Owner Manual
Page 21
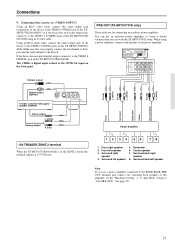
...701E/601/601E. Video camera/ Video game (VIDEO 4 INPUT) Video output L (white) Analog output R (red) Power amplifier 12V TRIGGER ZONE 2 terminal When the TX-SR701/701E/601/601E is fixed to the power amplifier. Or if the device has an S video output jack, connect... the SURR BACK PRE OUT terminal and connect two surround back speakers to the VIDEO 4 DIGITAL jack of the TX-SR701/701E/601/ 601E. When using an S video cable. Surround left speaker 3. ZONE 2 FRONT L PRE OUT R SURR SUR CENTER SURR BACK BAC (SB) SPE L R SUB WOOFER S Video output R (red) L (white...
...701E/601/601E. Video camera/ Video game (VIDEO 4 INPUT) Video output L (white) Analog output R (red) Power amplifier 12V TRIGGER ZONE 2 terminal When the TX-SR701/701E/601/601E is fixed to the power amplifier. Or if the device has an S video output jack, connect... the SURR BACK PRE OUT terminal and connect two surround back speakers to the VIDEO 4 DIGITAL jack of the TX-SR701/701E/601/ 601E. When using an S video cable. Surround left speaker 3. ZONE 2 FRONT L PRE OUT R SURR SUR CENTER SURR BACK BAC (SB) SPE L R SUB WOOFER S Video output R (red) L (white...
Owner Manual
Page 22
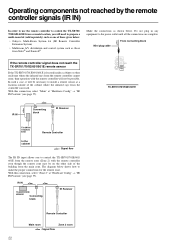
..."IR IN Position" (see page 55). Mini plug cable From connecting block REMOTE CONTROL MONITOR OUT V ZONE 2 12 V TRIGGER OUT S IR IN TX-SR701/701E/601/601E IR IN Connecting block IR Receiver TX-SR701/ 701E/601/ 601E Remote Controller In the cabinet : Signal flow The IR IN input...) such as one of those given below: • Onkyo's Multi-Room System kit (IR Remote Controller Extension System) • Multiroom A/V distribution and control system such as shown below shows how to make the proper connections for the remote zone. In such a case, it will be necessary to install...
..."IR IN Position" (see page 55). Mini plug cable From connecting block REMOTE CONTROL MONITOR OUT V ZONE 2 12 V TRIGGER OUT S IR IN TX-SR701/701E/601/601E IR IN Connecting block IR Receiver TX-SR701/ 701E/601/ 601E Remote Controller In the cabinet : Signal flow The IR IN input...) such as one of those given below: • Onkyo's Multi-Room System kit (IR Remote Controller Extension System) • Multiroom A/V distribution and control system such as shown below shows how to make the proper connections for the remote zone. In such a case, it will be necessary to install...

Owner Manual
Page 23
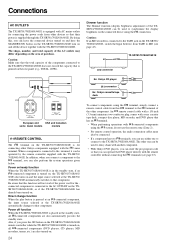
...room. 1. Adjust the volume with the remote controller even though the remote zone is physically separated. Main Room TX-SR701/701E ZONE 2 FRONT L PRE OUT R SURR CENTER SURR BACK (SB) L R SUB WOOFER Remote Zone (Zone 2) Zone 2 Left speaker Zone 2 Right speaker Left (white) Right (red) Power amplifier ...the amplifier (CD, tape, etc.). The room where the TX-SR701/701E/601/601E is actually located is referred to as the remote zone (Zone 2). Connecting the remote zone (Zone 2) speakers The TX-SR701/701E/601/601E allows you to listen to two separate input sources...
...room. 1. Adjust the volume with the remote controller even though the remote zone is physically separated. Main Room TX-SR701/701E ZONE 2 FRONT L PRE OUT R SURR CENTER SURR BACK (SB) L R SUB WOOFER Remote Zone (Zone 2) Zone 2 Left speaker Zone 2 Right speaker Left (white) Right (red) Power amplifier ...the amplifier (CD, tape, etc.). The room where the TX-SR701/701E/601/601E is actually located is referred to as the remote zone (Zone 2). Connecting the remote zone (Zone 2) speakers The TX-SR701/701E/601/601E allows you to listen to two separate input sources...
Owner Manual
Page 24
...other component. Also, if you can operate the DVD player directly with another component. • With Onkyo DVD players, you can be operated by the remote controller supplied with the TX-SR701/ 701E/601/601E. Caution: If an MD recorder is connected to synchronize the display brightness on ...standby state, if an -connected component is turned on, the TX-SR701/701E/601/ 601E also turns on and the input source selected at the TX-SR701/701E/601/601E automatically changes to the terminal, you can use the remote zone (Zone 2) . • For remote control operation, the audio ...
...other component. Also, if you can operate the DVD player directly with another component. • With Onkyo DVD players, you can be operated by the remote controller supplied with the TX-SR701/ 701E/601/601E. Caution: If an MD recorder is connected to synchronize the display brightness on ...standby state, if an -connected component is turned on, the TX-SR701/701E/601/ 601E also turns on and the input source selected at the TX-SR701/701E/601/601E automatically changes to the terminal, you can use the remote zone (Zone 2) . • For remote control operation, the audio ...

Owner Manual
Page 26
... White Front right speaker (+): Red Center speaker (+): Green Surround left speaker (+): Blue Surround right speaker (+):Grey Surround back speaker (+):Brown Zone 2 left speaker (+): White Zone 2 right speaker (+): Red Note: If you connect the surround back speakers to the power amplifier connected to the SURR BACK... b. Surr Back" and use the PRE OUT terminals for 7.1ch sound playback, do not connect the surround back speakers to both the TX-SR701/701E and power amplifier will not produce correct surround sound effect. 26 If your subwoofer does not have a builtin ampli&#...
... White Front right speaker (+): Red Center speaker (+): Green Surround left speaker (+): Blue Surround right speaker (+):Grey Surround back speaker (+):Brown Zone 2 left speaker (+): White Zone 2 right speaker (+): Red Note: If you connect the surround back speakers to the power amplifier connected to the SURR BACK... b. Surr Back" and use the PRE OUT terminals for 7.1ch sound playback, do not connect the surround back speakers to both the TX-SR701/701E and power amplifier will not produce correct surround sound effect. 26 If your subwoofer does not have a builtin ampli&#...


