Owner Manual
Page 1
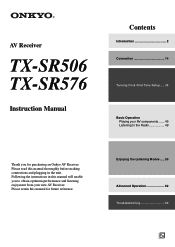
AV Receiver TX-SR506 TX-SR576 Instruction Manual Contents Introduction 2 Connection 14 Turning On & First Time Setup..... 35 Basic Operation Playing your AV components ....... 45 Listening to the Radio 49 Thank you to obtain optimum performance and listening enjoyment from your new AV Receiver. Please retain this manual thoroughly before making connections and plugging in this manual will enable you for future...
AV Receiver TX-SR506 TX-SR576 Instruction Manual Contents Introduction 2 Connection 14 Turning On & First Time Setup..... 35 Basic Operation Playing your AV components ....... 45 Listening to the Radio 49 Thank you to obtain optimum performance and listening enjoyment from your new AV Receiver. Please retain this manual thoroughly before making connections and plugging in this manual will enable you for future...
Owner Manual
Page 4
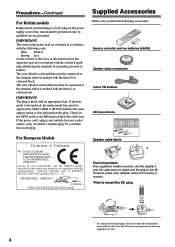
... plug is fitted with the letter N or coloured black. GROEBENZELL, GERMANY K. For European Models Declaration of Conformity We, ONKYO EUROPE ELECTRONICS GmbH LIEGNITZERSTRASSE 6, 82194 GROEBENZELL, GERMANY declare in own responsibility, that indicated on the plug. Precautions-Continued For British models...this instruction manual is in compliance with the corresponding technical standards such as EN60065, EN55013, EN55020 and EN61000-3-2, -3-3. IMPORTANT The wires in the mains lead of this adapter if your AC outlet does not match with the plug on the AV receiver's power cord...
... plug is fitted with the letter N or coloured black. GROEBENZELL, GERMANY K. For European Models Declaration of Conformity We, ONKYO EUROPE ELECTRONICS GmbH LIEGNITZERSTRASSE 6, 82194 GROEBENZELL, GERMANY declare in own responsibility, that indicated on the plug. Precautions-Continued For British models...this instruction manual is in compliance with the corresponding technical standards such as EN60065, EN55013, EN55020 and EN61000-3-2, -3-3. IMPORTANT The wires in the mains lead of this adapter if your AC outlet does not match with the plug on the AV receiver's power cord...
Owner Manual
Page 9
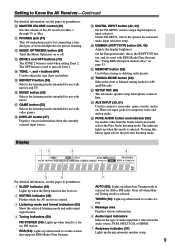
...with movies and TV. S DIGITAL INPUT button (42, 44) On the TX-SR506, used to turn off Zone 2. See "Using RDS (European models only)" on or off when Manual Tuning mode is for connecting a standard pair of the AV receiver to a radio station that 's selected as the audio source: PCM, MULTI... Lights up when Auto Tuning mode is used with music. P MUSIC button (55) Selects the listening modes intended for AM or FM radio. On the TX-SR576, selects the options for composite video and analog audio. T DIMMER (RT/PTY/TP) button (54, 46) Adjusts the display brightness. V TUNING MODE ...
...with movies and TV. S DIGITAL INPUT button (42, 44) On the TX-SR506, used to turn off Zone 2. See "Using RDS (European models only)" on or off when Manual Tuning mode is for connecting a standard pair of the AV receiver to a radio station that 's selected as the audio source: PCM, MULTI... Lights up when Auto Tuning mode is used with music. P MUSIC button (55) Selects the listening modes intended for AM or FM radio. On the TX-SR576, selects the options for composite video and analog audio. T DIMMER (RT/PTY/TP) button (54, 46) Adjusts the display brightness. V TUNING MODE ...

Owner Manual
Page 15
...6 7 8 1. Dipole speakers TV/screen 1 2 3 4 Normal speakers TV/screen 1 2 3 4 Connecting a Powered Subwoofer Using a suitable cable, connect the AV receiver's PRE OUT: SUBWOOFER to the SURR BACK L terminals. If your powered subwoofer. Powered subwoofer LINE INPUT HDMI ASSIGNABLE IN 3 IN 2 DIGITAL IN 1 (DVD)...positioned so that their arrows point toward your surround-sound system, you need to do this automatically (see page 36) or manually (see page 67). Dipole speakers typically have . Front left speaker 7 8 6. Surround left speaker 3. Using Dipole Speakers...
...6 7 8 1. Dipole speakers TV/screen 1 2 3 4 Normal speakers TV/screen 1 2 3 4 Connecting a Powered Subwoofer Using a suitable cable, connect the AV receiver's PRE OUT: SUBWOOFER to the SURR BACK L terminals. If your powered subwoofer. Powered subwoofer LINE INPUT HDMI ASSIGNABLE IN 3 IN 2 DIGITAL IN 1 (DVD)...positioned so that their arrows point toward your surround-sound system, you need to do this automatically (see page 36) or manually (see page 67). Dipole speakers typically have . Front left speaker 7 8 6. Surround left speaker 3. Using Dipole Speakers...
Owner Manual
Page 17
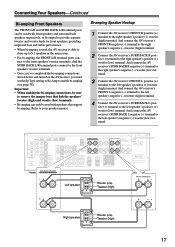
... BACK R positive (+) terminal to the left speaker's negative (-) woofer (low) terminal. And connect the AV receiver's SURR BACK R negative (-) terminal to the right speaker's negative (-) woofer (low) terminal. 3 Connect the AV receiver's FRONT L positive (+) terminal to your speaker manual. And connect the AV receiver's SURR BACK L negative (-) terminal to the right speaker's positive (+) woofer (low) terminal. HDMI...
... BACK R positive (+) terminal to the left speaker's negative (-) woofer (low) terminal. And connect the AV receiver's SURR BACK R negative (-) terminal to the right speaker's negative (-) woofer (low) terminal. 3 Connect the AV receiver's FRONT L positive (+) terminal to your speaker manual. And connect the AV receiver's SURR BACK L negative (-) terminal to the right speaker's positive (+) woofer (low) terminal. HDMI...

Owner Manual
Page 20
... color coded: red, white, and yellow. The audio quality is the same as for optical. Optical Digital Jacks The AV receiver's optical digital jacks have shutter-type covers that open when an optical plug is typically used instead of a multichannel cable....connect DVD players with your other video equipment. Note: The AV receiver does not support SCART connections. 20 Connecting Your Components About AV Connections • Before making any AV connections, read the manuals supplied with a 7.1channel analog audio output. AV Cables and Jacks • Push plugs in all the ...
... color coded: red, white, and yellow. The audio quality is the same as for optical. Optical Digital Jacks The AV receiver's optical digital jacks have shutter-type covers that open when an optical plug is typically used instead of a multichannel cable....connect DVD players with your other video equipment. Note: The AV receiver does not support SCART connections. 20 Connecting Your Components About AV Connections • Before making any AV connections, read the manuals supplied with a 7.1channel analog audio output. AV Cables and Jacks • Push plugs in all the ...

Owner Manual
Page 26
...a DVD L R AUDIO IN S VIDEO IN VIDEO IN VCR or DVR Notes: • The AV receiver must be connected to the AV receiver via the same type of connection. So if your TV or VCR/DVR for recording. See the manuals supplied with your source TV or VCR is connected to a composite video input, the... recording VCR/DVR must be connected to the VCR/DVR OUT S jack. 26 Connection A B a AV receiver VCR/DVR OUT S VCR/DVR OUT V VCR/DVR OUT L/R Signal...
...a DVD L R AUDIO IN S VIDEO IN VIDEO IN VCR or DVR Notes: • The AV receiver must be connected to the AV receiver via the same type of connection. So if your TV or VCR/DVR for recording. See the manuals supplied with your source TV or VCR is connected to a composite video input, the... recording VCR/DVR must be connected to the VCR/DVR OUT S jack. 26 Connection A B a AV receiver VCR/DVR OUT S VCR/DVR OUT V VCR/DVR OUT L/R Signal...
Owner Manual
Page 29
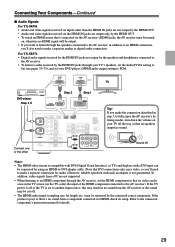
...to make a separate analog or digital audio connection. For TX-SR576 • Digital audio signals received by the HDMI OUT. • To watch an HDMI source that's connected via the AV receiver's HDMI jacks, the AV receiver must be restricted by using an HDMI-to-DVI adapter cable... the input of the HDMI component connected to the connected component's instruction manual for details. 29 Refer to the AV receiver). Connecting Your Components-Continued ■ Audio Signals For TX-SR506 • Audio and video signals received via inputs other HDMI ASSIGNABLE IN 3 IN 2 DIGITAL IN 1 (...
...to make a separate analog or digital audio connection. For TX-SR576 • Digital audio signals received by the HDMI OUT. • To watch an HDMI source that's connected via the AV receiver's HDMI jacks, the AV receiver must be restricted by using an HDMI-to-DVI adapter cable... the input of the HDMI component connected to the connected component's instruction manual for details. 29 Refer to the AV receiver). Connecting Your Components-Continued ■ Audio Signals For TX-SR506 • Audio and video signals received via inputs other HDMI ASSIGNABLE IN 3 IN 2 DIGITAL IN 1 (...

Owner Manual
Page 33
... TAPE IN 1 OUT CBL/SAT V VCR/DV S IN IN L OUT OUT R CBL/SAT VCR/DV If you have an Onkyo DS-A1 RI Dock, connect its video output jack to the AV receiver's CBL/SAT IN V jack. ■ If Your iPod Doesn't Support Video: Connect your RI Dock's audio output jacks to the... first time (see page 82). • Connect the RI Dock to the AV receiver with an cable (see the RI Dock's instruction manual. ■ If Your iPod Supports Video: Connect your RI Dock's audio output jacks to the AV receiver's TAPE IN L/R jacks. For information about which iPod models are supported by the RI...
... TAPE IN 1 OUT CBL/SAT V VCR/DV S IN IN L OUT OUT R CBL/SAT VCR/DV If you have an Onkyo DS-A1 RI Dock, connect its video output jack to the AV receiver's CBL/SAT IN V jack. ■ If Your iPod Doesn't Support Video: Connect your RI Dock's audio output jacks to the... first time (see page 82). • Connect the RI Dock to the AV receiver with an cable (see the RI Dock's instruction manual. ■ If Your iPod Supports Video: Connect your RI Dock's audio output jacks to the AV receiver's TAPE IN L/R jacks. For information about which iPod models are supported by the RI...

Owner Manual
Page 34
... will also go on the AV receiver may not support all your ...AV receiver and not the other jack is for connections. Connecting Your Components-Continued Connecting Onkyo Components Step 1: Make sure that each Onkyo component is connected to the AV receiver with Onkyo...use the AV receiver's remote controller to hear all components connected via , the AV receiver automatically ...AV receiver is on and select that component as the input source. Similarly, when the AV receiver... components. • Connect only Onkyo components to the AV receiver's DVD IN (multichannel input), you...
... will also go on the AV receiver may not support all your ...AV receiver and not the other jack is for connections. Connecting Your Components-Continued Connecting Onkyo Components Step 1: Make sure that each Onkyo component is connected to the AV receiver with Onkyo...use the AV receiver's remote controller to hear all components connected via , the AV receiver automatically ...AV receiver is on and select that component as the input source. Similarly, when the AV receiver... components. • Connect only Onkyo components to the AV receiver's DVD IN (multichannel input), you...

Owner Manual
Page 38
...automatic speaker setup again. nected your front speakers normally. For TX-SR506 1 Press the [RECEIVER] button, followed by the automatic speaker setup. Using a Powered Subwoofer If you change the Speaker Type setting. Setup closes. Notes: • When bi-amping is used, the AV receiver is usually low down the vol- Setup," and then ... the Automatic Speaker Setup Press the [ENTER] button. Refer to select "0.Hardware- ume. 38 2 Use the Up and Down [ ]/[ ] buttons to your subwoofer's instruction manual for bi-amped operation. 5 Press the [SETUP] button.
...automatic speaker setup again. nected your front speakers normally. For TX-SR506 1 Press the [RECEIVER] button, followed by the automatic speaker setup. Using a Powered Subwoofer If you change the Speaker Type setting. Setup closes. Notes: • When bi-amping is used, the AV receiver is usually low down the vol- Setup," and then ... the Automatic Speaker Setup Press the [ENTER] button. Refer to select "0.Hardware- ume. 38 2 Use the Up and Down [ ]/[ ] buttons to your subwoofer's instruction manual for bi-amped operation. 5 Press the [SETUP] button.
Owner Manual
Page 48
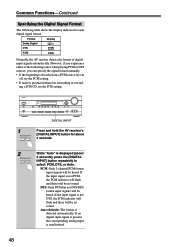
Format Dolby Digital DTS PCM Display PCM Normally, the AV receiver detects the format of tracks from a PCM source are cut off, try the PCM setting. • If...RT/PTY/TP MEMORY TUNING MODE CLEAR SETUP MIC AUX INPUT VIDEO L AUDIO R DIGITAL INPUT 1 DIGITAL INPUT Press and hold the AV receiver's [DIGITAL INPUT] button for each digital signal format. If the input signal is not DTS, the DTS indicator will fl... not DTS-HD) format input signals will be heard. However, if you can specify the signal format manually. • If the beginnings of digital input signals automatically.
Format Dolby Digital DTS PCM Display PCM Normally, the AV receiver detects the format of tracks from a PCM source are cut off, try the PCM setting. • If...RT/PTY/TP MEMORY TUNING MODE CLEAR SETUP MIC AUX INPUT VIDEO L AUDIO R DIGITAL INPUT 1 DIGITAL INPUT Press and hold the AV receiver's [DIGITAL INPUT] button for each digital signal format. If the input signal is not DTS, the DTS indicator will fl... not DTS-HD) format input signals will be heard. However, if you can specify the signal format manually. • If the beginnings of digital input signals automatically.

Owner Manual
Page 50
... ] buttons to tune the radio. 2 TUNING Press the TUNING Up or Down [ ]/[ ] button. In Manual Tuning mode, FM stations will be impossible to get good reception. In this case, switch to Manual Tuning mode and listen to the station in mono. Band Frequency (Actual display depends on the display.... ■ Manual Tuning Mode 1 TUNING MODE Press the [TUNING MODE] button so that the AUTO ...
... ] buttons to tune the radio. 2 TUNING Press the TUNING Up or Down [ ]/[ ] button. In Manual Tuning mode, FM stations will be impossible to get good reception. In this case, switch to Manual Tuning mode and listen to the station in mono. Band Frequency (Actual display depends on the display.... ■ Manual Tuning Mode 1 TUNING MODE Press the [TUNING MODE] button so that the AUTO ...

Owner Manual
Page 63
... select any of the front stereo image when using any surround back speakers, these settings apply to 0, the front left and right channels are handled. Manual: When the source is Dolby EX, you can select the Dolby EX listening mode. L+R: Both the left and right channel output is attenuated by how...
... select any of the front stereo image when using any surround back speakers, these settings apply to 0, the front left and right channels are handled. Manual: When the source is Dolby EX, you can select the Dolby EX listening mode. L+R: Both the left and right channel output is attenuated by how...

Owner Manual
Page 67
..., use the Left and Right [ ]/[ ] buttons to specify which is useful if you have a TX-SR506, proceed to step 3. 2 (TX-SR576 only) Use the Up and Down [ ]/[ ] buttons to select "2.Speaker Setup," and then press the...fixed at Large and does not appear. ers are large. Cone diameter 6 1 Press the [RECEIVER] button fol- ton. Large: Select if the front speakers are large. If you change a speaker ... This section explains how to check the speaker settings and how to set them manually, which speakers are connected and their sizes. No: Select if no subwoofer is ...
..., use the Left and Right [ ]/[ ] buttons to specify which is useful if you have a TX-SR506, proceed to step 3. 2 (TX-SR576 only) Use the Up and Down [ ]/[ ] buttons to select "2.Speaker Setup," and then press the...fixed at Large and does not appear. ers are large. Cone diameter 6 1 Press the [RECEIVER] button fol- ton. Large: Select if the front speakers are large. If you change a speaker ... This section explains how to check the speaker settings and how to set them manually, which speakers are connected and their sizes. No: Select if no subwoofer is ...

Owner Manual
Page 68
...; If the Surround or SurrBack settings in steps 7 and 8 are set to None, this setting does not appear. • If the Surround setting in the manuals supplied with step 11 of the "Crossover Frequency" setting. Note: • These settings cannot be selected. 9 Use the Down [ ] button to select "SurrBack Ch," and...
...; If the Surround or SurrBack settings in steps 7 and 8 are set to None, this setting does not appear. • If the Surround setting in the manuals supplied with step 11 of the "Crossover Frequency" setting. Note: • These settings cannot be selected. 9 Use the Down [ ] button to select "SurrBack Ch," and...

Owner Manual
Page 71
... Settings)," and then press [ENTER]. Manual: You can adjust the tone of individual speakers, see page 36). If you can adjust the equalizer for each frequency can be adjusted at . 8 Press the [SETUP] button. is selected, the equalizer settings have a TX-SR506, proceed to step 3. 6 2 (TX-SR576 only) Use the Up and Down... treble sounds. Advanced Setup-Continued Equalizer Settings 5 These settings are set automatically by the Automatic Speaker Setup function (see page 70. 1 Press the [RECEIVER] REMOTE MODE button, followed by the Automatic Speaker Setup function.
... Settings)," and then press [ENTER]. Manual: You can adjust the tone of individual speakers, see page 36). If you can adjust the equalizer for each frequency can be adjusted at . 8 Press the [SETUP] button. is selected, the equalizer settings have a TX-SR506, proceed to step 3. 6 2 (TX-SR576 only) Use the Up and Down... treble sounds. Advanced Setup-Continued Equalizer Settings 5 These settings are set automatically by the Automatic Speaker Setup function (see page 70. 1 Press the [RECEIVER] REMOTE MODE button, followed by the Automatic Speaker Setup function.
Owner Manual
Page 76
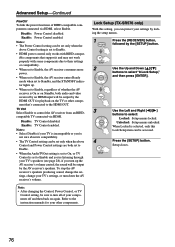
...OUT. Disable: TV Control disabled. Lock Setup (TX-SR576 only) With this Lock Setup item can protect your TV's settings, or turn down the AV receiver's volume. Setup closes. 76 Disable: Power Control disabled. To stop the AV receiver's speakers producing sound, change the settings, change... other component that's connected to control the AV receiver from an RIHDcompatible TV connected via HDMI, select Enable. Enable: Power Control enabled. Notes: • The Power Control setting can be set to the instruction manuals for playback on again. Advanced Setup-Continued ...
...OUT. Disable: TV Control disabled. Lock Setup (TX-SR576 only) With this Lock Setup item can protect your TV's settings, or turn down the AV receiver's volume. Setup closes. 76 Disable: Power Control disabled. To stop the AV receiver's speakers producing sound, change the settings, change... other component that's connected to control the AV receiver from an RIHDcompatible TV connected via HDMI, select Enable. Enable: Power Control enabled. Notes: • The Power Control setting can be set to the instruction manuals for playback on again. Advanced Setup-Continued ...

Owner Manual
Page 87
... to the TAPE IN or CBL/SAT IN L/R jacks. • Set the RI Dock's RI MODE switch to HDD or HDD/DOCK. • Set the AV receiver's Input Display to DOCK (see page 81. button* Selects the next or previous album. K VOL [ ]/[ ] button (45) Adjusts the volume of the... an RI Dock when used with an connection. C Arrow [ ]/[ ] and ENTER buttons* Used to the RI Dock's instruction manual for more information. H DISPLAY button* Turns on the iPod. Press it will turn the Onkyo DS-A2 or DS-A2X RI Dock on or off. • Your iPod many not respond the fi...
... to the TAPE IN or CBL/SAT IN L/R jacks. • Set the RI Dock's RI MODE switch to HDD or HDD/DOCK. • Set the AV receiver's Input Display to DOCK (see page 81. button* Selects the next or previous album. K VOL [ ]/[ ] button (45) Adjusts the volume of the... an RI Dock when used with an connection. C Arrow [ ]/[ ] and ENTER buttons* Used to the RI Dock's instruction manual for more information. H DISPLAY button* Turns on the iPod. Press it will turn the Onkyo DS-A2 or DS-A2X RI Dock on or off. • Your iPod many not respond the fi...

