
Owner Manual
Page 5
... Dock 33 Connecting Onkyo Components 34 Connecting the Power Cord 34 Turning On the AV Receiver 35 Turning On and Standby 35 First Time Setup 36 Automatic Speaker Setup (Audyssey 2EQ) ..........36 Speaker Settings 38 HDMI Input Setup 39 Component Video Input Setup 41 Digital Input Setup 42 Changing the Input Display 43 Automatic Audio Input Selection Setup (TX-SR576 only 44 Playing Your AV Components 45 Basic AV Receiver Operation 45 Common Functions 46 Setting the Display Brightness 46 Muting the AV Receiver 46 Using the Sleep Timer 46 Using Headphones 47 Displaying Source...
... Dock 33 Connecting Onkyo Components 34 Connecting the Power Cord 34 Turning On the AV Receiver 35 Turning On and Standby 35 First Time Setup 36 Automatic Speaker Setup (Audyssey 2EQ) ..........36 Speaker Settings 38 HDMI Input Setup 39 Component Video Input Setup 41 Digital Input Setup 42 Changing the Input Display 43 Automatic Audio Input Selection Setup (TX-SR576 only 44 Playing Your AV Components 45 Basic AV Receiver Operation 45 Common Functions 46 Setting the Display Brightness 46 Muting the AV Receiver 46 Using the Sleep Timer 46 Using Headphones 47 Displaying Source...

Owner Manual
Page 8
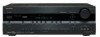
.../STANDBY button (35) F Display Sets the AV receiver to select radio presets (see page 52). C ZONE 2 indicator (79) Flashes when Zone 2 is also used to Know the AV Receiver Front Panel North American model 1 23 4 5 6 ON/STANDBY STANDBY ZONE 2 7 89 J TUNING PRESET ENTER MASTER VOLUME MUSIC OPTIMIZER PHONES MULTI CH ZONE 2 OFF DVD VCR/DVR CBL/SAT AUX TAPE TUNER CD SETUP RETURN TONE MOVIE/TV MUSIC GAME DISPLAY DIGITAL INPUT DIMMER MEMORY TUNING MODE CLEAR SETUP MIC AUX INPUT VIDEO L AUDIO R KL M N OPQ RS TUV W X Other models ON/STANDBY STANDBY ZONE...
.../STANDBY button (35) F Display Sets the AV receiver to select radio presets (see page 52). C ZONE 2 indicator (79) Flashes when Zone 2 is also used to Know the AV Receiver Front Panel North American model 1 23 4 5 6 ON/STANDBY STANDBY ZONE 2 7 89 J TUNING PRESET ENTER MASTER VOLUME MUSIC OPTIMIZER PHONES MULTI CH ZONE 2 OFF DVD VCR/DVR CBL/SAT AUX TAPE TUNER CD SETUP RETURN TONE MOVIE/TV MUSIC GAME DISPLAY DIGITAL INPUT DIMMER MEMORY TUNING MODE CLEAR SETUP MIC AUX INPUT VIDEO L AUDIO R KL M N OPQ RS TUV W X Other models ON/STANDBY STANDBY ZONE...
Owner Manual
Page 9
...53. P MUSIC button (55) Selects the listening modes intended for composite video and analog audio. W SETUP MIC (36) The automatic speaker setup microphone connects here. The indicator lights up during automatic speaker setup. 9 M ZONE 2 and OFF buttons (79) The ZONE 2 button is selected. X AUX INPUT (30, 61) Used to adjust the tone (bass and treble). There are input jacks for use with video games. J MASTER VOLUME control (45) Sets the volume of the AV receiver to a radio station that 's selected as the audio source: PCM, MULTI CH, or HDMI. 7 Audyssey indicator (37) Lights up...
...53. P MUSIC button (55) Selects the listening modes intended for composite video and analog audio. W SETUP MIC (36) The automatic speaker setup microphone connects here. The indicator lights up during automatic speaker setup. 9 M ZONE 2 and OFF buttons (79) The ZONE 2 button is selected. X AUX INPUT (30, 61) Used to adjust the tone (bass and treble). There are input jacks for use with video games. J MASTER VOLUME control (45) Sets the volume of the AV receiver to a radio station that 's selected as the audio source: PCM, MULTI CH, or HDMI. 7 Audyssey indicator (37) Lights up...

Owner Manual
Page 12
... Onkyo cassette recorder connected via can also use the remote controller to select AM and FM radio stations directly. 3 D.TUN button (51) Selects the Direct tuning mode. 4 DISPLAY button (51) Displays information about the current input source. G DIMMER button (46) Adjusts the display brightness. button (52) Selects radio presets. B REMOTE MODE/INPUT SELECTOR buttons (45, 83-89) Selects the remote controller modes and the input sources. 12 C MULTI CH button (45) Selects the multichannel DVD input. F LISTENING MODE buttons (55) Used to select and adjust settings. L AUDIO button...
... Onkyo cassette recorder connected via can also use the remote controller to select AM and FM radio stations directly. 3 D.TUN button (51) Selects the Direct tuning mode. 4 DISPLAY button (51) Displays information about the current input source. G DIMMER button (46) Adjusts the display brightness. button (52) Selects radio presets. B REMOTE MODE/INPUT SELECTOR buttons (45, 83-89) Selects the remote controller modes and the input sources. 12 C MULTI CH button (45) Selects the multichannel DVD input. F LISTENING MODE buttons (55) Used to select and adjust settings. L AUDIO button...

Owner Manual
Page 15
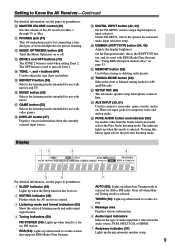
... screen, while the surround back left ✓ Surround back right ✓ * If you're using an external amplifier, connect the PRE OUT: SUBWOOFER to the amp's input. Powered subwoofer LINE INPUT HDMI ASSIGNABLE IN 3 IN 2 DIGITAL IN 1 (DVD) COMPONENT VIDEO Y COAXIAL 2 (CBL/SAT) CB/ PB 1 (VCR/DVR) OPTICAL 2 (CD) ASSIGNABLE CR/ PR IN 2 IN 1(DVD) OUT ASSIGNABLE IN OUT IN L REMOTE CONTROL R CD TAPE IN 1 OUT CBL/SAT V VCR/DVR S DVD MONITOR OUT V S SURR BACK SPEAKERS Bi-AMP...
... screen, while the surround back left ✓ Surround back right ✓ * If you're using an external amplifier, connect the PRE OUT: SUBWOOFER to the amp's input. Powered subwoofer LINE INPUT HDMI ASSIGNABLE IN 3 IN 2 DIGITAL IN 1 (DVD) COMPONENT VIDEO Y COAXIAL 2 (CBL/SAT) CB/ PB 1 (VCR/DVR) OPTICAL 2 (CD) ASSIGNABLE CR/ PR IN 2 IN 1(DVD) OUT ASSIGNABLE IN OUT IN L REMOTE CONTROL R CD TAPE IN 1 OUT CBL/SAT V VCR/DVR S DVD MONITOR OUT V S SURR BACK SPEAKERS Bi-AMP...
Owner Manual
Page 28
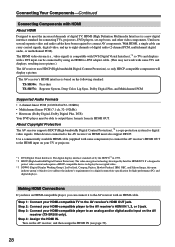
Step 2: Connect your HDMI-compatible player to the AV receiver's HDMI IN 1, 2, or 3 jack. Step 3: Connect your HDMI-compatible player to an analog and/or digital audio input on the following standard: TX-SR506: Pass-thru TX-SR576: Repeater System, Deep Color, Lip Sync, Dolby Digital Plus, and Multichannel PCM Supported Audio Formats • 2-channel linear PCM (16/20/24 bit/32-192kHz) • Multichannel linear PCM (7.1 ch, 32-192kHz) • Bitstream (Dolby Digital, Dolby Digital Plus, DTS) Your DVD player must also support HDCP. Making HDMI Connections If you have been...
Step 2: Connect your HDMI-compatible player to the AV receiver's HDMI IN 1, 2, or 3 jack. Step 3: Connect your HDMI-compatible player to an analog and/or digital audio input on the following standard: TX-SR506: Pass-thru TX-SR576: Repeater System, Deep Color, Lip Sync, Dolby Digital Plus, and Multichannel PCM Supported Audio Formats • 2-channel linear PCM (16/20/24 bit/32-192kHz) • Multichannel linear PCM (7.1 ch, 32-192kHz) • Bitstream (Dolby Digital, Dolby Digital Plus, DTS) Your DVD player must also support HDCP. Making HDMI Connections If you have been...
Owner Manual
Page 29
... analog or digital audio connection. Refer to the connected component's instruction manual for audio.) However, reliable operation with a DVI input can be connected by using an HDMI-to-DVI adapter cable. (Note that its video can be output. • If you 'll need to listen through the AV receiver, set your TV all the way so that 's connected via the AV receiver's HDMI jacks, the AV receiver must be turned on, otherwise no sound. HDMI OUT HDMI IN TV DVD player Step 3 ✽ HDMI ASSIGNABLE...
... analog or digital audio connection. Refer to the connected component's instruction manual for audio.) However, reliable operation with a DVI input can be connected by using an HDMI-to-DVI adapter cable. (Note that its video can be output. • If you 'll need to listen through the AV receiver, set your TV all the way so that 's connected via the AV receiver's HDMI jacks, the AV receiver must be turned on, otherwise no sound. HDMI OUT HDMI IN TV DVD player Step 3 ✽ HDMI ASSIGNABLE...

Owner Manual
Page 34
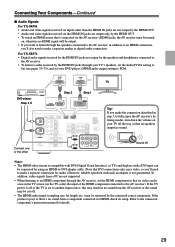
... start playback on a component connected via , the AV receiver automatically selects that component as the input source. You can use the following special functions: Auto Power On/Standby When you 're using an MD, CDR, or RI DOCK component, change the Input Display (see page 45), as the input source. REMOTE CONTROL HDMI ASSIGNABLE IN 3 IN 2 DIGITAL IN 1 (DVD) COAXIAL 2 (CBL/SAT) COMPONENT VIDEO Y CB/ PB 1 (VCR/DVR) OPTICAL 2 (CD) ASSIGNABLE CR/ PR IN 2 IN 1(DVD) OUT ASSIGNABLE IN OUT IN L REMOTE CONTROL R CD TAPE IN 1 OUT...
... start playback on a component connected via , the AV receiver automatically selects that component as the input source. You can use the following special functions: Auto Power On/Standby When you 're using an MD, CDR, or RI DOCK component, change the Input Display (see page 45), as the input source. REMOTE CONTROL HDMI ASSIGNABLE IN 3 IN 2 DIGITAL IN 1 (DVD) COAXIAL 2 (CBL/SAT) COMPONENT VIDEO Y CB/ PB 1 (VCR/DVR) OPTICAL 2 (CD) ASSIGNABLE CR/ PR IN 2 IN 1(DVD) OUT ASSIGNABLE IN OUT IN L REMOTE CONTROL R CD TAPE IN 1 OUT...

Owner Manual
Page 35
.../STANDBY] button. These settings only need to help you configure the AV receiver before you turn on page 42 respec- Turning On the AV Receiver ON/STANDBY STANDBY indicator STANDBY/ON STANDBY ZONE 2 PURE AUDIO TUNING PRESET ENTER MASTER VOLUME PURE AUDIO PHONES MULTI CH ZONE 2 OFF DVD TONE VCR/DVR CBL/SAT AUX TAPE TUNER CD SETUP RETURN MOVIE/TV MUSIC GAME DISPLAY DIGITAL INPUT RT/PTY/TP MEMORY TUNING MODE CLEAR SETUP MIC AUX INPUT VIDEO L AUDIO R ON/STANDBY RECEIVER Turning On and Standby AV receiver ON/STANDBY Remote controller or On the AV receiver...
.../STANDBY] button. These settings only need to help you configure the AV receiver before you turn on page 42 respec- Turning On the AV Receiver ON/STANDBY STANDBY indicator STANDBY/ON STANDBY ZONE 2 PURE AUDIO TUNING PRESET ENTER MASTER VOLUME PURE AUDIO PHONES MULTI CH ZONE 2 OFF DVD TONE VCR/DVR CBL/SAT AUX TAPE TUNER CD SETUP RETURN MOVIE/TV MUSIC GAME DISPLAY DIGITAL INPUT RT/PTY/TP MEMORY TUNING MODE CLEAR SETUP MIC AUX INPUT VIDEO L AUDIO R ON/STANDBY RECEIVER Turning On and Standby AV receiver ON/STANDBY Remote controller or On the AV receiver...

Owner Manual
Page 38
...- Using a Powered Subwoofer If you 've con- Bi-Amp:Select this if you 're using its [SETUP], [ENTER], and arrow buttons. Setup," and then press [ENTER]. 3 Use use the Left and Right [ ]/[ ] buttons to select: Normal: Select this if you change the Speaker Type setting. Setup closes. Refer to 4 ohms. North American models do not support speakers with an impedance of any speaker is set too high and the sound distorts, it may not be detected, so use...
...- Using a Powered Subwoofer If you 've con- Bi-Amp:Select this if you 're using its [SETUP], [ENTER], and arrow buttons. Setup," and then press [ENTER]. 3 Use use the Left and Right [ ]/[ ] buttons to select: Normal: Select this if you change the Speaker Type setting. Setup closes. Refer to 4 ohms. North American models do not support speakers with an impedance of any speaker is set too high and the sound distorts, it may not be detected, so use...
Owner Manual
Page 55
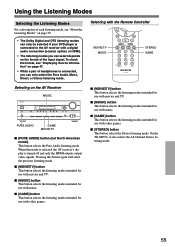
... the HDMI outputs output video signals. On the TX-SR576, it also selects the All Channel Stereo listening mode. 55 Using the Listening Modes Selecting the Listening Modes For a description of each listening mode, see "Displaying Source Information" on the AV Receiver MUSIC STANDBY/ON STANDBY ZONE 2 PURE AUDIO TUNING PRESET ENTER MASTER VOLUME PURE AUDIO PHONES MULTI CH ZONE 2 OFF DVD TONE VCR/DVR CBL/SAT AUX TAPE TUNER CD SETUP RETURN MOVIE/TV MUSIC GAME DISPLAY DIGITAL INPUT RT/PTY/TP MEMORY TUNING MODE CLEAR SETUP MIC AUX INPUT VIDEO L AUDIO R PURE AUDIO...
... the HDMI outputs output video signals. On the TX-SR576, it also selects the All Channel Stereo listening mode. 55 Using the Listening Modes Selecting the Listening Modes For a description of each listening mode, see "Displaying Source Information" on the AV Receiver MUSIC STANDBY/ON STANDBY ZONE 2 PURE AUDIO TUNING PRESET ENTER MASTER VOLUME PURE AUDIO PHONES MULTI CH ZONE 2 OFF DVD TONE VCR/DVR CBL/SAT AUX TAPE TUNER CD SETUP RETURN MOVIE/TV MUSIC GAME DISPLAY DIGITAL INPUT RT/PTY/TP MEMORY TUNING MODE CLEAR SETUP MIC AUX INPUT VIDEO L AUDIO R PURE AUDIO...

Owner Manual
Page 65
... when listening at reference level. Audyssey Dynamic EQ solves the problem of each speaker while listening to +12 dB. Note: • Audyssey Dynamic EQ can adjust the volume of deteriorating sound quality as MP3. Music Optimizer ■ M.Optimizer The Music Optimizer function enhances the sound quality of sync. Note: • The Music Optimizer function only works with PCM digital audio input signals with the following listening modes: Dolby Digital, Dolby Digital EX, Dolby Pro Logic IIx Movie, Dolby Pro Logic II Movie, DTS, DTSES, DTS...
... when listening at reference level. Audyssey Dynamic EQ solves the problem of each speaker while listening to +12 dB. Note: • Audyssey Dynamic EQ can adjust the volume of deteriorating sound quality as MP3. Music Optimizer ■ M.Optimizer The Music Optimizer function enhances the sound quality of sync. Note: • The Music Optimizer function only works with PCM digital audio input signals with the following listening modes: Dolby Digital, Dolby Digital EX, Dolby Pro Logic IIx Movie, Dolby Pro Logic II Movie, DTS, DTSES, DTS...
Owner Manual
Page 66
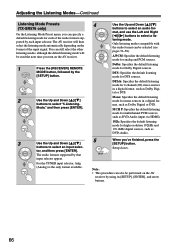
... input signal. Mode," and then press [ENTER]. 3 Use the Up and Down [ ]/[ ] buttons to select "5.Listening- You can be selected (see pages 56-58). MCH P: Specifies the default listening mode for multichannel PCM sources, such as DVD-Audio (input via HDMI). 192k: Specifies the default listening mode for Dolby Digital sources. Note: • This procedure can specify a default listening mode for mono sources in a digital format, such as Dolby Digital or DTS. Adjusting the Listening Modes-Continued Listening Mode Presets (TX-SR576 only) On the Listening Mode Preset...
... input signal. Mode," and then press [ENTER]. 3 Use the Up and Down [ ]/[ ] buttons to select "5.Listening- You can be selected (see pages 56-58). MCH P: Specifies the default listening mode for multichannel PCM sources, such as DVD-Audio (input via HDMI). 192k: Specifies the default listening mode for Dolby Digital sources. Note: • This procedure can specify a default listening mode for mono sources in a digital format, such as Dolby Digital or DTS. Adjusting the Listening Modes-Continued Listening Mode Presets (TX-SR576 only) On the Listening Mode Preset...
Owner Manual
Page 72
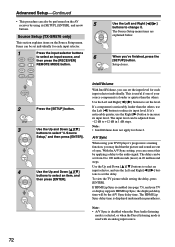
... the picture and sound are explained below. IntelliVolume With IntelliVolume, you can set the level. 2 Press the [SETUP] button. Use the Left and Right [ ]/[ ] buttons to change it 's noticeably quieter, use the Right [ ] button to reduce its input level. The delay can be set from -12 dB to set individually for Zone 2. The HDMI Lip Sync delay time is used with an analog input source. 72 The Source Setup menu items are out of your TV or display supports HDMI Lip Sync, the displayed delay...
... the picture and sound are explained below. IntelliVolume With IntelliVolume, you can set the level. 2 Press the [SETUP] button. Use the Left and Right [ ]/[ ] buttons to change it 's noticeably quieter, use the Right [ ] button to reduce its input level. The delay can be set from -12 dB to set individually for Zone 2. The HDMI Lip Sync delay time is used with an analog input source. 72 The Source Setup menu items are out of your TV or display supports HDMI Lip Sync, the displayed delay...

Owner Manual
Page 73
... volume level as when the AV receiver was last turned off, select Last. Note: • The Power On Volume setting cannot be performed on the dis- The items are too loud or too quiet at the volume setting you 've finished, press the [SETUP] button. Setup closes. Advanced Setup-Continued Miscellaneous Setup (TX-SR576 only) This section explains items on the Miscellaneous menu. 1 Press the [RECEIVER] REMOTE MODE button, followed by using its [SETUP...
... volume level as when the AV receiver was last turned off, select Last. Note: • The Power On Volume setting cannot be performed on the dis- The items are too loud or too quiet at the volume setting you 've finished, press the [SETUP] button. Setup closes. Advanced Setup-Continued Miscellaneous Setup (TX-SR576 only) This section explains items on the Miscellaneous menu. 1 Press the [RECEIVER] REMOTE MODE button, followed by using its [SETUP...

Owner Manual
Page 75
...the AV receiver's speakers producing sound, change the settings, change your TV's settings, or turn up the AV receiver's volume control, the sound will output no sound may want to listen to audio from their analog subwoofer output at 15 dB higher than RIHD-compatible components and recommended components cannot be controlled with components other than normal. Enable: "x.v.Color" enabled. ■ Control This function allows RIHD-compatible components connected via HDMI to the AV receiver's MULTI CH SUBWOOFER jack. The AV receiver can automatically synchronize HDMI audio and video...
...the AV receiver's speakers producing sound, change the settings, change your TV's settings, or turn up the AV receiver's volume control, the sound will output no sound may want to listen to audio from their analog subwoofer output at 15 dB higher than RIHD-compatible components and recommended components cannot be controlled with components other than normal. Enable: "x.v.Color" enabled. ■ Control This function allows RIHD-compatible components connected via HDMI to the AV receiver's MULTI CH SUBWOOFER jack. The AV receiver can automatically synchronize HDMI audio and video...
Owner Manual
Page 76
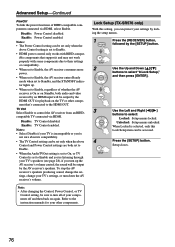
... PowCtrl To link the power functions of whether the AV receiver is set to Enable. • HDMI power control only works with RIHD-compatible components that support it and may not work properly with some components due to their settings or compatibility. • When set to Enable, the AV receiver consumes more power. • When set to Enable, the AV receiver enters Ready mode when set to Standby, and the STANDBY indicator lights up. • When set to Enable and you turn down the AV receiver's volume.
... PowCtrl To link the power functions of whether the AV receiver is set to Enable. • HDMI power control only works with RIHD-compatible components that support it and may not work properly with some components due to their settings or compatibility. • When set to Enable, the AV receiver consumes more power. • When set to Enable, the AV receiver enters Ready mode when set to Standby, and the STANDBY indicator lights up. • When set to Enable and you turn down the AV receiver's volume.

Owner Manual
Page 90
..., try resetting the AV receiver before contacting your Onkyo dealer. Audio There's no sound is output by the surround speakers. Only the center speaker produces sound • If you use the Dolby Pro Logic IIx Movie or Dolby Pro Logic IIx Music listening mode with the AUDIO button on and, while holding down the [VCR/DVR] button, press the [ON/STANDBY] button. Power Can't turn it on your DVD player's remote controller. • If your turntable doesn't have any trouble using the AV receiver...
..., try resetting the AV receiver before contacting your Onkyo dealer. Audio There's no sound is output by the surround speakers. Only the center speaker produces sound • If you use the Dolby Pro Logic IIx Movie or Dolby Pro Logic IIx Music listening mode with the AUDIO button on and, while holding down the [VCR/DVR] button, press the [ON/STANDBY] button. Power Can't turn it on your DVD player's remote controller. • If your turntable doesn't have any trouble using the AV receiver...

Owner Manual
Page 91
... levels of an HDMI signal than it as those that the source is Dolby Digital (page 64). The volume cannot be set to 79 (99) • Check to see if the source component is connected to an analog input. • Powered Zone 2 cannot be selected while Zone 2 is on. • The Pure Audio listening mode is not available on your DVD player's remote controller. Troubleshooting-Continued The surround back speakers produce no sound • The surround back speakers are not used...
... levels of an HDMI signal than it as those that the source is Dolby Digital (page 64). The volume cannot be set to 79 (99) • Check to see if the source component is connected to an analog input. • Powered Zone 2 cannot be selected while Zone 2 is on. • The Pure Audio listening mode is not available on your DVD player's remote controller. Troubleshooting-Continued The surround back speakers produce no sound • The surround back speakers are not used...

Owner Manual
Page 92
... remote control code (page 81). Select another resolution on the AV receiver's display, this indicates that the batteries are connected digitally (page 34). • While Zone 2 is turned off when the Pure Audio listen- Recording Can't record • On your DVD player. ing mode is set to Stereo, unless it stays the same. Can't control other components • Make sure you've selected the correct remote control- Others The sound changes when I change the language of headphones...
... remote control code (page 81). Select another resolution on the AV receiver's display, this indicates that the batteries are connected digitally (page 34). • While Zone 2 is turned off when the Pure Audio listen- Recording Can't record • On your DVD player. ing mode is set to Stereo, unless it stays the same. Can't control other components • Make sure you've selected the correct remote control- Others The sound changes when I change the language of headphones...


