Owner Manual
Page 1
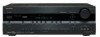
... the Radio 49 Thank you for future reference. AV Receiver TX-SR506 TX-SR576 Instruction Manual Contents Introduction 2 Connection 14 Turning On & First Time Setup..... 35 Basic Operation Playing your new AV Receiver. Enjoying the Listening Modes ..... 55 Advanced Operation 62 Troubleshooting 90 En Please read this manual thoroughly before making connections and plugging in this manual for purchasing an Onkyo AV Receiver.
... the Radio 49 Thank you for future reference. AV Receiver TX-SR506 TX-SR576 Instruction Manual Contents Introduction 2 Connection 14 Turning On & First Time Setup..... 35 Basic Operation Playing your new AV Receiver. Enjoying the Listening Modes ..... 55 Advanced Operation 62 Troubleshooting 90 En Please read this manual thoroughly before making connections and plugging in this manual for purchasing an Onkyo AV Receiver.
Owner Manual
Page 4
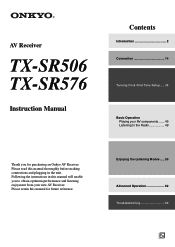
...the same ampere rating as EN60065, EN55013, EN55020 and EN61000-3-2, -3-3. Use this instruction manual is fitted with the coloured markings identifying the terminals in your plug, proceed... cable labels * Power-plug adapter Only supplied in compliance with the plug on the AV receiver's power cord. (Adapter varies from country to country.) *How to the terminal which... may not correspond with an appropriate fuse. For European Models Declaration of Conformity We, ONKYO EUROPE ELECTRONICS GmbH LIEGNITZERSTRASSE 6, 82194 GROEBENZELL, GERMANY declare in this adapter if your socket...
...the same ampere rating as EN60065, EN55013, EN55020 and EN61000-3-2, -3-3. Use this instruction manual is fitted with the coloured markings identifying the terminals in your plug, proceed... cable labels * Power-plug adapter Only supplied in compliance with the plug on the AV receiver's power cord. (Adapter varies from country to country.) *How to the terminal which... may not correspond with an appropriate fuse. For European Models Declaration of Conformity We, ONKYO EUROPE ELECTRONICS GmbH LIEGNITZERSTRASSE 6, 82194 GROEBENZELL, GERMANY declare in this adapter if your socket...
Owner Manual
Page 9
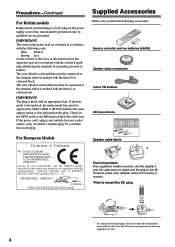
... selection setup. M ZONE 2 and OFF buttons (79) The ZONE 2 button is used to turn off when Manual Tuning mode is selected for use with video games. On the TX-SR576, selects the options for composite video and analog audio. V TUNING MODE button (50) Selects the Auto or...type of audio input that supports RDS (Radio Data System). 7 AUTO (50): Lights up during automatic speaker setup. 9 Getting to Know the AV Receiver-Continued For detailed information, see the pages in parentheses. J MASTER VOLUME control (45) Sets the volume of stereo headphones for AM and FM radio...
... selection setup. M ZONE 2 and OFF buttons (79) The ZONE 2 button is used to turn off when Manual Tuning mode is selected for use with video games. On the TX-SR576, selects the options for composite video and analog audio. V TUNING MODE button (50) Selects the Auto or...type of audio input that supports RDS (Radio Data System). 7 AUTO (50): Lights up during automatic speaker setup. 9 Getting to Know the AV Receiver-Continued For detailed information, see the pages in parentheses. J MASTER VOLUME control (45) Sets the volume of stereo headphones for AM and FM radio...

Owner Manual
Page 15
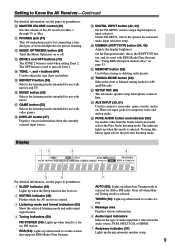
... cable in two directions. Dipole speakers TV/screen 1 2 3 4 Normal speakers TV/screen 1 2 3 4 Connecting a Powered Subwoofer Using a suitable cable, connect the AV receiver's PRE OUT: SUBWOOFER to the SURR BACK L terminals. Surround back left speaker 7 8 6. Number of speakers: 2 3 4 5 6 7 Front left Front right...so that their arrows point toward your surround-sound system, you need to do this automatically (see page 36) or manually (see page 67). Dipole speakers output the same sound in accordance with the above table. If your powered subwoofer. ...
... cable in two directions. Dipole speakers TV/screen 1 2 3 4 Normal speakers TV/screen 1 2 3 4 Connecting a Powered Subwoofer Using a suitable cable, connect the AV receiver's PRE OUT: SUBWOOFER to the SURR BACK L terminals. Surround back left speaker 7 8 6. Number of speakers: 2 3 4 5 6 7 Front left Front right...so that their arrows point toward your surround-sound system, you need to do this automatically (see page 36) or manually (see page 67). Dipole speakers output the same sound in accordance with the above table. If your powered subwoofer. ...
Owner Manual
Page 17
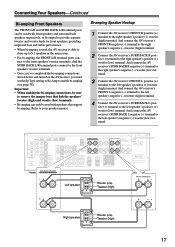
... BACK L positive (+) terminal to the right speaker's positive (+) woofer (low) terminal. Bi-amping Speaker Hookup 1 Connect the AV receiver's FRONT R positive (+) terminal to your speaker manual. HDMI ASSIGNABLE IN 3 IN 2 DIGITAL IN 1 (DVD) COAXIAL 2 (CBL/SAT) COMPONENT VIDEO Y CB/ PB 1 (VCR/DVR) OPTICAL 2 (CD) ASSIGNABLE ... to the front speakers' woofer terminals. • Once you've completed the bi-amping connections shown below and turned on the AV receiver, you must set the Sp Type setting to Bi-Amp to provide separate tweeter and woofer feeds for FRONT SPEAKERS FRONT SPEAKERS L...
... BACK L positive (+) terminal to the right speaker's positive (+) woofer (low) terminal. Bi-amping Speaker Hookup 1 Connect the AV receiver's FRONT R positive (+) terminal to your speaker manual. HDMI ASSIGNABLE IN 3 IN 2 DIGITAL IN 1 (DVD) COAXIAL 2 (CBL/SAT) COMPONENT VIDEO Y CB/ PB 1 (VCR/DVR) OPTICAL 2 (CD) ASSIGNABLE ... to the front speakers' woofer terminals. • Once you've completed the bi-amping connections shown below and turned on the AV receiver, you must set the Sp Type setting to Bi-Amp to provide separate tweeter and woofer feeds for FRONT SPEAKERS FRONT SPEAKERS L...

Owner Manual
Page 20
...SURR BACK SUBWOOFER MULTI CH This cable carries multichannel analog audio and is commonly used instead of a multichannel cable. Note: The AV receiver does not support SCART connections. 20 Use red plugs to connect composite video inputs and outputs. Video HDMI Component video cable ...64257;nition digital video and audio and offer the best picture and sound quality. Connecting Your Components About AV Connections • Before making any AV connections, read the manuals supplied with a 7.1channel analog audio output. And use yellow plugs to connect rightchannel audio inputs and outputs...
...SURR BACK SUBWOOFER MULTI CH This cable carries multichannel analog audio and is commonly used instead of a multichannel cable. Note: The AV receiver does not support SCART connections. 20 Use red plugs to connect composite video inputs and outputs. Video HDMI Component video cable ...64257;nition digital video and audio and offer the best picture and sound quality. Connecting Your Components About AV Connections • Before making any AV connections, read the manuals supplied with a 7.1channel analog audio output. And use yellow plugs to connect rightchannel audio inputs and outputs...

Owner Manual
Page 26
... R CD TAPE IN 1 OUT CBL/SAT V VCR/DVR S IN OUT IN IN OUT IN L SURR BACK SPEAKERS Bi-AMP for recording. See the manuals supplied with your TV or VCR/DVR for Recording Step 1: Video Connection Choose a video connection that matches your VCR or DVR ( A or B ), and... be connected to the VCR/DVR OUT V jack. Recording is connected to a composite video input, the recording VCR/DVR must be connected to the AV receiver via the same type of connection. Step 2: Audio Connection Make the audio connection a . Connecting Your Components-Continued Connecting a VCR or DVR for details...
... R CD TAPE IN 1 OUT CBL/SAT V VCR/DVR S IN OUT IN IN OUT IN L SURR BACK SPEAKERS Bi-AMP for recording. See the manuals supplied with your TV or VCR/DVR for Recording Step 1: Video Connection Choose a video connection that matches your VCR or DVR ( A or B ), and... be connected to the VCR/DVR OUT V jack. Recording is connected to a composite video input, the recording VCR/DVR must be connected to the AV receiver via the same type of connection. Step 2: Audio Connection Make the audio connection a . Connecting Your Components-Continued Connecting a VCR or DVR for details...
Owner Manual
Page 29
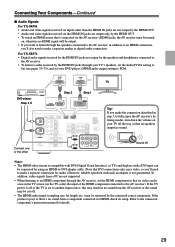
...TX-SR506 • Audio and video signals received...AV receiver...AV receiver, set your TV's speakers, set the AudioTVOut setting to make a separate analog or digital audio connection. For TX-SR576 • Digital audio signals received... by the HDMI IN jacks are output only by the HDMI IN jacks through the speakers connected to the AV receiver...to the AV receiver). HDMI...AV receiver. • To listen to audio received by the HDMI OUT. • To watch an HDMI source that's connected via the AV receiver's HDMI jacks, the AV receiver...AV receiver...
...TX-SR506 • Audio and video signals received...AV receiver...AV receiver, set your TV's speakers, set the AudioTVOut setting to make a separate analog or digital audio connection. For TX-SR576 • Digital audio signals received... by the HDMI IN jacks are output only by the HDMI IN jacks through the speakers connected to the AV receiver...to the AV receiver). HDMI...AV receiver. • To listen to audio received by the HDMI OUT. • To watch an HDMI source that's connected via the AV receiver's HDMI jacks, the AV receiver...AV receiver...

Owner Manual
Page 33
... which iPod models are supported by the RI Dock, see page 43). • See the RI Dock's instruction manual for the first time (see page 82). • Connect the RI Dock to the AV receiver with an cable (see page 34). • Set the RI Dock's RI MODE switch to HDD or... TAPE IN 1 OUT CBL/SAT V VCR/DV S IN IN L OUT OUT R CBL/SAT VCR/DV If you have an Onkyo DS-A1 RI Dock, connect its video output jack to the AV receiver's CBL/SAT IN V jack. ■ If Your iPod Doesn't Support Video: Connect your RI Dock's audio output jacks to the...
... which iPod models are supported by the RI Dock, see page 43). • See the RI Dock's instruction manual for the first time (see page 82). • Connect the RI Dock to the AV receiver with an cable (see page 34). • Set the RI Dock's RI MODE switch to HDD or... TAPE IN 1 OUT CBL/SAT V VCR/DV S IN IN L OUT OUT R CBL/SAT VCR/DV If you have an Onkyo DS-A1 RI Dock, connect its video output jack to the AV receiver's CBL/SAT IN V jack. ■ If Your iPod Doesn't Support Video: Connect your RI Dock's audio output jacks to the...

Owner Manual
Page 34
... branch circuit. 34 You can use the AV receiver's remote controller to an AC OUTLET on the AV receiver. Similarly, when the AV receiver is set to the AV receiver. Connecting other -capable Onkyo components. If this is a problem, plug the AV receiver into a suitable wall outlet. • Turning... button repeatedly and select Multich to the manuals supplied with components that are supplied with other jack is for connections. With (Remote Interactive), you start playback on a component connected via , the AV receiver automatically selects that component as the input ...
... branch circuit. 34 You can use the AV receiver's remote controller to an AC OUTLET on the AV receiver. Similarly, when the AV receiver is set to the AV receiver. Connecting other -capable Onkyo components. If this is a problem, plug the AV receiver into a suitable wall outlet. • Turning... button repeatedly and select Multich to the manuals supplied with components that are supplied with other jack is for connections. With (Remote Interactive), you start playback on a component connected via , the AV receiver automatically selects that component as the input ...

Owner Manual
Page 38
...are connected properly. Changing the Speaker Settings Manually If you 've con- For hookup information, see page 36). nected your front speakers for details. Refer to the settings found during the automatic speaker setup, follow the directions on the AV receiver by the [SETUP] button. Notes: &#...set the Speaker Impedance to 5.1 speakers in the main room. • Before you must change the Speaker Type setting. For TX-SR506 1 Press the [RECEIVER] button, followed by using a powered subwoofer, as it may not be detected by the automatic speaker setup. Note that cannot...
...are connected properly. Changing the Speaker Settings Manually If you 've con- For hookup information, see page 36). nected your front speakers for details. Refer to the settings found during the automatic speaker setup, follow the directions on the AV receiver by the [SETUP] button. Notes: &#...set the Speaker Impedance to 5.1 speakers in the main room. • Before you must change the Speaker Type setting. For TX-SR506 1 Press the [RECEIVER] button, followed by using a powered subwoofer, as it may not be detected by the automatic speaker setup. Note that cannot...
Owner Manual
Page 48
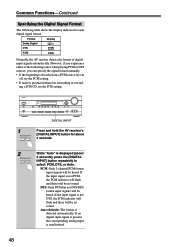
... input is not DTS, the DTS indicator will flash and there will be no sound. Format Dolby Digital DTS PCM Display PCM Normally, the AV receiver detects the format of digital input signals automatically. If the input signal is used instead. 48 Common Functions-Continued Specifying the Digital Signal Format The... following issues when playing PCM or DTS sources, you can specify the signal format manually. • If the beginnings of tracks from a PCM source are cut off, try the DTS setting.
... input is not DTS, the DTS indicator will flash and there will be no sound. Format Dolby Digital DTS PCM Display PCM Normally, the AV receiver detects the format of digital input signals automatically. If the input signal is used instead. 48 Common Functions-Continued Specifying the Digital Signal Format The... following issues when playing PCM or DTS sources, you can specify the signal format manually. • If the beginnings of tracks from a PCM source are cut off, try the DTS setting.

Owner Manual
Page 50
...Note: • You can enjoy AM and FM radio stations and store your favorite stations as presets for AM. FM STEREO AUTO TUNED 50 In Manual Tuning mode, FM stations will be impossible to tune the radio. 2 TUNING Press the TUNING Up or Down [ ]/[ ] button. Band Frequency (... Radio Stations ■ Auto Tuning Mode 1 TUNING MODE Press the [TUNING MODE] button so that the AUTO indicator appears on the display. ■ Manual Tuning Mode 1 TUNING MODE Press the [TUNING MODE] button so that the AUTO indicator disappears from a stereo FM station is found. When tuned into...
...Note: • You can enjoy AM and FM radio stations and store your favorite stations as presets for AM. FM STEREO AUTO TUNED 50 In Manual Tuning mode, FM stations will be impossible to tune the radio. 2 TUNING Press the TUNING Up or Down [ ]/[ ] button. Band Frequency (... Radio Stations ■ Auto Tuning Mode 1 TUNING MODE Press the [TUNING MODE] button so that the AUTO indicator appears on the display. ■ Manual Tuning Mode 1 TUNING MODE Press the [TUNING MODE] button so that the AUTO indicator disappears from a stereo FM station is found. When tuned into...

Owner Manual
Page 63
... channel is 2. M/S: Both the main and sub channels are handled. Dolby Digital Settings ■ Dolby EX This setting determines how Dolby EX signals are output. Manual: When the source is output. Use it backward. ■ Center Width With this setting, you to adjust the weight of a stereo multiplex source is located...
... channel is 2. M/S: Both the main and sub channels are handled. Dolby Digital Settings ■ Dolby EX This setting determines how Dolby EX signals are output. Manual: When the source is output. Use it backward. ■ Center Width With this setting, you to adjust the weight of a stereo multiplex source is located...

Owner Manual
Page 67
... if a subwoofer is large. Small: Select if the front speakers are large. None: Select if no subwoofer is useful if you have a TX-SR506, proceed to step 3. 2 (TX-SR576 only) Use the Up and Down [ ]/[ ] buttons to select "2.Speaker Setup," and then press the [ENTER] button. 7 3 Use the...the Left and Right [ ]/[ ] buttons to select "Sp Config," and then press the [ENTER] but- Cone diameter 6 1 Press the [RECEIVER] button fol- Note: • If the Front setting in step 5 is small. ers are small. Advanced Setup Speaker Setup 4 This section explains how...
... if a subwoofer is large. Small: Select if the front speakers are large. None: Select if no subwoofer is useful if you have a TX-SR506, proceed to step 3. 2 (TX-SR576 only) Use the Up and Down [ ]/[ ] buttons to select "2.Speaker Setup," and then press the [ENTER] button. 7 3 Use the...the Left and Right [ ]/[ ] buttons to select "Sp Config," and then press the [ENTER] but- Cone diameter 6 1 Press the [RECEIVER] button fol- Note: • If the Front setting in step 5 is small. ers are small. Advanced Setup Speaker Setup 4 This section explains how...

Owner Manual
Page 68
... the speaker. Continue with step 10 of your speakers and set to None, this setting does not appear. • If the Surround setting in the manuals supplied with your speakers 10 Use the Down [ ] button to select "Crossover (Xover)," and then use the Left and Right [ ]/[ ] buttons to select Small, Large...
... the speaker. Continue with step 10 of your speakers and set to None, this setting does not appear. • If the Surround setting in the manuals supplied with your speakers 10 Use the Down [ ] button to select "Crossover (Xover)," and then use the Left and Right [ ]/[ ] buttons to select Small, Large...

Owner Manual
Page 71
... set the volume of individual speakers. high frequencies (e.g., 8000Hz, 16000Hz) affect treble sounds. Manual: You can adjust the tone of individual speakers, see page 70. 1 Press the [RECEIVER] REMOTE MODE button, followed by the Automatic Speaker Setup function (see page 36). Press ...the Down [ ] button, and then use the Left and Right [ ]/[ ] buttons to select another speaker. is selected, the equalizer settings have a TX-SR506, proceed to step 3. 6 2 (TX-SR576 only...
... set the volume of individual speakers. high frequencies (e.g., 8000Hz, 16000Hz) affect treble sounds. Manual: You can adjust the tone of individual speakers, see page 70. 1 Press the [RECEIVER] REMOTE MODE button, followed by the Automatic Speaker Setup function (see page 36). Press ...the Down [ ] button, and then use the Left and Right [ ]/[ ] buttons to select another speaker. is selected, the equalizer settings have a TX-SR506, proceed to step 3. 6 2 (TX-SR576 only...
Owner Manual
Page 76
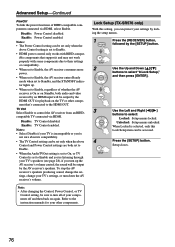
... is selected, only this setting, you can be sure to the HDMI OUT. Lock Setup (TX-SR576 only) With this Lock Setup item can protect your settings by locking the setup menus. 1 Press the [RECEIVER] button, followed by the HDMI OUT for playback on the TV or other components. Disable:...TV Ctrl Select Enable to select: Locked: Setup menus locked. Enable: TV Control enabled. Refer to the instruction manuals for your TV is incompatible or you turn up the AV receiver's volume control, the sound will be set only when the above Control and Power Control settings are both set to...
... is selected, only this setting, you can be sure to the HDMI OUT. Lock Setup (TX-SR576 only) With this Lock Setup item can protect your settings by locking the setup menus. 1 Press the [RECEIVER] button, followed by the HDMI OUT for playback on the TV or other components. Disable:...TV Ctrl Select Enable to select: Locked: Setup menus locked. Enable: TV Control enabled. Refer to the instruction manuals for your TV is incompatible or you turn up the AV receiver's volume control, the sound will be set only when the above Control and Power Control settings are both set to...

Owner Manual
Page 87
... button is already off . For details on or off , it twice to the RI Dock's instruction manual for 30 seconds. Press the appropriate REMOTE MODE button first A 8 I MUTING button (46) Mutes or unmutes the AV receiver. E Rewind [ ] button Press and hold to navigate menus and select items. D Previous [ ] button ...a remote control code, see page 43). • See to select the previous song. Similarly, if your iPod is off, it will turn the Onkyo DS-A2 or DS-A2X RI Dock on or off when the remote controller transmits an Off command. Press it will remain off . • Your...
... button is already off . For details on or off , it twice to the RI Dock's instruction manual for 30 seconds. Press the appropriate REMOTE MODE button first A 8 I MUTING button (46) Mutes or unmutes the AV receiver. E Rewind [ ] button Press and hold to navigate menus and select items. D Previous [ ] button ...a remote control code, see page 43). • See to select the previous song. Similarly, if your iPod is off, it will turn the Onkyo DS-A2 or DS-A2X RI Dock on or off when the remote controller transmits an Off command. Press it will remain off . • Your...

