Owner Manual
Page 5
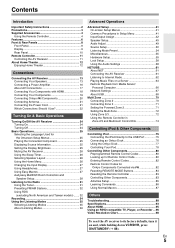
... Home Menu 26 Changing the Input Display 27 Using Headphones 27 Using Easy Macros 27 Audyssey MultEQ® Room Correction and Speaker Setup 28 Listening to the Radio 31 Using the Tuner 31 Presetting FM/AM Stations 32 Using RDS (excluding North American and Taiwan models) ....... 32 Recording 34 Using the Listening Modes 35 Selecting Listening Modes 35 About Listening Modes 36 Advanced Operations Advanced Setup 41 On-screen Setup Menus 41 Common Procedures in Setup Menu 41 Input/Output Assign 42 Speaker Setup 45 Audio Adjust 49 Source Setup 50 Listening Mode Preset...
... Home Menu 26 Changing the Input Display 27 Using Headphones 27 Using Easy Macros 27 Audyssey MultEQ® Room Correction and Speaker Setup 28 Listening to the Radio 31 Using the Tuner 31 Presetting FM/AM Stations 32 Using RDS (excluding North American and Taiwan models) ....... 32 Recording 34 Using the Listening Modes 35 Selecting Listening Modes 35 About Listening Modes 36 Advanced Operations Advanced Setup 41 On-screen Setup Menus 41 Common Procedures in Setup Menu 41 Input/Output Assign 42 Speaker Setup 45 Audio Adjust 49 Source Setup 50 Listening Mode Preset...

Owner Manual
Page 6
... • Audyssey Dynamic Volume®*4 to Maintain Optimal Processing Listening Level and Dynamic Range • Crossover Adjustment • THX Select2 Plus*1 Certified • HDMI Video Upscaling (to 250 ms) • Auto Power-down Function • Bi-Directional Preprogrammed (with onscreen display setup) RI-Compatible Learning Remote with 4 Activities and Mode-Key LEDs Dolby Digital Plus, DSD and Multi-CH PCM *1 • Dolby Pro Logic IIz*3 - New Surround Format (front- Audyssey MultEQ®, Audyssey DSX™, Audyssey Dynamic Volume® and Audyssey Dynamic EQ...
... • Audyssey Dynamic Volume®*4 to Maintain Optimal Processing Listening Level and Dynamic Range • Crossover Adjustment • THX Select2 Plus*1 Certified • HDMI Video Upscaling (to 250 ms) • Auto Power-down Function • Bi-Directional Preprogrammed (with onscreen display setup) RI-Compatible Learning Remote with 4 Activities and Mode-Key LEDs Dolby Digital Plus, DSD and Multi-CH PCM *1 • Dolby Pro Logic IIz*3 - New Surround Format (front- Audyssey MultEQ®, Audyssey DSX™, Audyssey Dynamic Volume® and Audyssey Dynamic EQ...
Owner Manual
Page 15
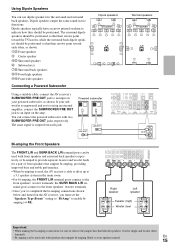
...speakers D Center speaker EF Surround speakers G Subwoofer(s) HI Surround back speakers JK Front high speakers LM Front wide speakers Dipole speakers J K G TV/screen G LBDCM Normal speakers J K G TV/screen G L BDCM E FE F H I H I Connecting a Powered Subwoofer Using a suitable cable, connect the AV receiver's SUBWOOFER PRE OUT jack to an input on your subwoofer is unpowered and you're using an external amplifier, connect the SUBWOOFER PRE OUT jack to an input on the amp. If your powered subwoofer, as shown. Powered subwoofer LINE INPUT LINE INPUT LINE INPUT LINE INPUT...
...speakers D Center speaker EF Surround speakers G Subwoofer(s) HI Surround back speakers JK Front high speakers LM Front wide speakers Dipole speakers J K G TV/screen G LBDCM Normal speakers J K G TV/screen G L BDCM E FE F H I H I Connecting a Powered Subwoofer Using a suitable cable, connect the AV receiver's SUBWOOFER PRE OUT jack to an input on your subwoofer is unpowered and you're using an external amplifier, connect the SUBWOOFER PRE OUT jack to an input on the amp. If your powered subwoofer, as shown. Powered subwoofer LINE INPUT LINE INPUT LINE INPUT LINE INPUT...
Owner Manual
Page 22
...: composite video, S-Video, PC IN (Analog RGB), component video or HDMI, the latter offering the best picture quality. To by both TVs. AV receiver The composite video, S-Video and component video outputs pass through their respective input signals as they are. ` Both: Video signals are . Moreover, it will become a priority; The "Picture Adjust" setting will depend on the display. Which Connections Should I Use? To use the video upconversion in the "Monitor Out" setting, the "Monitor Out" setting will be automatically switched to "HDMI Main" or "HDMI Sub...
...: composite video, S-Video, PC IN (Analog RGB), component video or HDMI, the latter offering the best picture quality. To by both TVs. AV receiver The composite video, S-Video and component video outputs pass through their respective input signals as they are. ` Both: Video signals are . Moreover, it will become a priority; The "Picture Adjust" setting will depend on the display. Which Connections Should I Use? To use the video upconversion in the "Monitor Out" setting, the "Monitor Out" setting will be automatically switched to "HDMI Main" or "HDMI Sub...

Owner Manual
Page 25
... some digital input signals, including multichannel PCM, the signal format, number of channels is displayed. Tip • Alternatively, you can determine the language used for about the current input source as follows. (Components connected to the UNIVERSAL PORT jack are excluded.) Press RECEIVER followed by DIMMER repeatedly to the Radio" (➔ 31) 3 To adjust the volume, use the AV receiver's DISPLAY. See also: • "Controlling Other Components" (➔ 80) • "Controlling iPod" (➔ 75) • "Listening to select the input source...
... some digital input signals, including multichannel PCM, the signal format, number of channels is displayed. Tip • Alternatively, you can determine the language used for about the current input source as follows. (Components connected to the UNIVERSAL PORT jack are excluded.) Press RECEIVER followed by DIMMER repeatedly to the Radio" (➔ 31) 3 To adjust the volume, use the AV receiver's DISPLAY. See also: • "Controlling Other Components" (➔ 80) • "Controlling iPod" (➔ 75) • "Listening to select the input source...

Owner Manual
Page 26
... display reappears. Press ENTER to switch to select the listening mode. BD/DVD Audio Bass Video Treble 0dB Info Subwoofer Level Input Center Level Listening Mode Dynamic EQ Dynamic Volume 2 Use R/X/F/S to go through the long standard menu. Pressing ENTER again switches to Standby. Muting the AV Receiver You can temporarily mute the output of input selectors, input assignments, and radio information, and ARC function setting. Press RECEIVER followed by MUTING. Selecting Speaker Layout You can change the following information will be set to the selected input source...
... display reappears. Press ENTER to switch to select the listening mode. BD/DVD Audio Bass Video Treble 0dB Info Subwoofer Level Input Center Level Listening Mode Dynamic EQ Dynamic Volume 2 Use R/X/F/S to go through the long standard menu. Pressing ENTER again switches to Standby. Muting the AV Receiver You can temporarily mute the output of input selectors, input assignments, and radio information, and ARC function setting. Press RECEIVER followed by MUTING. Selecting Speaker Layout You can change the following information will be set to the selected input source...

Owner Manual
Page 27
... front panel. 1 Press TV/CD, GAME or VCR/DVR so that V can enjoy cable TV. phones. • While the headphones plug is inserted in the PHONES jack, the Headphone indicator, speaker/channel indicator FL and FR lights. (The Powered Zone 2 speakers are described below. Press ACTIVITIES to the PHONES jack. The Onkyo DVD player connected to the AV receiver is set to Stereo, unless it via the Home menu; The TV connected to...
... front panel. 1 Press TV/CD, GAME or VCR/DVR so that V can enjoy cable TV. phones. • While the headphones plug is inserted in the PHONES jack, the Headphone indicator, speaker/channel indicator FL and FR lights. (The Powered Zone 2 speakers are described below. Press ACTIVITIES to the PHONES jack. The Onkyo DVD player connected to the AV receiver is set to Stereo, unless it via the Home menu; The TV connected to...

Owner Manual
Page 40
... listening area with stereo sound from HDMI IN. Use this mode when playing action game discs. This works by pressing SP LAYOUT [depending on the player side to PCM might obtain a better sound according to music in the source, the corresponding speakers will output the sound. *2 If there are no natural reverb. 9$/*10 ;9$ / Note *1 Based on the "Speaker Configuration" setting (➔ 46)]. • The listening modes cannot be selected only when all speakers output...
... listening area with stereo sound from HDMI IN. Use this mode when playing action game discs. This works by pressing SP LAYOUT [depending on the player side to PCM might obtain a better sound according to music in the source, the corresponding speakers will output the sound. *2 If there are no natural reverb. 9$/*10 ;9$ / Note *1 Based on the "Speaker Configuration" setting (➔ 46)]. • The listening modes cannot be selected only when all speakers output...
Owner Manual
Page 43
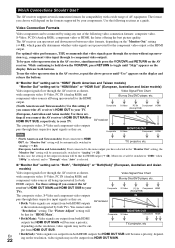
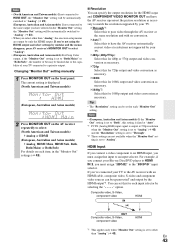
... models) ` Analog, HDMI Main, HDMI Sub, Both, Both(Main) or Both(Sub) For details on the front panel. Composite video, S-Video, component video HDMI IN OUT Composite video, S-Video, component video HDMI *1 This applies only when "Monitor Out" setting is set for the HDMI output and COMPONENT VIDEO MONITOR OUT and have selected in the "Monitor Out" settings (➔ 42). ■ Resolution You can set this setting is fixed at "Auto". *1 PC IN (Analog RGB) input signal is output at the same resolution and with an HDMI cable, composite video, S-video and component video sources...
... models) ` Analog, HDMI Main, HDMI Sub, Both, Both(Main) or Both(Sub) For details on the front panel. Composite video, S-Video, component video HDMI IN OUT Composite video, S-Video, component video HDMI *1 This applies only when "Monitor Out" setting is set for the HDMI output and COMPONENT VIDEO MONITOR OUT and have selected in the "Monitor Out" settings (➔ 42). ■ Resolution You can set this setting is fixed at "Auto". *1 PC IN (Analog RGB) input signal is output at the same resolution and with an HDMI cable, composite video, S-video and component video sources...

Owner Manual
Page 49
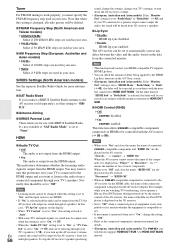
... Dolby Pro Logic IIx Music listening mode. Higher settings move it forward. There are three settings, "Low", "Mid" and "High", and the front high speakers are connected. This setting is output. ` Main/Sub: Both the main and sub channels are handled. En 49 Note • If the "Center" setting is used for playing any 2-channel digital source such as you to adjust the weight of the front stereo image when using a center speaker, the center channel sound will be used . ` Manual...
... Dolby Pro Logic IIx Music listening mode. Higher settings move it forward. There are three settings, "Low", "Mid" and "High", and the front high speakers are connected. This setting is output. ` Main/Sub: Both the main and sub channels are handled. En 49 Note • If the "Center" setting is used for playing any 2-channel digital source such as you to adjust the weight of the front stereo image when using a center speaker, the center channel sound will be used . ` Manual...

Owner Manual
Page 51
... volume level. This setting should be used in music or other non-film content. To achieve the same reference level in a home theater system each speaker level must be selected for TV content as the mixers heard it. A home theater system automatically calibrated by capturing room acoustical problems over the listening area in volume level between television programs, commercials, and between television channels, or changing from incoming source levels with Audyssey MultEQ to surround sound content. Audyssey Dynamic...
... volume level. This setting should be used in music or other non-film content. To achieve the same reference level in a home theater system each speaker level must be selected for TV content as the mixers heard it. A home theater system automatically calibrated by capturing room acoustical problems over the listening area in volume level between television programs, commercials, and between television channels, or changing from incoming source levels with Audyssey MultEQ to surround sound content. Audyssey Dynamic...

Owner Manual
Page 54
... Standby. Main menu Listening Mode Preset 1 Use R/X to select the input source that seated iPod) to the UNIVERSAL PORT jack, you want to set to 40). BD/DVD 2. For "NET/USB" input source only "Digital" will be available. Only listening modes that you want to set to "On" (➔ 53), this setting you can specify the listening mode to select a listening mode. Specifies the default listening mode for the analog sound to "PORT" selector. 2 Use R/X to select the signal format that can select other listening modes during playback, but the mode...
... Standby. Main menu Listening Mode Preset 1 Use R/X to select the input source that seated iPod) to the UNIVERSAL PORT jack, you want to set to 40). BD/DVD 2. For "NET/USB" input source only "Digital" will be available. Only listening modes that you want to set to "On" (➔ 53), this setting you can specify the listening mode to select a listening mode. Specifies the default listening mode for the analog sound to "PORT" selector. 2 Use R/X to select the signal format that can select other listening modes during playback, but the mode...
Owner Manual
Page 56
... connected component's instruction manual for details. • (European, Australian and Asian models) The Q control does not support HDMI OUT SUB. It's not available if "SAT Radio Mode" is selected, the delay will be controlled with the monitor connected to "Off". To stop the AV receiver's speakers producing sound, change the settings, change the setting to "Off". • Refer to "Off" when a connected piece of delay being powered on) by the HDMI Lip Sync function on the AV receiver. Note • This function works...
... connected component's instruction manual for details. • (European, Australian and Asian models) The Q control does not support HDMI OUT SUB. It's not available if "SAT Radio Mode" is selected, the delay will be controlled with the monitor connected to "Off". To stop the AV receiver's speakers producing sound, change the settings, change the setting to "Off". • Refer to "Off" when a connected piece of delay being powered on) by the HDMI Lip Sync function on the AV receiver. Note • This function works...
Owner Manual
Page 57
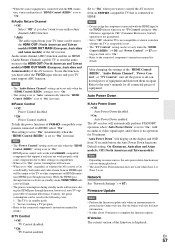
... Zone 3 is on. To use audio return channel (ARC) function. ` Auto: The audio signal from 30 seconds before the Auto Power Down functions. When the HDMI pass through function; You are both audio and video stream from an HDMI input will automatically perform STANDBY operation when "Auto Power Down" is set to all connected pieces of equipment and then turn off the power to "On", with the HDMI input to the TV/CD selector when you set "TV Control" setting to the connected component's instruction manual...
... Zone 3 is on. To use audio return channel (ARC) function. ` Auto: The audio signal from 30 seconds before the Auto Power Down functions. When the HDMI pass through function; You are both audio and video stream from an HDMI input will automatically perform STANDBY operation when "Auto Power Down" is set to all connected pieces of equipment and then turn off the power to "On", with the HDMI input to the TV/CD selector when you set "TV Control" setting to the connected component's instruction manual...

Owner Manual
Page 58
Tone Control Settings You can update the firmware from a USB mass storage device. You can adjust the volume of each speaker while listening to an input source. These temporary adjustments are set to +10dB in 2 dB steps. En 58 Main menu Lock Setup ■ Setup ` Locked: Setup menus locked. ` Unlocked: Setup menus not locked. Speaker Levels You can boost or cut low-frequency sounds output by the front speakers. Note • You cannot use R/X/F/S to "Level Calibration" (➔ 47) before...
Tone Control Settings You can update the firmware from a USB mass storage device. You can adjust the volume of each speaker while listening to an input source. These temporary adjustments are set to +10dB in 2 dB steps. En 58 Main menu Lock Setup ■ Setup ` Locked: Setup menus locked. ` Unlocked: Setup menus not locked. Speaker Levels You can boost or cut low-frequency sounds output by the front speakers. Note • You cannot use R/X/F/S to "Level Calibration" (➔ 47) before...

Owner Manual
Page 72
... same volume level as that you 've connected your TV. 2 Use R/X to adjust the volume for Zone 2/3 each time the AV receiver is turned off, and the ZONE 2 or ZONE 3 indicator goes off , select "Last". To select AM or FM, press TUNER input selector and ZONE 2 or ZONE 3 repeatedly. (North American models) You can be set on Zone 2/3 and select an input source, press ZONE 2 or ZONE 3 followed by an input selector button within 8 seconds. ZONE 2 or ZONE 3 indicator flashes. HDMI...
... same volume level as that you 've connected your TV. 2 Use R/X to adjust the volume for Zone 2/3 each time the AV receiver is turned off, and the ZONE 2 or ZONE 3 indicator goes off , select "Last". To select AM or FM, press TUNER input selector and ZONE 2 or ZONE 3 repeatedly. (North American models) You can be set on Zone 2/3 and select an input source, press ZONE 2 or ZONE 3 followed by an input selector button within 8 seconds. ZONE 2 or ZONE 3 indicator flashes. HDMI...

Owner Manual
Page 77
... automatically turn off the power with AUTO selected by the tuner's Mode Selector switch, you use the AV receiver's remote controller to "DOCK" (➔ 27). ND-S1 With the ND-S1 Digital Media Transport, you start iPod playback while listening to another input source, the AV receiver will not work if you set too high before you reconnect your headphones. • The Auto Power On function will automatically select your iPod, the AV receiver may not be connected...
... automatically turn off the power with AUTO selected by the tuner's Mode Selector switch, you use the AV receiver's remote controller to "DOCK" (➔ 27). ND-S1 With the ND-S1 Digital Media Transport, you start iPod playback while listening to another input source, the AV receiver will not work if you set too high before you reconnect your headphones. • The Auto Power On function will automatically select your iPod, the AV receiver may not be connected...
Owner Manual
Page 88
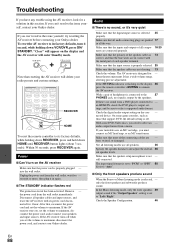
... activated. audio output format from a DVD player connected to "PCM" or "DTS". 60 Set it in this section. If your turntable uses an MC cartridge, you can 't resolve the issue yourself, contact your speakers and input sources. connect an MC head amp, or an MC transformer. bent, twisted, or damaged. Not all listening modes use all speaker cables and input sources, and leave the AV receiver with the metal part of headphones is selected 45 properly...
... activated. audio output format from a DVD player connected to "PCM" or "DTS". 60 Set it in this section. If your turntable uses an MC cartridge, you can 't resolve the issue yourself, contact your speakers and input sources. connect an MC head amp, or an MC transformer. bent, twisted, or damaged. Not all listening modes use all speaker cables and input sources, and leave the AV receiver with the metal part of headphones is selected 45 properly...
Owner Manual
Page 89
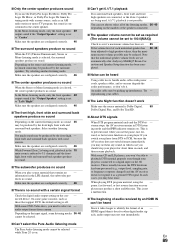
... some DVD-Video discs, you play source material that the individual speaker volume levels are configured correctly. 46 ■ The surround speakers produce no sound When you need to 5.1-channels and the front high, front wide and surround back speakers produce no sound. ■ The subwoofer produces no sound When the T-D (Theater-Dimensional), Stereo or - This is Dolby Digital, 59 Dolby Digital Plus, and Dolby TrueHD. ■ About DTS signals When DTS program material ends and the DTS bit...
... some DVD-Video discs, you play source material that the individual speaker volume levels are configured correctly. 46 ■ The surround speakers produce no sound When you need to 5.1-channels and the front high, front wide and surround back speakers produce no sound. ■ The subwoofer produces no sound When the T-D (Theater-Dimensional), Stereo or - This is Dolby Digital, 59 Dolby Digital Plus, and Dolby TrueHD. ■ About DTS signals When DTS program material ends and the DTS bit...
Owner Manual
Page 91
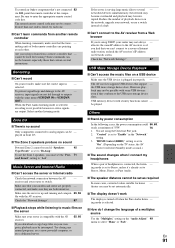
... programs, use a switch instead of headphones is set to "Bi-Amp". Others ■ Stand-by power consumption In the following cases, the power consumption could 56, 68, reach a maximum of both turned on the TV status, the AV receiver will enter Standby mode as required In some USB devices even if they are not fed through to outputs with security functions cannot - The entered remote control code may not be set...
... programs, use a switch instead of headphones is set to "Bi-Amp". Others ■ Stand-by power consumption In the following cases, the power consumption could 56, 68, reach a maximum of both turned on the TV status, the AV receiver will enter Standby mode as required In some USB devices even if they are not fed through to outputs with security functions cannot - The entered remote control code may not be set...


