Owner Manual
Page 1
... this manual will enable you for future reference. AV Receiver TX-NR807 HT-RC180 Instruction Manual Thank you to obtain optimum performance and listening enjoyment from your new AV Receiver. Contents Introduction 2 Connection 18 Turning On & First Time Setup .....42 Basic Operations 60 Using the Listening Modes ........74 Advanced Setup 84 NET 107 Multi Zone 115 Controlling Other...
... this manual will enable you for future reference. AV Receiver TX-NR807 HT-RC180 Instruction Manual Thank you to obtain optimum performance and listening enjoyment from your new AV Receiver. Contents Introduction 2 Connection 18 Turning On & First Time Setup .....42 Basic Operations 60 Using the Listening Modes ........74 Advanced Setup 84 NET 107 Multi Zone 115 Controlling Other...
Owner Manual
Page 4
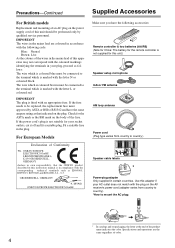
...your AC outlet does not match with an appropriate fuse. Check for this unit.) Speaker setup microphone Indoor FM antenna AM loop antenna Power cord (Plug type varies from country to... fuse must be connected to the terminal which is fitted with the plug on the AV receiver's power cord (adapter varies from country to country.) Speaker cable labels * Power-plug... compliance with the letter L or coloured red. For European Models Declaration of Conformity We, ONKYO EUROPE ELECTRONICS GmbH LIEGNITZERSTRASSE 6, 82194 GROEBENZELL, GERMANY declare in own responsibility, that indicated on ...
...your AC outlet does not match with an appropriate fuse. Check for this unit.) Speaker setup microphone Indoor FM antenna AM loop antenna Power cord (Plug type varies from country to... fuse must be connected to the terminal which is fitted with the plug on the AV receiver's power cord (adapter varies from country to country.) Speaker cable labels * Power-plug... compliance with the letter L or coloured red. For European Models Declaration of Conformity We, ONKYO EUROPE ELECTRONICS GmbH LIEGNITZERSTRASSE 6, 82194 GROEBENZELL, GERMANY declare in own responsibility, that indicated on ...
Owner Manual
Page 5
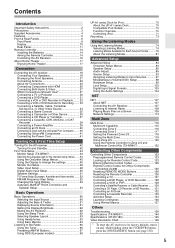
... 40 Connecting Onkyo V Components 41 Connecting the Power Cord 41 Turning On & First Time Setup Turning On the AV receiver 42 Turning On and Standby 42 First Time Setup 43 Monitor Setup (TX-NR807 43 Selecting the Language used for the onscreen setup menus ..... 44 Using the Onscreen Setup Menus 45 ... 109 Network Settings 113 Multi Zone Multi Zone 115 Multiroom Capability 115 Connecting Zone 2 116 Connecting Zone 3 117 Setting the Powered Zone 2/3 118 Setting the Multi Zone 119 Using Zone 2/3 120 Using the Remote Controller in Zone 2/3 and Multiroom Control Kits (TX-NR807 122 ...
... 40 Connecting Onkyo V Components 41 Connecting the Power Cord 41 Turning On & First Time Setup Turning On the AV receiver 42 Turning On and Standby 42 First Time Setup 43 Monitor Setup (TX-NR807 43 Selecting the Language used for the onscreen setup menus ..... 44 Using the Onscreen Setup Menus 45 ... 109 Network Settings 113 Multi Zone Multi Zone 115 Multiroom Capability 115 Connecting Zone 2 116 Connecting Zone 3 117 Setting the Powered Zone 2/3 118 Setting the Multi Zone 119 Using Zone 2/3 120 Using the Remote Controller in Zone 2/3 and Multiroom Control Kits (TX-NR807 122 ...
Owner Manual
Page 6
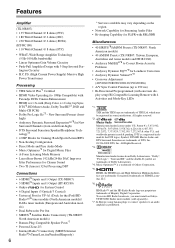
...HD Master Audio and DTS Surround Sensation are trademarks of Onkyo Corporation. *5. To receive HD Radio broadcasts, you must install an Onkyo UP-HT1 HD Radio tuner module (sold separately). ...616; 6,487,535; 7,212,872; 7,333,929; 7,392,195; 7,272,567 & other U.S. play setup) RI-Compatible Learning Remote with (Deep Color, x.v.Color, Lip Sync, DTS*2-HD Master Audio, Dolby TrueHD...Network Capability for Streaming Audio Files • Bi-Amping Capability for FL/FR with SBL/SBR Miscellaneous • 40 SIRIUS*8/AM/FM Presets (TX-NR807: North American models) • 40 AM/FM Presets (TX-NR807...
...HD Master Audio and DTS Surround Sensation are trademarks of Onkyo Corporation. *5. To receive HD Radio broadcasts, you must install an Onkyo UP-HT1 HD Radio tuner module (sold separately). ...616; 6,487,535; 7,212,872; 7,333,929; 7,392,195; 7,272,567 & other U.S. play setup) RI-Compatible Learning Remote with (Deep Color, x.v.Color, Lip Sync, DTS*2-HD Master Audio, Dolby TrueHD...Network Capability for Streaming Audio Files • Bi-Amping Capability for FL/FR with SBL/SBR Miscellaneous • 40 SIRIUS*8/AM/FM Presets (TX-NR807: North American models) • 40 AM/FM Presets (TX-NR807...
Owner Manual
Page 8
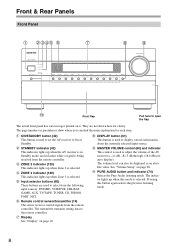
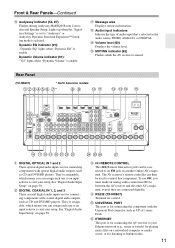
...for each item. D ZONE 2 indicator (120) This indicator lights up when Zone 3 is selected. See "Volume Setup" on page 10. They are used to set the AV receiver to On or Standby. J MASTER VOLUME control (60) and indicator This control is used to display various information about... input source. Front & Rear Panels Front Panel B CDEF G H I DISPLAY button (61) This button is used to adjust the volume of the AV receiver to the remote controller. K PURE AUDIO button and indicator (74) Selects the Pure Audio listening mode. I J K Front flap Pull here to open...
...for each item. D ZONE 2 indicator (120) This indicator lights up when Zone 3 is selected. See "Volume Setup" on page 10. They are used to set the AV receiver to On or Standby. J MASTER VOLUME control (60) and indicator This control is used to display various information about... input source. Front & Rear Panels Front Panel B CDEF G H I DISPLAY button (61) This button is used to adjust the volume of the AV receiver to the remote controller. K PURE AUDIO button and indicator (74) Selects the Pure Audio listening mode. I J K Front flap Pull here to open...
Owner Manual
Page 9
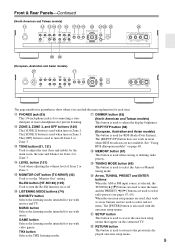
...are used to adjust the display brightness. N TONE button (61, 121) Used to select and set the "Monitor Out" setting. P MONITOR OUT button (TX-NR807) (43) Used to set items. The [ENTER] button is selected, the TUNING [R]/[X] buttons are used to adjust the tone (bass and treble) for ...source is also used , they work in parentheses show where you can find the main explanation for use with movies and TV. When the onscreen setup menus are used with music. Q LISTENING MODE buttons (74) MOVIE/TV button Selects the listening modes intended for Zone 2 or Zone 3. ...
...are used to adjust the display brightness. N TONE button (61, 121) Used to select and set the "Monitor Out" setting. P MONITOR OUT button (TX-NR807) (43) Used to set items. The [ENTER] button is selected, the TUNING [R]/[X] buttons are used to adjust the tone (bass and treble) for ...source is also used , they work in parentheses show where you can find the main explanation for use with movies and TV. When the onscreen setup menus are used with music. Q LISTENING MODE buttons (74) MOVIE/TV button Selects the listening modes intended for Zone 2 or Zone 3. ...
Owner Manual
Page 10
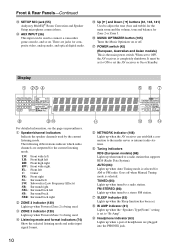
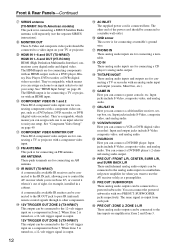
... Lights up when Auto Tuning mode is being used by the current listening mode. Front & Rear Panels-Continued X SETUP MIC jack (55) Audyssey MultEQ® Room Correction and Speaker Setup microphone connects here. LW: Front wide left LH: Front high left RH: Front high right RW: Front wide right...Surround back left SB: Surround back SBR: Surround back right C ZONE 2 indicator (120) Lights up when the AV receiver can be set to ON to set to a stereo FM station. L M NO F NETWORK indicator (108) Lights up when Powered Zone 2 is the main power switch. TUNED (66): Lights up when tuned...
... Lights up when Auto Tuning mode is being used by the current listening mode. Front & Rear Panels-Continued X SETUP MIC jack (55) Audyssey MultEQ® Room Correction and Speaker Setup microphone connects here. LW: Front wide left LH: Front high left RH: Front high right RW: Front wide right...Surround back left SB: Surround back SBR: Surround back right C ZONE 2 indicator (120) Lights up when the AV receiver can be set to ON to set to a stereo FM station. L M NO F NETWORK indicator (108) Lights up when Powered Zone 2 is the main power switch. TUNED (66): Lights up when tuned...
Owner Manual
Page 11
...radio. 11 The AV receiver's remote controller can be used to your Ethernet network (e.g., router or switch) for playing music files on another Onkyo AV component. G ETHERNET This port is muted. Dynamic EQ indicator (91): "Dynamic EQ" lights when "Dynamic EQ" is selected. Rear Panel (TX-NR807) * North ...jack on a networked computer or media server, or for connecting components with the Universal Port connector such as CD and DVD/BD players. N Volume level (60) Displays the volume level. See "Digital Audio Input Setup" on page 50. E RS232 (TX-NR807) Terminal for connecting...
...radio. 11 The AV receiver's remote controller can be used to your Ethernet network (e.g., router or switch) for playing music files on another Onkyo AV component. G ETHERNET This port is muted. Dynamic EQ indicator (91): "Dynamic EQ" lights when "Dynamic EQ" is selected. Rear Panel (TX-NR807) * North ...jack on a networked computer or media server, or for connecting components with the Universal Port connector such as CD and DVD/BD players. N Volume level (60) Displays the volume level. See "Digital Audio Input Setup" on page 50. E RS232 (TX-NR807) Terminal for connecting...
Owner Manual
Page 12
...ANTENNA These push terminals are for connecting a CD player's analog audio output. N IR IN/OUT (TX-NR807) A commercially available IR receiver can assign each one to an input selector to use the AV receiver solely as a preamplifier. Input jacks include S-Video, composite video, and analog audio. Z PRE OUT... is output. 12 P AC INLET The supplied power cord is output. 12V TRIGGER OUT ZONE 3 (TX-NR807) This output can be connected to the 12-volt trigger input on your setup. Y PRE OUT: FRONT L/R, CENTER, SURR L/R, and SURR BACK L/R These multichannel analog audio outputs can...
...ANTENNA These push terminals are for connecting a CD player's analog audio output. N IR IN/OUT (TX-NR807) A commercially available IR receiver can assign each one to an input selector to use the AV receiver solely as a preamplifier. Input jacks include S-Video, composite video, and analog audio. Z PRE OUT... is output. 12 P AC INLET The supplied power cord is output. 12V TRIGGER OUT ZONE 3 (TX-NR807) This output can be connected to the 12-volt trigger input on your setup. Y PRE OUT: FRONT L/R, CENTER, SURR L/R, and SURR BACK L/R These multichannel analog audio outputs can...
Owner Manual
Page 15
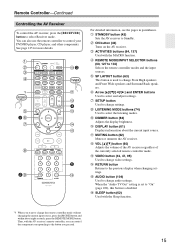
.... C ON button (42) Turns on the AV receiver. G Arrow [R]/[X]/[F]/[S] and ENTER buttons Used to Standby. H SETUP button Used to change settings. N VIDEO button (43, 47, 95) Used to change video settings. Then, with the AV receiver's remote controller, you can also use the remote...information about eight seconds, press the REMOTE MODE button. L MUTING button (62) Mutes or unmutes the AV receiver. M VOL [R]/[X] button (60) Adjusts the volume of the AV receiver regardless of the currently selected remote controller mode. You can control the component corresponding to the button you...
.... C ON button (42) Turns on the AV receiver. G Arrow [R]/[X]/[F]/[S] and ENTER buttons Used to Standby. H SETUP button Used to change settings. N VIDEO button (43, 47, 95) Used to change video settings. Then, with the AV receiver's remote controller, you can also use the remote...information about eight seconds, press the REMOTE MODE button. L MUTING button (62) Mutes or unmutes the AV receiver. M VOL [R]/[X] button (60) Adjusts the volume of the AV receiver regardless of the currently selected remote controller mode. You can control the component corresponding to the button you...
Owner Manual
Page 26
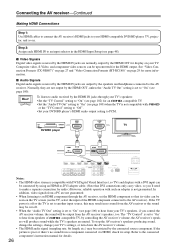
...input can be connected by using an HDMI-to-DVI adapter cable. (Note that its setup. See "Video Connection Formats (TX-NR807)" on page 27 and "Video Connection Formats (HT-RC180)" on . In addition, video signals from the AV receiver's speakers, too. If the TV power is off or the TV is set to ...another input source, this may result in the HDMI Input Setup (see page 102) for the HDMI...
...input can be connected by using an HDMI-to-DVI adapter cable. (Note that its setup. See "Video Connection Formats (TX-NR807)" on page 27 and "Video Connection Formats (HT-RC180)" on . In addition, video signals from the AV receiver's speakers, too. If the TV power is off or the TV is set to ...another input source, this may result in the HDMI Input Setup (see page 102) for the HDMI...
Owner Manual
Page 42
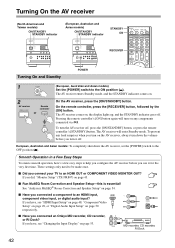
...steps to an HDMI input, HDMI component video input, or digital audio input? If you connected a component to help you configure the AV receiver before you connected an Onkyo MD recorder, CD recorder, or RI Dock? If you have , see "Changing the Input Display" on page 53. Turning On the.../TAPE MD recorder, CD recorder, RI Dock 42 See "Audyssey MultEQ® Room Correction and Speaker Setup" on page 54. ■ Have you did, "Monitor Setup" (TX-NR807) on the AV receiver, always turn down the AV receiver, set the [POWER] switch to be made once. ■ Did you use it off . ...
...steps to an HDMI input, HDMI component video input, or digital audio input? If you connected a component to help you configure the AV receiver before you connected an Onkyo MD recorder, CD recorder, or RI Dock? If you have , see "Changing the Input Display" on page 53. Turning On the.../TAPE MD recorder, CD recorder, RI Dock 42 See "Audyssey MultEQ® Room Correction and Speaker Setup" on page 54. ■ Have you did, "Monitor Setup" (TX-NR807) on the AV receiver, always turn down the AV receiver, set the [POWER] switch to be made once. ■ Did you use it off . ...
Owner Manual
Page 43
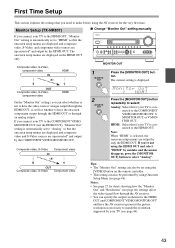
... to select: Analog: Select this if your TV is automatically set using Onscreen Setup Menu (see page 46). nected to the HDMI OUT. If you're not using the AV receiver for the very first time. Monitor Setup (TX-NR807) ■ Change "Monitor Out" setting manually If you connect your TV to...not to have the video sources' images output through the HDMI OUT, as well as whether to have the onscreen setup menu output through the HDMI OUT or through the AV receiver. • You can specify the output resolution for charts showing how the "Monitor Out" and "Resolution" (see ...
... to select: Analog: Select this if your TV is automatically set using Onscreen Setup Menu (see page 46). nected to the HDMI OUT. If you're not using the AV receiver for the very first time. Monitor Setup (TX-NR807) ■ Change "Monitor Out" setting manually If you connect your TV to...not to have the video sources' images output through the HDMI OUT, as well as whether to have the onscreen setup menu output through the HDMI OUT or through the AV receiver. • You can specify the output resolution for charts showing how the "Monitor Out" and "Resolution" (see ...
Owner Manual
Page 44
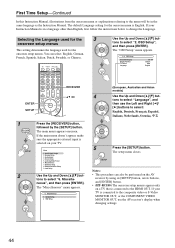
...default Language setting for the onscreen setup menus. The "OSD Setup" menu appears. 6-2. neous", and then press [ENTER]. Volume Setup 2. tons to select "Language", and then use the AV receiver's display when changing settings. 44 Menu 1. Remote Controller Setup 9. The setup menu closes. Use the Up ... buttons to select "2. Miscella- First Time Setup-Continued In this Instruction Manual, illustrations from the onscreen menu or explanations referring to the menu will be performed on the AV receiver by the [SETUP] button. Speaker Setup 3. You can also be in a language...
...default Language setting for the onscreen setup menus. The "OSD Setup" menu appears. 6-2. neous", and then press [ENTER]. Volume Setup 2. tons to select "Language", and then use the AV receiver's display when changing settings. 44 Menu 1. Remote Controller Setup 9. The setup menu closes. Use the Up ... buttons to select "2. Miscella- First Time Setup-Continued In this Instruction Manual, illustrations from the onscreen menu or explanations referring to the menu will be performed on the AV receiver by the [SETUP] button. Speaker Setup 3. You can also be in a language...
Owner Manual
Page 45
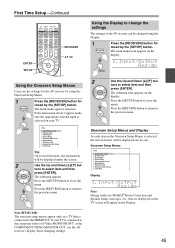
...connected to the composite video or S-Video MONITOR OUT, or the COMPONENT VIDEO MONITOR OUT, use the AV receiver's display when changing settings. 45 Source Setup 5. Remote Controller Setup 9. The submenu item appears on your TV is selected on the display. Audio Adjust 4. Listening ...Mode Preset 6. Note (HT-RC180): The onscreen setup menus appear only on the display. First Time Setup-Continued ENTER SETUP RECEIVER RXFS Using the Display to change the settings The settings of the AV receiver can be displayed one by one. Miscellaneous 7. tons to ...
...connected to the composite video or S-Video MONITOR OUT, or the COMPONENT VIDEO MONITOR OUT, use the AV receiver's display when changing settings. 45 Source Setup 5. Remote Controller Setup 9. The submenu item appears on your TV is selected on the display. Audio Adjust 4. Listening ...Mode Preset 6. Note (HT-RC180): The onscreen setup menus appear only on the display. First Time Setup-Continued ENTER SETUP RECEIVER RXFS Using the Display to change the settings The settings of the AV receiver can be displayed one by one. Miscellaneous 7. tons to ...
Owner Manual
Page 46
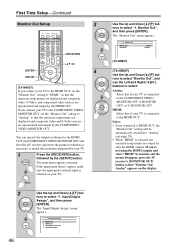
... AV receiver's [MONITOR OUT] button so that "Monitor Out: Analog" appears on your TV. HDMI Input 3. HDMI: Select this if your TV is connected to the HDMI OUT. Input/Output Assign", and then press [ENTER]. First Time Setup-Continued Monitor Out Setup 3 RECEIVER ENTER SETUP RXFS 4 (TX-NR807...) If you connect your TV to the HDMI OUT, set the "Monitor Out" setting to match the resolution supported by your TV. 1 Press the [RECEIVER] button, followed by the HDMI OUT...
... AV receiver's [MONITOR OUT] button so that "Monitor Out: Analog" appears on your TV. HDMI Input 3. HDMI: Select this if your TV is connected to the HDMI OUT. Input/Output Assign", and then press [ENTER]. First Time Setup-Continued Monitor Out Setup 3 RECEIVER ENTER SETUP RXFS 4 (TX-NR807...) If you connect your TV to the HDMI OUT, set the "Monitor Out" setting to match the resolution supported by your TV. 1 Press the [RECEIVER] button, followed by the HDMI OUT...

Owner Manual
Page 47
...TX-NR807): Settings marked with no conversion. Notes: • See page 27 for charts showing how the "Monitor Out" and "Resolution" settings affect the video signal flow through the AV receiver at the same resolution and with an asterisk (* ) are not available when the "Monitor Out" setting is set using its [SETUP...1080i output and video conversion as necessary. The setup menu closes. First Time Setup-Continued 5 Use the Up and Down [R]/[X] but- Tip: The "Resolution" setting can also be set to have the AV receiver automatically convert video at resolutions not supported by ...
...TX-NR807): Settings marked with no conversion. Notes: • See page 27 for charts showing how the "Monitor Out" and "Resolution" settings affect the video signal flow through the AV receiver at the same resolution and with an asterisk (* ) are not available when the "Monitor Out" setting is set using its [SETUP...1080i output and video conversion as necessary. The setup menu closes. First Time Setup-Continued 5 Use the Up and Down [R]/[X] but- Tip: The "Resolution" setting can also be set to have the AV receiver automatically convert video at resolutions not supported by ...

Owner Manual
Page 48
... has been connected Output composite video, S-Video, and component video sources from the HDMI OUT is selected on the AV receiver by the [SETUP] button. The setup menu closes. Component Video Input 4. HDMI Input 3. The video output signal from the HDMI OUT. For example, if...select an input selector, and use the Left and Right [F]/ [S] buttons to select: HDMI1, HDMI2, HDMI3, HDMI4, HDMI5, HDMI6 (TX-NR807): Select the HDMI IN to the DVD/BD input selector. Composite video, S-Video, component video HDMI IN OUT Composite video, S-Video, component...
... has been connected Output composite video, S-Video, and component video sources from the HDMI OUT is selected on the AV receiver by the [SETUP] button. The setup menu closes. Component Video Input 4. HDMI Input 3. The video output signal from the HDMI OUT. For example, if...select an input selector, and use the Left and Right [F]/ [S] buttons to select: HDMI1, HDMI2, HDMI3, HDMI4, HDMI5, HDMI6 (TX-NR807): Select the HDMI IN to the DVD/BD input selector. Composite video, S-Video, component video HDMI IN OUT Composite video, S-Video, component...

Owner Manual
Page 49
...and S-Video sources are using its [SETUP] button, arrow buttons, and [ENTER] button. 49 Input/Output Assign 1. Input selector Default assignment DVD/BD IN1 VCR/DVR ----- PORT ----- (TX-NR807) If you've connected your TV to "Analog". 1 Press the [RECEIVER] button fol- Input/Output Assign", ...doesn't appear, make sure the appropriate external input is connected to select: IN1: Select if the video component is selected on the AV receiver by the COMPONENT VIDEO MONITOR OUT*1. Digital Audio Input 3 Use the Up and Down [R]/[X] but - PHONO ----- The main menu ...
...and S-Video sources are using its [SETUP] button, arrow buttons, and [ENTER] button. 49 Input/Output Assign 1. Input selector Default assignment DVD/BD IN1 VCR/DVR ----- PORT ----- (TX-NR807) If you've connected your TV to "Analog". 1 Press the [RECEIVER] button fol- Input/Output Assign", ...doesn't appear, make sure the appropriate external input is connected to select: IN1: Select if the video component is selected on the AV receiver by the COMPONENT VIDEO MONITOR OUT*1. Digital Audio Input 3 Use the Up and Down [R]/[X] but - PHONO ----- The main menu ...

Owner Manual
Page 50
...input to PORT selector. • This procedure can be performed on the AV receiver by the [SETUP] button. By default, the COAXIAL IN1 jack is assigned to an input selector in "HDMI Input Setup" on page 48, the AV receiver will select audio from HDMI IN as UP-A1 series Dock that seated iPod...) to the UNIVERSAL PORT jack, you should assign that jack to an input selector. First Time Setup-Continued Digital Audio Input Setup If you connect a component to...
...input to PORT selector. • This procedure can be performed on the AV receiver by the [SETUP] button. By default, the COAXIAL IN1 jack is assigned to an input selector in "HDMI Input Setup" on page 48, the AV receiver will select audio from HDMI IN as UP-A1 series Dock that seated iPod...) to the UNIVERSAL PORT jack, you should assign that jack to an input selector. First Time Setup-Continued Digital Audio Input Setup If you connect a component to...


