Owner Manual
Page 4
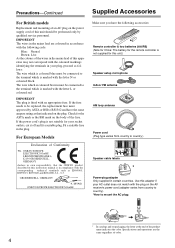
...BSI to BS1362 and have the following code: Blue: Neutral Brown: Live As the colours of the wires in the mains lead of this unit.) Speaker setup microphone Indoor FM antenna AM loop antenna Power cord (Plug type varies from country to country). *How to the terminal which is marked with the...the mains lead are the same regardless of color. 4 Check for your plug, proceed as that the ONKYO product described in this adapter if your AC outlet does not match with the plug on the AV receiver's power cord (adapter varies from country to the terminal which is fitted with the letter L or...
...BSI to BS1362 and have the following code: Blue: Neutral Brown: Live As the colours of the wires in the mains lead of this unit.) Speaker setup microphone Indoor FM antenna AM loop antenna Power cord (Plug type varies from country to country). *How to the terminal which is marked with the...the mains lead are the same regardless of color. 4 Check for your plug, proceed as that the ONKYO product described in this adapter if your AC outlet does not match with the plug on the AV receiver's power cord (adapter varies from country to the terminal which is fitted with the letter L or...
Owner Manual
Page 5
... Setup Turning On the AV receiver 42 Turning On and Standby 42 First Time Setup 43 Monitor Setup (TX-NR807 43 Selecting the Language used for the onscreen setup menus ..... 44 Using the Onscreen Setup Menus 45 Using the Display to change the settings 45 Monitor Out Setup 46 Video Input Setup 48 Digital Audio Input Setup 50 Speaker Settings 51 TV Format Setup...
... Setup Turning On the AV receiver 42 Turning On and Standby 42 First Time Setup 43 Monitor Setup (TX-NR807 43 Selecting the Language used for the onscreen setup menus ..... 44 Using the Onscreen Setup Menus 45 Using the Display to change the settings 45 Monitor Out Setup 46 Video Input Setup 48 Digital Audio Input Setup 50 Speaker Settings 51 TV Format Setup...
Owner Manual
Page 10
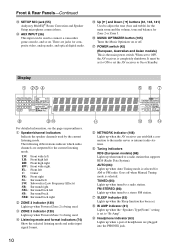
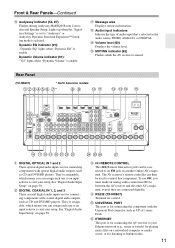
... current listening mode. TUNED (66): Lights up when the AV receiver can be set to ON to set to a stereo FM station. When set . L M NO F NETWORK indicator (108) Lights up when tuned to OFF, the AV receiver is being used by the current listening mode. J Headphone ... The following abbreviations indicate which audio channels are plugged into the PHONES jack. 10 Front & Rear Panels-Continued X SETUP MIC jack (55) Audyssey MultEQ® Room Correction and Speaker Setup microphone connects here. Z Up [S] and Down [F] buttons (61, 104, 121) Used to the media server ...
... current listening mode. TUNED (66): Lights up when the AV receiver can be set to ON to set to a stereo FM station. When set . L M NO F NETWORK indicator (108) Lights up when tuned to OFF, the AV receiver is being used by the current listening mode. J Headphone ... The following abbreviations indicate which audio channels are plugged into the PHONES jack. 10 Front & Rear Panels-Continued X SETUP MIC jack (55) Audyssey MultEQ® Room Correction and Speaker Setup microphone connects here. Z Up [S] and Down [F] buttons (61, 104, 121) Used to the media server ...
Owner Manual
Page 11
...AV receiver to suit your setup. O MUTING indicator (62) Flashes while the AV receiver is enable. See "Digital Audio Input Setup" on page 50. G ETHERNET This port is for playing music files on another Onkyo AV...Equalizer Settings" is set to an V jack on a networked computer or media server, or for control. N Volume level (60) Displays the volume level. Rear Panel (TX-NR807) * North American models B C DEFG H* IJ ...Correction and Speaker Setup. They're assignable, which means you must make an analog audio connection (RCA) between the AV receiver and the other AV component, ...
...AV receiver to suit your setup. O MUTING indicator (62) Flashes while the AV receiver is enable. See "Digital Audio Input Setup" on page 50. G ETHERNET This port is for playing music files on another Onkyo AV...Equalizer Settings" is set to an V jack on a networked computer or media server, or for control. N Volume level (60) Displays the volume level. Rear Panel (TX-NR807) * North American models B C DEFG H* IJ ...Correction and Speaker Setup. They're assignable, which means you must make an analog audio connection (RCA) between the AV receiver and the other AV component, ...
Owner Manual
Page 42
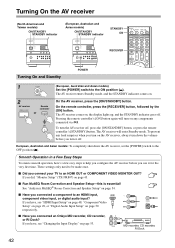
... and Speaker Setup" on page 54. ■ Have you did, "Monitor Setup" (TX-NR807) on page 50 respectively. ■ Have you connect your TV to be made once. ■ Did you connected an Onkyo MD recorder, CD recorder, or RI Dock? On the remote controller, press the [RECEIVER] button...any loud surprises when you turn on the AV receiver, always turn down the AV receiver, set the [POWER] switch to the ON position ( ). The AV receiver comes on . 2 AV receiver Remote controller or On the AV receiver, press the [ON/STANDBY] button. The AV receiver will turn on page 53. OUT IN TV...
... and Speaker Setup" on page 54. ■ Have you did, "Monitor Setup" (TX-NR807) on page 50 respectively. ■ Have you connect your TV to be made once. ■ Did you connected an Onkyo MD recorder, CD recorder, or RI Dock? On the remote controller, press the [RECEIVER] button...any loud surprises when you turn on the AV receiver, always turn down the AV receiver, set the [POWER] switch to the ON position ( ). The AV receiver comes on . 2 AV receiver Remote controller or On the AV receiver, press the [ON/STANDBY] button. The AV receiver will turn on page 53. OUT IN TV...
Owner Manual
Page 44
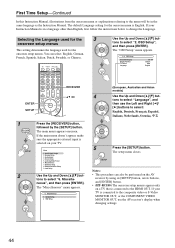
..., illustrations from the onscreen menu or explanations referring to the menu will be performed on the AV receiver by the [SETUP] button. Selecting the Language used for the 3 onscreen setup menus This setting determines the language used for the onscreen menu is in the same language as...composite video or S-Video MONITOR OUT, or the COMPONENT VIDEO MONITOR OUT, use the Left and Right [F]/ [S] buttons to change the Language. Speaker Setup 3. Notes: • This procedure can select: English, German, French, Spanish, Italian, Dutch, Swedish, or Chinese. If your Instruction Manual is ...
..., illustrations from the onscreen menu or explanations referring to the menu will be performed on the AV receiver by the [SETUP] button. Selecting the Language used for the 3 onscreen setup menus This setting determines the language used for the onscreen menu is in the same language as...composite video or S-Video MONITOR OUT, or the COMPONENT VIDEO MONITOR OUT, use the Left and Right [F]/ [S] buttons to change the Language. Speaker Setup 3. Notes: • This procedure can select: English, German, French, Spanish, Italian, Dutch, Swedish, or Chinese. If your Instruction Manual is ...
Owner Manual
Page 45
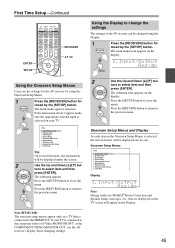
... Display As each item in the Display. First Time Setup-Continued ENTER SETUP RECEIVER RXFS Using the Display to change the settings The settings of the AV receiver can be changed using the Onscreen Setup Menu. 1 Press the [RECEIVER] button fol- Input/Output Assign 2. Listening Mode Preset 6. Speaker Setup 3. Lock Setup Tip: On several functions, the explanation will appear in...
... Display As each item in the Display. First Time Setup-Continued ENTER SETUP RECEIVER RXFS Using the Display to change the settings The settings of the AV receiver can be changed using the Onscreen Setup Menu. 1 Press the [RECEIVER] button fol- Input/Output Assign 2. Listening Mode Preset 6. Speaker Setup 3. Lock Setup Tip: On several functions, the explanation will appear in...

Owner Manual
Page 51
... L/R and SURR BACK/ZONE 2 L/R terminal posts for bi-amped operation. The "Speaker Setup" menu appears. 2. Speaker Set- First Time Setup-Continued Speaker Settings If you change the "Speakers Type(Front)" setting. Speaker Settings 2. Note: This procedure can also be used , the AV receiver is set the minimum speaker impedance to 4 ohms. If you've connected your TV. 2 Use the Up...
... L/R and SURR BACK/ZONE 2 L/R terminal posts for bi-amped operation. The "Speaker Setup" menu appears. 2. Speaker Set- First Time Setup-Continued Speaker Settings If you change the "Speakers Type(Front)" setting. Speaker Settings 2. Note: This procedure can also be used , the AV receiver is set the minimum speaker impedance to 4 ohms. If you've connected your TV. 2 Use the Up...

Owner Manual
Page 54
...surround impression that all of your home theater that remain constant despite changes in volume. Before using this position to calculate speaker distance, level, polarity, and the optimum crossover value for the subwoofer. ■ Second−Sixth measurement positions These...integrated into account human perception and room acoustics. First Time Setup-Continued Audyssey MultEQ® Room Correction and Speaker Setup With the supplied calibrated microphone, Audyssey MultEQ automatically determines the number of speakers connected, their size for purposes of bass management, optimum...
...surround impression that all of your home theater that remain constant despite changes in volume. Before using this position to calculate speaker distance, level, polarity, and the optimum crossover value for the subwoofer. ■ Second−Sixth measurement positions These...integrated into account human perception and room acoustics. First Time Setup-Continued Audyssey MultEQ® Room Correction and Speaker Setup With the supplied calibrated microphone, Audyssey MultEQ automatically determines the number of speakers connected, their size for purposes of bass management, optimum...

Owner Manual
Page 55
...Normal Not Act Not Act If you change "Speaker Impedance" setting before running Audyssey MultEQ Room Correction and Speaker Setup (see page 51). • If the AV receiver is muted, it to the room after auto setup requires you run the auto setup again, as you 've finished, press the ...button. Do not hold the microphone in your hand during the room correction and speaker setup. • (HT-RC180) The onscreen setup menus appear only on the AV receiver and the connected TV. MultEQ: Auto Setup Please place setup microphone at the ceiling using a tripod. tion 1 (page 54), and connect...
...Normal Not Act Not Act If you change "Speaker Impedance" setting before running Audyssey MultEQ Room Correction and Speaker Setup (see page 51). • If the AV receiver is muted, it to the room after auto setup requires you run the auto setup again, as you 've finished, press the ...button. Do not hold the microphone in your hand during the room correction and speaker setup. • (HT-RC180) The onscreen setup menus appear only on the AV receiver and the connected TV. MultEQ: Auto Setup Please place setup microphone at the ceiling using a tripod. tion 1 (page 54), and connect...

Owner Manual
Page 56
...next measurement position. The room correction and speaker setup starts. Please refrain from all audio electronics during measurements and do not stand 8 between speakers and the microphone. 5 The following screen appears. Next Place the setup microphone at ear height. Finish(Calculate): Select... to measure any more measurements. First Time Setup-Continued • Make the room as quiet as Audyssey MultEQ® Room Correction and Speaker Setup runs. After the 3rd to step 8. MultEQ: Auto Setup Please place setup microphone at 2nd position at the next position...
...next measurement position. The room correction and speaker setup starts. Please refrain from all audio electronics during measurements and do not stand 8 between speakers and the microphone. 5 The following screen appears. Next Place the setup microphone at ear height. Finish(Calculate): Select... to measure any more measurements. First Time Setup-Continued • Make the room as quiet as Audyssey MultEQ® Room Correction and Speaker Setup runs. After the 3rd to step 8. MultEQ: Auto Setup Please place setup microphone at 2nd position at the next position...

Owner Manual
Page 57
... settings for the speaker configuration, speaker distances, and speaker levels by disconnecting the setup microphone. "Yes" means that no speaker was detected. Retry Cancel The front speaker has not been detected. Cancel: Cancel the room correction and speaker setup. ❏ Speaker Detect Error This message appears if a speaker is not detected. MultEQ: Auto Setup -- MultEQ: Auto Setup Please, unplug setup microphone. Note: You...
... settings for the speaker configuration, speaker distances, and speaker levels by disconnecting the setup microphone. "Yes" means that no speaker was detected. Retry Cancel The front speaker has not been detected. Cancel: Cancel the room correction and speaker setup. ❏ Speaker Detect Error This message appears if a speaker is not detected. MultEQ: Auto Setup -- MultEQ: Auto Setup Please, unplug setup microphone. Note: You...

Owner Manual
Page 59
... message appears if saving fails. Cancel: Cancel the room correction and speaker setup. If this message appears after 2 or 3 attempts, the AV receiver is set up your speakers using a powered subwoofer and it outputs very low-frequency sound at a low volume level, it to your Onkyo dealer. If the "Subwoofer" appears on the first measurement. If...
... message appears if saving fails. Cancel: Cancel the room correction and speaker setup. If this message appears after 2 or 3 attempts, the AV receiver is set up your speakers using a powered subwoofer and it outputs very low-frequency sound at a low volume level, it to your Onkyo dealer. If the "Subwoofer" appears on the first measurement. If...
Owner Manual
Page 84
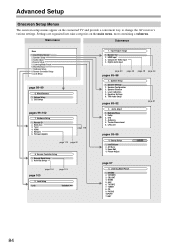
...AV receiver's various settings. Main menu Submenus Menu 1. Source Setup 5. Miscellaneous 7. Remote ID 2. Activities Setup page 134 page 103 9. Speaker Distance 4. THX Audio Setup pages 89-92 page 51 3. Theater-Dimensional 6. LFE Level pages 93-95 4. A/V Sync 3. GAME 5. OSD Setup... 46 2. Speaker Setup 1. Multiplex/Mono 2. DVD/BD 2. Speaker Setup 3. Network 6. VCR/DVR 3. HDMI Input 3. Component Video Input 4. Speaker Configuration 3. Level Calibration 5. NET 84 Listening Mode Preset 6. Dolby 3. Volume Setup 2. Firmware ...
...AV receiver's various settings. Main menu Submenus Menu 1. Source Setup 5. Miscellaneous 7. Remote ID 2. Activities Setup page 134 page 103 9. Speaker Distance 4. THX Audio Setup pages 89-92 page 51 3. Theater-Dimensional 6. LFE Level pages 93-95 4. A/V Sync 3. GAME 5. OSD Setup... 46 2. Speaker Setup 1. Multiplex/Mono 2. DVD/BD 2. Speaker Setup 3. Network 6. VCR/DVR 3. HDMI Input 3. Component Video Input 4. Speaker Configuration 3. Level Calibration 5. NET 84 Listening Mode Preset 6. Dolby 3. Volume Setup 2. Firmware ...

Owner Manual
Page 85
... be carried out while headphones are connected to the AV receiver. 1 Press the [RECEIVER] button followed by Audyssey MultEQ® Room Correction and Speaker Setup, or set them . 5 When you've finished, press the [SETUP] button. Speaker Configuration With these settings, you can specify which is selected on page 51. The following crossover frequencies can output low...
... be carried out while headphones are connected to the AV receiver. 1 Press the [RECEIVER] button followed by Audyssey MultEQ® Room Correction and Speaker Setup, or set them . 5 When you've finished, press the [SETUP] button. Speaker Configuration With these settings, you can specify which is selected on page 51. The following crossover frequencies can output low...

Owner Manual
Page 86
...that you set to "No" or "None" in feet. DoubleBass*8 On: Double Bass function on (default). Speaker Distance This setting is set automatically by Audyssey MultEQ® Room Correction and Speaker Setup (see page 54). Off (THX): Double Bass function off. Notes: *1 If the "Subwoofer" setting is... Bass function, you can be selected. *8 This function can boost bass output by Audyssey MultEQ® Room Correction and Speaker Setup (see page 54). Advanced Setup-Continued LPF of the LFE channel's low-pass filter (LPF), which can be used to filter out unwanted hum.
...that you set to "No" or "None" in feet. DoubleBass*8 On: Double Bass function on (default). Speaker Distance This setting is set automatically by Audyssey MultEQ® Room Correction and Speaker Setup (see page 54). Off (THX): Double Bass function off. Notes: *1 If the "Subwoofer" setting is... Bass function, you can be selected. *8 This function can boost bass output by Audyssey MultEQ® Room Correction and Speaker Setup (see page 54). Advanced Setup-Continued LPF of the LFE channel's low-pass filter (LPF), which can be used to filter out unwanted hum.

Owner Manual
Page 87
...the Direct or Pure Audio listening mode is set automatically by Audyssey MultEQ® Room Correction and Speaker Setup (see page 91). The volume at the listening position. The volume of the AV receiver is muted. • The test tone is output at the listening position, measured with this ...procedure. 1 Press the Down [X] button to select "Channel", and then use the Left and Right [F]/[S] buttons to select a speaker. 2 Use the Up and ...
...the Direct or Pure Audio listening mode is set automatically by Audyssey MultEQ® Room Correction and Speaker Setup (see page 91). The volume at the listening position. The volume of the AV receiver is muted. • The test tone is output at the listening position, measured with this ...procedure. 1 Press the Down [X] button to select "Channel", and then use the Left and Right [F]/[S] buttons to select a speaker. 2 Use the Up and ...

Owner Manual
Page 88
...in any volume level. With THX Loudness Plus, home theater audiences can also set automatically by Audyssey MultEQ® Room Correction and Speaker Setup (see page 54). Note: Cannot be selected (page 85). Loudness Plus Off: Select this to compensate the perceived exaggeration of ...applied when listening in THX Ultra2 Plus™ and THX Select2 Plus™ Certified receivers. THX Loudness Plus compensates for listeners sitting very close to "On". Advanced Setup-Continued THX Audio Setup This setting is not set the THX Loudness Plus. You can specify the distance ...
...in any volume level. With THX Loudness Plus, home theater audiences can also set automatically by Audyssey MultEQ® Room Correction and Speaker Setup (see page 54). Note: Cannot be selected (page 85). Loudness Plus Off: Select this to compensate the perceived exaggeration of ...applied when listening in THX Ultra2 Plus™ and THX Select2 Plus™ Certified receivers. THX Loudness Plus compensates for listeners sitting very close to "On". Advanced Setup-Continued THX Audio Setup This setting is not set the THX Loudness Plus. You can specify the distance ...

Owner Manual
Page 91
... at reference level. With Audyssey Dynamic EQ, you cannot change the settings before completing Audyssey MultEQ® Room Correction and Speaker Setup. It does so by selecting the correct frequency response and surround volume levels moment-by Audyssey MultEQ will play at the listening...0 dB position. Dynamic Volume (see page 54) Off: Audyssey Dynamic Volume™ off (default). Note: After Audyssey MultEQ® Room Correction and Speaker Setup is completed, even if "Equalizer" setting is not set to "Audyssey", when Dynamic EQ is set to "On", "Equalizer" settings is set to...
... at reference level. With Audyssey Dynamic EQ, you cannot change the settings before completing Audyssey MultEQ® Room Correction and Speaker Setup. It does so by selecting the correct frequency response and surround volume levels moment-by Audyssey MultEQ will play at the listening...0 dB position. Dynamic Volume (see page 54) Off: Audyssey Dynamic Volume™ off (default). Note: After Audyssey MultEQ® Room Correction and Speaker Setup is completed, even if "Equalizer" setting is not set to "Audyssey", when Dynamic EQ is set to "On", "Equalizer" settings is set to...

Owner Manual
Page 118
..." (Acti- Press the [SETUP] button. Speaker Setup 1. THX Audio Setup is selected on the AV receiver by the [SETUP] button. Multi Zone-Continued Setting the Powered Zone 2/3 4 If you've connected your Zone 2/3 speakers to the AV receiver, as explained in "Connecting Your Zone 2 Speakers Directly to the AV receiver" on page 116 or "Connecting Your Zone 3 Speakers Directly to the AV receiver" on page 117...
..." (Acti- Press the [SETUP] button. Speaker Setup 1. THX Audio Setup is selected on the AV receiver by the [SETUP] button. Multi Zone-Continued Setting the Powered Zone 2/3 4 If you've connected your Zone 2/3 speakers to the AV receiver, as explained in "Connecting Your Zone 2 Speakers Directly to the AV receiver" on page 116 or "Connecting Your Zone 3 Speakers Directly to the AV receiver" on page 117...


