
Owner Manual
Page 5
... the AV Receiver 12 Connecting Your Speakers 12 About AV Connections 18 Connecting Components with HDMI 19 Connecting Your Components 20 Connecting Onkyo V Components 22 Connecting a Recording Component 22 Connecting the Antennas 23 Connecting the Power Cord 23 Turning On & Basic Operations ...Using Normal Macros 84 Appendix Troubleshooting 85 Firmware Update 91 Connection Tips and Video Signal Path 94 Using an RIHD-compatible TV, Player, or Recorder 97 About HDMI 99 Network/USB Features 100 Specifications (TX-NR5009 103 Specifications (TX-NR3009 105 To reset the AV receiver to ...
... the AV Receiver 12 Connecting Your Speakers 12 About AV Connections 18 Connecting Components with HDMI 19 Connecting Your Components 20 Connecting Onkyo V Components 22 Connecting a Recording Component 22 Connecting the Antennas 23 Connecting the Power Cord 23 Turning On & Basic Operations ...Using Normal Macros 84 Appendix Troubleshooting 85 Firmware Update 91 Connection Tips and Video Signal Path 94 Using an RIHD-compatible TV, Player, or Recorder 97 About HDMI 99 Network/USB Features 100 Specifications (TX-NR5009 103 Specifications (TX-NR3009 105 To reset the AV receiver to ...
Owner Manual
Page 47
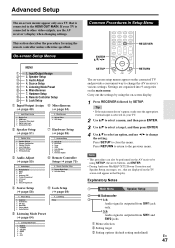
... then press ENTER. 3 Use R/X to select a target, and then press ENTER. 4 Use R/X to select an option, and use the AV receiver's display when changing settings. Firmware Update I 8. Advanced Operations Advanced Setup The on-screen menus appear only on the connected TV and provide a convenient way to change the setting. This section describes...
... then press ENTER. 3 Use R/X to select a target, and then press ENTER. 4 Use R/X to select an option, and use the AV receiver's display when changing settings. Firmware Update I 8. Advanced Operations Advanced Setup The on-screen menus appear only on the connected TV and provide a convenient way to change the setting. This section describes...
Owner Manual
Page 68
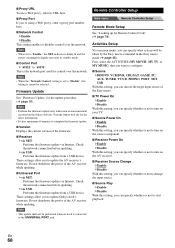
...increases in the Easy macro mode (➔ page 46). Do not shutdown the power of the firmware. ■ Receiver `via NET: Performs the firmware update via USB: Performs the firmware update from a USB device. Visit the Onkyo web site for control over the network. Do not shutdown the power of the Easy macro. ... not to change the input source. ■ Source Play ` Enable ` Disable With this setting, you can specify whether or not to update Onkyo dock's firmware. These settings allow you to start playback. Activities Setup Via onscreen menu, you can specify whether or not to...
...increases in the Easy macro mode (➔ page 46). Do not shutdown the power of the firmware. ■ Receiver `via NET: Performs the firmware update via USB: Performs the firmware update from a USB device. Visit the Onkyo web site for control over the network. Do not shutdown the power of the Easy macro. ... not to change the input source. ■ Source Play ` Enable ` Disable With this setting, you can specify whether or not to update Onkyo dock's firmware. These settings allow you to start playback. Activities Setup Via onscreen menu, you can specify whether or not to...

Owner Manual
Page 91
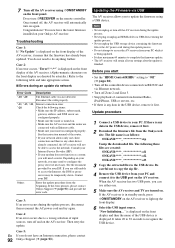
...includes the ability to power them. • Onkyo takes no responsibility whatsoever for use at least 32 MB of available space to complete the firmware update. • The AV receiver will be treated as a USB flash memory stick. During the update process, the on-screen display may not ...USB device is finished. Firmware Update To update the firmware of the AV receiver, you can choose from the use of a USB device with the AV receiver. Note • Check the network connection before updating. • Do not touch the any other reason whatsoever. Onkyo recommends that you back up...
...includes the ability to power them. • Onkyo takes no responsibility whatsoever for use at least 32 MB of available space to complete the firmware update. • The AV receiver will be treated as a USB flash memory stick. During the update process, the on-screen display may not ...USB device is finished. Firmware Update To update the firmware of the AV receiver, you can choose from the use of a USB device with the AV receiver. Note • Check the network connection before updating. • Do not touch the any other reason whatsoever. Onkyo recommends that you back up...
Owner Manual
Page 92
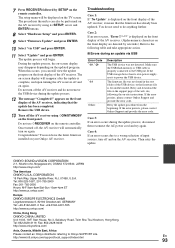
.... • Do not attempt to access the AV receiver from the Onkyo web site. Case 2: If an error occurs, "Error!! *-**" is any data in the USB device, remove it means that the firmware has already been updated. Depending on your network allows only one . 5 Make sure the AV ...files to access the Internet, the DNS or proxy server may need a router. If the error persists, please contact Onkyo Support (➔ page 93) and provide the error code. Updating the Firmware via network Error Code Description *-10, *-20 The Ethernet cable was not detected. 7 Turn off the AV receiver ...
.... • Do not attempt to access the AV receiver from the Onkyo web site. Case 2: If an error occurs, "Error!! *-**" is any data in the USB device, remove it means that the firmware has already been updated. Depending on your network allows only one . 5 Make sure the AV ...files to access the Internet, the DNS or proxy server may need a router. If the error persists, please contact Onkyo Support (➔ page 93) and provide the error code. Updating the Firmware via network Error Code Description *-10, *-20 The Ethernet cable was not detected. 7 Turn off the AV receiver ...
Owner Manual
Page 93
...Neyagawa-shi, OSAKA 572-8540, JAPAN http://www.onkyo.com/ The Americas 18 Park Way, Upper Saddle River, N.J. 07458, U.S.A. The setup menu will automatically turn on the support page of the AV receiver, indicating that the firmware has already been updated. The on-screen display will begin. Do not ...do anything further. If the USB storage device has its SETUP, arrow and ENTER buttons. 8 Select "Hardware Setup" and press ENTER. 9 Select "Firmware Update" and press ENTER. 10 Select "via USB Error Code *-10, *-20 *-14 Others Description The USB device was not found in the root folder...
...Neyagawa-shi, OSAKA 572-8540, JAPAN http://www.onkyo.com/ The Americas 18 Park Way, Upper Saddle River, N.J. 07458, U.S.A. The setup menu will automatically turn on the support page of the AV receiver, indicating that the firmware has already been updated. The on-screen display will begin. Do not ...do anything further. If the USB storage device has its SETUP, arrow and ENTER buttons. 8 Select "Hardware Setup" and press ENTER. 9 Select "Firmware Update" and press ENTER. 10 Select "via USB Error Code *-10, *-20 *-14 Others Description The USB device was not found in the root folder...


