Owner Manual
Page 5
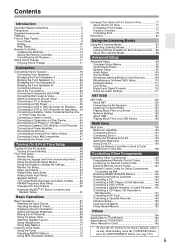
...Setting the Multi Zone 135 Using Zone 2/3 136 Using the Remote Controller in Zone 2/3 and Multiroom Control Kits 138 Controlling Other Components Controlling Other Components 139 Preprogrammed Remote Control Codes 139 Looking up for Remote Control Code 139 Entering Remote Control Codes 141 Remote Control Codes for Onkyo Components Connected via V 142 Resetting REMOTE...Activities Setup 150 Learning Commands 152 Using Normal Macros 153 Others Troubleshooting 154 Specifications (TX-NR3007 160 Specifications (TX-NR5007 161 Video Resolution Chart 162 * To reset the AV receiver to its ...
...Setting the Multi Zone 135 Using Zone 2/3 136 Using the Remote Controller in Zone 2/3 and Multiroom Control Kits 138 Controlling Other Components Controlling Other Components 139 Preprogrammed Remote Control Codes 139 Looking up for Remote Control Code 139 Entering Remote Control Codes 141 Remote Control Codes for Onkyo Components Connected via V 142 Resetting REMOTE...Activities Setup 150 Learning Commands 152 Using Normal Macros 153 Others Troubleshooting 154 Specifications (TX-NR3007 160 Specifications (TX-NR5007 161 Video Resolution Chart 162 * To reset the AV receiver to its ...
Owner Manual
Page 8
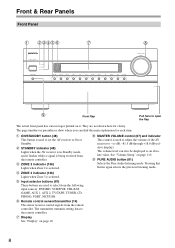
...(relative display). See "Volume Setup" on page 10. D ZONE 2 indicator (136) Lights when Zone 2 is selected. They are used to set the AV receiver to open the flap The actual front panel has various logos printed on it flashes while a signal is being received from the...for each item. H Display See "Display" on page 110. The transmitter transmits setting data to select from the remote controller. C STANDBY indicator (48) Lights when the AV receiver is used to the remote controller. Pressing this button again selects the previous listening mode. 8 The page ...
...(relative display). See "Volume Setup" on page 10. D ZONE 2 indicator (136) Lights when Zone 2 is selected. They are used to set the AV receiver to open the flap The actual front panel has various logos printed on it flashes while a signal is being received from the...for each item. H Display See "Display" on page 110. The transmitter transmits setting data to select from the remote controller. C STANDBY indicator (48) Lights when the AV receiver is used to the remote controller. Pressing this button again selects the previous listening mode. 8 The page ...

Owner Manual
Page 11
...mass storage device is for bridged front speaker operation. D DIGITAL OPTICAL IN 1 and 2 (TX-NR3007) DIGITAL OPTICAL IN 1, 2, and 3 (TX-NR5007) These optical digital audio inputs are plugged into the PHONES jack. Front & Rear Panels-... "Speakers Type(FrontA)" or "Speakers Type(FrontB)" setting is set . K BTL indicator (24, 26) Lights when the "Speakers Type(FrontA)" or "Speakers Type(FrontB)" setting is selected. P MUTING indicator (69) Flashes while...to the IR OUT jack to pass IR (infrared) remote control signals through to other components. AUTO (73): Lights when Auto Tuning mode ...
...mass storage device is for bridged front speaker operation. D DIGITAL OPTICAL IN 1 and 2 (TX-NR3007) DIGITAL OPTICAL IN 1, 2, and 3 (TX-NR5007) These optical digital audio inputs are plugged into the PHONES jack. Front & Rear Panels-... "Speakers Type(FrontA)" or "Speakers Type(FrontB)" setting is set . K BTL indicator (24, 26) Lights when the "Speakers Type(FrontA)" or "Speakers Type(FrontB)" setting is selected. P MUTING indicator (69) Flashes while...to the IR OUT jack to pass IR (infrared) remote control signals through to other components. AUTO (73): Lights when Auto Tuning mode ...
Owner Manual
Page 15
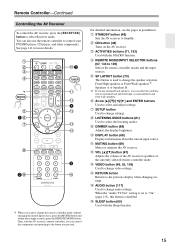
...) This button is used to the previous display when changing settings. J DIMMER button (69) Adjusts the display brightness. L MUTING button (69) Mutes or unmutes the AV receiver. O RETURN button Returns to change video settings. E REMOTE MODE/INPUT SELECTOR buttons (67, 143 to change the speaker... selection: Front High speakers or Front Wide speakers*2. N VIDEO button (49, 53, 105) Used to 149) Selects the remote controller modes and the input sources. When...
...) This button is used to the previous display when changing settings. J DIMMER button (69) Adjusts the display brightness. L MUTING button (69) Mutes or unmutes the AV receiver. O RETURN button Returns to change video settings. E REMOTE MODE/INPUT SELECTOR buttons (67, 143 to change the speaker... selection: Front High speakers or Front Wide speakers*2. N VIDEO button (49, 53, 105) Used to 149) Selects the remote controller modes and the input sources. When...

Owner Manual
Page 18
...normally. The Speakers A and Speakers B configurations are bridged, front Speakers B can only be bi-amped or bridged at a time. Speaker Settings Speaker Impedance Speakers Type(FrontA) Speakers Type(FrontB) Powered Zone2 Powered Zone3 6ohms Normal Normal Not Act Not Act 2-2. Speaker Configuration Subwoofer Front ...Not Use Not Use Speaker B 2-1. For example, if front Speakers A are selected by using the "Speaker Settings" on page 57 and "Speaker Setup" on the remote controller. The versatility offered by using the [SP LAYOUT] button on page 95. SW1 SW2 SW1 SW2 ■...
...normally. The Speakers A and Speakers B configurations are bridged, front Speakers B can only be bi-amped or bridged at a time. Speaker Settings Speaker Impedance Speakers Type(FrontA) Speakers Type(FrontB) Powered Zone2 Powered Zone3 6ohms Normal Normal Not Act Not Act 2-2. Speaker Configuration Subwoofer Front ...Not Use Not Use Speaker B 2-1. For example, if front Speakers A are selected by using the "Speaker Settings" on page 57 and "Speaker Setup" on the remote controller. The versatility offered by using the [SP LAYOUT] button on page 95. SW1 SW2 SW1 SW2 ■...

Owner Manual
Page 30
...BD players must also support HDCP. *1 DVI (Digital Visual Interface): The digital display interface standard set -top boxes, and other video components. c. It's designed to protect video content and requires.... • When the -compatible component more than the above audio formats. ■ Onkyo for System Control , which allows system control over HDMI, is a new digital interface ...Other devices connected to address the industry's requirements for a digital connectivity specification for Remote Interactive over HDMI and is up to three. Connecting the AV receiver-Continued ...
...BD players must also support HDCP. *1 DVI (Digital Visual Interface): The digital display interface standard set -top boxes, and other video components. c. It's designed to protect video content and requires.... • When the -compatible component more than the above audio formats. ■ Onkyo for System Control , which allows system control over HDMI, is a new digital interface ...Other devices connected to address the industry's requirements for a digital connectivity specification for Remote Interactive over HDMI and is up to three. Connecting the AV receiver-Continued ...

Owner Manual
Page 46
...Dock that seated iPod is connected, the power consumption on standby mode slightly increases. 46 Notes: • Enter the appropriate remote control code before using the AV receiver's remote controller for more information. For information about which iPod models are supported by the RI Dock, see the RI Dock's ...RI Dock to the AV receiver with an V cable (see page 47). • Set the RI Dock's RI MODE switch to "HDD" or "HDD/DOCK". • Set the AV receiver's Input Display to the AV receiver's TV/TAPE IN L/R jacks. (Onkyo DSA2 hookup shown below.) IN L R TV/TAPE GAME V IN IN L R...
...Dock that seated iPod is connected, the power consumption on standby mode slightly increases. 46 Notes: • Enter the appropriate remote control code before using the AV receiver's remote controller for more information. For information about which iPod models are supported by the RI Dock, see the RI Dock's ...RI Dock to the AV receiver with an V cable (see page 47). • Set the RI Dock's RI MODE switch to "HDD" or "HDD/DOCK". • Set the AV receiver's Input Display to the AV receiver's TV/TAPE IN L/R jacks. (Onkyo DSA2 hookup shown below.) IN L R TV/TAPE GAME V IN IN L R...

Owner Manual
Page 47
... power cord from the AV receiver while the other jack is for connecting additional V-capable components. • Connect only Onkyo components to V jacks. With V (Remote Interactive), you can use with the AV receiver and should not be used with the AV receiver. V cables are ... at the AV receiver's remote control sensor instead of your other manufacturer's components may cause a malfunction. • Some components may cause an electric shock. Similarly, when the AV receiver is set to Standby, all components connected via V, the AV receiver automatically selects that ...
... power cord from the AV receiver while the other jack is for connecting additional V-capable components. • Connect only Onkyo components to V jacks. With V (Remote Interactive), you can use with the AV receiver and should not be used with the AV receiver. V cables are ... at the AV receiver's remote control sensor instead of your other manufacturer's components may cause a malfunction. • Some components may cause an electric shock. Similarly, when the AV receiver is set to Standby, all components connected via V, the AV receiver automatically selects that ...
Owner Manual
Page 48
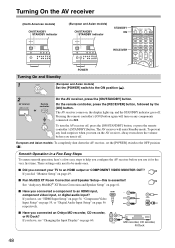
...operation, here's a few easy steps to an HDMI input, HDMI component video input, or digital audio input? Pressing the remote controller's [ON] button again will enter Standby mode. Turning On the AV receiver (North American models) ON/STANDBY STANDBY ... Setup" on the AV receiver, always turn it for the very first time. If you turn down the AV receiver, set the [POWER] switch to the OFF position ( ). If you have , see "Changing the Input Display" on any ...and Asian models: To completely shut down the volume before you connected an Onkyo MD recorder, CD recorder, or RI Dock?
...operation, here's a few easy steps to an HDMI input, HDMI component video input, or digital audio input? Pressing the remote controller's [ON] button again will enter Standby mode. Turning On the AV receiver (North American models) ON/STANDBY STANDBY ... Setup" on the AV receiver, always turn it for the very first time. If you turn down the AV receiver, set the [POWER] switch to the OFF position ( ). If you have , see "Changing the Input Display" on any ...and Asian models: To completely shut down the volume before you connected an Onkyo MD recorder, CD recorder, or RI Dock?

Owner Manual
Page 49
... resolution supported by using the AV receiver for charts showing how the "Monitor Out" and "Resolution" (see page 52). 49 The current setting is automatically set using the [VIDEO] button on each item, see page 52). Notes: • See page 32 for the very first time. Monitor... need to select: Analog, HDMI Main, HDMI Sub, Both, Both(Main) or Both(Sub) For details on the remote controller. • This setting can also be set so that the onscreen setup menus are displayed and composite video, SVideo, and component video sources are upconverted* and output. Composite...
... resolution supported by using the AV receiver for charts showing how the "Monitor Out" and "Resolution" (see page 52). 49 The current setting is automatically set using the [VIDEO] button on each item, see page 52). Notes: • See page 32 for the very first time. Monitor... need to select: Analog, HDMI Main, HDMI Sub, Both, Both(Main) or Both(Sub) For details on the remote controller. • This setting can also be set so that the onscreen setup menus are displayed and composite video, SVideo, and component video sources are upconverted* and output. Composite...

Owner Manual
Page 50
...setting determines the language used for the onscreen menu is English. You can also be in a language other than English, first follow the instructions below to change the Language. The main menu appears onscreen. Menu 5 Press the [SETUP] button. Speaker Setup 3. Audio Adjust 4. Hardware Setup 8. Remote... Preset 6. The "Miscellaneous" menu appears. 6. OSD Setup 50 If your TV. Miscella- tons to select "2. The default Language setting for the onscreen setup menus. OSD Setup", and then press [ENTER]. The setup menu closes. 1. Source Setup 5. Lock Setup ...
...setting determines the language used for the onscreen menu is English. You can also be in a language other than English, first follow the instructions below to change the Language. The main menu appears onscreen. Menu 5 Press the [SETUP] button. Speaker Setup 3. Audio Adjust 4. Hardware Setup 8. Remote... Preset 6. The "Miscellaneous" menu appears. 6. OSD Setup 50 If your TV. Miscella- tons to select "2. The default Language setting for the onscreen setup menus. OSD Setup", and then press [ENTER]. The setup menu closes. 1. Source Setup 5. Lock Setup ...
Owner Manual
Page 51
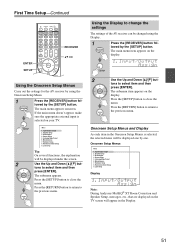
lowed by the [SETUP] button. Menu 1. Audio Adjust 4. Miscellaneous 7. Remote Controller Setup 9. Press the [RETURN] button to return to select item and then press [ENTER]. lowed by the [SETUP] button. Onscreen Setup Menus and Display ... appears on the TV screen will be changed using the Onscreen Setup Menu. 1 Press the [RECEIVER] button fol- Press the [SETUP] button to change the settings The settings of the AV receiver can be displayed under the screen. 2 Use the Up and Down [R]/[X] but - Miscellaneous 7. Lock Setup Display Note: During Audyssey MultEQ...
lowed by the [SETUP] button. Menu 1. Audio Adjust 4. Miscellaneous 7. Remote Controller Setup 9. Press the [RETURN] button to return to select item and then press [ENTER]. lowed by the [SETUP] button. Onscreen Setup Menus and Display ... appears on the TV screen will be changed using the Onscreen Setup Menu. 1 Press the [RECEIVER] button fol- Press the [SETUP] button to change the settings The settings of the AV receiver can be displayed under the screen. 2 Use the Up and Down [R]/[X] but - Miscellaneous 7. Lock Setup Display Note: During Audyssey MultEQ...
Owner Manual
Page 53
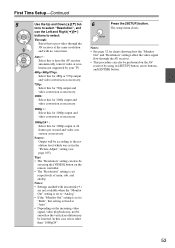
... by your TV. 480p (480p/576p): Select this for 480p or 576p output and video conversion as necessary. Tips: • The "Resolution" setting can also be according to select "Resolution", and The setup menu closes. First Time Setup-Continued 5 Use the Up and Down [R]/[X] but- 6... Press the [SETUP] button. Source: Output will be performed on the remote controller. • The "Resolution" setting is fixed at 24 frames per second and video conversion as necessary. In this to pass video through the AV receiver. •...
... by your TV. 480p (480p/576p): Select this for 480p or 576p output and video conversion as necessary. Tips: • The "Resolution" setting can also be according to select "Resolution", and The setup menu closes. First Time Setup-Continued 5 Use the Up and Down [R]/[X] but- 6... Press the [SETUP] button. Source: Output will be performed on the remote controller. • The "Resolution" setting is fixed at 24 frames per second and video conversion as necessary. In this to pass video through the AV receiver. •...

Owner Manual
Page 59
... to select "6. tons to select "TV Format", and then use the Left and Right [F]/[S] buttons to select: Auto: Select this setting is selected on your TV. 3 Use the Up and Down [R]/[X] buttons to select "2. The "Miscellaneous" menu appears. 6. OSD Setup... menu appears. Multi Zone 3. Miscella- OSD Setup Immediate Display Display Position TV Format Language On Bottom Auto English 7. tons to select "7. Remote ID 2. Network 6. Miscellaneous 1. Hardware and then press [ENTER]. Firmware Update 4 Use the Up and Down [R]/[X] but - The main menu...
... to select "6. tons to select "TV Format", and then use the Left and Right [F]/[S] buttons to select: Auto: Select this setting is selected on your TV. 3 Use the Up and Down [R]/[X] buttons to select "2. The "Miscellaneous" menu appears. 6. OSD Setup... menu appears. Multi Zone 3. Miscella- OSD Setup Immediate Display Display Position TV Format Language On Bottom Auto English 7. tons to select "7. Remote ID 2. Network 6. Miscellaneous 1. Hardware and then press [ENTER]. Firmware Update 4 Use the Up and Down [R]/[X] but - The main menu...

Owner Manual
Page 60
...setting can only be changed on the AV receiver. 60 GAME TV/TAPE VCR/DVR 1 or Press the [TV/TAPE], [GAME] or [VCR/DVR] input selector button so that "TV/TAPE", "GAME" or "VCR/DVR" appears on the AV receiver by using the AV receiver's remote...kHz steps are used in your area. 9kHz: Select if 9 kHz steps are used in this setting. The "Tuner" menu appears. (North American models) 7-3. Tuner FM/AM Frequency Step SAT ... 4 Use the Left and Right [F]/[S] buttons to work properly, you connect an V-capable Onkyo MiniDisc recorder, CD recorder, or RI Dock to the TV/TAPE IN/ OUT jacks, ...
...setting can only be changed on the AV receiver. 60 GAME TV/TAPE VCR/DVR 1 or Press the [TV/TAPE], [GAME] or [VCR/DVR] input selector button so that "TV/TAPE", "GAME" or "VCR/DVR" appears on the AV receiver by using the AV receiver's remote...kHz steps are used in your area. 9kHz: Select if 9 kHz steps are used in this setting. The "Tuner" menu appears. (North American models) 7-3. Tuner FM/AM Frequency Step SAT ... 4 Use the Left and Right [F]/[S] buttons to work properly, you connect an V-capable Onkyo MiniDisc recorder, CD recorder, or RI Dock to the TV/TAPE IN/ OUT jacks, ...
Owner Manual
Page 67
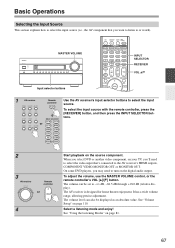
...enjoyment. On some DVD players, you want to listen to or watch). It has a wide volume range, allowing precise adjustment. The volume can also be set to -2 dB, -81.5 dB through +18.0 dB (relative display). The volume level can be displayed as an absolute value. Select a listening mode ...the AV receiver's HDMI outputs, COMPONENT VIDEO MONITOR OUT or MONITOR OUT. MASTER VOLUME INPUT SELECTOR RECEIVER VOL R/X Input selector buttons 1 AV receiver Remote controller or Use the AV receiver's input selector buttons to select the input source. To select the input source with the...
...enjoyment. On some DVD players, you want to listen to or watch). It has a wide volume range, allowing precise adjustment. The volume can also be set to -2 dB, -81.5 dB through +18.0 dB (relative display). The volume level can be displayed as an absolute value. Select a listening mode ...the AV receiver's HDMI outputs, COMPONENT VIDEO MONITOR OUT or MONITOR OUT. MASTER VOLUME INPUT SELECTOR RECEIVER VOL R/X Input selector buttons 1 AV receiver Remote controller or Use the AV receiver's input selector buttons to select the input source. To select the input source with the...

Owner Manual
Page 68
... Audio or THX listening mode. Information is displayed. SP LAYOUT DIMMER SLEEP Adjusting the Bass & Treble You can also be adjusted for input sources. Remote controller Press the [RECEIVER] button, and then press the [DISPLAY] button repeatedly to adjust. Input source Listening mode Signal format* Sampling frequency Input ... "Treble" for about the current input source as follows. Basic Operations-Continued DISPLAY TONE, F, S DIMMER Press [RECEIVER] first. DISPLAY MUTING Notes: • This setting is not available when the multichannel Analog input is displayed.
... Audio or THX listening mode. Information is displayed. SP LAYOUT DIMMER SLEEP Adjusting the Bass & Treble You can also be adjusted for input sources. Remote controller Press the [RECEIVER] button, and then press the [DISPLAY] button repeatedly to adjust. Input source Listening mode Signal format* Sampling frequency Input ... "Treble" for about the current input source as follows. Basic Operations-Continued DISPLAY TONE, F, S DIMMER Press [RECEIVER] first. DISPLAY MUTING Notes: • This setting is not available when the multichannel Analog input is displayed.
Owner Manual
Page 69
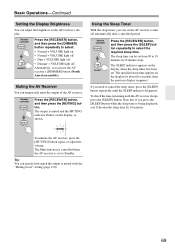
Basic Operations-Continued Setting the Display Brightness You can adjust the brightness of the AV receiver. Remote controller Press the [RECEIVER] button, and then press the [MUTING] button. Remote controller Press the [RECEIVER] button, and then press the [SLEEP] button repeatedly to 10 minutes in 10 minute steps. To check the time remaining until...
Basic Operations-Continued Setting the Display Brightness You can adjust the brightness of the AV receiver. Remote controller Press the [RECEIVER] button, and then press the [MUTING] button. Remote controller Press the [RECEIVER] button, and then press the [SLEEP] button repeatedly to 10 minutes in 10 minute steps. To check the time remaining until...

Owner Manual
Page 70
Basic Operations-Continued Selecting Speaker Layout Remote controller Press the [RECEIVER] button, and then press the [SP LAYOUT] button repeatedly. Front High or Front Wide Speakers When "Speakers Type(FrontB)" setting is set to "Not Use", you want to use of stereo headphones (1/4-inch phone plug) to... Listening mode automatically changes into DTS surround sensation when you can choose which of the following listening modes can be used , the setting cannot be selected. • If you cannot use surround back speakers, the speaker selection will be based on the combination of ...
Basic Operations-Continued Selecting Speaker Layout Remote controller Press the [RECEIVER] button, and then press the [SP LAYOUT] button repeatedly. Front High or Front Wide Speakers When "Speakers Type(FrontB)" setting is set to "Not Use", you want to use of stereo headphones (1/4-inch phone plug) to... Listening mode automatically changes into DTS surround sensation when you can choose which of the following listening modes can be used , the setting cannot be selected. • If you cannot use surround back speakers, the speaker selection will be based on the combination of ...

Owner Manual
Page 71
...Note: Once you start the Easy macro command. With some televisions, the power may not activate this playback command. You can sequentially operate Onkyo components with the default settings, this will not be turned off . 3. The AV receiver turns off (or enter standby). 1 Press the [MY MOVIE], [MY ...to the normal macro mode. Once the AV receiver has entered the normal macro mode, all of the AV receiver is set to the AV receiver is turned on the remote controller. *2. The player starts playback. The AV receiver is turned on . 3. The TV connected to "CD". 4....
...Note: Once you start the Easy macro command. With some televisions, the power may not activate this playback command. You can sequentially operate Onkyo components with the default settings, this will not be turned off . 3. The AV receiver turns off (or enter standby). 1 Press the [MY MOVIE], [MY ...to the normal macro mode. Once the AV receiver has entered the normal macro mode, all of the AV receiver is set to the AV receiver is turned on the remote controller. *2. The player starts playback. The AV receiver is turned on . 3. The TV connected to "CD". 4....


