
Owner Manual
Page 59
...: This procedure can also be performed on the AV receiver by using its [SETUP] button, arrow buttons, and [ENTER] button. Setup", and then press [ENTER]. Firmware Update 4 Use the Up and Down [R]/[X] but - Miscellaneous 1. OSD Setup", 2 Use the Up and Down [R]/[X] buttons to select "6. The main menu appears onscreen.
...: This procedure can also be performed on the AV receiver by using its [SETUP] button, arrow buttons, and [ENTER] button. Setup", and then press [ENTER]. Firmware Update 4 Use the Up and Down [R]/[X] but - Miscellaneous 1. OSD Setup", 2 Use the Up and Down [R]/[X] buttons to select "6. The main menu appears onscreen.

Owner Manual
Page 92
... 2. Digital Audio Input 5. Remote Controller Setup 1. A/V Sync 3. Input/Output Assign 2. Source Setup 5. Hardware Setup 8. Multi Zone 3. Speaker Distance 4. Level Calibration 5. Activities Setup 4. Remote ID 2. Network 6. Firmware Update page 135 1. Remote Mode Setup 2. Picture Adjust page 109 DVD/BD page 150 page 116 9. CBL/SAT 4. Advanced Setup Onscreen Setup Menus The onscreen setup...
... 2. Digital Audio Input 5. Remote Controller Setup 1. A/V Sync 3. Input/Output Assign 2. Source Setup 5. Hardware Setup 8. Multi Zone 3. Speaker Distance 4. Level Calibration 5. Activities Setup 4. Remote ID 2. Network 6. Firmware Update page 135 1. Remote Mode Setup 2. Picture Adjust page 109 DVD/BD page 150 page 116 9. CBL/SAT 4. Advanced Setup Onscreen Setup Menus The onscreen setup...
Owner Manual
Page 111
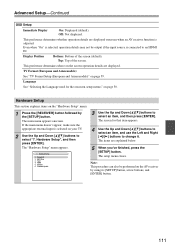
... be performed on page 50. . If the main menu doesn't appear, make sure the appropriate external input is adjusted. Hardware Setup", and then press [ENTER]. Firmware Update 3 Use the Up and Down [R]/[X] buttons to select "7. The main menu appears onscreen. This preference determines whether operation details are displayed onscreen when an AV...
... be performed on page 50. . If the main menu doesn't appear, make sure the appropriate external input is adjusted. Hardware Setup", and then press [ENTER]. Firmware Update 3 Use the Up and Down [R]/[X] buttons to select "7. The main menu appears onscreen. This preference determines whether operation details are displayed onscreen when an AV...

Owner Manual
Page 115
... when an announcement is connected to complete the firmware update. • (TX-NR5007) When updating a firmware from a USB mass storage device. You can update the Onkyo dock's firmware. Check the network connection before update. via USB: You can update the firmware via Internet. Universal Port via NET: You can update the firmware from a USB mass storage device. Do not shutdown the power of...
... when an announcement is connected to complete the firmware update. • (TX-NR5007) When updating a firmware from a USB mass storage device. You can update the Onkyo dock's firmware. Check the network connection before update. via USB: You can update the firmware via Internet. Universal Port via NET: You can update the firmware from a USB mass storage device. Do not shutdown the power of...

Owner Manual
Page 126
..., before accessing the site, your router's DHCP server is disabled, for example, you enter a domain name such as the AV receiver is essential. Remote ID 7 2. Firmware Update Use the Up and Down [R]/[X] buttons to Enable). The settings are explained below. Hardware Setup 1. If, however, your browser uses 5 DNS to configure itself automatically...
..., before accessing the site, your router's DHCP server is disabled, for example, you enter a domain name such as the AV receiver is essential. Remote ID 7 2. Firmware Update Use the Up and Down [R]/[X] buttons to Enable). The settings are explained below. Hardware Setup 1. If, however, your browser uses 5 DNS to configure itself automatically...
Owner Manual
Page 135
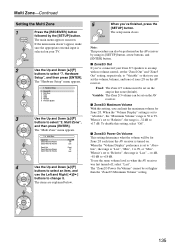
... its [SETUP] button, arrow buttons, and [ENTER] button. ■ Zone2/3 Out If you've connected your TV. 2 Use the Up and Down [R]/[X] buttons to 99. Firmware Update 3 Use the Up and Down [R]/[X] buttons to 99, or "Max". Multi Zone", and then press [ENTER]. When the "Volume Display" setting is set to "Absolute...
... its [SETUP] button, arrow buttons, and [ENTER] button. ■ Zone2/3 Out If you've connected your TV. 2 Use the Up and Down [R]/[X] buttons to 99. Firmware Update 3 Use the Up and Down [R]/[X] buttons to 99, or "Max". Multi Zone", and then press [ENTER]. When the "Volume Display" setting is set to "Absolute...


