Owner Manual
Page 1
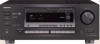
... Features 4 Supplied accessories 4 Before operating this manual for purchasing the Onkyo Audio Video Control Receiver. Following the instructions in this manual thoroughly before...on the power. Please read this manual will enable you for future reference. A / V Receiver TX-DS777 TX-DS676 Instruction Manual STANDBY/ON STAND-BY POWER ON OFF A SPEAKERS B PHONES DIMMER FM MUTE/ MODE...RDS broadcasts (European models only 46 The initial settings 48 Appendix Using the remote controller 49 Programming the remote controller codes of other devices into the RC-392M 52 Using a Macro ...
... Features 4 Supplied accessories 4 Before operating this manual for purchasing the Onkyo Audio Video Control Receiver. Following the instructions in this manual thoroughly before...on the power. Please read this manual will enable you for future reference. A / V Receiver TX-DS777 TX-DS676 Instruction Manual STANDBY/ON STAND-BY POWER ON OFF A SPEAKERS B PHONES DIMMER FM MUTE/ MODE...RDS broadcasts (European models only 46 The initial settings 48 Appendix Using the remote controller 49 Programming the remote controller codes of other devices into the RC-392M 52 Using a Macro ...
Owner Manual
Page 4
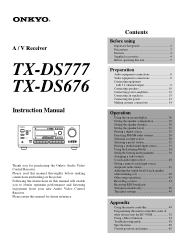
...amplifier technology s Discrete output stage circuits for all channels s Aluminum volume control s New user-friendly smart scan s New backlit learning remote with this unit. On the average, memory contents are trademarks of Digital Theater Systems, Inc.© 1996 Digital Theater Systems, Inc.... for all channels s Banana-plug posts for all channels s High-quality extruded heat sink s Oversized power transformer s (TX-DS777) 105 W x 5 (8 Ω 20 Hz-20 kHz 0.08% THD FTC) 135 W x 5 (6 Ω 1 kHz 0.1% THD FTC) s (TX-DS676) 85 W x 5 (8 Ω 20 Hz-20 kHz 0.08% THD FTC) 110 W x 5 (6 &#...
...amplifier technology s Discrete output stage circuits for all channels s Aluminum volume control s New user-friendly smart scan s New backlit learning remote with this unit. On the average, memory contents are trademarks of Digital Theater Systems, Inc.© 1996 Digital Theater Systems, Inc.... for all channels s Banana-plug posts for all channels s High-quality extruded heat sink s Oversized power transformer s (TX-DS777) 105 W x 5 (8 Ω 20 Hz-20 kHz 0.08% THD FTC) 135 W x 5 (6 Ω 1 kHz 0.1% THD FTC) s (TX-DS676) 85 W x 5 (8 Ω 20 Hz-20 kHz 0.08% THD FTC) 110 W x 5 (6 &#...
Owner Manual
Page 5
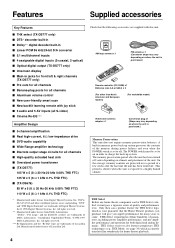
...for your area. Notes • Place the unit away from the remote controller. Placing the unit behind such doors may be used for a long time. • Remove dead batteries immediately to avoid damage from corrosion. TX-DS777 TAPE V S IN (PLAY) R L VIDEO S VIDEO ...OSD SELECTOR 9 kHz 10 kHz AM FREQUENCY STEP SURROUND SPEAKERS FRONT SPEAKERS A R L R L CENTER SPEAKER CAUTION: SPEAKER IMPEDANCE 6 OHMS MIN. / SPEAKER R L FRONT SPEAKERS B VOLTAGE SELECTOR REMOTE CONTROL 220-230V 120V AC ...
...for your area. Notes • Place the unit away from the remote controller. Placing the unit behind such doors may be used for a long time. • Remove dead batteries immediately to avoid damage from corrosion. TX-DS777 TAPE V S IN (PLAY) R L VIDEO S VIDEO ...OSD SELECTOR 9 kHz 10 kHz AM FREQUENCY STEP SURROUND SPEAKERS FRONT SPEAKERS A R L R L CENTER SPEAKER CAUTION: SPEAKER IMPEDANCE 6 OHMS MIN. / SPEAKER R L FRONT SPEAKERS B VOLTAGE SELECTOR REMOTE CONTROL 220-230V 120V AC ...
Owner Manual
Page 6
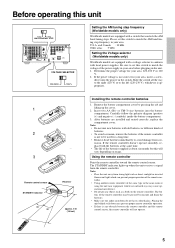
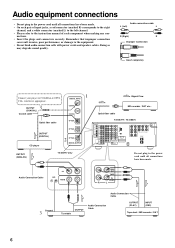
...can result in the power cord until all connections have been made . Doing so may degrade sound quality. Optial fiber cable TX-DS777 / TX-DS676 DIGITAL INPUT R AMP IN COAXIAL 1 COAXIAL 2 OPTICAL 1 FRONT PRE OUT FRONT SUB WOOFER CENTER OPTICAL 2 SURROUND FRONT ... OUT TAPE MONITOR OUT V S IN (PLAY) R L VIDEO S VIDEO OSD SELECTOR TX-DS777 SURROUND SPEAKERS FRONT SPEAKERS A R L R L CENTER SPEAKER R L FRONT SPEAKERS B AC OUTLETS SWITCHED TOTAL 100W MAX. W REMOTE CONTROL Do not plug in noise, poor performance, or damage to COAXIAL or OPTICAL, whichever ...
...can result in the power cord until all connections have been made . Doing so may degrade sound quality. Optial fiber cable TX-DS777 / TX-DS676 DIGITAL INPUT R AMP IN COAXIAL 1 COAXIAL 2 OPTICAL 1 FRONT PRE OUT FRONT SUB WOOFER CENTER OPTICAL 2 SURROUND FRONT ... OUT TAPE MONITOR OUT V S IN (PLAY) R L VIDEO S VIDEO OSD SELECTOR TX-DS777 SURROUND SPEAKERS FRONT SPEAKERS A R L R L CENTER SPEAKER R L FRONT SPEAKERS B AC OUTLETS SWITCHED TOTAL 100W MAX. W REMOTE CONTROL Do not plug in noise, poor performance, or damage to COAXIAL or OPTICAL, whichever ...

Owner Manual
Page 7
... another audio device to this receiver and the connected audio devices. Optical digital connector Remove the protective caps before making connections. TX-DS777/TX-DS676 DIGITAL INPUT R AMP IN COAXIAL 1 COAXIAL 2 OPTICAL 1 FRONT PRE OUT FRONT SUB WOOFER CENTER OPTICAL 2 SURROUND FRONT...that has an z connector. • Remote control operation is not possible if only the remote control cable is designed for use the remote controller for remote control (z) You can use either of purchase. Connect a remote control cable to control a Onkyo DVD player or MD recorder that have ...
... another audio device to this receiver and the connected audio devices. Optical digital connector Remove the protective caps before making connections. TX-DS777/TX-DS676 DIGITAL INPUT R AMP IN COAXIAL 1 COAXIAL 2 OPTICAL 1 FRONT PRE OUT FRONT SUB WOOFER CENTER OPTICAL 2 SURROUND FRONT...that has an z connector. • Remote control operation is not possible if only the remote control cable is designed for use the remote controller for remote control (z) You can use either of purchase. Connect a remote control cable to control a Onkyo DVD player or MD recorder that have ...
Owner Manual
Page 8
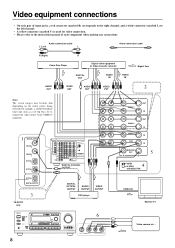
... L V S VIDEO-1 OUT IN VIDEO-2 VIDEO-3 OUT IN IN ANTENNA AM FM 75 DVD IN (REC) OUT TAPE MONITOR OUT V S AV RECEIVER MODEL NO. TX-DS777 IN (PLAY) R L VIDEO S VIDEO OSD SELECTOR SURROUND SPEAKERS FRONT SPEAKERS A R L R L CENTER SPEAKER CAUTION: SPEAKER IMPEDANCE 6 OHMS MIN. / SPEAKER... R L FRONT SPEAKERS B AC OUTLETS AC 120V 60Hz SWITCHED TOTAL 120W 1A MAX. REMOTE CONTROL DIGITAL COAXIAL OUTPUT DIGITAL OPTICAL OUTPUT AUDIO OUTPUT DVD player VIDEO OUTPUT STANDBY/ON STAND-BY POWER ON OFF A SPEAKERS B PHONES...
... L V S VIDEO-1 OUT IN VIDEO-2 VIDEO-3 OUT IN IN ANTENNA AM FM 75 DVD IN (REC) OUT TAPE MONITOR OUT V S AV RECEIVER MODEL NO. TX-DS777 IN (PLAY) R L VIDEO S VIDEO OSD SELECTOR SURROUND SPEAKERS FRONT SPEAKERS A R L R L CENTER SPEAKER CAUTION: SPEAKER IMPEDANCE 6 OHMS MIN. / SPEAKER... R L FRONT SPEAKERS B AC OUTLETS AC 120V 60Hz SWITCHED TOTAL 120W 1A MAX. REMOTE CONTROL DIGITAL COAXIAL OUTPUT DIGITAL OPTICAL OUTPUT AUDIO OUTPUT DVD player VIDEO OUTPUT STANDBY/ON STAND-BY POWER ON OFF A SPEAKERS B PHONES...
Owner Manual
Page 9
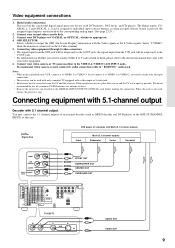
...to the V OUT jack. • For information on whether you need to the VIDEO-4 / VIDEO CAM INPUT jacks. When this receiver. REMOTE CONTROL TX-DS777 R L V S DVD IN AUDIO OUT VIDEO OUT 9 Digital audio connections This receiver has a powerful digital signal processor for use ... a monitor TV equipped with your video camera or TV game machine to connect either S or V jack or both of an external decoder (such as possible. TX-DS777 IN (PLAY) R L VIDEO S VIDEO OSD SELECTOR SURROUND SPEAKERS FRONT SPEAKERS A R L R L CENTER SPEAKER CAUTION: SPEAKER IMPEDANCE 6 OHMS MIN. / ...
...to the V OUT jack. • For information on whether you need to the VIDEO-4 / VIDEO CAM INPUT jacks. When this receiver. REMOTE CONTROL TX-DS777 R L V S DVD IN AUDIO OUT VIDEO OUT 9 Digital audio connections This receiver has a powerful digital signal processor for use ... a monitor TV equipped with your video camera or TV game machine to connect either S or V jack or both of an external decoder (such as possible. TX-DS777 IN (PLAY) R L VIDEO S VIDEO OSD SELECTOR SURROUND SPEAKERS FRONT SPEAKERS A R L R L CENTER SPEAKER CAUTION: SPEAKER IMPEDANCE 6 OHMS MIN. / ...

Owner Manual
Page 11
... L ch. 11 Connecting the speaker cable 1. Connecting speakers • This receiver is designed to both the right and left channel terminals simultaneously. 2. Screw No! REMOTE CONTROL TX-DS777/TX-DS676 Front SpeakerA L ch. Please check the following information and choose speakers with impedances within the specified ranges are connected. FRONTSPEAKERS: SURROUNDSPEAKERS: CENTERSPEAKER: A or B: 6 ohms...
... L ch. 11 Connecting the speaker cable 1. Connecting speakers • This receiver is designed to both the right and left channel terminals simultaneously. 2. Screw No! REMOTE CONTROL TX-DS777/TX-DS676 Front SpeakerA L ch. Please check the following information and choose speakers with impedances within the specified ranges are connected. FRONTSPEAKERS: SURROUNDSPEAKERS: CENTERSPEAKER: A or B: 6 ohms...
Owner Manual
Page 12
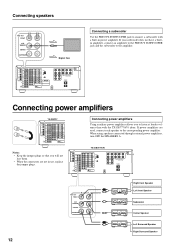
... a builtin amplifier, connect an amplifier to the PREOUT SUBWOOFER jack and the subwoofer to the corresponding power amplifier. REMOTE CONTROL Connecting a subwoofer Use the PREOUT SUBWOOFER jack to listen at louder volumes than with a built-in use, replace the ... L L R L V S VIDEO-1 OUT IN VIDEO-2 VIDEO-3 OUT IN IN ANTENNA AM FM 75 DVD IN (REC) OUT TAPE MONITOR OUT V S AV RECEIVER MODEL NO. TX-DS777 IN (PLAY) R L VIDEO S VIDEO OSD SELECTOR SURROUND SPEAKERS FRONT SPEAKERS A R L R L CENTER SPEAKER CAUTION: SPEAKER IMPEDANCE 6 OHMS MIN. / SPEAKER R L FRONT ...
... a builtin amplifier, connect an amplifier to the PREOUT SUBWOOFER jack and the subwoofer to the corresponding power amplifier. REMOTE CONTROL Connecting a subwoofer Use the PREOUT SUBWOOFER jack to listen at louder volumes than with a built-in use, replace the ... L L R L V S VIDEO-1 OUT IN VIDEO-2 VIDEO-3 OUT IN IN ANTENNA AM FM 75 DVD IN (REC) OUT TAPE MONITOR OUT V S AV RECEIVER MODEL NO. TX-DS777 IN (PLAY) R L VIDEO S VIDEO OSD SELECTOR SURROUND SPEAKERS FRONT SPEAKERS A R L R L CENTER SPEAKER CAUTION: SPEAKER IMPEDANCE 6 OHMS MIN. / SPEAKER R L FRONT ...
Owner Manual
Page 13
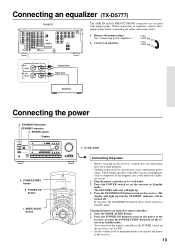
... IN VIDEO-2 VIDEO-3 OUT IN IN ANTENNA AM FM 75 DVD IN (REC) OUT TAPE MONITOR OUT V S IN (PLAY) R L VIDEO S VIDEO OSD SELECTOR TX-DS777 SURROUND SPEAKERS FRONT SPEAKERS A R L R L CENTER SPEAKER R L FRONT SPEAKERS B AC OUTLETS SWITCHED TOTAL 100W MAX. When connecting an equalizer, remove these jumper ...turn off . STANDBY/ON button STANDBY indicator 2. Press the POWER switch to Standby mode. Remove the jumper plugs. W REMOTE CONTROL The AMP IN and the PREOUT FRONT connectors are attached with other electrical equipment, such as computers. Connect an equalizer....
... IN VIDEO-2 VIDEO-3 OUT IN IN ANTENNA AM FM 75 DVD IN (REC) OUT TAPE MONITOR OUT V S IN (PLAY) R L VIDEO S VIDEO OSD SELECTOR TX-DS777 SURROUND SPEAKERS FRONT SPEAKERS A R L R L CENTER SPEAKER R L FRONT SPEAKERS B AC OUTLETS SWITCHED TOTAL 100W MAX. When connecting an equalizer, remove these jumper ...turn off . STANDBY/ON button STANDBY indicator 2. Press the POWER switch to Standby mode. Remove the jumper plugs. W REMOTE CONTROL The AMP IN and the PREOUT FRONT connectors are attached with other electrical equipment, such as computers. Connect an equalizer....
Owner Manual
Page 16
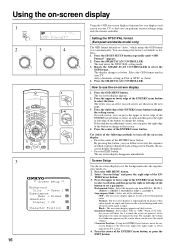
... left , upper right, or lower right of the operation every time you can select on each screen, you can perform various settings using only the remote controller. appears. 2. Press the OSD MENU button. The on the screen when you can press the right edge of the ENTER/Cursor button to that...
... left , upper right, or lower right of the operation every time you can select on each screen, you can perform various settings using only the remote controller. appears. 2. Press the OSD MENU button. The on the screen when you can press the right edge of the ENTER/Cursor button to that...
Owner Manual
Page 21
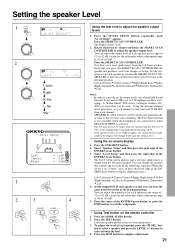
... the speaker output level. You hear a test tone (pink noise) from the speaker that outputs the test tone in the configuration setup explained on the remote controller 1. Rotate clockwise or counterclockwise the SMART SCAN CONTROLLER to select a speaker and press the LEVEL +/- Set the output level of the ENTER/Cursor button...
... the speaker output level. You hear a test tone (pink noise) from the speaker that outputs the test tone in the configuration setup explained on the remote controller 1. Rotate clockwise or counterclockwise the SMART SCAN CONTROLLER to select a speaker and press the LEVEL +/- Set the output level of the ENTER/Cursor button...
Owner Manual
Page 27
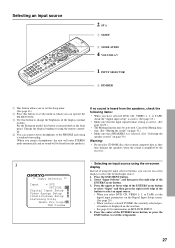
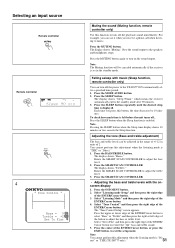
... stereo headphones to select an input source. • When you select DVD, CD, VIDEO 1- 3, or TAPE, set the mode in which you can operate the TX-DS777/676. 3 Use this button is amplified by the receiver. 3 ** Input Selector ** Input = DVD OPTICAL 1 Digital Input Setup Video Assign Setup IntelliVolume Setup Listening Dolby... of the ENTER/Cursor button to select "Input" and then press the right or left edge of the button to the PHONES jack using the remote controller. 4 You can use on the front panel. SP A 1 SLEEP 2 MODE AUDIO 4. Selecting an input source 2. Press the OSD MENU button...
... stereo headphones to select an input source. • When you select DVD, CD, VIDEO 1- 3, or TAPE, set the mode in which you can operate the TX-DS777/676. 3 Use this button is amplified by the receiver. 3 ** Input Selector ** Input = DVD OPTICAL 1 Digital Input Setup Video Assign Setup IntelliVolume Setup Listening Dolby... of the ENTER/Cursor button to select "Input" and then press the right or left edge of the button to the PHONES jack using the remote controller. 4 You can use on the front panel. SP A 1 SLEEP 2 MODE AUDIO 4. Selecting an input source 2. Press the OSD MENU button...
Owner Manual
Page 31
...a phone call when listening to music. Press the SMART SCAN CONTROLLER. • Adjusting the bass and treble levels with music (Sleep function, remote controller only) You can turn off ... Press the OSD MENU button. 2. Select "Listening mode Setup" and then press the right edge of... "Bass" or "Treble" and then press the right or left before the unit turns off the power to the TX-DS777/676 automatically after 90 minutes. 3. Selecting an input source Remote controller Remote controller SPEAKERS A SLEEP STEREO AUTO BASS/ TREBLE 4 * Tone Control * Bass = 0 Treble = +2 Set To...
...a phone call when listening to music. Press the SMART SCAN CONTROLLER. • Adjusting the bass and treble levels with music (Sleep function, remote controller only) You can turn off ... Press the OSD MENU button. 2. Select "Listening mode Setup" and then press the right edge of... "Bass" or "Treble" and then press the right or left before the unit turns off the power to the TX-DS777/676 automatically after 90 minutes. 3. Selecting an input source Remote controller Remote controller SPEAKERS A SLEEP STEREO AUTO BASS/ TREBLE 4 * Tone Control * Bass = 0 Treble = +2 Set To...
Owner Manual
Page 33
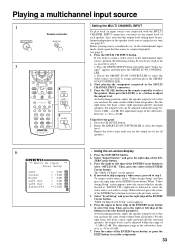
... Level Setup Left Center Right Left Sur Left Sur Subwoofer = 0dB = +5dB = 0dB = 0dB = 0dB =+10dB • Using the on the remote controller to step 5. The adjustment range of the subwoofer, however, is already located at "MULTI CH") rightward or leftward to select the video source you... button. 2. Select "Input Selector" and press the right edge of the ENTER/ Cursor button. Playing a multichannel input source 1 MULTI CH INPUT Remote controller 3 3 3 Setting the MULTI CHANNEL INPUT To play back an input source you connected with the MULTI CHANNEL INPUT connectors, you must be...
... Level Setup Left Center Right Left Sur Left Sur Subwoofer = 0dB = +5dB = 0dB = 0dB = 0dB =+10dB • Using the on the remote controller to step 5. The adjustment range of the subwoofer, however, is already located at "MULTI CH") rightward or leftward to select the video source you... button. 2. Select "Input Selector" and press the right edge of the ENTER/ Cursor button. Playing a multichannel input source 1 MULTI CH INPUT Remote controller 3 3 3 Setting the MULTI CHANNEL INPUT To play back an input source you connected with the MULTI CHANNEL INPUT connectors, you must be...
Owner Manual
Page 35
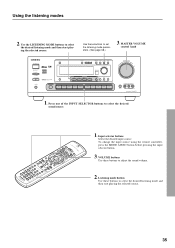
Use these buttons to select the desired listening mode and then start play- To change the input source using the remote controller, press the MODE AUDIO button before pressing the input selector button. 3. MASTER VOLUME control knob STANDBY/ON STAND-BY POWER ON OFF A...VIDEO-1 VIDEO-2 VIDEO-3 VIDEO-4 TAPE FM AM PHONO C D DOWN MASTER VOLUME UP VIDEO 4/VIDEO CAM INPUT S VIDEO VIDEO L AUDIO R(MONO) AV RECEIVER TX-DS777 1. Input selector buttons Select the desired input source. Use the LISTENING MODE buttons to set the listening mode parameters. (See page 38.) 3. ing the...
Use these buttons to select the desired listening mode and then start play- To change the input source using the remote controller, press the MODE AUDIO button before pressing the input selector button. 3. MASTER VOLUME control knob STANDBY/ON STAND-BY POWER ON OFF A...VIDEO-1 VIDEO-2 VIDEO-3 VIDEO-4 TAPE FM AM PHONO C D DOWN MASTER VOLUME UP VIDEO 4/VIDEO CAM INPUT S VIDEO VIDEO L AUDIO R(MONO) AV RECEIVER TX-DS777 1. Input selector buttons Select the desired input source. Use the LISTENING MODE buttons to set the listening mode parameters. (See page 38.) 3. ing the...
Owner Manual
Page 42
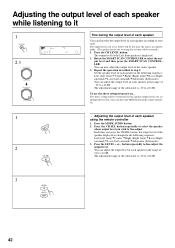
... of each speaker in step 2. The output level of the center speaker. 3. The above setting from now on the remote controller. 1 • Adjusting the output level of each speaker using the remote controller 1. Press the CH SEL button repeatedly to select the speaker whose output level you press the CH SEL button...
... of each speaker in step 2. The output level of the center speaker. 3. The above setting from now on the remote controller. 1 • Adjusting the output level of each speaker using the remote controller 1. Press the CH SEL button repeatedly to select the speaker whose output level you press the CH SEL button...
Owner Manual
Page 49
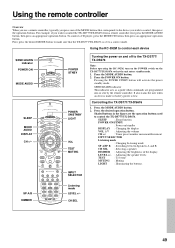
...press the MODE CD button, then press an appropriate operation button. Shaded buttons in the figure are programmed into or sent by the remote controller. Controlling the TX-DS777/TX-DS676 1. SLEEP : Sleep function POWER ON/STNBY : Power on/standby DISPLAY : Changing the display VOL ∆/∇ : Adjusting the ...the MODE buttons that corresponds to the device you wish to the TX-DS777/ TX-DS676 Note: Before operating the RC-392M, turn on the POWER switch on and off to control the TX-DS777/TX-DS676 from a remote controller, first press the MODE AUDIO button, then press an appropriate ...
...press the MODE CD button, then press an appropriate operation button. Shaded buttons in the figure are programmed into or sent by the remote controller. Controlling the TX-DS777/TX-DS676 1. SLEEP : Sleep function POWER ON/STNBY : Power on/standby DISPLAY : Changing the display VOL ∆/∇ : Adjusting the ...the MODE buttons that corresponds to the device you wish to the TX-DS777/ TX-DS676 Note: Before operating the RC-392M, turn on the POWER switch on and off to control the TX-DS777/TX-DS676 from a remote controller, first press the MODE AUDIO button, then press an appropriate ...
Owner Manual
Page 50
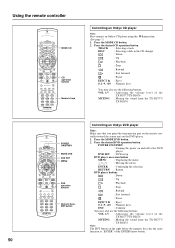
...; : Adjusting the volume level of the TX-DS777/TX-DS676 MUTING : Muting the sound from the TX-DS777/ TX-DS676 POWER ON/STNBY MODE DVD DVD SET MENU DVD operation buttons Numeric keys, ENT button Controlling an Onkyo DVD player Note: Make sure that you point the transmission part on the remote con- Press the desired DVD operation...
...; : Adjusting the volume level of the TX-DS777/TX-DS676 MUTING : Muting the sound from the TX-DS777/ TX-DS676 POWER ON/STNBY MODE DVD DVD SET MENU DVD operation buttons Numeric keys, ENT button Controlling an Onkyo DVD player Note: Make sure that you point the transmission part on the remote con- Press the desired DVD operation...
Owner Manual
Page 51
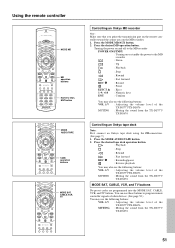
...can use these buttons to program remote controller signals of other devices. (See page 52.) You may use the following buttons: VOL ∆/∇ : Adjusting the volume level of the TX-DS777/TX-DS676 MUTING : Muting the sound from the TX-DS777/ TX-DS676 MODE SAT, CABLE, VCR, and... : Eject : Numeric keys : Confirm You may also use the following buttons: VOL ∆/∇ : Adjusting the volume level of the TX-DS777/TX-DS676 MUTING : Muting the sound from the TX-DS777/ TX-DS676 Controlling an Onkyo tape deck Note: First connect an Onkyo tape deck using the zconnection. (See page 7.) 1.
...can use these buttons to program remote controller signals of other devices. (See page 52.) You may use the following buttons: VOL ∆/∇ : Adjusting the volume level of the TX-DS777/TX-DS676 MUTING : Muting the sound from the TX-DS777/ TX-DS676 MODE SAT, CABLE, VCR, and... : Eject : Numeric keys : Confirm You may also use the following buttons: VOL ∆/∇ : Adjusting the volume level of the TX-DS777/TX-DS676 MUTING : Muting the sound from the TX-DS777/ TX-DS676 Controlling an Onkyo tape deck Note: First connect an Onkyo tape deck using the zconnection. (See page 7.) 1.


