Owner Manual
Page 1
... purchasing the Onkyo Audio Video Control Receiver. Please retain this manual thoroughly before making connections and turning on -screen display 16 Setting the speaker configuration 18 Setting the speaker distance 20 Setting the speaker Level...Setting the listening mode parameters 38 Assigning a video source to each audio input source 40 Giving a name to each input source and preset radio station 41 Adjusting the output level of each speaker while listening to obtain optimum performance and listening enjoyment from your new Audio Video Control Receiver. A / V Receiver TX-DS777 TX-DS676...
... purchasing the Onkyo Audio Video Control Receiver. Please retain this manual thoroughly before making connections and turning on -screen display 16 Setting the speaker configuration 18 Setting the speaker distance 20 Setting the speaker Level...Setting the listening mode parameters 38 Assigning a video source to each audio input source 40 Giving a name to each input source and preset radio station 41 Adjusting the output level of each speaker while listening to obtain optimum performance and listening enjoyment from your new Audio Video Control Receiver. A / V Receiver TX-DS777 TX-DS676...
Owner Manual
Page 3
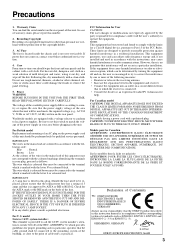
.... For Canadian model CAUTION: THIS DIGITAL APPARATUS DOES NOT EXCEED THE CLASS B LIMITS FOR RADIO NOISE EMISSION FROM DIGITAL APPARATUS SET OUT IN THE RADIO INTERFERENCE REGULATIONS OF THE CANADIAN DEPARTMENT OF COMMUNICATIONS. Warranty Claim You can radiate radio frequency energy and,...Precautions 1. In case of the available power supply differs according to local power supplies. Recording Copyright Recording of Conformity We, ONKYO EUROPE ELECTRONICS GmbH INDUSTRIESTRASSE 20 82110 GERMERING, GERMANY declare in own responsibility, that to radio communications. If power does not ...
.... For Canadian model CAUTION: THIS DIGITAL APPARATUS DOES NOT EXCEED THE CLASS B LIMITS FOR RADIO NOISE EMISSION FROM DIGITAL APPARATUS SET OUT IN THE RADIO INTERFERENCE REGULATIONS OF THE CANADIAN DEPARTMENT OF COMMUNICATIONS. Warranty Claim You can radiate radio frequency energy and,...Precautions 1. In case of the available power supply differs according to local power supplies. Recording Copyright Recording of Conformity We, ONKYO EUROPE ELECTRONICS GmbH INDUSTRIESTRASSE 20 82110 GERMERING, GERMANY declare in own responsibility, that to radio communications. If power does not ...
Owner Manual
Page 4
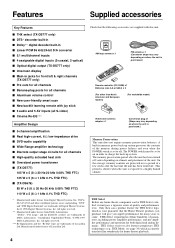
... outs for all channels s Banana-plug posts for all channels s High-quality extruded heat sink s Oversized power transformer s (TX-DS777) 105 W x 5 (8 Ω 20 Hz-20 kHz 0.08% THD FTC) 135 W x 5 (6 Ω 1 kHz 0.1% THD FTC) s (TX-DS676) 85 W x 5 (8 Ω 20 Hz-20 kHz 0.08% THD FTC) 110 W x 5 (6 Ω 1 kHz...accurately translate film soundtracks for many years to charge the back-up system preserves the contents of the unit. Only then can be set to a highly humid climate. Check that the Home Theatre products you purchase will give you superb performance for home theater playback....
... outs for all channels s Banana-plug posts for all channels s High-quality extruded heat sink s Oversized power transformer s (TX-DS777) 105 W x 5 (8 Ω 20 Hz-20 kHz 0.08% THD FTC) 135 W x 5 (6 Ω 1 kHz 0.1% THD FTC) s (TX-DS676) 85 W x 5 (8 Ω 20 Hz-20 kHz 0.08% THD FTC) 110 W x 5 (6 Ω 1 kHz...accurately translate film soundtracks for many years to charge the back-up system preserves the contents of the unit. Only then can be set to a highly humid climate. Check that the Home Theatre products you purchase will give you superb performance for home theater playback....
Owner Manual
Page 5
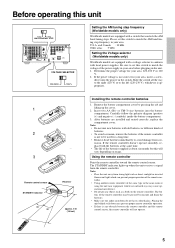
... MONITOR OUT AV RECEIVER MODEL NO. Using the remote controller Point the remote controller toward the remote control sensor. driver into the battery compartment. TX-DS777 TAPE V S IN (PLAY) R L VIDEO S VIDEO OSD SELECTOR 9 kHz 10 kHz AM FREQUENCY STEP SURROUND SPEAKERS FRONT SPEAKERS A...VOLTAGE SELECTOR REMOTE CONTROL 220-230V 120V AC OUTLETS AC 230V 50Hz SWITCHED TOTAL 100W MAX. VOLTAGE SELECTOR 220-230V 120V Setting the AM tuning step frequency (Worldwide models only) Worldwide models are installed and seated correctly, replace the compartment cover. After...
... MONITOR OUT AV RECEIVER MODEL NO. Using the remote controller Point the remote controller toward the remote control sensor. driver into the battery compartment. TX-DS777 TAPE V S IN (PLAY) R L VIDEO S VIDEO OSD SELECTOR 9 kHz 10 kHz AM FREQUENCY STEP SURROUND SPEAKERS FRONT SPEAKERS A...VOLTAGE SELECTOR REMOTE CONTROL 220-230V 120V AC OUTLETS AC 230V 50Hz SWITCHED TOTAL 100W MAX. VOLTAGE SELECTOR 220-230V 120V Setting the AM tuning step frequency (Worldwide models only) Worldwide models are installed and seated correctly, replace the compartment cover. After...
Owner Manual
Page 8
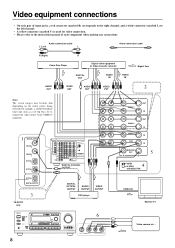
...video source to the left channel. • A yellow connector (marked V) is used for example, a satellite-broadcast tuner unit such as a set-top box). TX-DS777 IN (PLAY) R L VIDEO S VIDEO OSD SELECTOR SURROUND SPEAKERS FRONT SPEAKERS A R L R L CENTER SPEAKER CAUTION: SPEAKER IMPEDANCE 6... connector (marked L) to the VIDEO-3 connector. R L 1 DIGITAL INPUT COAXIAL 1 COAXIAL 2 OPTICAL 1 OPTICAL 2 OPTICAL DIGITAL OUTPUT 3 TX-DS777 only DIGITAL INPUT R AMP IN COAXIAL 1 COAXIAL 2 OPTICAL 1 FRONT PRE OUT FRONT SUB WOOFER CENTER OPTICAL 2 SURROUND FRONT OPTICAL DIGITAL...
...video source to the left channel. • A yellow connector (marked V) is used for example, a satellite-broadcast tuner unit such as a set-top box). TX-DS777 IN (PLAY) R L VIDEO S VIDEO OSD SELECTOR SURROUND SPEAKERS FRONT SPEAKERS A R L R L CENTER SPEAKER CAUTION: SPEAKER IMPEDANCE 6... connector (marked L) to the VIDEO-3 connector. R L 1 DIGITAL INPUT COAXIAL 1 COAXIAL 2 OPTICAL 1 OPTICAL 2 OPTICAL DIGITAL OUTPUT 3 TX-DS777 only DIGITAL INPUT R AMP IN COAXIAL 1 COAXIAL 2 OPTICAL 1 FRONT PRE OUT FRONT SUB WOOFER CENTER OPTICAL 2 SURROUND FRONT OPTICAL DIGITAL...
Owner Manual
Page 13
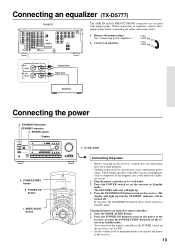
... OUT VIDEO-1 IN VIDEO-2 VIDEO-3 OUT IN IN ANTENNA AM FM 75 DVD IN (REC) OUT TAPE MONITOR OUT V S IN (PLAY) R L VIDEO S VIDEO OSD SELECTOR TX-DS777 SURROUND SPEAKERS FRONT SPEAKERS A R L R L CENTER SPEAKER R L FRONT SPEAKERS B AC OUTLETS SWITCHED TOTAL 100W MAX. Remove the jumper plugs. STANDBY/ON button STANDBY indicator 2.... mode. Press the STANDBY/ON button to turn on the power to the receiver, or press the POWER STNBY button to set the receiver in the receiver, confirm that all connections have been made properly. • Turning on this happens, use the...
... OUT VIDEO-1 IN VIDEO-2 VIDEO-3 OUT IN IN ANTENNA AM FM 75 DVD IN (REC) OUT TAPE MONITOR OUT V S IN (PLAY) R L VIDEO S VIDEO OSD SELECTOR TX-DS777 SURROUND SPEAKERS FRONT SPEAKERS A R L R L CENTER SPEAKER R L FRONT SPEAKERS B AC OUTLETS SWITCHED TOTAL 100W MAX. Remove the jumper plugs. STANDBY/ON button STANDBY indicator 2.... mode. Press the STANDBY/ON button to turn on the power to the receiver, or press the POWER STNBY button to set the receiver in the receiver, confirm that all connections have been made properly. • Turning on this happens, use the...
Owner Manual
Page 15
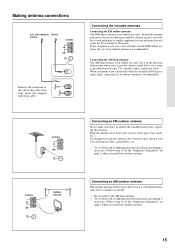
... an FM outdoor antenna Please make sure that will be more effective if it in the direction and position where you install the outdoor antenna. Set it well away from power lines, transformers, etc. • To avoid the risk of lightning and electrical shock, grounding is received. Follow item 19 of...
... an FM outdoor antenna Please make sure that will be more effective if it in the direction and position where you install the outdoor antenna. Set it well away from power lines, transformers, etc. • To avoid the risk of lightning and electrical shock, grounding is received. Follow item 19 of...
Owner Manual
Page 16
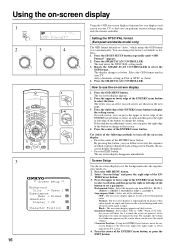
... sound volume. Background Color : Select the desired color from BLUE-1, BLUE-2, GREEN-1, GREEN-2, MAGENTA, RED-1, and RED-2. appears. 2. Auto (Automatic setting) PAL NTSC (Auto) 4. The on your TV. On each screen, you can follow in reverse the sequence in your TV so that screen. ...Immediate Display = ON Character Position 16 Using the OSD (on-screen display) function lets you display each screen on -screen display appears. 2. Setting the NTSC/PAL format (European/worldwide model only) The OSD format defaults to select the item. TER/Cursor button. 3. Superimpose Mode : Select...
... sound volume. Background Color : Select the desired color from BLUE-1, BLUE-2, GREEN-1, GREEN-2, MAGENTA, RED-1, and RED-2. appears. 2. Auto (Automatic setting) PAL NTSC (Auto) 4. The on your TV. On each screen, you can follow in reverse the sequence in your TV so that screen. ...Immediate Display = ON Character Position 16 Using the OSD (on-screen display) function lets you display each screen on -screen display appears. 2. Setting the NTSC/PAL format (European/worldwide model only) The OSD format defaults to select the item. TER/Cursor button. 3. Superimpose Mode : Select...
Owner Manual
Page 17
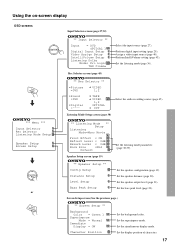
...(page 19) ** Speaker Setup ** Config Setup Distance Setup Level Setup Bass Peak Setup Set the listening mode parameters (page 38,39). Set the superimpose mode. Set the display position of characters. 17 TAPE VIDEO 1,2 OPTICAL OUT Select the audio recording... ** Background Color = Green 1 Superimpose Mode = Normal Immediate Display = ON Character Position Set the background color. Perform IntelliVolume setting (page 43). Set the speaker configuration (page 19). Set the simultaneous display mode. Set the listening mode (page 36). ** Rec Selector ** •Picture =DVD VIDEO 1,2 ...
...(page 19) ** Speaker Setup ** Config Setup Distance Setup Level Setup Bass Peak Setup Set the listening mode parameters (page 38,39). Set the superimpose mode. Set the display position of characters. 17 TAPE VIDEO 1,2 OPTICAL OUT Select the audio recording... ** Background Color = Green 1 Superimpose Mode = Normal Immediate Display = ON Character Position Set the background color. Perform IntelliVolume setting (page 43). Set the speaker configuration (page 19). Set the simultaneous display mode. Set the listening mode (page 36). ** Rec Selector ** •Picture =DVD VIDEO 1,2 ...
Owner Manual
Page 18
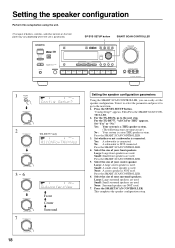
...Your system is a THX speaker system. (The following steps are used . Set whether or not a subwoofer is a non-THX speaker system. Press the SMART SCAN CONTROLLER. 6. Press the SMART SCAN CONTROLLER. For the TX-DS676, go to the next step. Press the SMART SCAN CONTROLLER. 3. Press ...the SMART SCAN CONTROLLER. 4. Large: Large front speakers are used . Small: Small front speakers are used . 7. Small: Small surround speakers are NOT used . Setting the speaker configuration Perform this...
...Your system is a THX speaker system. (The following steps are used . Set whether or not a subwoofer is a non-THX speaker system. Press the SMART SCAN CONTROLLER. 6. Press the SMART SCAN CONTROLLER. For the TX-DS676, go to the next step. Press the SMART SCAN CONTROLLER. 3. Press ...the SMART SCAN CONTROLLER. 4. Large: Large front speakers are used . Small: Small front speakers are used . 7. Small: Small surround speakers are NOT used . Setting the speaker configuration Perform this...
Owner Manual
Page 19
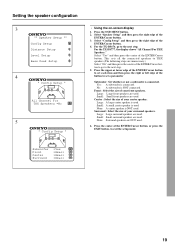
... are NOT used . Setting the speaker configuration 3 ** Speaker Setup ** Config Setup Distance Setup Level Setup Bass Peak Setup 4 * Config Setup * All Channel For THX Speakers =No 5 * Config Setup * • Using the on-screen display 1. Press the OSD MENU button. 2. For the TX-DS676, go to the next... step. For the TX-DS777, the display shows "All Channel For THX Speakers." Select "Yes" and then press the center of the ENTER/Cursor button....
... are NOT used . Setting the speaker configuration 3 ** Speaker Setup ** Config Setup Distance Setup Level Setup Bass Peak Setup 4 * Config Setup * All Channel For THX Speakers =No 5 * Config Setup * • Using the on-screen display 1. Press the OSD MENU button. 2. For the TX-DS676, go to the next... step. For the TX-DS777, the display shows "All Channel For THX Speakers." Select "Yes" and then press the center of the ENTER/Cursor button....
Owner Manual
Page 20
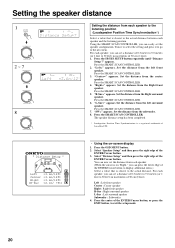
...button. 3. For each speaker, you can press the lower edge of the ENTER/Cursor button to the actual distance. For each speaker, you can set a distance of 0.3 meter to 9.0 meters (or 1 foot to the actual distance between each speaker and the listening position. "SW=" appears....ENTER PRESET/MODE ADJ SPEAKERS A PCM DIGITAL PUSH TO ENTER 8 PRESET/MODE ADJ PUSH TO ENTER TUNED AUTO TUNED FM STEREO AUTO ft Setting the distance from each speaker to the listening position (Loudspeaker Position Time Synchronization*) Select a value that is a registered trademark of Lucasfilm LTD....
...button. 3. For each speaker, you can press the lower edge of the ENTER/Cursor button to the actual distance. For each speaker, you can set a distance of 0.3 meter to 9.0 meters (or 1 foot to the actual distance between each speaker and the listening position. "SW=" appears....ENTER PRESET/MODE ADJ SPEAKERS A PCM DIGITAL PUSH TO ENTER 8 PRESET/MODE ADJ PUSH TO ENTER TUNED AUTO TUNED FM STEREO AUTO ft Setting the distance from each speaker to the listening position (Loudspeaker Position Time Synchronization*) Select a value that is a registered trademark of Lucasfilm LTD....
Owner Manual
Page 21
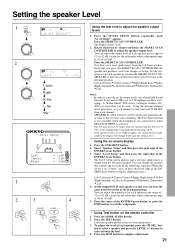
... soon as below. Press the TEST button. Press the SMART SCAN CONTROLLER. You hear a test tone (pink noise) from the left front speaker. Set the output level of each speaker by rotating the SMART SCAN CONTROLLER so that you can hear the same level of each channel so that... the setup mode. • Using Test button on the remote controller 1. Press the center of the ENTER/Cursor button. buttons to complete adjustment. 21 Setting the speaker Level 1 SP/SYS SETUP SPEAKERS DSP A PRESET/MODE ADJ PUSH TO ENTER 2 PRESET/MODE ADJ SPEAKERS A PCM DIGITAL STEREO db PUSH TO...
... soon as below. Press the TEST button. Press the SMART SCAN CONTROLLER. You hear a test tone (pink noise) from the left front speaker. Set the output level of each speaker by rotating the SMART SCAN CONTROLLER so that you can hear the same level of each channel so that... the setup mode. • Using Test button on the remote controller 1. Press the center of the ENTER/Cursor button. buttons to complete adjustment. 21 Setting the speaker Level 1 SP/SYS SETUP SPEAKERS DSP A PRESET/MODE ADJ PUSH TO ENTER 2 PRESET/MODE ADJ SPEAKERS A PCM DIGITAL STEREO db PUSH TO...

Owner Manual
Page 22
... reproduce. 1. Note: • Allowing the speakers to produce distorted sound for a long time may cause damage to select "Yes" or "No." Setting the Speaker level 1 SP/SYS SETUP SPEAKERS DSP A PRESET/MODE ADJ PUSH TO ENTER 2 PRESET/MODE ADJ PUSH TO ENTER PRESET/MODE ADJ PUSH...MODE ADJ 4 PUSH TO ENTER PRESET/MODE ADJ PUSH TO ENTER PRESET/MODE ADJ PUSH TO ENTER SPEAKERS A SPEAKERS A SPEAKERS A Setting the bass peak level (Bass Peak Level Manager* TX-DS777 only) To prevent damage to your Front speakers can reproduce. "Limiter ="appears and You are now in step 2. * ...
... reproduce. 1. Note: • Allowing the speakers to produce distorted sound for a long time may cause damage to select "Yes" or "No." Setting the Speaker level 1 SP/SYS SETUP SPEAKERS DSP A PRESET/MODE ADJ PUSH TO ENTER 2 PRESET/MODE ADJ PUSH TO ENTER PRESET/MODE ADJ PUSH...MODE ADJ 4 PUSH TO ENTER PRESET/MODE ADJ PUSH TO ENTER PRESET/MODE ADJ PUSH TO ENTER SPEAKERS A SPEAKERS A SPEAKERS A Setting the bass peak level (Bass Peak Level Manager* TX-DS777 only) To prevent damage to your Front speakers can reproduce. "Limiter ="appears and You are now in step 2. * ...
Owner Manual
Page 23
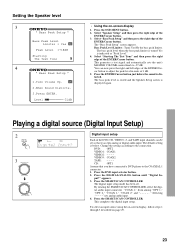
...peak level is stored and the Speaker Setup screen is distorted. Press the DVD input selector button. 2. The digital input setup mode has been set so that you have connected a DVD player to adjust the peak level in units of the ENTER/Cursor button. 3. tal audio input connector ..."COAX 1," from among "OPT 1," "OPT 2," "COAX 1," "COAX 2" and Selecting "- - - -"sets analog audio input. 4. This completes the digital input setup. Select "Speaker Setup" and then press the right edge of 1 dB. 5. Change the...
...peak level is stored and the Speaker Setup screen is distorted. Press the DVD input selector button. 2. The digital input setup mode has been set so that you have connected a DVD player to adjust the peak level in units of the ENTER/Cursor button. 3. tal audio input connector ..."COAX 1," from among "OPT 1," "OPT 2," "COAX 1," "COAX 2" and Selecting "- - - -"sets analog audio input. 4. This completes the digital input setup. Select "Speaker Setup" and then press the right edge of 1 dB. 5. Change the...
Owner Manual
Page 27
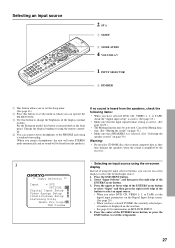
INPUT SELECTOR 3 DIMMER 1 This button allows you to set the sleep timer. (See page 31.) 2 Press this button to set the digital input parameters on the Digital Input Setup screen. (See page 29.) • When you can operate the TX-DS777/676. 3 Use this button is selected. (See "Selecting the speaker ... input source 2. For the European model, this button to select an input source. • When you select DVD, CD, VIDEO 1- 3, or TAPE, set the mode in which you have selected TUNER, the currently selected preset number is correct. (See page 28,29.) • The Muting function may damage...
INPUT SELECTOR 3 DIMMER 1 This button allows you to set the sleep timer. (See page 31.) 2 Press this button to set the digital input parameters on the Digital Input Setup screen. (See page 29.) • When you can operate the TX-DS777/676. 3 Use this button is selected. (See "Selecting the speaker ... input source 2. For the European model, this button to select an input source. • When you select DVD, CD, VIDEO 1- 3, or TAPE, set the mode in which you have selected TUNER, the currently selected preset number is correct. (See page 28,29.) • The Muting function may damage...
Owner Manual
Page 28
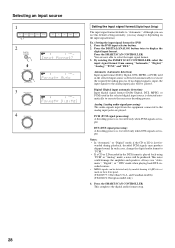
...be detected only by models bearing mark on the input signal format. In such cases, change it depending on their front panel. (TX-DS777: Other than U.S.A. This completes the digital audio format setup. 28 Although you may produce skipped sound. Press the DIGITAL/ANALOG ... to the analog input jacks are input. Always use this default setting normally, you can use "Automatic", "Digital", or " DTS" mode when playing back DTS-encoded sources. • MPEG signals can be produced. and Canadian models) (TX-DS676: European model only) 4. Press the DVD input selector button. ...
...be detected only by models bearing mark on the input signal format. In such cases, change it depending on their front panel. (TX-DS777: Other than U.S.A. This completes the digital audio format setup. 28 Although you may produce skipped sound. Press the DIGITAL/ANALOG ... to the analog input jacks are input. Always use this default setting normally, you can use "Automatic", "Digital", or " DTS" mode when playing back DTS-encoded sources. • MPEG signals can be produced. and Canadian models) (TX-DS676: European model only) 4. Press the DVD input selector button. ...

Owner Manual
Page 29
...the OSD MENU button. 2. To set the input signal format, move the cursor vertically using these jacks. Select "Digital Input Setup" and then press the right edge of the VIDEO-1, VIDEO-2, and TAPE connectors output analog audio signals. Notes on the TX-DS777/676 lights up while it will... PCM signal immediately, the PCM signal may not be played. Do not record CDs or LDs that supports DTS when the "Automatic", or "Digital" setting is assigned to exit the setup mode. The DTS indicator on DTS 1. Selecting an input source * Digital Input Setup * CD DVD VIDEO 1 :COAXIAL...
...the OSD MENU button. 2. To set the input signal format, move the cursor vertically using these jacks. Select "Digital Input Setup" and then press the right edge of the VIDEO-1, VIDEO-2, and TAPE connectors output analog audio signals. Notes on the TX-DS777/676 lights up while it will... PCM signal immediately, the PCM signal may not be played. Do not record CDs or LDs that supports DTS when the "Automatic", or "Digital" setting is assigned to exit the setup mode. The DTS indicator on DTS 1. Selecting an input source * Digital Input Setup * CD DVD VIDEO 1 :COAXIAL...
Owner Manual
Page 30
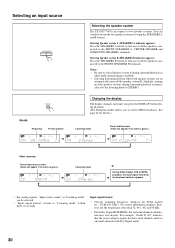
DISPLAY Changing the display The display changes each time you press the DISPLAY button during Surround playback automatically sets the listening mode to STEREO. No correct information displays, however, for three front channels and two surround channels in Dolby ...information may also display. Similarly, turning on automatically turns off the speaker system B. Selecting an input source A SPEAKERS B Selecting the speaker system The TX-DS777/676 can connect to two speaker systems. You can be selected. • "Input signal format" returns to "Listening mode" within three (3)...
DISPLAY Changing the display The display changes each time you press the DISPLAY button during Surround playback automatically sets the listening mode to STEREO. No correct information displays, however, for three front channels and two surround channels in Dolby ...information may also display. Similarly, turning on automatically turns off the speaker system B. Selecting an input source A SPEAKERS B Selecting the speaker system The TX-DS777/676 can connect to two speaker systems. You can be selected. • "Input signal format" returns to "Listening mode" within three (3)...
Owner Manual
Page 31
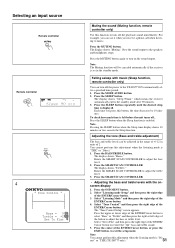
... controller SPEAKERS A SLEEP STEREO AUTO BASS/ TREBLE 4 * Tone Control * Bass = 0 Treble = +2 Set To Flat Muting the sound (Muting function, remote controller only) Use this function to the TX-DS777/676 automatically after 90 minutes. 3. Falling asleep with the onscreen display 1. Press the SLEEP button repeatedly ...You cannot perform this button, the time decreases by 10 minutes. rect" or "THX (TX-DS777 only)." Press the SLEEP button. Press the SLEEP button when the Sleep function is set in units of the ENTER/ Cursor button to the speakers and headphones stops. Rotate the ...
... controller SPEAKERS A SLEEP STEREO AUTO BASS/ TREBLE 4 * Tone Control * Bass = 0 Treble = +2 Set To Flat Muting the sound (Muting function, remote controller only) Use this function to the TX-DS777/676 automatically after 90 minutes. 3. Falling asleep with the onscreen display 1. Press the SLEEP button repeatedly ...You cannot perform this button, the time decreases by 10 minutes. rect" or "THX (TX-DS777 only)." Press the SLEEP button. Press the SLEEP button when the Sleep function is set in units of the ENTER/ Cursor button to the speakers and headphones stops. Rotate the ...


