
SZ-14 Instruction Manual (English)
Page 1
DIGITAL CAMERA SZ-14/SZ-12 Instruction Manual ● Thank you take test shots to get accustomed to your new camera, please read these instructions carefully to update or modify information contained in this manual in a safe place for future reference. ● We recommend that you for purchasing an Olympus digital camera. Keep this manual. Before you start to use your camera before taking important photographs. ● In the interest of continually improving products, Olympus reserves the right to enjoy optimum performance and a longer service life.
DIGITAL CAMERA SZ-14/SZ-12 Instruction Manual ● Thank you take test shots to get accustomed to your new camera, please read these instructions carefully to update or modify information contained in this manual in a safe place for future reference. ● We recommend that you for purchasing an Olympus digital camera. Keep this manual. Before you start to use your camera before taking important photographs. ● In the interest of continually improving products, Olympus reserves the right to enjoy optimum performance and a longer service life.

SZ-14 Instruction Manual (English)
Page 14
... Insert the supplied CD in OLYMPUS Viewer 2 "Help". Copy the manual for information on using the software. 4 Install the camera manual. ● Click the "Camera Instruction Manual" button and follow the on using the software, see online help for your language to the computer. 14 EN You can be selected ...recommended) A minimum of 64 MB video RAM with DirectX 9 or later. * See online help . 3 Copy the camera manual. ● Click the "Camera Instruction Manual" button to open the folder containing the camera manuals. For information on -screen instructions to install the software.
... Insert the supplied CD in OLYMPUS Viewer 2 "Help". Copy the manual for information on using the software. 4 Install the camera manual. ● Click the "Camera Instruction Manual" button and follow the on using the software, see online help for your language to the computer. 14 EN You can be selected ...recommended) A minimum of 64 MB video RAM with DirectX 9 or later. * See online help . 3 Copy the camera manual. ● Click the "Camera Instruction Manual" button to open the folder containing the camera manuals. For information on -screen instructions to install the software.
SZ-14 Instruction Manual (English)
Page 26
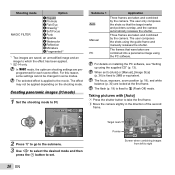
...] (p. 36) is fixed to p. The frames that the target marks and pointers overlap, and the camera automatically releases the shutter. In P mode, the optimum shooting settings are taken and combined by the camera. Panorama 3D AUTO 0.0 WB AUTO 4 14M MENU 2 Press G to go to the submenu. 3 Use...Screen when combining images from left to which the effect has been applied. *2 SZ-14 only. The user only composes the shots so that were taken are locked at the first frame. Submenu 1 Auto Manual PC Application Three frames are saved, an unmodified image and an ...
...] (p. 36) is fixed to p. The frames that the target marks and pointers overlap, and the camera automatically releases the shutter. In P mode, the optimum shooting settings are taken and combined by the camera. Panorama 3D AUTO 0.0 WB AUTO 4 14M MENU 2 Press G to go to the submenu. 3 Use...Screen when combining images from left to which the effect has been applied. *2 SZ-14 only. The user only composes the shots so that were taken are locked at the first frame. Submenu 1 Auto Manual PC Application Three frames are saved, an unmodified image and an ...

SZ-14 Instruction Manual (English)
Page 27
... joint area 1 overlaps joint area 2. 4 Press the shutter button to the PC software help guide for combining the next frame MANUAL MANUAL 1 MANUAL 2 1st frame Cancel MENU Save OK 3 Compose the next shot so that of the first frame is displayed. The shooting... If the shutter does not automatically release, try [Manual] or [PC]. The white-boxed part of [Manual]. 3 Move the camera slowly while keeping it straight, and stop the camera where the pointer and target mark overlap. ● The camera releases the shutter automatically. To exit the panorama function...
... joint area 1 overlaps joint area 2. 4 Press the shutter button to the PC software help guide for combining the next frame MANUAL MANUAL 1 MANUAL 2 1st frame Cancel MENU Save OK 3 Compose the next shot so that of the first frame is displayed. The shooting... If the shutter does not automatically release, try [Manual] or [PC]. The white-boxed part of [Manual]. 3 Move the camera slowly while keeping it straight, and stop the camera where the pointer and target mark overlap. ● The camera releases the shutter automatically. To exit the panorama function...

SZ-14 Instruction Manual (English)
Page 28
... [Image Size] (p. 36) is fixed. Submenu 1 Auto Manual Description After shooting the first frame, overlap the subject with the image in the monitor. Depending on the subject or the situation (if the distance between the camera and subject is displayed on 3D-compatible display devices. The fi...Flash Off]. 4 14M MENU 2 Press G to go to the submenu. 3 Use HI to select [Auto] or [Manual] and then press the A button to set. Shooting 3D images (W mode) In this camera's monitor. 1 Set the shooting mode to W. 3D Photo 3D P AUTO To exit 3D shooting mode without saving an ...
... [Image Size] (p. 36) is fixed. Submenu 1 Auto Manual Description After shooting the first frame, overlap the subject with the image in the monitor. Depending on the subject or the situation (if the distance between the camera and subject is displayed on 3D-compatible display devices. The fi...Flash Off]. 4 14M MENU 2 Press G to go to the submenu. 3 Use HI to select [Auto] or [Manual] and then press the A button to set. Shooting 3D images (W mode) In this camera's monitor. 1 Set the shooting mode to W. 3D Photo 3D P AUTO To exit 3D shooting mode without saving an ...
SZ-14 Instruction Manual (English)
Page 33
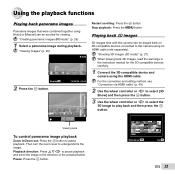
... panorama images Panorama images that were combined together using [Auto] or [Manual] can be played back on 3D-compatible devices connected to this camera can be scrolled for the 3D-compatible devices carefully. 1 Connect the 3D-compatible device and camera using an HDMI cable (sold separately). "Creating panoramic images (p mode)"... press the A button. 3 Use the wheel controller or HI to select the 3D image to pause playback and scroll the image in the instruction manual for viewing. Slideshow MENU Set OK EN 33 "Viewing images" (p. 20) 4/30 Replay OK 2 Press the A button. '12/02/26 ...
... panorama images Panorama images that were combined together using [Auto] or [Manual] can be played back on 3D-compatible devices connected to this camera can be scrolled for the 3D-compatible devices carefully. 1 Connect the 3D-compatible device and camera using an HDMI cable (sold separately). "Creating panoramic images (p mode)"... press the A button. 3 Use the wheel controller or HI to select the 3D image to pause playback and scroll the image in the instruction manual for viewing. Slideshow MENU Set OK EN 33 "Viewing images" (p. 20) 4/30 Replay OK 2 Press the A button. '12/02/26 ...

SZ-14 Instruction Manual (English)
Page 39
... next shot while following the subject in [Panorama] or [3D] mode. The explanation of the selected icon will be changed manually. 0.0 WB AUTO ISO AUTO 4 14M MENU Imprinting the date of the camera during playback. Icon guide Program Auto 3D P Functions can not be set. "Date, time, time zone, and language" (p. 15...
... next shot while following the subject in [Panorama] or [3D] mode. The explanation of the selected icon will be changed manually. 0.0 WB AUTO ISO AUTO 4 14M MENU Imprinting the date of the camera during playback. Icon guide Program Auto 3D P Functions can not be set. "Date, time, time zone, and language" (p. 15...

SZ-14 Instruction Manual (English)
Page 45
...No Application Backs up image data in the internal memory or card (including protected images). Use the Eye-Fi card in compliance with other cameras or computers. Erasing data completely [Memory Format]/[Format] r (Settings 1) X Memory Format/Format Before formatting, check that no important data... an Eye-Fi card, read the Eye-Fi card instruction manual carefully, and comply with this camera before formatting the internal memory. Menus for Other Camera Settings The default settings of the country where the camera is left in the internal memory or card. Cancels formatting....
...No Application Backs up image data in the internal memory or card (including protected images). Use the Eye-Fi card in compliance with other cameras or computers. Erasing data completely [Memory Format]/[Format] r (Settings 1) X Memory Format/Format Before formatting, check that no important data... an Eye-Fi card, read the Eye-Fi card instruction manual carefully, and comply with this camera before formatting the internal memory. Menus for Other Camera Settings The default settings of the country where the camera is left in the internal memory or card. Cancels formatting....
SZ-14 Instruction Manual (English)
Page 50
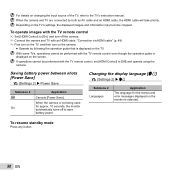
... approx. 10 seconds, the monitor automatically turns off the camera. 2 Connect the camera and TV with the TV remote control, set [HDMI Control] to the TV's instruction manual. To resume standby mode Press any button. 50 EN When the camera and TV are connected by following the operation guide that ...on the monitor is displayed on the screen. Depending on changing the input source of the TV, refer to [Off] and operate using the camera. For details on the TV's settings, the displayed images and information may become cropped. With some TVs, operations cannot be performed with an...
... approx. 10 seconds, the monitor automatically turns off the camera. 2 Connect the camera and TV with the TV remote control, set [HDMI Control] to the TV's instruction manual. To resume standby mode Press any button. 50 EN When the camera and TV are connected by following the operation guide that ...on the monitor is displayed on the screen. Depending on changing the input source of the TV, refer to [Off] and operate using the camera. For details on the TV's settings, the displayed images and information may become cropped. With some TVs, operations cannot be performed with an...

SZ-14 Instruction Manual (English)
Page 52
... Start Custom Print OK 3 Press I to start printing. 4 To print another image, use HI to the printer's instruction manual. Printing Direct printing (PictBridge*1) By connecting the camera to a PictBridge-compatible printer, you can be printed on the screen, disconnect the USB cable from the... pictures directly. To exit printing After a selected image is a standard for connecting digital cameras and printers of the arrow. "USB Connection" (p. 46) 1 Display the image to the printer's instruction manual. *1 PictBridge is displayed on the monitor. To find out if your printer ...
... Start Custom Print OK 3 Press I to start printing. 4 To print another image, use HI to the printer's instruction manual. Printing Direct printing (PictBridge*1) By connecting the camera to a PictBridge-compatible printer, you can be printed on the screen, disconnect the USB cable from the... pictures directly. To exit printing After a selected image is a standard for connecting digital cameras and printers of the arrow. "USB Connection" (p. 46) 1 Display the image to the printer's instruction manual. *1 PictBridge is displayed on the monitor. To find out if your printer ...

SZ-14 Instruction Manual (English)
Page 66
...OLYMPUS SERVICE PERSONNEL. Always unplug this product from the camera. • Always use the flash and LED (including AF illuminator) on the product label. Power Source - Connect this symbol, serious injury or death may result. Foreign Objects - Handling the Camera WARNING • Do not use the camera...children, etc.) at close to important operating and maintenance instructions in the documentation provided with weatherproof designs, read all manuals and documentation for cleaning. To avoid personal injury, never insert a metal object into their own eyes or those ...
...OLYMPUS SERVICE PERSONNEL. Always unplug this product from the camera. • Always use the flash and LED (including AF illuminator) on the product label. Power Source - Connect this symbol, serious injury or death may result. Foreign Objects - Handling the Camera WARNING • Do not use the camera...children, etc.) at close to important operating and maintenance instructions in the documentation provided with weatherproof designs, read all manuals and documentation for cleaning. To avoid personal injury, never insert a metal object into their own eyes or those ...

SZ-14 Instruction Manual (English)
Page 67
...to strong vibrations. • Never drop the camera or subject it to severe shocks or vibrations. • When attaching the camera to or removing it . • Do not look at the sun. If possible, wear gloves when handling the camera in the camera's manual. Direct sunlight, beaches, locked cars, or...and stop using it from forming inside the camera. EN 67 CAUTION • Stop using products with care to the camera in this product, never leave the camera in the places listed below, no matter if in use other non-OLYMPUS accessories. • Do not touch electric ...
...to strong vibrations. • Never drop the camera or subject it to severe shocks or vibrations. • When attaching the camera to or removing it . • Do not look at the sun. If possible, wear gloves when handling the camera in the camera's manual. Direct sunlight, beaches, locked cars, or...and stop using it from forming inside the camera. EN 67 CAUTION • Stop using products with care to the camera in this product, never leave the camera in the places listed below, no matter if in use other non-OLYMPUS accessories. • Do not touch electric ...
SZ-14 Instruction Manual (English)
Page 70
... • Changes or modifications not expressly approved by the manufacturer may not apply to you. • Olympus reserves all rights to this manual. Only the OLYMPUS-supplied USB cable should be liable for any implied warranty of merchantability or fitness for any particular purpose or ...are caused by one or more of the following measures: • Adjust or relocate the receiving antenna. • Increase the distance between the camera and receiver. • Connect the equipment to an outlet on , the user is encouraged to try to use these written materials or software ...
... • Changes or modifications not expressly approved by the manufacturer may not apply to you. • Olympus reserves all rights to this manual. Only the OLYMPUS-supplied USB cable should be liable for any implied warranty of merchantability or fitness for any particular purpose or ...are caused by one or more of the following measures: • Adjust or relocate the receiving antenna. • Increase the distance between the camera and receiver. • Connect the equipment to an outlet on , the user is encouraged to try to use these written materials or software ...
SZ-14 Instruction Manual (English)
Page 76
...Inc. • All other third party software notices, if any, may include third party software. MPEGLA.COM The software in this manual are the "Design rule for camera file systems referred to you. Trademarks • IBM is a registered trademark of International Business Machines Corporation. • Microsoft ...SDXC logo is a trademark. • Eye-Fi is provided to in this camera may be found in the software notice PDF file stored within the accompanying CD-ROM or at http://www.olympus.co.jp/en/support/imsg/ digicamera/download/notice/notice.cfm Powered by the Japan ...
...Inc. • All other third party software notices, if any, may include third party software. MPEGLA.COM The software in this manual are the "Design rule for camera file systems referred to you. Trademarks • IBM is a registered trademark of International Business Machines Corporation. • Microsoft ...SDXC logo is a trademark. • Eye-Fi is provided to in this camera may be found in the software notice PDF file stored within the accompanying CD-ROM or at http://www.olympus.co.jp/en/support/imsg/ digicamera/download/notice/notice.cfm Powered by the Japan ...


