
SZ-14 Instruction Manual (English)
Page 8
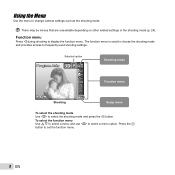
... Auto 3D P Shooting mode 0.0 WB AUTO ISO AUTO 4 14M Shooting Function menu Setup menu To select the shooting mode Use HI to change camera settings such as the shooting mode. Using the Menu Use the menu to select the shooting mode and press the A button. To select the function menu Use FG to select a menu and use HI to set the function menu. 8 EN Press the A button to select a menu option. The function menu is used to choose the shooting mode and provides access to display the function menu. Function menu Press H during shooting to frequently used shooting settings...
... Auto 3D P Shooting mode 0.0 WB AUTO ISO AUTO 4 14M Shooting Function menu Setup menu To select the shooting mode Use HI to change camera settings such as the shooting mode. Using the Menu Use the menu to select the shooting mode and press the A button. To select the function menu Use FG to select a menu and use HI to set the function menu. 8 EN Press the A button to select a menu option. The function menu is used to choose the shooting mode and provides access to display the function menu. Function menu Press H during shooting to frequently used shooting settings...
SZ-14 Instruction Manual (English)
Page 9
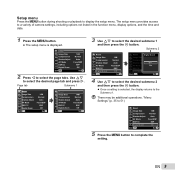
... additional operations. Use FG to select the desired submenu 1 and then press the A button. "Menu Settings" (p. 35 to 51) 1 Reset 2 Image Size Compression Shadow Adjust 1 AF Mode 2 ESP/ 3 Digital Zoom Exit MENU 14M Normal Auto Face/iESP ESP On Set OK 5 Press the m button to display the setup menu. Setup menu Press the m button during shooting or playback to complete the setting. The setup menu provides access to a variety of camera settings, including options not listed in the function menu, display options...
... additional operations. Use FG to select the desired submenu 1 and then press the A button. "Menu Settings" (p. 35 to 51) 1 Reset 2 Image Size Compression Shadow Adjust 1 AF Mode 2 ESP/ 3 Digital Zoom Exit MENU 14M Normal Auto Face/iESP ESP On Set OK 5 Press the m button to display the setup menu. Setup menu Press the m button during shooting or playback to complete the setting. The setup menu provides access to a variety of camera settings, including options not listed in the function menu, display options...

SZ-14 Instruction Manual (English)
Page 10
Rec View Pic Orientation Icon Guide Date Stamp a A (Movie menu p. 36 Image Size Image Quality IS Movie Mode R (Movie sound recording) b q (Playback p. 41 Slideshow Photo Surfing Edit Erase Print Order R (Protect) y (Rotate) cr (Settings 1 p. 45 Memory Format/Format Backup Eye-Fi USB Connection q Power On KeepzSettings Pw On Setup d s (Settings 2 p. 47 Sound Settings File Name Pixel Mapping s (Monitor) TV Out Power Save l (Language) e t (Settings 3 p. 51 X (Date/time) World Time Reset Database 10 EN Menu Index Program Auto 4 14M 3D P 1 2 3 4 0.0 5 WB AUTO 6 ISO AUTO 7 8...
Rec View Pic Orientation Icon Guide Date Stamp a A (Movie menu p. 36 Image Size Image Quality IS Movie Mode R (Movie sound recording) b q (Playback p. 41 Slideshow Photo Surfing Edit Erase Print Order R (Protect) y (Rotate) cr (Settings 1 p. 45 Memory Format/Format Backup Eye-Fi USB Connection q Power On KeepzSettings Pw On Setup d s (Settings 2 p. 47 Sound Settings File Name Pixel Mapping s (Monitor) TV Out Power Save l (Language) e t (Settings 3 p. 51 X (Date/time) World Time Reset Database 10 EN Menu Index Program Auto 4 14M 3D P 1 2 3 4 0.0 5 WB AUTO 6 ISO AUTO 7 8...
SZ-14 Instruction Manual (English)
Page 11
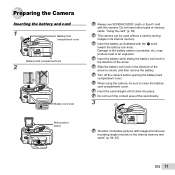
..., and then remove the battery. Turn off the camera before opening the battery/card compartment cover. Slide the battery lock knob in the internal memory and cards" (p. 64, 65) EN 11 Preparing the Camera Inserting the battery and card 1 2 Battery/card compartment cover 1 Battery/card compartment lock 2 Battery lock knob Write-protect switch Always use SD/SDHC/SDXC cards or Eye-Fi card with the C mark toward the battery lock knob. When using the camera, be used without a card by storing images in the direction of the...
..., and then remove the battery. Turn off the camera before opening the battery/card compartment cover. Slide the battery lock knob in the internal memory and cards" (p. 64, 65) EN 11 Preparing the Camera Inserting the battery and card 1 2 Battery/card compartment cover 1 Battery/card compartment lock 2 Battery lock knob Write-protect switch Always use SD/SDHC/SDXC cards or Eye-Fi card with the C mark toward the battery lock knob. When using the camera, be used without a card by storing images in the direction of the...
SZ-14 Instruction Manual (English)
Page 13
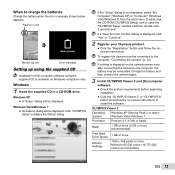
... displayed. If the "Setup" dialog is displayed on the camera screen even after connecting the camera to the computer. If a "User Account Control" dialog is available on -screen instructions to charge the batteries Charge the battery when the error message shown below appears. Flashes in a CD-ROM drive. When to install the software. Windows 1 Insert the supplied CD in red Battery Empty 4 14M Monitor top left Error message Setting up using the supplied CD Installation of [ib] computer software using...
... displayed. If the "Setup" dialog is displayed on the camera screen even after connecting the camera to the computer. If a "User Account Control" dialog is available on -screen instructions to charge the batteries Charge the battery when the error message shown below appears. Flashes in a CD-ROM drive. When to install the software. Windows 1 Insert the supplied CD in red Battery Empty 4 14M Monitor top left Error message Setting up using the supplied CD Installation of [ib] computer software using...

SZ-14 Instruction Manual (English)
Page 14
...) A minimum of 64 MB video RAM with DirectX 9 or later. * See online help . 3 Copy the camera manual. ● Click the "Camera Instruction Manual" button to display the "Setup" dialog. 2 Install OLYMPUS Viewer 2. ● Check the system requirements before beginning installation. ● Click the "OLYMPUS Viewer 2" button and follow the on-screen instructions. [ib] Operating System Processor RAM Free Hard Drive Space Monitor Settings Graphics Windows XP (Service Pack 2 or later) / Windows Vista / Windows 7 Pentium 4 1.3 GHz or...
...) A minimum of 64 MB video RAM with DirectX 9 or later. * See online help . 3 Copy the camera manual. ● Click the "Camera Instruction Manual" button to display the "Setup" dialog. 2 Install OLYMPUS Viewer 2. ● Check the system requirements before beginning installation. ● Click the "OLYMPUS Viewer 2" button and follow the on-screen instructions. [ib] Operating System Processor RAM Free Hard Drive Space Monitor Settings Graphics Windows XP (Service Pack 2 or later) / Windows Vista / Windows 7 Pentium 4 1.3 GHz or...

SZ-14 Instruction Manual (English)
Page 15
... be used to change the date and time, adjust the setting from the menu. [X] (Date/time) (p. 51) 5 Use HI to select the [x] time zone and then press the A button. ● Use FG to turn on the camera. ● The date and time setting screen is displayed when the date and time are saved to save the setting for [Y]. X Y M D Time 2012 Y/M/D Cancel MENU 3 Press I to image file names, date prints, and other data. To change the selected language. [l] (p. 50) EN 15 X Y M D Time Y/M/D Cancel MENU Date and time setting screen 2 Use...
... be used to change the date and time, adjust the setting from the menu. [X] (Date/time) (p. 51) 5 Use HI to select the [x] time zone and then press the A button. ● Use FG to turn on the camera. ● The date and time setting screen is displayed when the date and time are saved to save the setting for [Y]. X Y M D Time 2012 Y/M/D Cancel MENU 3 Press I to image file names, date prints, and other data. To change the selected language. [l] (p. 50) EN 15 X Y M D Time Y/M/D Cancel MENU Date and time setting screen 2 Use...
SZ-14 Instruction Manual (English)
Page 16
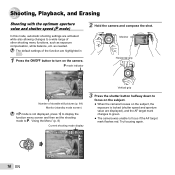
... function menu screen and then set the shooting mode to focus if the AF target mark flashes red. The default settings of other shooting menu functions, such as needed. Try focusing again. 16 EN 0.0 WB AUTO ISO AUTO 4 14M MENU "Using the Menu" (p. 8) Current shooting mode display Program Auto 3D P Vertical grip 3 Press the shutter button halfway down to focus on the subject. ● When the camera focuses on the camera. as exposure compensation, white balance, etc. Shooting, Playback, and Erasing Shooting with the optimum aperture value and shutter speed (P mode...
... function menu screen and then set the shooting mode to focus if the AF target mark flashes red. The default settings of other shooting menu functions, such as needed. Try focusing again. 16 EN 0.0 WB AUTO ISO AUTO 4 14M MENU "Using the Menu" (p. 8) Current shooting mode display Program Auto 3D P Vertical grip 3 Press the shutter button halfway down to focus on the subject. ● When the camera focuses on the camera. as exposure compensation, white balance, etc. Shooting, Playback, and Erasing Shooting with the optimum aperture value and shutter speed (P mode...
SZ-14 Instruction Manual (English)
Page 25
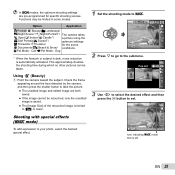
... camera, and then press the shutter button to set EN 25 Functions may be taken. Cat/ t Pet Mode - Pop Art 0.0 WB AUTO MENU 3 Use HI to select the desired effect and then press the A button to take the picture. ● The unedited image and edited image are pre-programmed for the scene d Documents/q Beach & Snow/ conditions. In s modes, the optimum shooting settings are both saved. ● If the image...
... camera, and then press the shutter button to set EN 25 Functions may be taken. Cat/ t Pet Mode - Pop Art 0.0 WB AUTO MENU 3 Use HI to select the desired effect and then press the A button to take the picture. ● The unedited image and edited image are pre-programmed for the scene d Documents/q Beach & Snow/ conditions. In s modes, the optimum shooting settings are both saved. ● If the image...
SZ-14 Instruction Manual (English)
Page 26
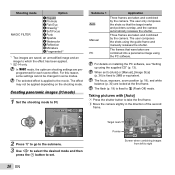
... each scene effect. For details on the shooting mode. The focus, exposure, zoom position (p. 18), and white balance (p. 30) are taken and combined by the camera. The user composes the shots using the supplied CD" (p. 13). AUTO Target mark Pointer Cancel MENU Save OK Screen when combining images from left to p. Creating panoramic images (p mode) 1 Set the shooting mode to right 26 EN Panorama 3D AUTO 0.0 WB AUTO 4 14M MENU 2 Press G to go to the submenu...
... each scene effect. For details on the shooting mode. The focus, exposure, zoom position (p. 18), and white balance (p. 30) are taken and combined by the camera. The user composes the shots using the supplied CD" (p. 13). AUTO Target mark Pointer Cancel MENU Save OK Screen when combining images from left to p. Creating panoramic images (p mode) 1 Set the shooting mode to right 26 EN Panorama 3D AUTO 0.0 WB AUTO 4 14M MENU 2 Press G to go to the submenu...
SZ-14 Instruction Manual (English)
Page 31
... screen, and make sure that there is no shadow area. ● Setting the zoom to telephoto (T) is recommended. ● Perform this procedure under the light where the pictures are taken sequentially while the shutter button is held down. 1 Select the drive option in Step 2, new white balance will be registered. Return to the shooting scene. Option ISO Auto High ISO Auto Value Description The camera automatically adjusts...
... screen, and make sure that there is no shadow area. ● Setting the zoom to telephoto (T) is recommended. ● Perform this procedure under the light where the pictures are taken sequentially while the shutter button is held down. 1 Select the drive option in Step 2, new white balance will be registered. Return to the shooting scene. Option ISO Auto High ISO Auto Value Description The camera automatically adjusts...
SZ-14 Instruction Manual (English)
Page 33
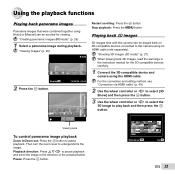
... turn the zoom lever to pause playback. Pause: Press the A button. "Shooting 3D images (3D mode)" (p. 27) When playing back 3D images, read the warnings in /Zoom out: Press the A button to enlarge/shrink the image. Playing back W images 3D images shot with this camera can be played back on 3D-compatible devices connected to this camera using the HDMI cable. "Creating panoramic images (p mode)" (p. 26) 1 Select a panorama image during playback. Stop playback: Press the m button. Viewing area To control panorama image playback Zoom in the instruction manual for viewing...
... turn the zoom lever to pause playback. Pause: Press the A button. "Shooting 3D images (3D mode)" (p. 27) When playing back 3D images, read the warnings in /Zoom out: Press the A button to enlarge/shrink the image. Playing back W images 3D images shot with this camera can be played back on 3D-compatible devices connected to this camera using the HDMI cable. "Creating panoramic images (p mode)" (p. 26) 1 Select a panorama image during playback. Stop playback: Press the m button. Viewing area To control panorama image playback Zoom in the instruction manual for viewing...

SZ-14 Instruction Manual (English)
Page 49
... and camera. Multi-connector Connect to the camera. EN 49 To play back camera images on a TV ● Connection via HDMI cable 1 On the camera, select the digital signal format that will be connected ([480p/576p]/[720p]/[1080i]). 2 Connect the TV and camera. 3 Turn on the TV, and change "INPUT" to "VIDEO (an input jack connected to the camera)." 4 Turn on the camera, and use HI to select the image for playback. Before viewing camera images on...
... and camera. Multi-connector Connect to the camera. EN 49 To play back camera images on a TV ● Connection via HDMI cable 1 On the camera, select the digital signal format that will be connected ([480p/576p]/[720p]/[1080i]). 2 Connect the TV and camera. 3 Turn on the TV, and change "INPUT" to "VIDEO (an input jack connected to the camera)." 4 Turn on the camera, and use HI to select the image for playback. Before viewing camera images on...

SZ-14 Instruction Manual (English)
Page 52
...-compatible printer, you can be printed on the monitor. Open the connector cover in the direction of different makers and printing out pictures directly. To find out if your printer supports PictBridge, refer to the printer's instruction manual. *1 PictBridge is a standard for connecting digital cameras and printers of the arrow. The printing modes, paper sizes, and other parameters that is displayed on the printer, and then connect the printer and camera. Printing images at the printer's standard settings [Easy Print...
...-compatible printer, you can be printed on the monitor. Open the connector cover in the direction of different makers and printing out pictures directly. To find out if your printer supports PictBridge, refer to the printer's instruction manual. *1 PictBridge is a standard for connecting digital cameras and printers of the arrow. The printing modes, paper sizes, and other parameters that is displayed on the printer, and then connect the printer and camera. Printing images at the printer's standard settings [Easy Print...
SZ-14 Instruction Manual (English)
Page 57
... shutdown. Card/Internal memory "An error message is fully pressed in the correct direction. No picture is taken even if the shutter button is displayed". Monitor "Difficult to see". ● Condensation may activate the lens and make a noise even if no operation for the camera body to become acclimated to low temperature. Date and time function "Date and time settings return to the default setting". ● If the batteries are installed". ●...
... shutdown. Card/Internal memory "An error message is fully pressed in the correct direction. No picture is taken even if the shutter button is displayed". Monitor "Difficult to see". ● Condensation may activate the lens and make a noise even if no operation for the camera body to become acclimated to low temperature. Date and time function "Date and time settings return to the default setting". ● If the batteries are installed". ●...
SZ-14 Instruction Manual (English)
Page 58
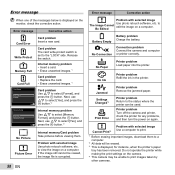
... Charge the battery. Connection problem Connect the camera and computer or printer correctly. Printer problem Return to print. *1 Before erasing important images, download them . Error message Corrective action Card Error Write Protect Memory Full Card problem Insert a new card. Internal memory problem • Insert a card. • Erase unwanted images.*1 Card Full Card problem • Replace the card. • Erase unwanted images.*1 Card Setup Power Off Format Card problem Use FG to The Image Cannot edit the image on a computer. Do not operate the printer while making...
... Charge the battery. Connection problem Connect the camera and computer or printer correctly. Printer problem Return to print. *1 Before erasing important images, download them . Error message Corrective action Card Error Write Protect Memory Full Card problem Insert a new card. Internal memory problem • Insert a card. • Erase unwanted images.*1 Card Full Card problem • Replace the card. • Erase unwanted images.*1 Card Setup Power Off Format Card problem Use FG to The Image Cannot edit the image on a computer. Do not operate the printer while making...

SZ-14 Instruction Manual (English)
Page 61
.... [Panorama] (p. 26) Batteries "Making batteries last longer" ● Set [Power Save] (p. 50) to [On] Playback/Editing tips Playback "Playing images in the internal memory and card" ● Remove the card and display the images in internal memory ● "Inserting the battery and card" (p. 11) "Viewing images with high picture quality on a highdefinition TV" ● Connect the camera to the TV using an HDMI cable (sold separately) ● "To play back camera images on a TV" (p. 48) Editing "Erasing the sound recorded to still images [R]" (p. 42...
.... [Panorama] (p. 26) Batteries "Making batteries last longer" ● Set [Power Save] (p. 50) to [On] Playback/Editing tips Playback "Playing images in the internal memory and card" ● Remove the card and display the images in internal memory ● "Inserting the battery and card" (p. 11) "Viewing images with high picture quality on a highdefinition TV" ● Connect the camera to the TV using an HDMI cable (sold separately) ● "To play back camera images on a TV" (p. 48) Editing "Erasing the sound recorded to still images [R]" (p. 42...

SZ-14 Instruction Manual (English)
Page 63
... card During shooting, the current memory indicator lights up in the card is writing data. Image], or [All Erase] is performed, the data in red while the camera is not completely erased. Readout/recording process of personal data. When using an Eye-Fi card, the camera may run out faster. Checking the image saving location The memory indicator shows whether the internal memory or card is being used Even if [Memory Format]/[Format], [Erase], [Sel. Never open the battery/card compartment cover or unplug the USB cable...
... card During shooting, the current memory indicator lights up in the card is writing data. Image], or [All Erase] is performed, the data in red while the camera is not completely erased. Readout/recording process of personal data. When using an Eye-Fi card, the camera may run out faster. Checking the image saving location The memory indicator shows whether the internal memory or card is being used Even if [Memory Format]/[Format], [Erase], [Sel. Never open the battery/card compartment cover or unplug the USB cable...
SZ-14 Instruction Manual (English)
Page 73
... record serial numbers). 3 A detailed description of the problem. 4 Sample prints, negatives, digital prints (or files on a Product to another image or data storage medium and/or remove any film from the Product prior to sending the Product to dealers, representatives, salespersons, or agents of Olympus, which are intended for the disposal of the waste batteries. When returning Products for service...
... record serial numbers). 3 A detailed description of the problem. 4 Sample prints, negatives, digital prints (or files on a Product to another image or data storage medium and/or remove any film from the Product prior to sending the Product to dealers, representatives, salespersons, or agents of Olympus, which are intended for the disposal of the waste batteries. When returning Products for service...

SZ-14 Instruction Manual (English)
Page 77
SPECIFICATIONS Camera Product type : Digital camera (for shooting and displaying) Recording system Still pictures : Digital recording, JPEG (in accordance with Design rule for Camera File system (DCF)) Applicable standards : Exif 2.2, Digital Print Order Format (DPOF), PRINT Image Matching III, PictBridge 3D still image : MP format Sound with still : Wave format pictures Movie : MPEG-4AVC./H.264 Memory : Internal memory SD/SDHC/SDXC/Eye-Fi card No. of effective pixels : 14,000,000 pixels Image pickup device : 1/2.3" CCD (primary color filter) Lens : Olympus lens 4.5 to ...
SPECIFICATIONS Camera Product type : Digital camera (for shooting and displaying) Recording system Still pictures : Digital recording, JPEG (in accordance with Design rule for Camera File system (DCF)) Applicable standards : Exif 2.2, Digital Print Order Format (DPOF), PRINT Image Matching III, PictBridge 3D still image : MP format Sound with still : Wave format pictures Movie : MPEG-4AVC./H.264 Memory : Internal memory SD/SDHC/SDXC/Eye-Fi card No. of effective pixels : 14,000,000 pixels Image pickup device : 1/2.3" CCD (primary color filter) Lens : Olympus lens 4.5 to ...


