
SP-320 Advanced Manual (English)
Page 121
... compatible with the USB cable. Print modes and settings Available printing modes, paper sizes etc., vary depending on the camera's monitor. g"Printing pictures (CUSTOM PRINT)" (P. 123) It is PictBridge?... If [STANDARD] is the standard for its standard settings or contact the printer manufacturer. Refer to the printer's instruction manual for connecting digital cameras and printers...
... compatible with the USB cable. Print modes and settings Available printing modes, paper sizes etc., vary depending on the camera's monitor. g"Printing pictures (CUSTOM PRINT)" (P. 123) It is PictBridge?... If [STANDARD] is the standard for its standard settings or contact the printer manufacturer. Refer to the printer's instruction manual for connecting digital cameras and printers...

SP-320 Advanced Manual (English)
Page 122
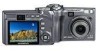
... press the < button. • When you want to print out on the monitor. 2 Connect one end of the provided USB cable into the camera's multi-connector and the other end into the printer's USB connector. • The [EASY PRINT START] screen is displayed. EASY PRINT START PC / CUSTOM PRINT OK EXIT PRINT Printing pictures... pictures (EASY PRINT) [EASY PRINT] can be used to print out the picture displayed on the monitor. 1 Display the picture you are finished, disconnect the USB cable from the camera with the picture selection screen displayed.
... press the < button. • When you want to print out on the monitor. 2 Connect one end of the provided USB cable into the camera's multi-connector and the other end into the printer's USB connector. • The [EASY PRINT START] screen is displayed. EASY PRINT START PC / CUSTOM PRINT OK EXIT PRINT Printing pictures... pictures (EASY PRINT) [EASY PRINT] can be used to print out the picture displayed on the monitor. 1 Display the picture you are finished, disconnect the USB cable from the camera with the picture selection screen displayed.

SP-320 Advanced Manual (English)
Page 123
... date and file name are not printed. 8 1 Connect one picture with the most basic printing method of your printer. The selection screen for the USB connection is displayed. Direct printing (PictBridge) 5 Remove the USB cable from the camera. • The camera turns off. Printing pictures TIPS • You can use [EASY PRINT] even when the...
... date and file name are not printed. 8 1 Connect one picture with the most basic printing method of your printer. The selection screen for the USB connection is displayed. Direct printing (PictBridge) 5 Remove the USB cable from the camera. • The camera turns off. Printing pictures TIPS • You can use [EASY PRINT] even when the...

SP-320 Advanced Manual (English)
Page 126
PRINT MODE SELECT PRINT ALL PRINT MULTI PRINT ALL INDEX EXIT SELECT GO OK 10Remove the USB cable from the camera. • The camera turns off. Direct printing (PictBridge) 8 In the [PRINT MODE SELECT] screen, press p. • A message is displayed. 9 Remove the USB cable from the printer. 8 Printing pictures 126
PRINT MODE SELECT PRINT ALL PRINT MULTI PRINT ALL INDEX EXIT SELECT GO OK 10Remove the USB cable from the camera. • The camera turns off. Direct printing (PictBridge) 8 In the [PRINT MODE SELECT] screen, press p. • A message is displayed. 9 Remove the USB cable from the printer. 8 Printing pictures 126

SP-320 Advanced Manual (English)
Page 137
... the camera to a computer OLYMPUS Master CD-ROM USB Cable Computer equipped with ) a computer. If you use a hub, but connect the camera directly to the computer. 137 The camera does not turn the camera off automatically while it is connected to (communicating with a USB port Install the OLYMPUS Master software gP. 139 Connect the camera to the computer using the USB cable...
... the camera to a computer OLYMPUS Master CD-ROM USB Cable Computer equipped with ) a computer. If you use a hub, but connect the camera directly to the computer. 137 The camera does not turn the camera off automatically while it is connected to (communicating with a USB port Install the OLYMPUS Master software gP. 139 Connect the camera to the computer using the USB cable...

SP-320 Advanced Manual (English)
Page 140
Failure to do so could result in USB port. • QuickTime 6 or later and Safari 1.0 or later must be installed. • Be sure to remove the media (drag & drop onto the trash icon) ... operation and the need to reboot. • Disconnect the cable connecting the camera to the computer • Turn off the camera • Open the camera's card cover • Open the camera's battery compartment cover Windows 1 Insert the CD-ROM into the CD-ROM drive. • The OLYMPUS Master setup screen is displayed. • If the screen...
Failure to do so could result in USB port. • QuickTime 6 or later and Safari 1.0 or later must be installed. • Be sure to remove the media (drag & drop onto the trash icon) ... operation and the need to reboot. • Disconnect the cable connecting the camera to the computer • Turn off the camera • Open the camera's card cover • Open the camera's battery compartment cover Windows 1 Insert the CD-ROM into the CD-ROM drive. • The OLYMPUS Master setup screen is displayed. • If the screen...

SP-320 Advanced Manual (English)
Page 143
... the SELECT EXIT GO OK 9 camera. Note • The camera functions are disabled while the camera is displayed. USB P C EASY PRINT • Windows CUSTOM PRINT When you connect your digital camera for managing digital images. Monitor • Refer to a computer 2 Plug the USB cable into the Connector cover multi-connector of the camera. • The camera turns on automatically. • The...
... the SELECT EXIT GO OK 9 camera. Note • The camera functions are disabled while the camera is displayed. USB P C EASY PRINT • Windows CUSTOM PRINT When you connect your digital camera for managing digital images. Monitor • Refer to a computer 2 Plug the USB cable into the Connector cover multi-connector of the camera. • The camera turns on automatically. • The...

SP-320 Advanced Manual (English)
Page 147
... or "NO_NAME" icon on the desktop is displayed saying that the orange lamp has stopped blinking. 2 Make the following preparations for disconnecting the USB cable. Windows 98SE 1 Double-click the "My Computer" icon and right-click the "Removable Disk" icon to display the menu. 2 Click "...Eject" on the eject icon. 9 147 Connecting the camera to a computer Displaying camera images on a computer (To disconnect the camera You can disconnect the camera after downloading the images to your computer. 1 Make sure that the hardware can be ejected safely, click...
... or "NO_NAME" icon on the desktop is displayed saying that the orange lamp has stopped blinking. 2 Make the following preparations for disconnecting the USB cable. Windows 98SE 1 Double-click the "My Computer" icon and right-click the "Removable Disk" icon to display the menu. 2 Click "...Eject" on the eject icon. 9 147 Connecting the camera to a computer Displaying camera images on a computer (To disconnect the camera You can disconnect the camera after downloading the images to your computer. 1 Make sure that the hardware can be ejected safely, click...

SP-320 Advanced Manual (English)
Page 148
..." on the OLYMPUS Master main menu. 2 • The "Browse" window is not being downloaded from the camera. Connecting the camera to the main menu, click "Menu" in the "Browse" window. 148 Click the "Unplug or Eject Hardware" icon again and disconnect the cable. Viewing still pictures and movies 3 Disconnect the USB cable from the camera and that...
..." on the OLYMPUS Master main menu. 2 • The "Browse" window is not being downloaded from the camera. Connecting the camera to the main menu, click "Menu" in the "Browse" window. 148 Click the "Unplug or Eject Hardware" icon again and disconnect the cable. Viewing still pictures and movies 3 Disconnect the USB cable from the camera and that...
SP-320 Advanced Manual (English)
Page 151
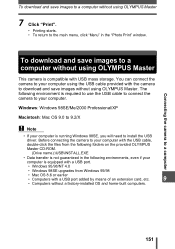
... your computer. The following folders on the provided OLYMPUS Master CD-ROM. (Drive name):\USB\INSTALL.EXE • Data transfer is required to use the USB cable to connect the camera to download and save images without using the USB cable provided with the USB cable, double-click the files from Windows 95/98 • Mac OS 8.6 or earlier...
... your computer. The following folders on the provided OLYMPUS Master CD-ROM. (Drive name):\USB\INSTALL.EXE • Data transfer is required to use the USB cable to connect the camera to download and save images without using the USB cable provided with the USB cable, double-click the files from Windows 95/98 • Mac OS 8.6 or earlier...

SP-320 Advanced Manual (English)
Page 161
... USB driver has not Install OLYMPUS Master. Troubleshooting (When the camera is not recognized by the computer. The camera is connected to a computer or printer Possible cause Corrective action The printer fails to connect. [PC] was selected on the monitor after connecting the camera to the printer with the USB cable. and connect it again. Remove the USB cable...
... USB driver has not Install OLYMPUS Master. Troubleshooting (When the camera is not recognized by the computer. The camera is connected to a computer or printer Possible cause Corrective action The printer fails to connect. [PC] was selected on the monitor after connecting the camera to the printer with the USB cable. and connect it again. Remove the USB cable...

SP-320 Advanced Manual (English)
Page 168
... may cause harmful interference to which can radiate radio frequency energy and, if not installed and used to connect the camera to provide reasonable protection against harmful interference in a particular installation. If this equipment would void the user's authority to...- Consult your dealer or an experienced radio/TV technician for a Class B digital device, pursuant to operate this equipment. Increase the distance between the camera and receiver. - Only the OLYMPUS-supplied USB cable should be determined by turning the equipment off and on a circuit different from...
... may cause harmful interference to which can radiate radio frequency energy and, if not installed and used to connect the camera to provide reasonable protection against harmful interference in a particular installation. If this equipment would void the user's authority to...- Consult your dealer or an experienced radio/TV technician for a Class B digital device, pursuant to operate this equipment. Increase the distance between the camera and receiver. - Only the OLYMPUS-supplied USB cable should be determined by turning the equipment off and on a circuit different from...

SP-320 Advanced Manual (English)
Page 190
Index Miscellaneous Index Self-timer Y 69 SEPIA 89 Sequential shooting j............67 SET ALL 81 SET CALENDAR 81 SHARPNESS N 64 SHOOT & SELECT 1/2 e f..38 Shooting mode 10 SHORT CUT 115 Shortcut menus 14, 15 SHQ 26, 30 Shutter button 24 Shutter priority mode S.....52, 171 SHUTTER SOUND 109 Shutter speed 52 Single-frame erase S .......85, 103 Single-frame reservation
Index Miscellaneous Index Self-timer Y 69 SEPIA 89 Sequential shooting j............67 SET ALL 81 SET CALENDAR 81 SHARPNESS N 64 SHOOT & SELECT 1/2 e f..38 Shooting mode 10 SHORT CUT 115 Shortcut menus 14, 15 SHQ 26, 30 Shutter button 24 Shutter priority mode S.....52, 171 SHUTTER SOUND 109 Shutter speed 52 Single-frame erase S .......85, 103 Single-frame reservation

SP-320 Basic Manual (English, Français, Español)
Page 4
Contents may vary depending on purchase location. Attach the strap 4 BEFORE YOU BEGIN Gather these items (box contents) En Two AA batteries USB Cable Digital Camera OLYMPUS Master software CD-ROM AV Cable Items not shown: Strap, Advanced Manual (CD-ROM), Basic Manual (this manual), warranty card.
Contents may vary depending on purchase location. Attach the strap 4 BEFORE YOU BEGIN Gather these items (box contents) En Two AA batteries USB Cable Digital Camera OLYMPUS Master software CD-ROM AV Cable Items not shown: Strap, Advanced Manual (CD-ROM), Basic Manual (this manual), warranty card.

SP-320 Basic Manual (English, Français, Español)
Page 8
Connect the camera to the computer 1 Connect the camera and computer using the USB cable (included). b. USB P C EASY PRINT CUSTOM PRINT Your computer will turn on automatically. 2 1 USB Cable 2 Select [PC] on -screen instructions. EXIT SELECT GO OK 8 Macintosh: Double-click the "Installer" icon. 3 Simply follow the on the monitor, and press Z. Install the software 1 Insert the OLYMPUS Master CD-ROM. 2 Windows: Click the "OLYMPUS En Master" button. The monitor will now recognize your camera as a removable storage drive. Step 4 Transfer Images TRANSFER IMAGES a.
Connect the camera to the computer 1 Connect the camera and computer using the USB cable (included). b. USB P C EASY PRINT CUSTOM PRINT Your computer will turn on automatically. 2 1 USB Cable 2 Select [PC] on -screen instructions. EXIT SELECT GO OK 8 Macintosh: Double-click the "Installer" icon. 3 Simply follow the on the monitor, and press Z. Install the software 1 Insert the OLYMPUS Master CD-ROM. 2 Windows: Click the "OLYMPUS En Master" button. The monitor will now recognize your camera as a removable storage drive. Step 4 Transfer Images TRANSFER IMAGES a.

SP-320 Basic Manual (English, Français, Español)
Page 19
... a PictBridge compatible printer such as the Olympus P-11 to print out on the monitor. 2 Connect one end of the provided USB cable into the camera's multi-connector and the other end into the printer's USB connector. < Button Multi-Connector En USB Cable 3 Press the < button. Direct printing (PictBridge) Using the provided USB cable, you wanto to make prints. You...
... a PictBridge compatible printer such as the Olympus P-11 to print out on the monitor. 2 Connect one end of the provided USB cable into the camera's multi-connector and the other end into the printer's USB connector. < Button Multi-Connector En USB Cable 3 Press the < button. Direct printing (PictBridge) Using the provided USB cable, you wanto to make prints. You...

SP-320 Quick Start Guide (English)
Page 1
... Display the picture you install OLYMPUS Master or visit: www.olympusamerica.com/prodreg Printed in or out. USB Your PC will now recognize your subject. VH512401 BEFORE YOU BEGIN Gather these items (box contents) Digital Camera Two AA batteries USB Cable AV Cable Items not shown: Strap, ...Compartment Cover TRANSFER IMAGES a. Click the "From Camera" icon. [Transfer Images] button © 2006 Quick Start Guide SP-320 Start Here For more information, please refer to scroll around. Contents may vary depending on . OLYMPUS Master Software CD-ROM GET STARTED a. Attach the...
... Display the picture you install OLYMPUS Master or visit: www.olympusamerica.com/prodreg Printed in or out. USB Your PC will now recognize your subject. VH512401 BEFORE YOU BEGIN Gather these items (box contents) Digital Camera Two AA batteries USB Cable AV Cable Items not shown: Strap, ...Compartment Cover TRANSFER IMAGES a. Click the "From Camera" icon. [Transfer Images] button © 2006 Quick Start Guide SP-320 Start Here For more information, please refer to scroll around. Contents may vary depending on . OLYMPUS Master Software CD-ROM GET STARTED a. Attach the...


