
D-100 Instruction Manual
Page 1
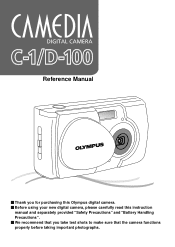
Reference Manual Ⅵ Thank you for purchasing this Olympus digital camera. Ⅵ Before using your new digital camera, please carefully read this instruction manual and separately provided "Safety Precautions" and "Battery Handling Precautions". Ⅵ We recommend that you take test shots to make sure that the camera functions properly before taking important photographs.
Reference Manual Ⅵ Thank you for purchasing this Olympus digital camera. Ⅵ Before using your new digital camera, please carefully read this instruction manual and separately provided "Safety Precautions" and "Battery Handling Precautions". Ⅵ We recommend that you take test shots to make sure that the camera functions properly before taking important photographs.
D-100 Instruction Manual
Page 2
... frequency energy and, if not installed and used to connect the camera to operate this equipment. Copyright ©2001 OLYMPUS CO., LTD. 2 Read the Following Before Use This section provides important information about using the camera, please be sure to loss of image data resulting from servicing ...not expressly approved by one or more of the following . Only the USB cable should be determined by Olympus or from other causes. ⅷ The quality of the images shot with ordinary film-based cameras. This equipment generates, uses, and can be used in a particular installation.
... frequency energy and, if not installed and used to connect the camera to operate this equipment. Copyright ©2001 OLYMPUS CO., LTD. 2 Read the Following Before Use This section provides important information about using the camera, please be sure to loss of image data resulting from servicing ...not expressly approved by one or more of the following . Only the USB cable should be determined by Olympus or from other causes. ⅷ The quality of the images shot with ordinary film-based cameras. This equipment generates, uses, and can be used in a particular installation.
D-100 Instruction Manual
Page 3
...Drive, Melville, New York 11747-3157 USA Telephone Number: 631-844-5000 This device complies with the European requirements for Camera File system) is subject to the following two conditions: (1) This device may not cause harmful interference, and (2) This ... accept any interference received, including interference that this manual are trademarks or registered trademarks of Conformity Model Number: D-100/C-1 Trade Name: OLYMPUS Responsible Party: Olympus America Inc. This Class B digital apparatus meets all requirements of the FCC rules. 3 Declaration of their respective...
...Drive, Melville, New York 11747-3157 USA Telephone Number: 631-844-5000 This device complies with the European requirements for Camera File system) is subject to the following two conditions: (1) This device may not cause harmful interference, and (2) This ... accept any interference received, including interference that this manual are trademarks or registered trademarks of Conformity Model Number: D-100/C-1 Trade Name: OLYMPUS Responsible Party: Olympus America Inc. This Class B digital apparatus meets all requirements of the FCC rules. 3 Declaration of their respective...
D-100 Instruction Manual
Page 4
..., see Page 34. These settings are set automatically. Release your finger from the shutter button, hold the camera securely again and half press the button again. Press the shutter button all the way. [The camera takes the picture and two short beep tones are generated. [The green lamp on the right of...
..., see Page 34. These settings are set automatically. Release your finger from the shutter button, hold the camera securely again and half press the button again. Press the shutter button all the way. [The camera takes the picture and two short beep tones are generated. [The green lamp on the right of...
D-100 Instruction Manual
Page 5
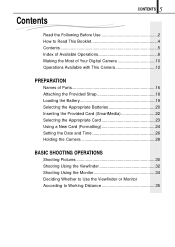
...Before Use 2 How to Read This Booklet 4 Contents 5 Index of Available Operations 8 Making the Most of Your Digital Camera 10 Operations Available with This Camera 12 PREPARATION Names of Parts 16 Attaching the Provided Strap 18 Loading the Battery 19 Selecting the Appropriate Batteries 20 Inserting the ...Card (SmartMedia 22 Selecting the Appropriate Card 23 Using a New Card (Formatting 24 Setting the Date and Time 26 Holding the Camera 28 BASIC SHOOTING OPERATIONS Shooting Pictures 30 Shooting Using the Viewfinder 32 Shooting Using the Monitor 34 Deciding Whether to Use the ...
...Before Use 2 How to Read This Booklet 4 Contents 5 Index of Available Operations 8 Making the Most of Your Digital Camera 10 Operations Available with This Camera 12 PREPARATION Names of Parts 16 Attaching the Provided Strap 18 Loading the Battery 19 Selecting the Appropriate Batteries 20 Inserting the ...Card (SmartMedia 22 Selecting the Appropriate Card 23 Using a New Card (Formatting 24 Setting the Date and Time 26 Holding the Camera 28 BASIC SHOOTING OPERATIONS Shooting Pictures 30 Shooting Using the Viewfinder 32 Shooting Using the Monitor 34 Deciding Whether to Use the ...
D-100 Instruction Manual
Page 6
6 CONTENTS Checking the Camera Status Indication Next to the Viewfinder or on the Monitor (in Shooting Mode 37 If Correct Focus Cannot Be Obtained (Focus Lock 40 VIEWING OR ...
6 CONTENTS Checking the Camera Status Indication Next to the Viewfinder or on the Monitor (in Shooting Mode 37 If Correct Focus Cannot Be Obtained (Focus Lock 40 VIEWING OR ...
D-100 Instruction Manual
Page 10
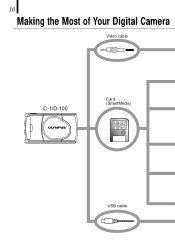
10 Making the Most of Your Digital Camera Video cable C-1/D-100 Card (SmartMedia) USB cable
10 Making the Most of Your Digital Camera Video cable C-1/D-100 Card (SmartMedia) USB cable

D-100 Instruction Manual
Page 11
...USB SmartMedia reader/writer Storing and processing images (This can be used when it is connected to the camera's USB port.) Attaching images to view and enjoy the images you shoot with a digital camera. 11 A variety of these features. Television Digital color printer P-400/P-200/P-330N(E)/P-330(E) Viewing images...lab ( Pages 72-73) (Bring the SmartMedia card.) Note: Some photo studios and labs do not handle images shot with your camera. In some cases, you will need a personal computer to take full advantage of optional accessories make possible many different ways to e-mail
...USB SmartMedia reader/writer Storing and processing images (This can be used when it is connected to the camera's USB port.) Attaching images to view and enjoy the images you shoot with a digital camera. 11 A variety of these features. Television Digital color printer P-400/P-200/P-330N(E)/P-330(E) Viewing images...lab ( Pages 72-73) (Bring the SmartMedia card.) Note: Some photo studios and labs do not handle images shot with your camera. In some cases, you will need a personal computer to take full advantage of optional accessories make possible many different ways to e-mail
D-100 Instruction Manual
Page 12
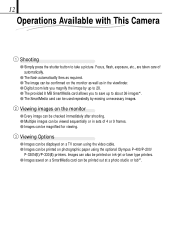
... 9 frames. ⅷ Images can be magnified for viewing. 3 Viewing Options ⅷ Images can be displayed on a TV screen using the optional Olympus P-400/P-200/ P-330N(E)/P-330(E) printers. Images can be printed on ink-jet or laser type printers. ⅷ Images saved on photographic paper using ...8567; Images can be printed on a SmartMedia card can also be printed out at a photo studio or lab*2. 12 Operations Available with This Camera 1 Shooting ⅷ Simply press the shutter button to about 36 images*1. ⅷ The SmartMedia card can be used repeatedly by erasing unnecessary images...
... 9 frames. ⅷ Images can be magnified for viewing. 3 Viewing Options ⅷ Images can be displayed on a TV screen using the optional Olympus P-400/P-200/ P-330N(E)/P-330(E) printers. Images can be printed on ink-jet or laser type printers. ⅷ Images saved on photographic paper using ...8567; Images can be printed on a SmartMedia card can also be printed out at a photo studio or lab*2. 12 Operations Available with This Camera 1 Shooting ⅷ Simply press the shutter button to about 36 images*1. ⅷ The SmartMedia card can be used repeatedly by erasing unnecessary images...
D-100 Instruction Manual
Page 13
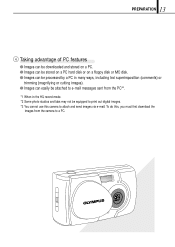
To do this camera to a PC. 13 PREPARATION 4 Taking advantage of PC features ⅷ Images can be downloaded and stored on a PC. ⅷ Images can be stored on a PC ... photo studios and labs may not be equipped to print out digital images. *3 You cannot use this , you must first download the images from the camera to attach and send images via e-mail.
To do this camera to a PC. 13 PREPARATION 4 Taking advantage of PC features ⅷ Images can be downloaded and stored on a PC. ⅷ Images can be stored on a PC ... photo studios and labs may not be equipped to print out digital images. *3 You cannot use this , you must first download the images from the camera to attach and send images via e-mail.
D-100 Instruction Manual
Page 15
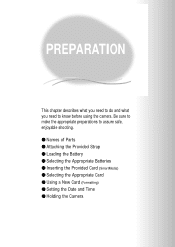
PREPARATION This chapter describes what you need to do and what you need to assure safe, enjoyable shooting. ⅷ Names of Parts ⅷ Attaching the Provided Strap ⅷ Loading the Battery ⅷ Selecting the Appropriate Batteries ⅷ Inserting the Provided Card (SmartMedia) ⅷ Selecting the Appropriate Card ⅷ Using a New Card (Formatting) ⅷ Setting the Date and Time ⅷ Holding the Camera Be sure to make the appropriate preparations to know before using the camera.
PREPARATION This chapter describes what you need to do and what you need to assure safe, enjoyable shooting. ⅷ Names of Parts ⅷ Attaching the Provided Strap ⅷ Loading the Battery ⅷ Selecting the Appropriate Batteries ⅷ Inserting the Provided Card (SmartMedia) ⅷ Selecting the Appropriate Card ⅷ Using a New Card (Formatting) ⅷ Setting the Date and Time ⅷ Holding the Camera Be sure to make the appropriate preparations to know before using the camera.
D-100 Instruction Manual
Page 16
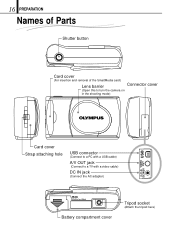
16 PREPARATION Names of Parts Shutter button Card cover (For insertion and removal of the SmartMedia card) Lens barrier Connector cover (Open this to turn the camera on in the shooting mode) Card cover Strap attaching hole USB connector (Connect to a PC with a USB cable) A/V OUT jack (Connect to a TV with a video cable) DC IN jack (Connect the AC adapter) Battery compartment cover Tripod socket (Attach the tripod here)
16 PREPARATION Names of Parts Shutter button Card cover (For insertion and removal of the SmartMedia card) Lens barrier Connector cover (Open this to turn the camera on in the shooting mode) Card cover Strap attaching hole USB connector (Connect to a PC with a USB cable) A/V OUT jack (Connect to a TV with a video cable) DC IN jack (Connect the AC adapter) Battery compartment cover Tripod socket (Attach the tripod here)
D-100 Instruction Manual
Page 18
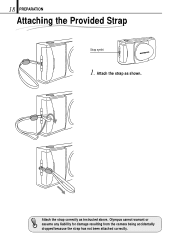
18 PREPARATION Attaching the Provided Strap Strap eyelet 1. Attach the strap as instructed above. Olympus cannot warrant or assume any liability for damage resulting from the camera being accidentally dropped because the strap has not been attached correctly. Attach the strap correctly as shown.
18 PREPARATION Attaching the Provided Strap Strap eyelet 1. Attach the strap as instructed above. Olympus cannot warrant or assume any liability for damage resulting from the camera being accidentally dropped because the strap has not been attached correctly. Attach the strap correctly as shown.
D-100 Instruction Manual
Page 20
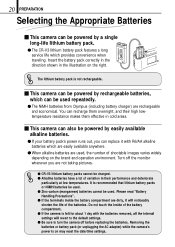
20 PREPARATION Selecting the Appropriate Batteries Ⅵ This camera can be powered by a single long-life lithium battery pack. ⅷ The CR-V3 lithium battery pack features a long CR-V3x1orLR6x2 service life which can be used repeatedly. ⅷ The NiMH batteries from Olympus (including battery charger) are rechargeable and economical. You can recharge...
20 PREPARATION Selecting the Appropriate Batteries Ⅵ This camera can be powered by a single long-life lithium battery pack. ⅷ The CR-V3 lithium battery pack features a long CR-V3x1orLR6x2 service life which can be used repeatedly. ⅷ The NiMH batteries from Olympus (including battery charger) are rechargeable and economical. You can recharge...
D-100 Instruction Manual
Page 22
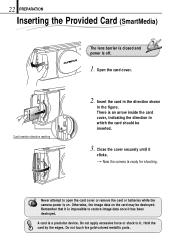
... the edges. Never attempt to restore image data once it is impossible to open the card cover or remove the card or batteries while the camera power is on the card may be inserted. 3. Remember that it has been destroyed. A card is off. 1. Otherwise, the image data on . Do... not apply excessive force or shock to it clicks. [Now the camera is an arrow inside the card cover, indicating the direction in the figure. Open the card cover. Card insertion direction marking 2. Close the cover securely...
... the edges. Never attempt to restore image data once it is impossible to open the card cover or remove the card or batteries while the camera power is on the card may be inserted. 3. Remember that it has been destroyed. A card is off. 1. Otherwise, the image data on . Do... not apply excessive force or shock to it clicks. [Now the camera is an arrow inside the card cover, indicating the direction in the figure. Open the card cover. Card insertion direction marking 2. Close the cover securely...
D-100 Instruction Manual
Page 23
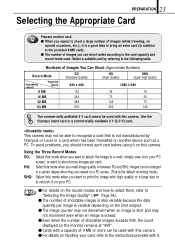
...device such as a PC. HQ: Select this mode when you should format each card before using it on this camera. ⅷ For details on handling your card, refer to the instructions provided with high quality or a large ...size or to retouch it . Select a suitable card by Olympus or Lexar or a card which has been formatted on your PC screen, or want to recognize a card that is...is a good idea to the card capacity and record mode used with this camera. Use the Olympus brand card or a commercially available 3 V (3.3 V) card.
...device such as a PC. HQ: Select this mode when you should format each card before using it on this camera. ⅷ For details on handling your card, refer to the instructions provided with high quality or a large ...size or to retouch it . Select a suitable card by Olympus or Lexar or a card which has been formatted on your PC screen, or want to recognize a card that is...is a good idea to the card capacity and record mode used with this camera. Use the Olympus brand card or a commercially available 3 V (3.3 V) card.
D-100 Instruction Manual
Page 24
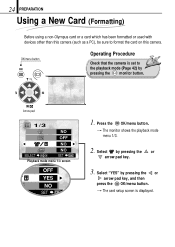
... pressing the or arrow pad key, and then press the OK/menu button. [The card setup screen is set to format the card on this camera (such as a PC), be sure to the playback mode (Page 42) by pressing the monitor button. 24 PREPARATION Using a New Card (Formatting) Before using a... non-Olympus card or a card which has been formatted or used with devices other than this camera. Arrow pad 1/3 NO OFF NO SELECT NO SET OK NO Playback mode menu 1/3 screen OFF YES NO SET...
... pressing the or arrow pad key, and then press the OK/menu button. [The card setup screen is set to format the card on this camera (such as a PC), be sure to the playback mode (Page 42) by pressing the monitor button. 24 PREPARATION Using a New Card (Formatting) Before using a... non-Olympus card or a card which has been formatted or used with devices other than this camera. Arrow pad 1/3 NO OFF NO SELECT NO SET OK NO Playback mode menu 1/3 screen OFF YES NO SET...
D-100 Instruction Manual
Page 28
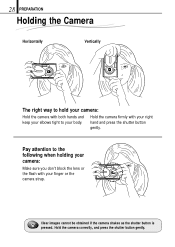
Hold the camera correctly, and press the shutter button gently. Hold the camera firmly with your finger or the camera strap. Clear images cannot be obtained if the camera shakes as the shutter button is pressed. Pay attention to your right hand and press the shutter button gently. 28 PREPARATION Holding the Camera Horizontally Vertically The right way to hold your camera: Hold the camera with both hands and keep your elbows tight to the following when holding your camera: Make sure you don't block the lens or the flash with your body.
Hold the camera correctly, and press the shutter button gently. Hold the camera firmly with your finger or the camera strap. Clear images cannot be obtained if the camera shakes as the shutter button is pressed. Pay attention to your right hand and press the shutter button gently. 28 PREPARATION Holding the Camera Horizontally Vertically The right way to hold your camera: Hold the camera with both hands and keep your elbows tight to the following when holding your camera: Make sure you don't block the lens or the flash with your body.
D-100 Instruction Manual
Page 29
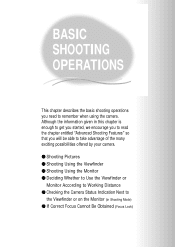
...) BASIC SHOOTING OPERATIONS This chapter describes the basic shooting operations you will be able to take advantage of the many exciting possibilities offered by your camera. ⅷ Shooting Pictures ⅷ Shooting Using the Viewfinder ⅷ Shooting Using the Monitor ⅷ Deciding Whether to Use the Viewfinder or Monitor According to Working...
...) BASIC SHOOTING OPERATIONS This chapter describes the basic shooting operations you will be able to take advantage of the many exciting possibilities offered by your camera. ⅷ Shooting Pictures ⅷ Shooting Using the Viewfinder ⅷ Shooting Using the Monitor ⅷ Deciding Whether to Use the Viewfinder or Monitor According to Working...
D-100 Instruction Manual
Page 30
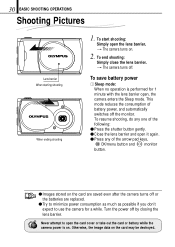
... consumption of the arrow pad keys, OK/menu button and monitor button. ⅷ Images stored on . 2. To end shooting: Simply close the lens barrier. [The camera turns off by closing the lens barrier. Otherwise, the image data on . To save battery power 1 Sleep mode: When no operation is on the card...or the batteries are replaced. ⅷ Try to minimize power consumption as much as possible if you don't expect to open , the camera enters the Sleep mode. Never attempt to use the camera for 1 minute with the lens barrier open the card cover or take out the card or battery while the...
... consumption of the arrow pad keys, OK/menu button and monitor button. ⅷ Images stored on . 2. To end shooting: Simply close the lens barrier. [The camera turns off by closing the lens barrier. Otherwise, the image data on . To save battery power 1 Sleep mode: When no operation is on the card...or the batteries are replaced. ⅷ Try to minimize power consumption as much as possible if you don't expect to open , the camera enters the Sleep mode. Never attempt to use the camera for 1 minute with the lens barrier open the card cover or take out the card or battery while the...


