PrintSuperVision Configuration Guide
Page 7
... professional edition also offers the choice to install a single-user "Easy Configuration" option that does not require a server and can be installed on a centrally located Windows server accessible from the Single-user Easy Configuration Option to the standard Professional Edition requires re-running the PSV Setup Utility and selecting Professional Edition. 7 • New Names/New Editions Upgrades can be easily performed from older versions of...
... professional edition also offers the choice to install a single-user "Easy Configuration" option that does not require a server and can be installed on a centrally located Windows server accessible from the Single-user Easy Configuration Option to the standard Professional Edition requires re-running the PSV Setup Utility and selecting Professional Edition. 7 • New Names/New Editions Upgrades can be easily performed from older versions of...
PrintSuperVision Configuration Guide
Page 15
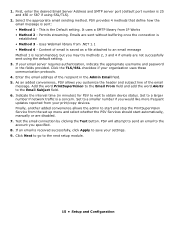
... Test button. Click Next to go to the Email Subject field. 6. 1. First, enter the desired Email Server Address and SMTP server port (default port number is established • Method 3 - Emails are not successfully sent using SSL/TLS). 2. PSV provides 4 methods that define how the email message is recommended, but you would like more frequent updates reported from the set up menu and select whether the PSV Services should start and stop...
... Test button. Click Next to go to the Email Subject field. 6. 1. First, enter the desired Email Server Address and SMTP server port (default port number is established • Method 3 - Emails are not successfully sent using SSL/TLS). 2. PSV provides 4 methods that define how the email message is recommended, but you would like more frequent updates reported from the set up menu and select whether the PSV Services should start and stop...
C330/C530/C610/C711 DIMM Install Sheet
Page 5
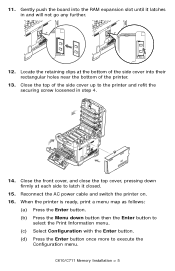
... top of the side cover up to execute the Configuration menu. Reconnect the AC power cable and switch the printer on. 16. Locate the retaining clips at each side to latch it latches in step 4. 14. C610/C711 Memory Installation > 5 When the printer is ready, print a menu map as follows: (a) Press the Enter button. (b) Press the Menu down firmly at the bottom of the printer. 13. Gently push...
... top of the side cover up to execute the Configuration menu. Reconnect the AC power cable and switch the printer on. 16. Locate the retaining clips at each side to latch it latches in step 4. 14. C610/C711 Memory Installation > 5 When the printer is ready, print a menu map as follows: (a) Press the Enter button. (b) Press the Menu down firmly at the bottom of the printer. 13. Gently push...
C330/C530/C610/C711 DIMM Install Sheet
Page 19
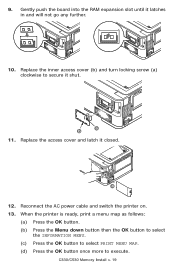
... the INFORMATION MENU. (c) Press the OK button to select PRINT MENU MAP. (d) Press the OK button once more to secure it shut. Replace the inner access cover (b) and turn locking screw (a) clockwise to execute. Reconnect the AC power cable and switch the printer on. 13. Gently push the board into the RAM expansion slot until it closed. a b 11. C330/C530 Memory Install > 19 Replace the access cover and...
... the INFORMATION MENU. (c) Press the OK button to select PRINT MENU MAP. (d) Press the OK button once more to secure it shut. Replace the inner access cover (b) and turn locking screw (a) clockwise to execute. Reconnect the AC power cable and switch the printer on. 13. Gently push the board into the RAM expansion slot until it closed. a b 11. C330/C530 Memory Install > 19 Replace the access cover and...
SD Card Install
Page 8
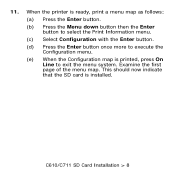
This should now indicate that the SD card is printed, press On Line to execute the Configuration menu. (e) When the Configuration map is installed. 11. C610/C711 SD Card Installation > 8 Examine the first page of the menu map. When the printer is ready, print a menu map as follows: (a) Press the Enter button. (b) Press the Menu down button then the Enter button to select the Print Information menu. (c) Select Configuration with the Enter button. (d) Press the Enter button once more to exit the menu system.
This should now indicate that the SD card is printed, press On Line to execute the Configuration menu. (e) When the Configuration map is installed. 11. C610/C711 SD Card Installation > 8 Examine the first page of the menu map. When the printer is ready, print a menu map as follows: (a) Press the Enter button. (b) Press the Menu down button then the Enter button to select the Print Information menu. (c) Select Configuration with the Enter button. (d) Press the Enter button once more to exit the menu system.

SD Card Install
Page 32
When the printer is ready, print a menu map as follows: (a) Press the Enter button. (b) Press the Menu down button then the Enter button to select the Print Information menu. (c) Select Configuration with the Enter button. (d) Press the Enter button once more to exit the menu system. Examine the first page of the menu map. This should now indicate that the SD card is printed, press On Line to execute the Configuration menu. (e) When the Configuration map is installed. C530 SD Card Installation > 32 11.
When the printer is ready, print a menu map as follows: (a) Press the Enter button. (b) Press the Menu down button then the Enter button to select the Print Information menu. (c) Select Configuration with the Enter button. (d) Press the Enter button once more to exit the menu system. Examine the first page of the menu map. This should now indicate that the SD card is printed, press On Line to execute the Configuration menu. (e) When the Configuration map is installed. C530 SD Card Installation > 32 11.

Duplex Installation Instructions
Page 1
.... First, open the Printers (Printers and Faxes) dialog box: a. Windows 2000: Click Start > Settings > Printers. In the PCL driver select the appropriate check box in until Print Setup displays. 7. Print Information displays. 4. It should indicate that the duplex unit is aaaaaa). 5. Enter the password (default password is now installed. 1. Press the down arrow key until it stops and latches home. 2 Confirm the Installation Examine the top of the first page of the configuration report. In...
.... First, open the Printers (Printers and Faxes) dialog box: a. Windows 2000: Click Start > Settings > Printers. In the PCL driver select the appropriate check box in until Print Setup displays. 7. Print Information displays. 4. It should indicate that the duplex unit is aaaaaa). 5. Enter the password (default password is now installed. 1. Press the down arrow key until it stops and latches home. 2 Confirm the Installation Examine the top of the first page of the configuration report. In...
C610, C711 User's Guide (English)
Page 7
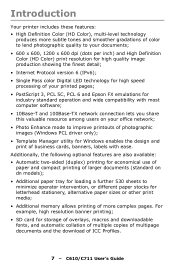
... office network; • Photo Enhance mode to minimize operator intervention, or different paper stocks for letterhead stationery, alternative paper sizes or other print media; • Additional memory allows printing of business cards, banners, labels with most computer software; • 10Base-T and 100Base-TX network connection lets you share this valuable resource among users on dn models); • Additional paper tray for loading a further 530 sheets to improve printouts of photographic images (Windows PCL driver...
... office network; • Photo Enhance mode to minimize operator intervention, or different paper stocks for letterhead stationery, alternative paper sizes or other print media; • Additional memory allows printing of business cards, banners, labels with most computer software; • 10Base-T and 100Base-TX network connection lets you share this valuable resource among users on dn models); • Additional paper tray for loading a further 530 sheets to improve printouts of photographic images (Windows PCL driver...
C610, C711 User's Guide (English)
Page 12
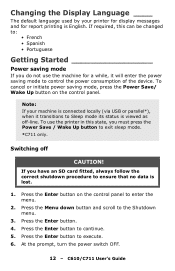
... status is viewed as off CAUTION! Press the Enter button to ensure that no data is lost. 1. Press the Enter button on the control panel. If required, this state, you must press the Power Save / Wake Up button to exit sleep mode. *C711 only. If you do not use the machine for report printing is English. Changing the Display Language ____ The default language used by your machine is connected locally (via USB...
... status is viewed as off CAUTION! Press the Enter button to ensure that no data is lost. 1. Press the Enter button on the control panel. If required, this state, you must press the Power Save / Wake Up button to exit sleep mode. *C711 only. If you do not use the machine for report printing is English. Changing the Display Language ____ The default language used by your machine is connected locally (via USB...
C610, C711 User's Guide (English)
Page 24
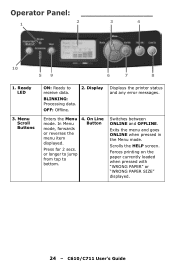
.... Forces printing on the paper currently loaded when pressed with "WRONG PAPER" or "WRONG PAPER SIZE" displayed. 24 - Press for 2 secs. or longer to jump from top to receive data. OFF: Offline. 2. C610/C711 User's Guide In Menu mode, forwards or reverses the menu item displayed. Exits the menu and goes ONLINE when pressed in the Menu mode. Display Displays the printer status and any error messages. Enters the Menu mode. On Line Button Switches between ONLINE and OFFLINE. Ready LED 3. BLINKING: Processing data. Operator Panel...
.... Forces printing on the paper currently loaded when pressed with "WRONG PAPER" or "WRONG PAPER SIZE" displayed. 24 - Press for 2 secs. or longer to jump from top to receive data. OFF: Offline. 2. C610/C711 User's Guide In Menu mode, forwards or reverses the menu item displayed. Exits the menu and goes ONLINE when pressed in the Menu mode. Display Displays the printer status and any error messages. Enters the Menu mode. On Line Button Switches between ONLINE and OFFLINE. Ready LED 3. BLINKING: Processing data. Operator Panel...

C610, C711 User's Guide (English)
Page 56
... reflected as offset values (addition) to adjust TRC. Calibration ITEM Auto Density Mode Adjust Density Adjust Registration Print Tuning Pattern SETTINGS EXPLANATION On/Off Execute Execute Execute Selects whether density adjustment and TRC compensation is automatically adjusted to the recommended levels through the Adjust Density/TRC Compensation function. 56 - When this function is not needed because TRC is automatically performed. C610/C711 User's Guide
... reflected as offset values (addition) to adjust TRC. Calibration ITEM Auto Density Mode Adjust Density Adjust Registration Print Tuning Pattern SETTINGS EXPLANATION On/Off Execute Execute Execute Selects whether density adjustment and TRC compensation is automatically adjusted to the recommended levels through the Adjust Density/TRC Compensation function. 56 - When this function is not needed because TRC is automatically performed. C610/C711 User's Guide
C610, C711 User's Guide (English)
Page 61
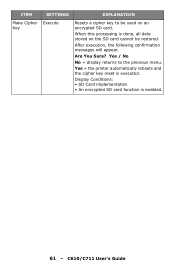
Are You Sure? Yes / No No = display returns to be used on the SD card cannot be restored. C610/C711 User's Guide Yes = the printer automatically reboots and the cipher key reset is done, all data stored on an encrypted SD card. When this processing is executed. ITEM SETTINGS EXPLANATION Make Cipher Execute Key Resets a cipher key to the previous menu. Display Conditions: • SD Card implementation • An encrypted SD card function is enabled. 61 - After execution, the following confirmation messages will appear.
Are You Sure? Yes / No No = display returns to be used on the SD card cannot be restored. C610/C711 User's Guide Yes = the printer automatically reboots and the cipher key reset is done, all data stored on an encrypted SD card. When this processing is executed. ITEM SETTINGS EXPLANATION Make Cipher Execute Key Resets a cipher key to the previous menu. Display Conditions: • SD Card implementation • An encrypted SD card function is enabled. 61 - After execution, the following confirmation messages will appear.
C610, C711 User's Guide (English)
Page 62
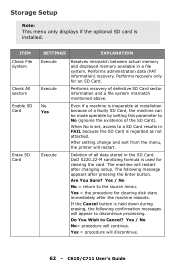
... the Cancel button is installed. After setting change and exit from the menu, the printer will discontinue. 62 - Yes = the procedure for an SD Card. Deletion of defective SD Card sector information and a file system mismatch mentioned above. C610/C711 User's Guide ITEM Check File System Check All Sectors Enable SD Card Erase SD Card SETTINGS EXPLANATION Execute Execute No Yes Execute Resolves mismatch between actual memory and displayed memory available...
... the Cancel button is installed. After setting change and exit from the menu, the printer will discontinue. 62 - Yes = the procedure for an SD Card. Deletion of defective SD Card sector information and a file system mismatch mentioned above. C610/C711 User's Guide ITEM Check File System Check All Sectors Enable SD Card Erase SD Card SETTINGS EXPLANATION Execute Execute No Yes Execute Resolves mismatch between actual memory and displayed memory available...
C610/C711 Software Setup Guide (English, Fran栩s, Espa?ol, Portugu鱩
Page 3
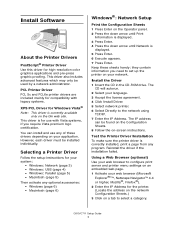
... Sheets.) 3 Click on a tab to configure print server and printer menu settings on an embedded web page. 1 Activate your web browser (Microsoft Explorer®/™, Netscape Navigator™ 4.4 or higher, Mozilla®, Firefox®). 2 Enter the IP Address for your system: • Windows: Network (page 3) • Windows: USB (page 4) • Windows: Parallel (page 5) • Macintosh (page 5) Then activate any optional accessories: • Windows (page 6) • Macintosh (page 6) Windows®: Network Setup Print the Configuration Sheets 1 Press Enter on the Operator panel...
... Sheets.) 3 Click on a tab to configure print server and printer menu settings on an embedded web page. 1 Activate your web browser (Microsoft Explorer®/™, Netscape Navigator™ 4.4 or higher, Mozilla®, Firefox®). 2 Enter the IP Address for your system: • Windows: Network (page 3) • Windows: USB (page 4) • Windows: Parallel (page 5) • Macintosh (page 5) Then activate any optional accessories: • Windows (page 6) • Macintosh (page 6) Windows®: Network Setup Print the Configuration Sheets 1 Press Enter on the Operator panel...

C610/C711 Software Setup Guide (English, Fran栩s, Espa?ol, Portugu鱩
Page 4
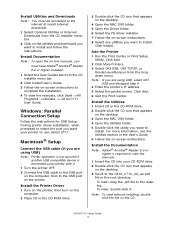
... installed. 1 Select the User Guides tab from the CD installer menu bar. 2 Click Install User's Guide. 3 Follow the on the printer. 1 Click Start -> Control Panel -> Print- in the PCL driver select the appropriate check box in the CD-ROM drive. Install Utilities and Downloads Note: You must have a TCP/IP enabled network, you can configure the options automatically using the Two-Way Communications feature. To Configure PostScript and PCL Options Manually 1 Click Start -> Control Panel -> Printers...
... installed. 1 Select the User Guides tab from the CD installer menu bar. 2 Click Install User's Guide. 3 Follow the on the printer. 1 Click Start -> Control Panel -> Print- in the PCL driver select the appropriate check box in the CD-ROM drive. Install Utilities and Downloads Note: You must have a TCP/IP enabled network, you can configure the options automatically using the Two-Way Communications feature. To Configure PostScript and PCL Options Manually 1 Click Start -> Control Panel -> Printers...
C610/C711 Software Setup Guide (English, Fran栩s, Espa?ol, Portugu鱩
Page 5
... ->OkiData -> C610/C711 User Guide. Click Add. 6 Quit the Print Center. Note: To view without installing, doubleclick the file on the desktop. 3 Open the MAC OSX folder. 4 Open the Utilities folder. 5 Double-click the utility you are using USB, select OKI USB and disregard step 4. 4 Enter the printer's IP address. 5 Select the printer model. Install Documentation Note: To open the on-line manuals, you want to install and follow the instructions. Windows: Parallel Connection Setup Follow the instructions for USB Setup. For...
... ->OkiData -> C610/C711 User Guide. Click Add. 6 Quit the Print Center. Note: To view without installing, doubleclick the file on the desktop. 3 Open the MAC OSX folder. 4 Open the Utilities folder. 5 Double-click the utility you are using USB, select OKI USB and disregard step 4. 4 Enter the printer's IP address. 5 Select the printer model. Install Documentation Note: To open the on-line manuals, you want to install and follow the instructions. Windows: Parallel Connection Setup Follow the instructions for USB Setup. For...
C610/C711 Software Setup Guide (English, Fran栩s, Espa?ol, Portugu鱩
Page 6
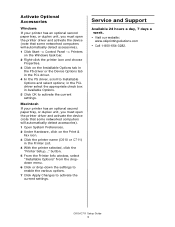
... Print & Fax icon. 3 Click the printer name (C610 or C711) in the Printer List. 4 With the printer selected, click the "Printer Setup..." in the PCL driver select the appropriate check box in Available Options. 5 Click OK to activate the current settings. Activate Optional Accessories Windows If your printer has an optional second paper tray, or duplex unit, you must open the printer driver and activate the device (note that some networked...
... Print & Fax icon. 3 Click the printer name (C610 or C711) in the Printer List. 4 With the printer selected, click the "Printer Setup..." in the PCL driver select the appropriate check box in Available Options. 5 Click OK to activate the current settings. Activate Optional Accessories Windows If your printer has an optional second paper tray, or duplex unit, you must open the printer driver and activate the device (note that some networked...
C610 Handy Reference (English, Fran栩s, Espa?ol, Portugu鱩
Page 14
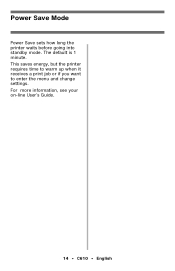
For more information, see your on-line User's Guide. 14 • C610 • English The default is 1 minute. Power Save Mode Power Save sets how long the printer waits before going into standby mode. This saves energy, but the printer requires time to warm up when it receives a print job or if you want to enter the menu and change settings.
For more information, see your on-line User's Guide. 14 • C610 • English The default is 1 minute. Power Save Mode Power Save sets how long the printer waits before going into standby mode. This saves energy, but the printer requires time to warm up when it receives a print job or if you want to enter the menu and change settings.
C610 Safety Warranty Regulatory Guide
Page 4
...such as toner cartridges, image drums, ribbon cartridges, fuses, etc. If you would like to be returned must accompany any other than the second business day. To make a ...Oki Data at its option, replace, with the exchange product. Overnight Exchange of the printer for authorized service locations or if you choose to use our Overnight Exchange service, call 1-800-654-3282 (1-800-OKI-DATA): our trained personnel will try to solve your credit card available as a result of service or modification by Oki Data's representative within two (2) business days of the exchange unit...
...such as toner cartridges, image drums, ribbon cartridges, fuses, etc. If you would like to be returned must accompany any other than the second business day. To make a ...Oki Data at its option, replace, with the exchange product. Overnight Exchange of the printer for authorized service locations or if you choose to use our Overnight Exchange service, call 1-800-654-3282 (1-800-OKI-DATA): our trained personnel will try to solve your credit card available as a result of service or modification by Oki Data's representative within two (2) business days of the exchange unit...
C610 Safety Warranty Regulatory Guide
Page 5
... use of your machine • Error message interpretation/solutions • Parts and supplies identification • Consumer relations Note: Customer Support Representatives are calling from a telephone close to state. Spanish Only: call 1-905-238-4275. Service and Support, US and Canada U.S. If you have other rights which vary from state to your machine so you can check your software user's manual for warranty work. East, Unit...
... use of your machine • Error message interpretation/solutions • Parts and supplies identification • Consumer relations Note: Customer Support Representatives are calling from a telephone close to state. Spanish Only: call 1-905-238-4275. Service and Support, US and Canada U.S. If you have other rights which vary from state to your machine so you can check your software user's manual for warranty work. East, Unit...


