
C330/C530 Safety Warranty Regulatory Guide
Page 3
... than 70 dB (A) as you may lead to prevent overheating and any risk of fire. is a risk of entrapment or personal injury. After installing additional memory, hard disk drive, or any covers removed or doors opened must be taken to which may receive burns. Do not throw toner cartridges or image...
... than 70 dB (A) as you may lead to prevent overheating and any risk of fire. is a risk of entrapment or personal injury. After installing additional memory, hard disk drive, or any covers removed or doors opened must be taken to which may receive burns. Do not throw toner cartridges or image...
C330/C530/C610/C711 DIMM Install Sheet
Page 3
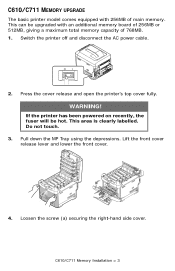
WARNING! Pull down the MP Tray using the depressions. Lift the front cover release lever and lower the front cover. 4. C610/C711 Memory Installation > 3 This can be hot. OI 2. If the printer has been powered on recently, the fuser will be upgraded with 256MB of 768MB.... printer off and disconnect the AC power cable. Do not touch. 3. C610/C711 MEMORY UPGRADE The basic printer model comes equipped with an additional memory board of 256MB or 512MB, giving a maximum total memory capacity of main memory. This area is clearly labelled. Loosen the screw (a) securing the right-hand side ...
WARNING! Pull down the MP Tray using the depressions. Lift the front cover release lever and lower the front cover. 4. C610/C711 Memory Installation > 3 This can be hot. OI 2. If the printer has been powered on recently, the fuser will be upgraded with 256MB of 768MB.... printer off and disconnect the AC power cable. Do not touch. 3. C610/C711 MEMORY UPGRADE The basic printer model comes equipped with an additional memory board of 256MB or 512MB, giving a maximum total memory capacity of main memory. This area is clearly labelled. Loosen the screw (a) securing the right-hand side ...
C330/C530/C610/C711 DIMM Install Sheet
Page 4
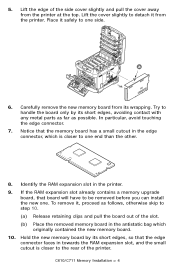
...closer to step 10. (a) Release retaining clips and pull the board out of the printer. Carefully remove the new memory board from the printer at the top. Notice that the memory board has a small cutout in towards the RAM expansion slot, and the small cutout is closer to detach it ... to be removed before you can install the new one. If the RAM expansion slot already contains a memory upgrade board, that the edge connector faces in the edge connector, which originally contained the new memory board. 10. Lift the cover slightly to one side. a 6. Try to handle the board only...
...closer to step 10. (a) Release retaining clips and pull the board out of the printer. Carefully remove the new memory board from the printer at the top. Notice that the memory board has a small cutout in towards the RAM expansion slot, and the small cutout is closer to detach it ... to be removed before you can install the new one. If the RAM expansion slot already contains a memory upgrade board, that the edge connector faces in the edge connector, which originally contained the new memory board. 10. Lift the cover slightly to one side. a 6. Try to handle the board only...
C330/C530/C610/C711 DIMM Install Sheet
Page 5
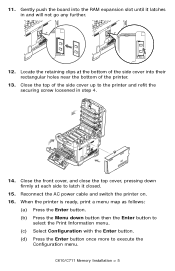
... the Print Information menu. (c) Select Configuration with the Enter button. (d) Press the Enter button once more to latch it latches in step 4. 14. C610/C711 Memory Installation > 5 When the printer is ready, print a menu map as follows: (a) Press the Enter button. (b) Press the Menu down firmly at the bottom of the...
... the Print Information menu. (c) Select Configuration with the Enter button. (d) Press the Enter button once more to latch it latches in step 4. 14. C610/C711 Memory Installation > 5 When the printer is ready, print a menu map as follows: (a) Press the Enter button. (b) Press the Menu down firmly at the bottom of the...
C330/C530/C610/C711 DIMM Install Sheet
Page 6
Examine the first page of the page, between the two horizontal lines, you will see the current printer configuration. Near the top of the menu map. This list contains the figure for total memory size. C610/C711 Memory Installation > 6 This should indicate the total memory now installed. (e) When the Configuration map is printed, press On Line to exit the menu system. 17.
Examine the first page of the page, between the two horizontal lines, you will see the current printer configuration. Near the top of the menu map. This list contains the figure for total memory size. C610/C711 Memory Installation > 6 This should indicate the total memory now installed. (e) When the Configuration map is printed, press On Line to exit the menu system. 17.
C330/C530/C610/C711 DIMM Install Sheet
Page 17
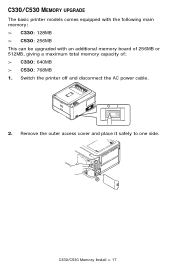
Remove the outer access cover and place it safely to one side. Switch the printer off and disconnect the AC power cable. 2. a b C330/C530 Memory Install > 17 C330/C530 MEMORY UPGRADE The basic printer models comes equipped with the following main memory: > C330: 128MB > C530: 256MB This can be upgraded with an additional memory board of 256MB or 512MB, giving a maximum total memory capacity of: > C330: 640MB > C530: 768MB 1.
Remove the outer access cover and place it safely to one side. Switch the printer off and disconnect the AC power cable. 2. a b C330/C530 Memory Install > 17 C330/C530 MEMORY UPGRADE The basic printer models comes equipped with the following main memory: > C330: 128MB > C530: 256MB This can be upgraded with an additional memory board of 256MB or 512MB, giving a maximum total memory capacity of: > C330: 640MB > C530: 768MB 1.
C330/C530/C610/C711 DIMM Install Sheet
Page 18
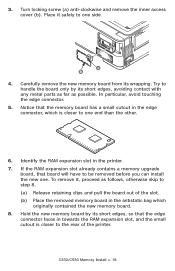
... to be removed before you can install the new one end than the other. 6. If the RAM expansion slot already contains a memory upgrade board, that the memory board has a small cutout in the antistatic bag which is closer to one side. To remove it safely to the rear of ... the printer. Turn locking screw (a) anti-clockwise and remove the inner access cover (b). Place it , proceed as possible. C330/C530 Memory Install > 18 3. Carefully remove the new memory board from its short edges, so that the edge connector faces in the printer. 7. Notice that board will have to one ....
... to be removed before you can install the new one end than the other. 6. If the RAM expansion slot already contains a memory upgrade board, that the memory board has a small cutout in the antistatic bag which is closer to one side. To remove it safely to the rear of ... the printer. Turn locking screw (a) anti-clockwise and remove the inner access cover (b). Place it , proceed as possible. C330/C530 Memory Install > 18 3. Carefully remove the new memory board from its short edges, so that the edge connector faces in the printer. 7. Notice that board will have to one ....
C330/C530/C610/C711 DIMM Install Sheet
Page 19
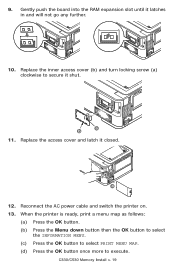
... push the board into the RAM expansion slot until it shut. Replace the inner access cover (b) and turn locking screw (a) clockwise to execute. C330/C530 Memory Install > 19 When the printer is ready, print a menu map as follows: (a) Press the OK button. (b) Press the Menu down button then the OK button...
... push the board into the RAM expansion slot until it shut. Replace the inner access cover (b) and turn locking screw (a) clockwise to execute. C330/C530 Memory Install > 19 When the printer is ready, print a menu map as follows: (a) Press the OK button. (b) Press the Menu down button then the OK button...

Safety Warranty Manual
Page 3
... liquid or aerosol cleaners. Do not use an extremely flammable spray near the product as you have a suitable power supply before touching. After installing additional memory, hard disk drive, or any risk of this may cause a fire. Unplugging by an incorrect type. It is recommended that may cause electric shock. Unplug...
... liquid or aerosol cleaners. Do not use an extremely flammable spray near the product as you have a suitable power supply before touching. After installing additional memory, hard disk drive, or any risk of this may cause a fire. Unplugging by an incorrect type. It is recommended that may cause electric shock. Unplug...


