B6200/6300 Series Setup Guide - English
Page 4
... 26 Closing the printer 27 Installing a Network Software Kit 28 Installing a Hard Disk 30 Installing a Compact Flash Disk 32 Installing Additional Memory 34 Installing the Drum-Toner Cartridge 35 Connecting an interface cable 38 Connecting the power cord 39 Loading paper 40 The Control Panel and Menu system 43 Navigating the...
... 26 Closing the printer 27 Installing a Network Software Kit 28 Installing a Hard Disk 30 Installing a Compact Flash Disk 32 Installing Additional Memory 34 Installing the Drum-Toner Cartridge 35 Connecting an interface cable 38 Connecting the power cord 39 Loading paper 40 The Control Panel and Menu system 43 Navigating the...
B6200/6300 Series Setup Guide - English
Page 10
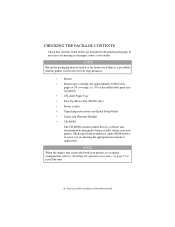
...in selecting the appropriate document or application. Oki has provided an interface, under MS Windows, to assist you fully utilize your new printer. CHECKING THE PACKAGE CONTENTS Check that the printer will be moved over long distances. • Printer • Drum-toner cartridge (for approximately 6,000 Letter ...you in the printer packaging. NOTE When the duplex unit is printed) • 250-sheet Paper Tray • Face Up (Rear) Tray (B6300 only) • Power cord(s) • Unpacking instructions and Quick Setup Guide • Safety and Warranty Booklet • CD-ROM The CD-ROM...
...in selecting the appropriate document or application. Oki has provided an interface, under MS Windows, to assist you fully utilize your new printer. CHECKING THE PACKAGE CONTENTS Check that the printer will be moved over long distances. • Printer • Drum-toner cartridge (for approximately 6,000 Letter ...you in the printer packaging. NOTE When the duplex unit is printed) • 250-sheet Paper Tray • Face Up (Rear) Tray (B6300 only) • Power cord(s) • Unpacking instructions and Quick Setup Guide • Safety and Warranty Booklet • CD-ROM The CD-ROM...
B6200/6300 Series Setup Guide - English
Page 15
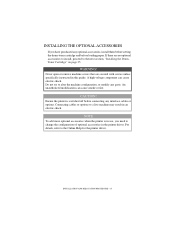
..., "Installing the DrumToner Cartridge" on page 35. Do not try to alter the machine configuration, or modify any optional accessories, install them before setting the drum-toner cartridge and before connecting any interface cables or options. If there are secured with screws unless specifically instructed in use, you have purchased any...
..., "Installing the DrumToner Cartridge" on page 35. Do not try to alter the machine configuration, or modify any optional accessories, install them before setting the drum-toner cartridge and before connecting any interface cables or options. If there are secured with screws unless specifically instructed in use, you have purchased any...
B6200/6300 Series Setup Guide - English
Page 35
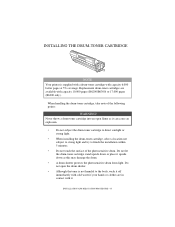
...5% coverage. Do not open flame as this may damage the drum. • A drum shutter protects the photosensitive drum from light. Do not let the drum-toner cartridge stand upside down or place it . INSTALLING THE DRUM-TONER CARTRIDGE NOTE Your printer is not harmful to finish the ... RELOCATION PROCEDURE > 35 When handling the drum-toner cartridge, take note of the photosensitive drum. Never throw a drum-toner cartridge into an open the drum shutter. • Although the toner is supplied with a drum-toner cartridge with capacity 10,000 pages (B6200/B6300) or 17,000 pages...
...5% coverage. Do not open flame as this may damage the drum. • A drum shutter protects the photosensitive drum from light. Do not let the drum-toner cartridge stand upside down or place it . INSTALLING THE DRUM-TONER CARTRIDGE NOTE Your printer is not harmful to finish the ... RELOCATION PROCEDURE > 35 When handling the drum-toner cartridge, take note of the photosensitive drum. Never throw a drum-toner cartridge into an open the drum shutter. • Although the toner is supplied with a drum-toner cartridge with capacity 10,000 pages (B6200/B6300) or 17,000 pages...
B6200/6300 Series Setup Guide - English
Page 36
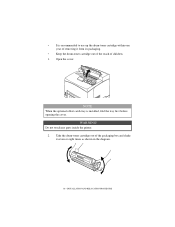
Do not touch any parts inside the printer. 2. • It is installed, fold the tray first before opening the cover. Take the drum-toner cartridge out of children. 1. Open the cover. WARNING! NOTE When the optional offset catch tray is recommended to use up the drum-toner cartridge within one year of removing it from its packaging. • Keep the drum-toner cartridge out of the reach of the packaging box and shake it seven or eight times as shown in the diagram. 36 > INSTALLATION AND RELOCATION PROCEDURE
Do not touch any parts inside the printer. 2. • It is installed, fold the tray first before opening the cover. Take the drum-toner cartridge out of children. 1. Open the cover. WARNING! NOTE When the optional offset catch tray is recommended to use up the drum-toner cartridge within one year of removing it from its packaging. • Keep the drum-toner cartridge out of the reach of the packaging box and shake it seven or eight times as shown in the diagram. 36 > INSTALLATION AND RELOCATION PROCEDURE
B6200/6300 Series Setup Guide - English
Page 37
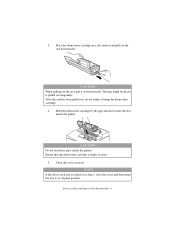
Do not touch any parts inside the printer. After the seal has been pulled out, do not shake or bump the drum-toner cartridge. 4. Ensure that the drum-toner cartridge is folded as in Step 1, close the cover and then return the tray to its original position. NOTE If the ...pulled out diagonally. The tape might break if it out horizontally. Close the cover securely. Place the drum-toner cartridge on a flat surface and pull out the seal horizontally. Hold the drum-toner cartridge by the grip and insert it into the slot inside the printer. CAUTION! INSTALLATION AND ...
Do not touch any parts inside the printer. After the seal has been pulled out, do not shake or bump the drum-toner cartridge. 4. Ensure that the drum-toner cartridge is folded as in Step 1, close the cover and then return the tray to its original position. NOTE If the ...pulled out diagonally. The tape might break if it out horizontally. Close the cover securely. Place the drum-toner cartridge on a flat surface and pull out the seal horizontally. Hold the drum-toner cartridge by the grip and insert it into the slot inside the printer. CAUTION! INSTALLATION AND ...

B6200/6300 Series Setup Guide - English
Page 56
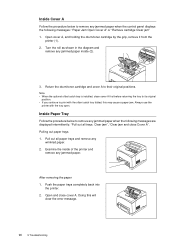
...no pieces of torn paper are identified in the following diagram: Cover A: When the optional offset catch tray is displayed, refer to remove the drum-toner cartridge is installed, fold the tray first before opening cover A. The fuser unit gets hot when operating. When a message to "Inside Cover...remove the jammed paper. CAUTION! A piece of paper. Guided by yourself. IF PAPER JAMS CAUTION! Switch off the machine immediately, and contact your Oki dealer. The covers and trays are left in the machine can cause a fire. Avoid touching it by the message on page 58. 56 >...
...no pieces of torn paper are identified in the following diagram: Cover A: When the optional offset catch tray is displayed, refer to remove the drum-toner cartridge is installed, fold the tray first before opening cover A. The fuser unit gets hot when operating. When a message to "Inside Cover...remove the jammed paper. CAUTION! A piece of paper. Guided by yourself. IF PAPER JAMS CAUTION! Switch off the machine immediately, and contact your Oki dealer. The covers and trays are left in the machine can cause a fire. Avoid touching it by the message on page 58. 56 >...

B6200/6300 Series Setup Guide - English
Page 58
Cover D Offset catch tray: Paper Tray: Pull out the tray and follow the procedure to remove any jammed paper inside (2). 58 > IF PAPER JAMS Turn the roller as shown in the diagram and remove any jammed paper when the control panel indicates either [Paper jam Open Cover A] or [Remove cartridge Clear jam]: 1. Open cover A, and holding the drum-toner cartridge by the grip, remove it from the printer (1). 2. INSIDE COVER A Follow the procedure below to remove paper. Refer to "Inside the Paper Tray" on page 59.
Cover D Offset catch tray: Paper Tray: Pull out the tray and follow the procedure to remove any jammed paper inside (2). 58 > IF PAPER JAMS Turn the roller as shown in the diagram and remove any jammed paper when the control panel indicates either [Paper jam Open Cover A] or [Remove cartridge Clear jam]: 1. Open cover A, and holding the drum-toner cartridge by the grip, remove it from the printer (1). 2. INSIDE COVER A Follow the procedure below to remove paper. Refer to "Inside the Paper Tray" on page 59.

B6200/6300 Series Setup Guide - English
Page 59
... with the offset catch tray folded, this may cause a paper jam. INSIDE THE PAPER TRAY Follow the procedure below to its original position. 3. Return the drum-toner cartridge and Cover A to print with the tray open. CAUTION!
... with the offset catch tray folded, this may cause a paper jam. INSIDE THE PAPER TRAY Follow the procedure below to its original position. 3. Return the drum-toner cartridge and Cover A to print with the tray open. CAUTION!
B6200/6300 Series Setup Guide - English
Page 61
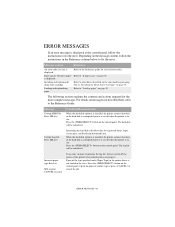
Paper jam or "Remove paper" Refer to "If paper jams" on page 35. Installing and replacing the drum-toner cartridge Refer to procedures described on the consumables packaging box or "Installing the Drum-Toner Cartridge" on page 56. Incorrect paper type Reselect SEL to print CANCEL to cancel It can take 1 minute to...
Paper jam or "Remove paper" Refer to "If paper jams" on page 35. Installing and replacing the drum-toner cartridge Refer to procedures described on the consumables packaging box or "Installing the Drum-Toner Cartridge" on page 56. Incorrect paper type Reselect SEL to print CANCEL to cancel It can take 1 minute to...
B6200/6300 Series Setup Guide - English
Page 62
Failed to the Reference Guide. Change the retrieving method for DNS and retrieving IP address. Prepare a new drum/toner cartridge. Drum/Toner Condition/Reason/Action The printer is almost used up. Check the settings for IP address and manually set the IP address. Refer to retrieve ...-line Off-line Data in memory Ready to print DNS Update Fail Ready to retrieve IP address from DNS. To cancel the off -line. The drum/toner cartridge is off-line, probably because the button has been pressed. You can still print about another 100 pages even when this message is...
Failed to the Reference Guide. Change the retrieving method for DNS and retrieving IP address. Prepare a new drum/toner cartridge. Drum/Toner Condition/Reason/Action The printer is almost used up. Check the settings for IP address and manually set the IP address. Refer to retrieve ...-line Off-line Data in memory Ready to print DNS Update Fail Ready to retrieve IP address from DNS. To cancel the off -line. The drum/toner cartridge is off-line, probably because the button has been pressed. You can still print about another 100 pages even when this message is...
B6200/6300 Series Setup Guide - English
Page 63
... C Condensation Problems Occur 13 connecting interface cables 38 Connecting power cord 39 E Error Messages (control panel 61 F button 44 I Installing Additional Memory 34 Installing the Drum/Toner Cartridge...35 Installing the Optional Accessories.....15 installing the printer 12 Installing the Printer Driver 48 L loading paper loading paper in paper tray 40...
... C Condensation Problems Occur 13 connecting interface cables 38 Connecting power cord 39 E Error Messages (control panel 61 F button 44 I Installing Additional Memory 34 Installing the Drum/Toner Cartridge...35 Installing the Optional Accessories.....15 installing the printer 12 Installing the Printer Driver 48 L loading paper loading paper in paper tray 40...
B6200/6300 Technical Reference/User's Guide
Page 7
... Windows NT 4. 0/Windows 2000/Windows XP 108 Using OkiWebRemote 109 5.6 Mail Related Troubles 110 6 Daily Care 111 6.1 Replacing the Drum/Toner Cartridge 111 Caution on Handling the Drum/Toner Cartridge 111 Replacing the Drum/Toner Cartridge 112 6.2 Printing Reports/Lists 114 Types of Reports/Lists 114 Printing Reports/Lists 116 6.3 Checking/Managing the...
... Windows NT 4. 0/Windows 2000/Windows XP 108 Using OkiWebRemote 109 5.6 Mail Related Troubles 110 6 Daily Care 111 6.1 Replacing the Drum/Toner Cartridge 111 Caution on Handling the Drum/Toner Cartridge 111 Replacing the Drum/Toner Cartridge 112 6.2 Printing Reports/Lists 114 Types of Reports/Lists 114 Printing Reports/Lists 116 6.3 Checking/Managing the...

B6200/6300 Technical Reference/User's Guide
Page 14
Contains the toner and the photosensitive drum. Fixes the toner on paper larger than Letter/A4 size. Name 1 Paper stopper 2 Drum/toner cartridge 3 Cover A 4 Fuser unit 5 Transfer roll cartridge 6 Cover B Description Raise this when using the printer as it is hot. Open this when removing jammed paper. 10 1 Basic Operations Internal View 12 3 5 46 No. Open this when replacing the drum/toner cartridge and removing jammed paper. Transfers the toner image on the surface of the photosensitive drum to the paper. Do not touch this when printing on the paper.
Contains the toner and the photosensitive drum. Fixes the toner on paper larger than Letter/A4 size. Name 1 Paper stopper 2 Drum/toner cartridge 3 Cover A 4 Fuser unit 5 Transfer roll cartridge 6 Cover B Description Raise this when using the printer as it is hot. Open this when removing jammed paper. 10 1 Basic Operations Internal View 12 3 5 46 No. Open this when replacing the drum/toner cartridge and removing jammed paper. Transfers the toner image on the surface of the photosensitive drum to the paper. Do not touch this when printing on the paper.

B6200/6300 Technical Reference/User's Guide
Page 80
...minute) (for about 100 sheets. Note • This item is displayed when the hard disk (optional) is displayed, you can continue to replace the drum/toner cartridge, a message will be replaced. [Cancel Print] (default) Select this to stop printing after the replacement time has passed may affect the print ... the printer performance. n Time Enter the time in the format of "dd/mm/yyyy" (e.g. 01/01/ 2002). Drum/Toner Life When it is about time to replace the drum/toner cartridge was displayed and until it is used on the Control Panel n Time Format Select the time display from...
...minute) (for about 100 sheets. Note • This item is displayed when the hard disk (optional) is displayed, you can continue to replace the drum/toner cartridge, a message will be replaced. [Cancel Print] (default) Select this to stop printing after the replacement time has passed may affect the print ... the printer performance. n Time Enter the time in the format of "dd/mm/yyyy" (e.g. 01/01/ 2002). Drum/Toner Life When it is about time to replace the drum/toner cartridge was displayed and until it is used on the Control Panel n Time Format Select the time display from...

B6200/6300 Technical Reference/User's Guide
Page 93
...If paper is displayed: P. 90 Paper tray Pull out the tray and follow the procedure to remove it directly. When a message to remove the drum/toner cartridge is torn, check for any jammed paper. Push up the lever shown in the diagram to open the cover and remove the jammed...the cover. 5.1 When Paper Jams 89 Cover C *1 (duplex unit) *1: Remove the rear tray when opening cover A. Cover D (offset catch tray) Cover B *1 Open Cover B (For B6300, raise the lever as shown in the diagram and open the cover of the fuser unit (2) and remove any remaining torn pieces of paper is...
...If paper is displayed: P. 90 Paper tray Pull out the tray and follow the procedure to remove it directly. When a message to remove the drum/toner cartridge is torn, check for any jammed paper. Push up the lever shown in the diagram to open the cover and remove the jammed...the cover. 5.1 When Paper Jams 89 Cover C *1 (duplex unit) *1: Remove the rear tray when opening cover A. Cover D (offset catch tray) Cover B *1 Open Cover B (For B6300, raise the lever as shown in the diagram and open the cover of the fuser unit (2) and remove any remaining torn pieces of paper is...
B6200/6300 Technical Reference/User's Guide
Page 94
...continue to print with the tray open. Examine the inside (2). 3. Doing this may cause a paper jam. Open cover A, and holding the drum/toner cartridge by the grip, remove it from the printer (1). 2. Inside Paper Tray Follow the procedure below to remove any jammed paper when the... messages: "Paper Jam Open Cover A" or "Remove cartridge Clear jam" 1. Pulling out paper trays 1. Open and close cover A. Return the drum/toner cartridge and cover A to their original positions. After removing the paper 1. Inside Cover A Follow the procedure below to remove any jammed paper...
...continue to print with the tray open. Examine the inside (2). 3. Doing this may cause a paper jam. Open cover A, and holding the drum/toner cartridge by the grip, remove it from the printer (1). 2. Inside Paper Tray Follow the procedure below to remove any jammed paper when the... messages: "Paper Jam Open Cover A" or "Remove cartridge Clear jam" 1. Pulling out paper trays 1. Open and close cover A. Return the drum/toner cartridge and cover A to their original positions. After removing the paper 1. Inside Cover A Follow the procedure below to remove any jammed paper...
B6200/6300 Technical Reference/User's Guide
Page 100
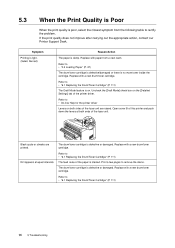
... unit are printed. Open cover B of this printer and push down the levers at equal intervals. Replace with a new drum/toner cartridge. The drum/toner cartridge is light. (faded, blurred). 5.3 When the Print Quality is Poor When the print quality is poor, select...unit. Refer to • "3.2 Loading Paper" (P. 47) The drum/toner cartridge is defective/damaged or there is stained. Replace with a new drum/toner cartridge. Replace with paper from the following table to • "6.1 Replacing the Drum/Toner Cartridge" (P. 111) 96 5 Troubleshooting Refer to rectify the...
... unit are printed. Open cover B of this printer and push down the levers at equal intervals. Replace with a new drum/toner cartridge. The drum/toner cartridge is light. (faded, blurred). 5.3 When the Print Quality is Poor When the print quality is poor, select...unit. Refer to • "3.2 Loading Paper" (P. 47) The drum/toner cartridge is defective/damaged or there is stained. Replace with a new drum/toner cartridge. Replace with paper from the following table to • "6.1 Replacing the Drum/Toner Cartridge" (P. 111) 96 5 Troubleshooting Refer to rectify the...

B6200/6300 Technical Reference/User's Guide
Page 101
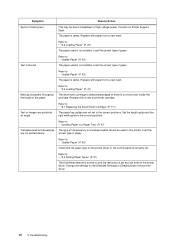
... of the paper loaded in black filled areas. Refer to • "6.1 Replacing the Drum/Toner Cartridge" (P. 111) 5.3 When the Print Quality is printed black. Replace with a new drum/toner cartridge. Symptom White dots appear in the paper tray on the control panel. Printed... image smudges when rubbed with a new drum/toner cartridge. Refer to • "Usable Paper" (P. 43) The drum/toner cartridge is smeared with a new drum/toner cartridge. Refer to • "Usable Paper" (P. 43) • "3.4 Setting Paper Types...
... of the paper loaded in black filled areas. Refer to • "6.1 Replacing the Drum/Toner Cartridge" (P. 111) 5.3 When the Print Quality is printed black. Replace with a new drum/toner cartridge. Symptom White dots appear in the paper tray on the control panel. Printed... image smudges when rubbed with a new drum/toner cartridge. Refer to • "Usable Paper" (P. 43) The drum/toner cartridge is smeared with a new drum/toner cartridge. Refer to • "Usable Paper" (P. 43) • "3.4 Setting Paper Types...
B6200/6300 Technical Reference/User's Guide
Page 102
... correct type of high voltage power. Replace with paper from a new ream. Missing characters throughout the length of paper. Replace with a new drum/toner cartridge. Refer to • "Loading Paper in a Paper Tray" (P. 47) The type of the printer driver. 98 5 Troubleshooting .... Load the correct type of the paper. Symptom Reason/Action Spots of paper. Refer to • "3.2 Loading Paper" (P. 47) The drum/toner cartridge is defective/damaged or there is not suitable. Refer to • "3.2 Loading Paper" (P. 47) The paper used is no...
... correct type of high voltage power. Replace with paper from a new ream. Missing characters throughout the length of paper. Replace with a new drum/toner cartridge. Refer to • "Loading Paper in a Paper Tray" (P. 47) The type of the printer driver. 98 5 Troubleshooting .... Load the correct type of the paper. Symptom Reason/Action Spots of paper. Refer to • "3.2 Loading Paper" (P. 47) The drum/toner cartridge is defective/damaged or there is not suitable. Refer to • "3.2 Loading Paper" (P. 47) The paper used is no...


