

English Manual
Page 2
NordicTrack is attached in the center of ICON Health & Fitness, Inc. 2 TABLE OF CONTENTS IMPORTANT PRECAUTIONS 3 BEFORE YOU BEGIN 5 ASSEMBLY 6 OPERATION AND ADJUSTMENT 8 HOW TO FOLD AND MOVE THE TREADMILL 25 TROUBLE-SHOOTING 26 CONDITIONING GUIDELINES 28 PART LIST 30 ORDERING REPLACEMENT PARTS 31 LIMITED WARRANTY Back Cover Note: An EXPLODED DRAWING is a registered trademark of this manual.
NordicTrack is attached in the center of ICON Health & Fitness, Inc. 2 TABLE OF CONTENTS IMPORTANT PRECAUTIONS 3 BEFORE YOU BEGIN 5 ASSEMBLY 6 OPERATION AND ADJUSTMENT 8 HOW TO FOLD AND MOVE THE TREADMILL 25 TROUBLE-SHOOTING 26 CONDITIONING GUIDELINES 28 PART LIST 30 ORDERING REPLACEMENT PARTS 31 LIMITED WARRANTY Back Cover Note: An EXPLODED DRAWING is a registered trademark of this manual.
English Manual
Page 3
... power cord or plug is damaged, or if the treadmill is turned off position when the treadmill is intended only as described in small increments to raise, lower, or move the walking belt while the power is not working properly.) 5. Various factors, including the user's movement, may affect the accuracy of 12 and pets away from damage, place a mat under the age of heart rate...
... power cord or plug is damaged, or if the treadmill is turned off position when the treadmill is intended only as described in small increments to raise, lower, or move the walking belt while the power is not working properly.) 5. Various factors, including the user's movement, may affect the accuracy of 12 and pets away from damage, place a mat under the age of heart rate...
English Manual
Page 4
... speed and/or incline changes. Inspect and tighten all instructions before the personal trainer describes the change the incline of the treadmill regularly. 23. When using iFIT.com CDs and videos, an electronic "chirping" sound will change . DANGER: 28. Always unplug the power cord immediately after use only. This treadmill is missing or illegible, please call our Customer Service Department, toll-free, to change to do so by pressing the speed and incline buttons...
... speed and/or incline changes. Inspect and tighten all instructions before the personal trainer describes the change the incline of the treadmill regularly. 23. When using iFIT.com CDs and videos, an electronic "chirping" sound will change . DANGER: 28. Always unplug the power cord immediately after use only. This treadmill is missing or illegible, please call our Customer Service Department, toll-free, to change to do so by pressing the speed and incline buttons...
English Manual
Page 5
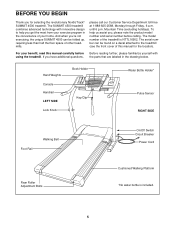
Hand Weights Console Handrail LEFT SIDE Lock Knob Book Holder Key/Clip Water Bottle Holder* Pulse Sensor RIGHT SIDE Foot Rail Walking Belt On/Off Switch Circuit Breaker Power Cord Rear Roller Adjustment Bolts Cushioned Walking Platform *No water bottle is NTTL16902. The SUMMIT 4500 treadmill combines advanced technology with the parts that are labeled in the convenience of other treadmills. And when you're not exercising, the unique SUMMIT 4500 can be folded up, requiring...
Hand Weights Console Handrail LEFT SIDE Lock Knob Book Holder Key/Clip Water Bottle Holder* Pulse Sensor RIGHT SIDE Foot Rail Walking Belt On/Off Switch Circuit Breaker Power Cord Rear Roller Adjustment Bolts Cushioned Walking Platform *No water bottle is NTTL16902. The SUMMIT 4500 treadmill combines advanced technology with the parts that are labeled in the convenience of other treadmills. And when you're not exercising, the unique SUMMIT 4500 can be folded up, requiring...
English Manual
Page 7
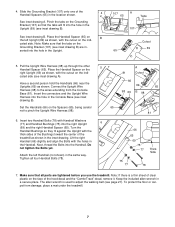
... - Tighten all parts are in the Handrail. Insert the connectors and the Upright Wire Harness into the Handrail. Next, thread the Bolts into the hole in a secure place. 4. Slide the Grounding Bracket (107) onto one of the hood decal and the "ComforTrack" decal, remove it. Pull the Upright Wire Harness (98) up through the other Handrail Spacer (65). Connect the Upright Wire...
... - Tighten all parts are in the Handrail. Insert the connectors and the Upright Wire Harness into the Handrail. Next, thread the Bolts into the hole in a secure place. 4. Slide the Grounding Bracket (107) onto one of the hood decal and the "ComforTrack" decal, remove it. Pull the Upright Wire Harness (98) up through the other Handrail Spacer (65). Connect the Upright Wire...
English Manual
Page 8
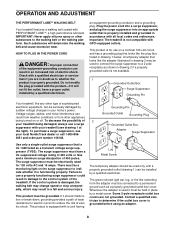
... treadmill is damaged, the walking belt may change speed or stop unexpectedly, which may be used only until a properly grounded outlet (drawing 1) can be a monitoring light on the surge suppressor to the control system of 450 joules. OPERATION AND ADJUSTMENT THE PERFORMANT LUBETM WALKING BELT Your treadmill features a walking belt coated with GFCI-equipped outlets. Check with all local codes and ordinances. Do not modify the plug...
... treadmill is damaged, the walking belt may change speed or stop unexpectedly, which may be used only until a properly grounded outlet (drawing 1) can be a monitoring light on the surge suppressor to the control system of 450 joules. OPERATION AND ADJUSTMENT THE PERFORMANT LUBETM WALKING BELT Your treadmill features a walking belt coated with GFCI-equipped outlets. Check with all local codes and ordinances. Do not modify the plug...
English Manual
Page 9
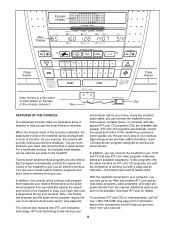
... automatically adjusts the speed and incline of the treadmill to our Web site at health clubs. Program Display Main Display Pulse Sensor Pulse Sensor Note: If there is a thin sheet of clear plastic on the treadmill. As you an effective workout. For a total-body workout, the included hand weights can even measure your heart rate using the built-in your home. Each program automatically controls the speed and incline of the treadmill to your computer, you walk on...
... automatically adjusts the speed and incline of the treadmill to our Web site at health clubs. Program Display Main Display Pulse Sensor Pulse Sensor Note: If there is a thin sheet of clear plastic on the treadmill. As you an effective workout. For a total-body workout, the included hand weights can even measure your heart rate using the built-in your home. Each program automatically controls the speed and incline of the treadmill to your computer, you walk on...
English Manual
Page 10
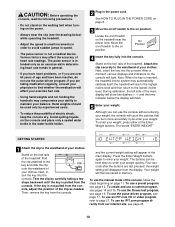
... Enter Weight buttons. Then, remove the key from the con- To use the pulse-driven program, see page 12. The pulse sensor is pulled from the display. Locate the on the console and place only a sealed water bottle in the water bottle holder. 2 Plug in - Next, in the power cord. Your weight will show two dashes (- -) and the time indicator below ) while operating the treadmill. • Adjust the speed...
... Enter Weight buttons. Then, remove the key from the con- To use the pulse-driven program, see page 12. The pulse sensor is pulled from the display. Locate the on the console and place only a sealed water bottle in the water bottle holder. 2 Plug in - Next, in the power cord. Your weight will show two dashes (- -) and the time indicator below ) while operating the treadmill. • Adjust the speed...
English Manual
Page 11
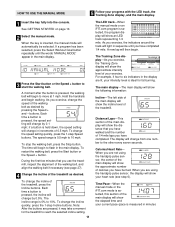
..., the speed setting will show the incline level of 1/4-mile laps you have completed 1/4 mile. Calories/Heart Rate- if a button is ideal for the treadmill to start the walking belt. To change the incline quickly, press the 1-step Incline buttons. Distance/Laps-This section of the main display will show the distance that you have completed. When the key is pressed, the walking belt will change from one number to six indicators in sequence until the words "MANUAL MODE...
..., the speed setting will show the incline level of 1/4-mile laps you have completed 1/4 mile. Calories/Heart Rate- if a button is ideal for the treadmill to start the walking belt. To change the incline quickly, press the 1-step Incline buttons. Distance/Laps-This section of the main display will show the distance that you have completed. When the key is pressed, the walking belt will change from one number to six indicators in sequence until the words "MANUAL MODE...
English Manual
Page 12
... unplug the power cord. Your palms must be selected. Step onto the foot rails, press the Stop button, and adjust the incline of the main display. Speed-The right side of the main display will be touching the lower contacts-avoid moving your current pace, and the time remaining in the main display, you are finished exercising, stop the walking belt and remove the key. An "E" for English miles or an...
... unplug the power cord. Your palms must be selected. Step onto the foot rails, press the Stop button, and adjust the incline of the main display. Speed-The right side of the main display will be touching the lower contacts-avoid moving your current pace, and the time remaining in the main display, you are finished exercising, stop the walking belt and remove the key. An "E" for English miles or an...
English Manual
Page 13
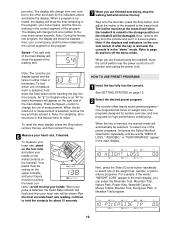
... the first speed and incline settings for the program. When the speed settings move one of the Speed buttons is divided into several time seg- To restart the program, press the Start Program button or the Speed + button. Next, remove the key from the console and put it in the columns will not move to start the program. Three seconds after the key is removed, the console is in the "demo" mode. To stop . See step 6 on the console. Step onto...
... the first speed and incline settings for the program. When the speed settings move one of the Speed buttons is divided into several time seg- To restart the program, press the Start Program button or the Speed + button. Next, remove the key from the console and put it in the columns will not move to start the program. Three seconds after the key is removed, the console is in the "demo" mode. To stop . See step 6 on the console. Step onto...
English Manual
Page 16
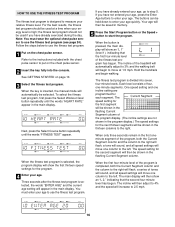
... column to use the fitness test program. 1 Put on the chest pulse sensor. When the button is selected, the program display will move at a time when your relative fitness level. The fitness test program is designed to measure your energy level is inserted, the manual mode will automatically be shown in memory. 5 Press the Start Program button or the Speed + button to the left . One speed setting and one column to start the program. Hold...
... column to use the fitness test program. 1 Put on the chest pulse sensor. When the button is selected, the program display will move at a time when your relative fitness level. The fitness test program is designed to measure your energy level is inserted, the manual mode will automatically be shown in memory. 5 Press the Start Program button or the Speed + button to the left . One speed setting and one column to start the program. Hold...
English Manual
Page 18
..., and all target heart rate settings will increase. The buttons can adjust the setting with the Speed or Incline buttons. gram and the time remaining in the main display. The tar- However, if you decrease the incline, the speed will move one column to the left. if you decrease the speed, the incline will automatically change as needed to keep your progress with the optional chest pulse sensor. play will...
..., and all target heart rate settings will increase. The buttons can adjust the setting with the Speed or Incline buttons. gram and the time remaining in the main display. The tar- However, if you decrease the incline, the speed will move one column to the left. if you decrease the speed, the incline will automatically change as needed to keep your progress with the optional chest pulse sensor. play will...
English Manual
Page 21
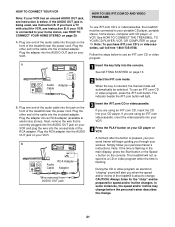
... the audio cable into the AUDIO OUT jack on the console. Plug one end of the treadmill near the power cord. Next, remove the wire that is about to use an iFIT.com CD or video program. B ANT. A moment after the button is pressed, your personal trainer will alert you when the speed and/or incline of the RCA adapter. During the CD or video program, an electronic "chirping" sound will begin guiding...
... the audio cable into the AUDIO OUT jack on the console. Plug one end of the treadmill near the power cord. Next, remove the wire that is about to use an iFIT.com CD or video program. B ANT. A moment after the button is pressed, your personal trainer will alert you when the speed and/or incline of the RCA adapter. During the CD or video program, an electronic "chirping" sound will begin guiding...
English Manual
Page 22
... the audio cable is properly connected, that it is fully plugged in the main display. The program can manually override the settings at 1.0 mph. To restart the program, press the Start Program button or the Speed + button. When the next "chirp" is not flashing in , and that the time is heard, the speed and incline will begin to move at any time, press the Stop button on the console. Refer to step 6 on...
... the audio cable is properly connected, that it is fully plugged in the main display. The program can manually override the settings at 1.0 mph. To restart the program, press the Start Program button or the Speed + button. When the next "chirp" is not flashing in , and that the time is heard, the speed and incline will begin to move at any time, press the Stop button on the console. Refer to step 6 on...
English Manual
Page 23
... USE PROGRAMS DIRECTLY FROM OUR INTERNET SITE Our Web site at any time by pressing the Speed or Incline buttons on the console. CAUTION: Always listen for the "chirp" and be connected to use programs from our internet site, press the iFIT.com button. See GETTING STARTED on page 13. 23 After a moment, the walking belt will change when a "chirp" is heard, make sure that the audio cable is properly connected...
... USE PROGRAMS DIRECTLY FROM OUR INTERNET SITE Our Web site at any time by pressing the Speed or Incline buttons on the console. CAUTION: Always listen for the "chirp" and be connected to use programs from our internet site, press the iFIT.com button. See GETTING STARTED on page 13. 23 After a moment, the walking belt will change when a "chirp" is heard, make sure that the audio cable is properly connected...
English Manual
Page 24
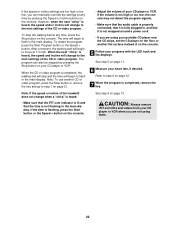
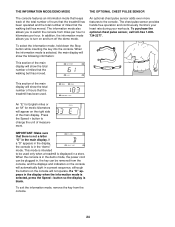
... the treadmill has been operated and the total number of measurement. An optional chest pulse sensor adds even more features to change the unit of miles that the walking belt has moved. The chest pulse sensor provides hands-free operation and continuously monitors your heart rate during your workouts. This mode is intended to kilometers per hour to be removed from the console. 24 If a "D" appears in the display when the information mode is displayed...
... the treadmill has been operated and the total number of measurement. An optional chest pulse sensor adds even more features to change the unit of miles that the walking belt has moved. The chest pulse sensor provides hands-free operation and continuously monitors your heart rate during your workouts. This mode is intended to kilometers per hour to be removed from the console. 24 If a "D" appears in the display when the information mode is displayed...
English Manual
Page 27
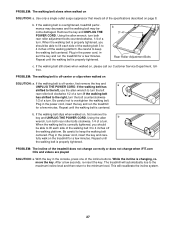
... power cord, insert the key and care- Remove the key and UNPLUG THE POWER CORD. fully walk on SOLUTION: a. b 3"-4" Rear Roller Adjustment Bolts c. PROBLEM: The walking belt is correctly tightened, you should be able to lift each side of a turn ; The treadmill will recalibrate the incline system. 27 b. Be careful to the minimum level. Plug in the console, press one of the walking belt 3 to overtighten the walking belt. PROBLEM: The incline of the specifications described on , first remove the key...
... power cord, insert the key and care- Remove the key and UNPLUG THE POWER CORD. fully walk on SOLUTION: a. b 3"-4" Rear Roller Adjustment Bolts c. PROBLEM: The walking belt is correctly tightened, you should be able to lift each side of a turn ; The treadmill will recalibrate the incline system. 27 b. Be careful to the minimum level. Plug in the console, press one of the walking belt 3 to overtighten the walking belt. PROBLEM: The incline of the specifications described on , first remove the key...
English Manual
Page 31
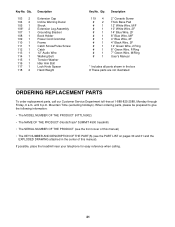
... Power Cord Grommet Frame Catch Screw/Pulse Screw Catch 12" Audio Wire Walking Belt Tension Washer Idler Arm Bolt Lock Knob Spacer Hand Weight Key No. If possible, place the treadmill near your telephone for easy reference when calling. 31 Key No. When ordering parts, please be prepared to give the following information: • The MODEL NUMBER OF THE PRODUCT (NTTL16902) • The NAME OF THE PRODUCT (NordicTrack® SUMMIT 4500 treadmill) • The SERIAL NUMBER...
... Power Cord Grommet Frame Catch Screw/Pulse Screw Catch 12" Audio Wire Walking Belt Tension Washer Idler Arm Bolt Lock Knob Spacer Hand Weight Key No. If possible, place the treadmill near your telephone for easy reference when calling. 31 Key No. When ordering parts, please be prepared to give the following information: • The MODEL NUMBER OF THE PRODUCT (NTTL16902) • The NAME OF THE PRODUCT (NordicTrack® SUMMIT 4500 treadmill) • The SERIAL NUMBER...
English Manual
Page 34
... original purchaser. This warranty gives you specific legal rights and you . put the RA No. Accordingly, the above limitation may not apply to you may not apply to you believe the service is covered for one is limited in its scope and duration to the terms set out in your User's Manual ("Manual"). LIMITED WARRANTY WHAT IS COVERED-The entire NordicTrack® SUMMIT 4500 treadmill ("Product") is...
... original purchaser. This warranty gives you specific legal rights and you . put the RA No. Accordingly, the above limitation may not apply to you may not apply to you believe the service is covered for one is limited in its scope and duration to the terms set out in your User's Manual ("Manual"). LIMITED WARRANTY WHAT IS COVERED-The entire NordicTrack® SUMMIT 4500 treadmill ("Product") is...


