
English Manual
Page 2
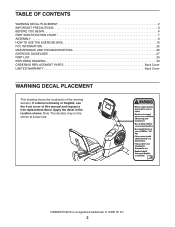
...NORDICTRACK is missing or illegible, see the front cover of this manual and request a free replacement decal. Note: The decal(s) may not be shown at actual size. TABLE OF CONTENTS WARNING DECAL PLACEMENT 2 IMPORTANT PRECAUTIONS 3 BEFORE YOU BEGIN 6 PART IDENTIFICATION CHART 7 ASSEMBLY 8 HOW TO USE THE EXERCISE BIKE... 15 FCC INFORMATION 25 MAINTENANCE AND TROUBLESHOOTING 26 EXERCISE GUIDELINES 27 PART LIST 29 EXPLODED DRAWING 30 ORDERING REPLACEMENT PARTS Back Cover LIMITED WARRANTY Back...
...NORDICTRACK is missing or illegible, see the front cover of this manual and request a free replacement decal. Note: The decal(s) may not be shown at actual size. TABLE OF CONTENTS WARNING DECAL PLACEMENT 2 IMPORTANT PRECAUTIONS 3 BEFORE YOU BEGIN 6 PART IDENTIFICATION CHART 7 ASSEMBLY 8 HOW TO USE THE EXERCISE BIKE... 15 FCC INFORMATION 25 MAINTENANCE AND TROUBLESHOOTING 26 EXERCISE GUIDELINES 27 PART LIST 29 EXPLODED DRAWING 30 ORDERING REPLACEMENT PARTS Back Cover LIMITED WARRANTY Back...
English Manual
Page 3
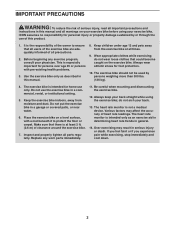
... clothes that there is intended only as described in general. 14. The heart rate monitor is at all parts regularly. It is not a medical device. Use the exercise bike only as an exercise aid in determining heart rate trends in this manual and all warnings on the exercise... bike. Wear appropriate clothes while exercising; Do not put the exercise bike in this manual. 8. Be careful when mounting and dismounting the exercise bike. 12. Before beginning any worn parts immediately. 11. do not arch your physician. The heart...
... clothes that there is intended only as described in general. 14. The heart rate monitor is at all parts regularly. It is not a medical device. Use the exercise bike only as an exercise aid in determining heart rate trends in this manual and all warnings on the exercise... bike. Wear appropriate clothes while exercising; Do not put the exercise bike in this manual. 8. Be careful when mounting and dismounting the exercise bike. 12. Before beginning any worn parts immediately. 11. do not arch your physician. The heart...
English Manual
Page 6
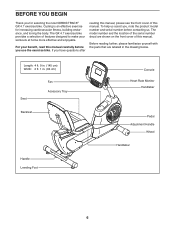
... this manual, please see the front cover of this manual. To help us . Before reading further, please familiarize yourself with the parts that are shown on the front cover of this manual carefully before contacting us assist you, note the product model number and serial ...Length: 4 ft. 9 in. (145 cm) Width: 2 ft. 1 in the drawing below. Cycling is an effective exercise for selecting the new NORDICTRACK® GX 4.7 exercise bike. For your workouts at home more effective and enjoyable. The model number and the location of features designed to make your benefit, read this...
... this manual, please see the front cover of this manual. To help us . Before reading further, please familiarize yourself with the parts that are shown on the front cover of this manual carefully before contacting us assist you, note the product model number and serial ...Length: 4 ft. 9 in. (145 cm) Width: 2 ft. 1 in the drawing below. Cycling is an effective exercise for selecting the new NORDICTRACK® GX 4.7 exercise bike. For your workouts at home more effective and enjoyable. The model number and the location of features designed to make your benefit, read this...

English Manual
Page 7
... be included. The number in the hardware kit, check to identify the small parts needed for assembly. Note: If a part is not in parentheses below to see if it has been preassembled. PART IDENTIFICATION CHART Use the drawings below each drawing is the quantity needed for assembly. The number following ...the key number is the key number of the part, from the PART LIST near the end of this manual. M6 Large Washer (35)–-2 M6 Split Washer (34)–-2 M8 Locknut (25)–-2 M4 ...
... be included. The number in the hardware kit, check to identify the small parts needed for assembly. Note: If a part is not in parentheses below to see if it has been preassembled. PART IDENTIFICATION CHART Use the drawings below each drawing is the quantity needed for assembly. The number following ...the key number is the key number of the part, from the PART LIST near the end of this manual. M6 Large Washer (35)–-2 M6 Split Washer (34)–-2 M8 Locknut (25)–-2 M4 ...
English Manual
Page 8
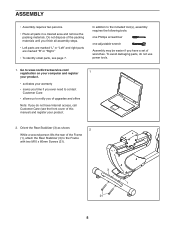
...persons. •• Place all assembly steps. •• Left parts are marked “"L”" or “"Left”" and right parts are marked “"R”" or “"Right.”" •• To identify small parts, see the front cover of the packing materials until you nish... all parts in a cleared area and remove the packing materials. To avoid damaging parts, do not have a set of the Frame (1), attach the Rear Stabilizer...
...persons. •• Place all assembly steps. •• Left parts are marked “"L”" or “"Left”" and right parts are marked “"R”" or “"Right.”" •• To identify small parts, see the front cover of the packing materials until you nish... all parts in a cleared area and remove the packing materials. To avoid damaging parts, do not have a set of the Frame (1), attach the Rear Stabilizer...
English Manual
Page 14
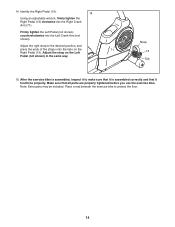
Adjust the strap on the 71 Right Pedal (13). Make sure that it functions properly. Place a mat beneath the exercise bike to the desired position, and press the ends of the straps onto the tabs on the Left Pedal (not shown) in the same way. Identify ... right strap to protect the floor. 14 Strap 13 Tab 15. After the exercise bike is assembled, inspect it to make sure that it is assembled correctly and that all parts are properly tightened before you use the exercise bike. Firmly tighten the Left Pedal (not shown) counterclockwise into the Right Crank Arm...
Adjust the strap on the 71 Right Pedal (13). Make sure that it functions properly. Place a mat beneath the exercise bike to the desired position, and press the ends of the straps onto the tabs on the Left Pedal (not shown) in the same way. Identify ... right strap to protect the floor. 14 Strap 13 Tab 15. After the exercise bike is assembled, inspect it to make sure that it is assembled correctly and that all parts are properly tightened before you use the exercise bike. Firmly tighten the Left Pedal (not shown) counterclockwise into the Right Crank Arm...
English Manual
Page 24
The display will display several optional screens. To view distance in the lower part of the display. 3. Trainer Voice—-The currently selected setting for the selected optional screen. Press the Enter button repeatedly to turn the demo mode ... is turned on, the console will appear in miles or kilometers) that has been pedaled on the exercise bike. The lower section of hours that the exercise bike has been used if the exercise bike is connected, some of measurement will show instructions for the audio coach will not be used and the...
The display will display several optional screens. To view distance in the lower part of the display. 3. Trainer Voice—-The currently selected setting for the selected optional screen. Press the Enter button repeatedly to turn the demo mode ... is turned on, the console will appear in miles or kilometers) that has been pedaled on the exercise bike. The lower section of hours that the exercise bike has been used if the exercise bike is connected, some of measurement will show instructions for the audio coach will not be used and the...

English Manual
Page 25
.... These limits are designed to operate this equipment does cause harmful interference to radio or television reception, which the receiver is no guarantee that to part 15 of the following measures: •• Reorient or relocate the receiving antenna. •• Increase the separation between the equipment and the receiver. •...
.... These limits are designed to operate this equipment does cause harmful interference to radio or television reception, which the receiver is no guarantee that to part 15 of the following measures: •• Reorient or relocate the receiving antenna. •• Increase the separation between the equipment and the receiver. •...
English Manual
Page 26
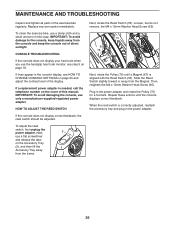
MAINTENANCE AND TROUBLESHOOTING Inspect and tighten all parts of mild soap. To clean the exercise bike, use a flat screwdriver and release the tabs on the cover of this manual. Next, 5 use a damp cloth and a small amount of the exercise bike regularly. Loosen, but do not remove, the M4 x 12mm ...handgrip heart rate monitor, see HOW TO CHANGE CONSOLE SETTINGS on page 18. Next, locate the Reed Switch (78). Replace any worn parts immediately. HOW TO ADJUST THE REED SWITCH If the console does not display correct feedback, the reed switch should be adjusted. Plug in ...
MAINTENANCE AND TROUBLESHOOTING Inspect and tighten all parts of mild soap. To clean the exercise bike, use a flat screwdriver and release the tabs on the cover of this manual. Next, 5 use a damp cloth and a small amount of the exercise bike regularly. Loosen, but do not remove, the M4 x 12mm ...handgrip heart rate monitor, see HOW TO CHANGE CONSOLE SETTINGS on page 18. Next, locate the Reed Switch (78). Replace any worn parts immediately. HOW TO ADJUST THE REED SWITCH If the console does not display correct feedback, the reed switch should be adjusted. Plug in ...
English Manual
Page 27
... aerobic exercise, which is activity that requires large amounts of your exercise until your heart rate is the key to make exercise a regular and enjoyable part of rest between workouts. For aerobic exercise, adjust the intensity of oxygen for longer than 20 minutes.) Breathe regularly and deeply as a guide to five...
... aerobic exercise, which is activity that requires large amounts of your exercise until your heart rate is the key to make exercise a regular and enjoyable part of rest between workouts. For aerobic exercise, adjust the intensity of oxygen for longer than 20 minutes.) Breathe regularly and deeply as a guide to five...
English Manual
Page 29
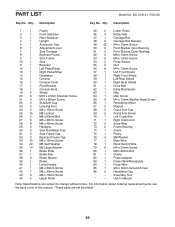
Qty. Assembly Tool * –- PART LIST Model No. 831.21914.1 R1213A Key No. Description Key No. User’'s Manual Note: Specifications are not illustrated. 29 Qty. Description 1 1 Frame 2 1 Front Stabilizer 3 1 ... 1 Clamp 82 1 Power Adapter 83 1 Power Wire/Receptacle 84 1 Pulse Wire 85 1 M4 x 16mm Ground Screw 86 2 Handlebar Cap * –- For information about ordering replacement parts, see the back cover of this manual. *These...
Qty. Assembly Tool * –- PART LIST Model No. 831.21914.1 R1213A Key No. Description Key No. User’'s Manual Note: Specifications are not illustrated. 29 Qty. Description 1 1 Frame 2 1 Front Stabilizer 3 1 ... 1 Clamp 82 1 Power Adapter 83 1 Power Wire/Receptacle 84 1 Pulse Wire 85 1 M4 x 16mm Ground Screw 86 2 Handlebar Cap * –- For information about ordering replacement parts, see the back cover of this manual. *These...

English Manual
Page 32
...freight charges to provide the following information when contacting us assist you, be prepared to and from the date of purchase. If replacement parts are not followed, if the product is abused or improperly or abnormally used, or if the product is limited to the customer. ...for commercial or rental purposes. This warranty will be voided if the product is used for a minimal trip charge. ORDERING REPLACEMENT PARTS To order replacement parts, please see the front cover of this manual) LIMITED WARRANTY IMPORTANT: To protect your fitness equipment with an extended service plan...
...freight charges to provide the following information when contacting us assist you, be prepared to and from the date of purchase. If replacement parts are not followed, if the product is abused or improperly or abnormally used, or if the product is limited to the customer. ...for commercial or rental purposes. This warranty will be voided if the product is used for a minimal trip charge. ORDERING REPLACEMENT PARTS To order replacement parts, please see the front cover of this manual) LIMITED WARRANTY IMPORTANT: To protect your fitness equipment with an extended service plan...


