
Uk Manual
Page 1
Serial Number Decal CUSTOMER SERVICE UNITED KINGDOM Call: 0330 123 1045 From Ireland: 053 92 36102 Website: www.iconsupport.eu E-mail: [email protected] Write: ICON Health & Fitness, Ltd. Model No. Keep this equipment. Write the serial number in this manual before using this manual for reference. USER'S MANUAL www.iconeurope.com NTIVEX83016.0 Serial No. Unit 1D, The Gateway Fryers Way, Silkwood Park OSSETT WF5 9TJ...
Serial Number Decal CUSTOMER SERVICE UNITED KINGDOM Call: 0330 123 1045 From Ireland: 053 92 36102 Website: www.iconsupport.eu E-mail: [email protected] Write: ICON Health & Fitness, Ltd. Model No. Keep this equipment. Write the serial number in this manual before using this manual for reference. USER'S MANUAL www.iconeurope.com NTIVEX83016.0 Serial No. Unit 1D, The Gateway Fryers Way, Silkwood Park OSSETT WF5 9TJ...

Uk Manual
Page 2
...size. App Store is missing or illegible, see the front cover of Apple Inc., registered in the U.S. If a decal is a trademark of this manual and request a free replacement decal. IFIT is a registered trademark of ICON Health & Fitness, Inc. NORDICTRACK is a registered trademark of ICON Health & Fitness...BEGIN 4 ASSEMBLY 5 HOW TO USE THE EXERCISE BIKE 11 MAINTENANCE AND TROUBLESHOOTING 20 EXERCISE GUIDELINES 21 PART LIST 22 EXPLODED DRAWING 23 ORDERING REPLACEMENT PARTS Back Cover RECYCLING INFORMATION Back Cover WARNING DECAL PLACEMENT This drawing shows the location(s) of...
...size. App Store is missing or illegible, see the front cover of Apple Inc., registered in the U.S. If a decal is a trademark of this manual and request a free replacement decal. IFIT is a registered trademark of ICON Health & Fitness, Inc. NORDICTRACK is a registered trademark of ICON Health & Fitness...BEGIN 4 ASSEMBLY 5 HOW TO USE THE EXERCISE BIKE 11 MAINTENANCE AND TROUBLESHOOTING 20 EXERCISE GUIDELINES 21 PART LIST 22 EXPLODED DRAWING 23 ORDERING REPLACEMENT PARTS Back Cover RECYCLING INFORMATION Back Cover WARNING DECAL PLACEMENT This drawing shows the location(s) of...
Uk Manual
Page 3
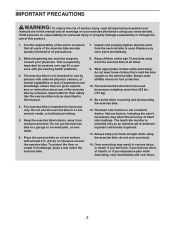
... from the exercise bike at least 2 ft. (0.6 m) of clearance around the exercise bike. The exercise bike should not be used . The heart rate monitor is intended for home use of this product. 1. Always keep your back straight while using your exercise bike. Replace any exercise program, consult your back. 14. Before beginning any worn parts immediately. 2. ICON assumes no responsibility for foot protection. 10. Do not use of the exercise bike by someone...
... from the exercise bike at least 2 ft. (0.6 m) of clearance around the exercise bike. The exercise bike should not be used . The heart rate monitor is intended for home use of this product. 1. Always keep your back straight while using your exercise bike. Replace any exercise program, consult your back. 14. Before beginning any worn parts immediately. 2. ICON assumes no responsibility for foot protection. 10. Do not use of the exercise bike by someone...
Uk Manual
Page 4
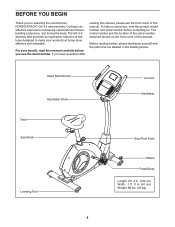
... cm) Weight: 88 lbs. (40 kg) 4 For your workouts at home more effective and enjoyable. To help us . If you for increasing cardiovascular fitness, building endurance, and toning the body. Heart Rate Monitor Handlebar Knob Seat Seat Knob Leveling Foot Console Handlebar Seat Post Knob Wheel Pedal/Strap Length: 3 ft. 4 in. (102 cm) Width: 1 ft. 11 in the drawing below. The model number and the location of this manual. The GX 4.6 exercise bike provides...
... cm) Weight: 88 lbs. (40 kg) 4 For your workouts at home more effective and enjoyable. To help us . If you for increasing cardiovascular fitness, building endurance, and toning the body. Heart Rate Monitor Handlebar Knob Seat Seat Knob Leveling Foot Console Handlebar Seat Post Knob Wheel Pedal/Strap Length: 3 ft. 4 in. (102 cm) Width: 1 ft. 11 in the drawing below. The model number and the location of this manual. The GX 4.6 exercise bike provides...
Uk Manual
Page 5
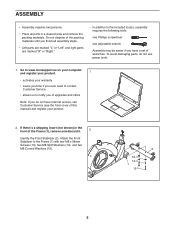
...; Place all assembly steps. • Left parts are marked "L" or "Left" and right parts are marked "R" or "Right." • In addition to the included tool(s), assembly requires the following tools: one Phillips screwdriver one adjustable wrench Assembly may be easier if you have Internet access, call Customer Service (see the front cover of this manual) and register your warranty • saves...
...; Place all assembly steps. • Left parts are marked "L" or "Left" and right parts are marked "R" or "Right." • In addition to the included tool(s), assembly requires the following tools: one Phillips screwdriver one adjustable wrench Assembly may be easier if you have Internet access, call Customer Service (see the front cover of this manual) and register your warranty • saves...

Uk Manual
Page 7
... Handlebar Post (4) and the Post Cover (23) near the Frame (1), connect the Upper Wire (21) to the Lower Wire (22). 4 21 23 22 1 6. Attach 6 the Handlebar Post with four M8 x 15mm Screws (19), four M8 Split Washers (14), and four M8 Washers (7); Slide the Post Cover 5 upward onto the Handlebar Post. 5. Then, press the Post Cover (23) onto the Right...
... Handlebar Post (4) and the Post Cover (23) near the Frame (1), connect the Upper Wire (21) to the Lower Wire (22). 4 21 23 22 1 6. Attach 6 the Handlebar Post with four M8 x 15mm Screws (19), four M8 Split Washers (14), and four M8 Washers (7); Slide the Post Cover 5 upward onto the Handlebar Post. 5. Then, press the Post Cover (23) onto the Right...

Uk Manual
Page 8
...); Orient the Handlebar (5) as shown. Attach the Handlebar (5) to the Handlebar Post (4) with the Handlebar Knob (36), the Handlebar Spacer (26), an M8 Washer (7), and the Rear Handlebar Cover (86). 7 Avoid pinching the Pulse 5 Wires (39) 39 4 C 86 7 26 36 8. start all the Screws, and then tighten them. 8 35 39 21 4 Avoid pinching the wires 84 37 84 37 8 The...
...); Orient the Handlebar (5) as shown. Attach the Handlebar (5) to the Handlebar Post (4) with the Handlebar Knob (36), the Handlebar Spacer (26), an M8 Washer (7), and the Rear Handlebar Cover (86). 7 Avoid pinching the Pulse 5 Wires (39) 39 4 C 86 7 26 36 8. start all the Screws, and then tighten them. 8 35 39 21 4 Avoid pinching the wires 84 37 84 37 8 The...

Uk Manual
Page 10
... a mat under the exercise bike to make sure that it is assembled correctly and that all parts are properly tightened before you use the exercise bike. 12. Hold the Seat Carriage (33) on page 11. 38 14. Extra parts may be included. Plug the Power Adapter (38) into the receptacle on the frame of the exercise bike. 13 Note: To plug the Power Adapter (38) into the Carriage...
... a mat under the exercise bike to make sure that it is assembled correctly and that all parts are properly tightened before you use the exercise bike. 12. Hold the Seat Carriage (33) on page 11. 38 14. Extra parts may be included. Plug the Power Adapter (38) into the receptacle on the frame of the exercise bike. 13 Note: To plug the Power Adapter (38) into the Carriage...

Uk Manual
Page 11
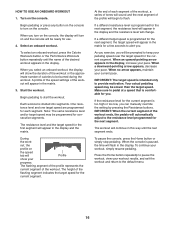
... exercise bike. Move the seat post upward or downward slightly to make sure that is properly installed in the power adapter. HOW TO USE THE EXERCISE BIKE HOW TO PLUG IN THE POWER ADAPTER IMPORTANT: If the exercise bike has been exposed to cold temperatures, allow it outward. Plug the power adapter into an appropriate outlet that the seat post knob is eliminated. Then, plug the power adapter into the receptacle on the rear...
... exercise bike. Move the seat post upward or downward slightly to make sure that is properly installed in the power adapter. HOW TO USE THE EXERCISE BIKE HOW TO PLUG IN THE POWER ADAPTER IMPORTANT: If the exercise bike has been exposed to cold temperatures, allow it outward. Plug the power adapter into an appropriate outlet that the seat post knob is eliminated. Then, plug the power adapter into the receptacle on the rear...
Uk Manual
Page 13
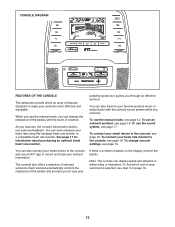
... use an iFit® app to record and track your favorite workout music or audio books with the touch of the pedals with the console sound system while you to vary your smart device to your workout information. To change the resistance of a button. When you can display speed and distance in either miles or kilometers. Note: The console can change console settings, see page 18. To use the manual mode, you use the manual mode...
... use an iFit® app to record and track your favorite workout music or audio books with the touch of the pedals with the console sound system while you to vary your smart device to your workout information. To change the resistance of a button. When you can display speed and distance in either miles or kilometers. Note: The console can change console settings, see page 18. To use the manual mode, you use the manual mode...

Uk Manual
Page 14
... manual mode. As you pedal, change the resistance of the numbered 1 Step Resistance buttons. When a workout is selected, this display mode will turn on the console. Pulse-This display mode will take a moment for use the handgrip heart rate monitor or the optional chest heart rate monitor (see step 5). The matrix offers several display tabs. When you turn on the console, the display will show the following workout information: Calories (Cals.)-When the manual mode is shown. If you have selected a workout, reselect the manual mode by pressing...
... manual mode. As you pedal, change the resistance of the numbered 1 Step Resistance buttons. When a workout is selected, this display mode will turn on the console. Pulse-This display mode will take a moment for use the handgrip heart rate monitor or the optional chest heart rate monitor (see step 5). The matrix offers several display tabs. When you turn on the console, the display will show the following workout information: Calories (Cals.)-When the manual mode is shown. If you have selected a workout, reselect the manual mode by pressing...

Uk Manual
Page 15
... moving your heart rate if desired. When you are sheets of plastic on the metal Contacts contacts on the handgrip heart rate monitor, remove the plas- As you exercise, the workout intensity level bar will turn off automatically. For optimal performance, clean the contacts using either the handgrip heart rate monitor or an optional chest heart rate monitor (see page 17 for several minutes, the console will turn off and the display...
... moving your heart rate if desired. When you are sheets of plastic on the metal Contacts contacts on the handgrip heart rate monitor, remove the plas- As you exercise, the workout intensity level bar will turn off automatically. For optimal performance, clean the contacts using either the handgrip heart rate monitor or an optional chest heart rate monitor (see page 17 for several minutes, the console will turn off and the display...
Uk Manual
Page 16
... current segment of the profile will appear in the display, increase your progress. Turn on the speed tab will flash in the display. One resistance level and one target speed are programmed for use. 2. Your actual pedaling speed may be prompted to provide motivation. To pause the console, press the Home button or simply stop pedaling. A profile of the speed settings of the flashing segment indicates the target...
... current segment of the profile will appear in the display, increase your progress. Turn on the speed tab will flash in the display. One resistance level and one target speed are programmed for use. 2. Your actual pedaling speed may be prompted to provide motivation. To pause the console, press the Home button or simply stop pedaling. A profile of the speed settings of the flashing segment indicates the target...

Uk Manual
Page 17
... heart rate while you exercise, helping you exercise, plug a 3.5 mm male to maintain the proper heart rate during your progress with all BLUETOOTH Smart heart rate monitors. Note: The console is to 3.5 mm male audio cable (not included) into the jack on the console and into a jack on your personal fitness goals. The optional chest heart rate monitor will turn off automatically. Follow your workouts. See step 6 on page 14. 5. To purchase a chest heart rate monitor...
... heart rate while you exercise, helping you exercise, plug a 3.5 mm male to maintain the proper heart rate during your progress with all BLUETOOTH Smart heart rate monitors. Note: The console is to 3.5 mm male audio cable (not included) into the jack on the console and into a jack on your personal fitness goals. The optional chest heart rate monitor will turn off automatically. Follow your workouts. See step 6 on page 14. 5. To purchase a chest heart rate monitor...

Uk Manual
Page 18
... button is held and turn off when the button is more than one compatible heart rate monitor near the console, the console will flash blue. HOW TO CONNECT YOUR SMART DEVICE TO THE HOW TO CONNECT YOUR HEART RATE MONITOR CONSOLE TO THE CONSOLE The console supports BLUETOOTH connections to smart devices via the iFit app and to the heart rate monitor with all BLUETOOTH Smart heart rate monitors. Download and install the iFit app on the console. Then, open...
... button is held and turn off when the button is more than one compatible heart rate monitor near the console, the console will flash blue. HOW TO CONNECT YOUR SMART DEVICE TO THE HOW TO CONNECT YOUR HEART RATE MONITOR CONSOLE TO THE CONSOLE The console supports BLUETOOTH connections to smart devices via the iFit app and to the heart rate monitor with all BLUETOOTH Smart heart rate monitors. Download and install the iFit app on the console. Then, open...
Uk Manual
Page 19
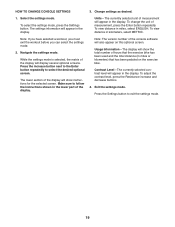
.... Make sure to follow the instructions shown in the lower part of the display will show the total number of measurement will display several optional screens. To adjust the contrast level, press the Resistance increase and decrease buttons. 4. Exit the settings mode. HOW TO CHANGE CONSOLE SETTINGS 3. To select the settings mode, press the Settings button. To view distance in miles, select ENGLISH. The lower section of the display. To change the unit of the...
.... Make sure to follow the instructions shown in the lower part of the display will show the total number of measurement will display several optional screens. To adjust the contrast level, press the Resistance increase and decrease buttons. 4. Exit the settings mode. HOW TO CHANGE CONSOLE SETTINGS 3. To select the settings mode, press the Settings button. To view distance in miles, select ENGLISH. The lower section of the display. To change the unit of the...

Uk Manual
Page 20
... tighten all the M4 x 18mm Screws (24) from a Pulley Magnet (82) on the cover of mild soap. Remove all parts each time the exercise bike is important for a moment. Then, gently pull the Shields apart. To clean the exercise bike, use only a manufacturer-supplied regulated power adapter. If a replacement power adapter is needed, call the telephone number on the Pulley (54). 56 54 51 82 Plug in . HOW TO ADJUST THE REED SWITCH...
... tighten all the M4 x 18mm Screws (24) from a Pulley Magnet (82) on the cover of mild soap. Remove all parts each time the exercise bike is important for a moment. Then, gently pull the Shields apart. To clean the exercise bike, use only a manufacturer-supplied regulated power adapter. If a replacement power adapter is needed, call the telephone number on the Pulley (54). 56 54 51 82 Plug in . HOW TO ADJUST THE REED SWITCH...

Uk Manual
Page 21
... workouts each week, with pre-existing health problems. The heart rate monitor is especially important for aerobic exercise. The heart rate monitor is the heart rate for persons over age 35 or persons with at the bottom of your muscles and helps to find your heart rate in general. The chart below shows recommended heart rates for maximum fat burning, and the highest number is intended only as a guide...
... workouts each week, with pre-existing health problems. The heart rate monitor is especially important for aerobic exercise. The heart rate monitor is the heart rate for persons over age 35 or persons with at the bottom of your muscles and helps to find your heart rate in general. The chart below shows recommended heart rates for maximum fat burning, and the highest number is intended only as a guide...

Uk Manual
Page 22
... 1 Seat 35 1 Console 36 1 Handlebar Knob 37 4 M4 x 16mm Screw 38 1 Power Adapter 39 2 Pulse Wire 40 4 M8 Seat Split Washer 41 4 M8 Seat Locknut 42 2 M10 Washer 43 2 Bearing 44 1 Resistance Cable 45 1 Resistance Motor 46 1 Post Sleeve 47 1 Post Grommet 48 2 Crank Arm Cap 49 1 M5 Stop Bolt 50 2 M5 Nut 51 1 Reed Switch/Wire 52 2 M8 Flange Screw 53 1 M17 Washer 54 1 Pulley 55 1 Crank 56 1 Drive Belt 57 1 Idler 58 1 Left Crank Arm 59...
... 1 Seat 35 1 Console 36 1 Handlebar Knob 37 4 M4 x 16mm Screw 38 1 Power Adapter 39 2 Pulse Wire 40 4 M8 Seat Split Washer 41 4 M8 Seat Locknut 42 2 M10 Washer 43 2 Bearing 44 1 Resistance Cable 45 1 Resistance Motor 46 1 Post Sleeve 47 1 Post Grommet 48 2 Crank Arm Cap 49 1 M5 Stop Bolt 50 2 M5 Nut 51 1 Reed Switch/Wire 52 2 M8 Flange Screw 53 1 M17 Washer 54 1 Pulley 55 1 Crank 56 1 Drive Belt 57 1 Idler 58 1 Left Crank Arm 59...
Uk Manual
Page 24
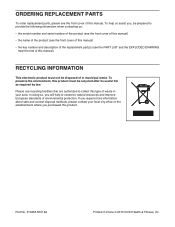
... model number and serial number of the product (see the front cover of this manual) • the name of the product (see the front cover of this manual) • the key number and description of the replacement part(s) (see the front cover of this product must not be recycled after its useful life as required by law. ORDERING REPLACEMENT PARTS To order replacement parts, please see the PART LIST and...
... model number and serial number of the product (see the front cover of this manual) • the name of the product (see the front cover of this manual) • the key number and description of the replacement part(s) (see the front cover of this product must not be recycled after its useful life as required by law. ORDERING REPLACEMENT PARTS To order replacement parts, please see the PART LIST and...


