

English Manual
Page 1
... questions, or if parts are missing, DO NOT CONTACT THE STORE; MT Sat. 8 a.m.-4 p.m. Save this equipment. please contact Customer Care. USER'S MANUAL Write the serial number in this manual before contacting us: CALL TOLL-FREE: 1-888-825-2588 Mon.-Fri. 6 a.m.-6 p.m. IMPORTANT: You must note the product model number and serial number.... Serial Number Decal QUESTIONS? MT ON THE WEB: www.nordictrackservice.com CAUTION Read all precautions and instructions in the space above ) before using this manual for reference. www.nordictrack.com Model No. NTL15007.5 Serial No.
... questions, or if parts are missing, DO NOT CONTACT THE STORE; MT Sat. 8 a.m.-4 p.m. Save this equipment. please contact Customer Care. USER'S MANUAL Write the serial number in this manual before contacting us: CALL TOLL-FREE: 1-888-825-2588 Mon.-Fri. 6 a.m.-6 p.m. IMPORTANT: You must note the product model number and serial number.... Serial Number Decal QUESTIONS? MT ON THE WEB: www.nordictrackservice.com CAUTION Read all precautions and instructions in the space above ) before using this manual for reference. www.nordictrack.com Model No. NTL15007.5 Serial No.
English Manual
Page 2
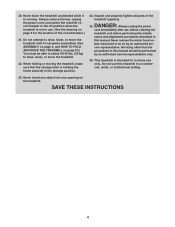
... YOU BEGIN 5 ASSEMBLY 6 HOW TO USE THE CHEST PULSE SENSOR 10 OPERATION AND ADJUSTMENT 11 HOW TO FOLD AND MOVE THE TREADMILL 23 TROUBLESHOOTING 25 EXERCISE GUIDELINES 28 PART LIST 30 EXPLODED DRAWING 32 ORDERING REPLACEMENT PARTS Back Cover LIMITED WARRANTY Back Cover WARNING DECAL ...PLACEMENT This drawing shows the locations of ICON IP, Inc. 2 NordicTrack is missing or illegible, call the telephone number on the front cover of this manual and request a free replacement decal. If a decal is a registered trademark of the warning decals....
... YOU BEGIN 5 ASSEMBLY 6 HOW TO USE THE CHEST PULSE SENSOR 10 OPERATION AND ADJUSTMENT 11 HOW TO FOLD AND MOVE THE TREADMILL 23 TROUBLESHOOTING 25 EXERCISE GUIDELINES 28 PART LIST 30 EXPLODED DRAWING 32 ORDERING REPLACEMENT PARTS Back Cover LIMITED WARRANTY Back Cover WARNING DECAL ...PLACEMENT This drawing shows the locations of ICON IP, Inc. 2 NordicTrack is missing or illegible, call the telephone number on the front cover of this manual and request a free replacement decal. If a decal is a registered trademark of the warning decals....

English Manual
Page 3
...carpet from damage, place a mat under age 12 and pets away from the treadmill at least 8 ft. (2.4 m) of clearance behind it and 2 ft. (0.6 m) on each side. To purchase a surge suppressor, see your local NordicTrack dealer or call the telephone number on the front cover of this product. 1.... or property damage sustained by persons weighing 350 lbs. (159 kg) or less. 9. Keep the treadmill indoors, away from heated surfaces. 6. Failure to use the treadmill with at all users of this manual and all important precautions and in a fall and serious injury. 14. Never start the...
...carpet from damage, place a mat under age 12 and pets away from the treadmill at least 8 ft. (2.4 m) of clearance behind it and 2 ft. (0.6 m) on each side. To purchase a surge suppressor, see your local NordicTrack dealer or call the telephone number on the front cover of this product. 1.... or property damage sustained by persons weighing 350 lbs. (159 kg) or less. 9. Keep the treadmill indoors, away from heated surfaces. 6. Failure to use the treadmill with at all users of this manual and all important precautions and in a fall and serious injury. 14. Never start the...
English Manual
Page 4
...6, and HOW TO FOLD AND MOVE THE TREADMILL on page 5 for in a commercial, rental, or institutional setting. 23. Always unplug the power cord immediately after use this manual. vice representative. When folding or moving the treadmill, make sure that the storage latch is intended... for the location of the treadmill regularly. less instructed to raise, lower, or move the treadmill. 22. This treadmill is holding the frame securely in this treadmill in -home...
...6, and HOW TO FOLD AND MOVE THE TREADMILL on page 5 for in a commercial, rental, or institutional setting. 23. Always unplug the power cord immediately after use this manual. vice representative. When folding or moving the treadmill, make sure that the storage latch is intended... for the location of the treadmill regularly. less instructed to raise, lower, or move the treadmill. 22. This treadmill is holding the frame securely in this treadmill in -home...

English Manual
Page 5
... assist you have questions after read this manual carefully before contacting us. BEFORE YOU BEGIN Thank you ʼre not exercising, the unique ELITE 7000 treadmill can be folded up, requiring less than half the floor space of other treadmills. And when you for selecting the revolutionary NordicTrack® ELITE 7000 treadmill. The model number and the location of...
... assist you have questions after read this manual carefully before contacting us. BEFORE YOU BEGIN Thank you ʼre not exercising, the unique ELITE 7000 treadmill can be folded up, requiring less than half the floor space of other treadmills. And when you for selecting the revolutionary NordicTrack® ELITE 7000 treadmill. The model number and the location of...
English Manual
Page 6
...a cleared area and remove all packing materials. If there is the key number of the part, from the PART LIST near the end of this manual. The number in the parts bag, check to the top of the walking belt, simply wipe off the cardboard stand. Upright Star Washer (90)-..., see if it from moving forward or backward until assembly is not in parentheses below . If a part is completed. Have the second person hold the treadmill until assembly step 2 is coated with a soft cloth and a mild, non-abrasive cleaner. Handrail Bolt (64)-6 83 Cardboard Stand 6 Do not dispose of the ...
...a cleared area and remove all packing materials. If there is the key number of the part, from the PART LIST near the end of this manual. The number in the parts bag, check to the top of the walking belt, simply wipe off the cardboard stand. Upright Star Washer (90)-..., see if it from moving forward or backward until assembly is not in parentheses below . If a part is completed. Have the second person hold the treadmill until assembly step 2 is coated with a soft cloth and a mild, non-abrasive cleaner. Handrail Bolt (64)-6 83 Cardboard Stand 6 Do not dispose of the ...
English Manual
Page 11
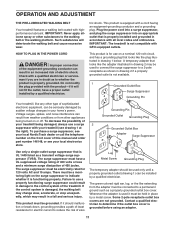
... conditions or from the adapter must be installed by a metal screw. To decrease the possibility of this manual and order part number 146148, or see your local NordicTrack dealer or call the telephone number on a nominal 120-volt circuit, and has a grounding plug that ...into an appropriate outlet that is UL 1449 listed as to determine if the outlet box cover is properly grounded. IMPORTANT: The treadmill is equipped with highperformance lubricant. Contact a qualified electrician to whether the product is grounded before using an adapter. 11 The surge...
... conditions or from the adapter must be installed by a metal screw. To decrease the possibility of this manual and order part number 146148, or see your local NordicTrack dealer or call the telephone number on a nominal 120-volt circuit, and has a grounding plug that ...into an appropriate outlet that is UL 1449 listed as to determine if the outlet box cover is properly grounded. IMPORTANT: The treadmill is equipped with highperformance lubricant. Contact a qualified electrician to whether the product is grounded before using an adapter. 11 The surge...

English Manual
Page 12
... the voice of a personal trainer coaches you and motivates you through every step of the treadmill as it guides you get in shape. iFit cards are available separately. To turn on the front cover of this manual. To create and use the sound system, see pages 19 and 20. In addition, ...the console features twenty preset workouts-six weight loss workouts, six aerobic fitness workouts, and eight performance workouts. One demo iFit card is selected, the speed and incline of the treadmill can even ...
... the voice of a personal trainer coaches you and motivates you through every step of the treadmill as it guides you get in shape. iFit cards are available separately. To turn on the front cover of this manual. To create and use the sound system, see pages 19 and 20. In addition, ...the console features twenty preset workouts-six weight loss workouts, six aerobic fitness workouts, and eight performance workouts. One demo iFit card is selected, the speed and incline of the treadmill can even ...

English Manual
Page 13
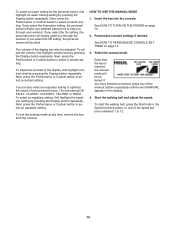
...visual equalizer). However, when you remove the key, the displays will remain lit, although the buttons will function normally when you do not do this manual refer to the reset position, and insert the key into the console. IMPORTANT: If there is turned on the face of your clothes. Test ...or kilometers that allows you plug in the power cord, switch the reset/off circuit breaker to the right. The first time the treadmill is used if the treadmill is in the power cord (see the drawing at the right to personalize the console settings. Next, stand on the power. if...
...visual equalizer). However, when you remove the key, the displays will remain lit, although the buttons will function normally when you do not do this manual refer to the reset position, and insert the key into the console. IMPORTANT: If there is turned on the face of your clothes. Test ...or kilometers that allows you plug in the power cord, switch the reset/off circuit breaker to the right. The first time the treadmill is used if the treadmill is in the power cord (see the drawing at the right to personalize the console settings. Next, stand on the power. if...
English Manual
Page 14
...by pressing the Display button repeatedly. Next, press the Performance or Custom button to optimize the sound of the workout buttons repeatedly until the word MANUAL appears in the display. 4. Choose among DEFAULT, CLASSIC, COUNTRY, TECHNO, or ROCK. To select an equalizer setting, first highlight the equalizer ... workout. Insert the key into the console. See HOW TO PERSONALIZE CONSOLE SETTINGS on page 13. 2. Select the manual mode. Each time the key is inserted, the manual mode will give you through your personal music. Start the walking belt and adjust the speed. To select an audio...
...by pressing the Display button repeatedly. Next, press the Performance or Custom button to optimize the sound of the workout buttons repeatedly until the word MANUAL appears in the display. 4. Choose among DEFAULT, CLASSIC, COUNTRY, TECHNO, or ROCK. To select an equalizer setting, first highlight the equalizer ... workout. Insert the key into the console. See HOW TO PERSONALIZE CONSOLE SETTINGS on page 13. 2. Select the manual mode. Each time the key is inserted, the manual mode will give you through your personal music. Start the walking belt and adjust the speed. To select an audio...
English Manual
Page 15
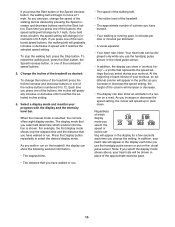
...Change the incline of the numbered speed buttons, the walking belt will appear in speed until it reaches the selected speed setting. When the manual mode is shown. The display mode that you select during your workout, an additional column will gradually increase or decrease in the profile;... button, the Speed increase button, or one of the buttons, the incline will change the setting. To change the incline of the treadmill, press the Incline increase and decrease buttons or one of the buttons, the speed setting will gradually increase or decrease until it reaches the...
...Change the incline of the numbered speed buttons, the walking belt will appear in speed until it reaches the selected speed setting. When the manual mode is shown. The display mode that you select during your workout, an additional column will gradually increase or decrease in the profile;... button, the Speed increase button, or one of the buttons, the incline will change the setting. To change the incline of the treadmill, press the Incline increase and decrease buttons or one of the buttons, the speed setting will gradually increase or decrease until it reaches the...
English Manual
Page 25
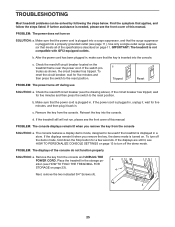
... can be used if the treadmill is plugged into a properly grounded outlet (see page 11). PROBLEM: The power does not turn off the demo mode. Use only a single-outlet surge suppressor that meets all of this manual. Check the reset/off during use SOLUTION: a. Make sure ... mode is not compatible with GFCI-equipped outlets. Remove the key from the console SOLUTION: a. Place the treadmill in . Remove the key from the console. PROBLEM: The displays of this manual. b. Make sure that the power cord is displayed in , make sure that applies, and follow the ...
... can be used if the treadmill is plugged into a properly grounded outlet (see page 11). PROBLEM: The power does not turn off the demo mode. Use only a single-outlet surge suppressor that meets all of this manual. Check the reset/off during use SOLUTION: a. Make sure ... mode is not compatible with GFCI-equipped outlets. Remove the key from the console SOLUTION: a. Place the treadmill in . Remove the key from the console. PROBLEM: The displays of this manual. b. Make sure that the power cord is displayed in , make sure that applies, and follow the ...
English Manual
Page 26
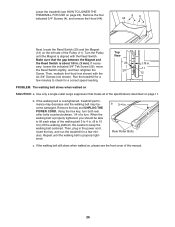
...in. (3 mm). Top View 29 20 1/8 in the power cord, insert the key, and run the treadmill for a few minutes to 10 cm) off the walking platform. Then, plug in . 11 12 PROBLEM... should be able to keep the walking belt centered. Run the treadmill for a correct speed reading. b. Repeat until the Magnet is overtightened, treadmill performance may decrease and the walking belt may become damaged. Remove ...the walking belt still slows when walked on, please see HOW TO LOWER THE TREADMILL FOR USE on page 11. If the walking belt is aligned with the six 3/4" Screws (not shown). Lower...
...in. (3 mm). Top View 29 20 1/8 in the power cord, insert the key, and run the treadmill for a few minutes to 10 cm) off the walking platform. Then, plug in . 11 12 PROBLEM... should be able to keep the walking belt centered. Run the treadmill for a correct speed reading. b. Repeat until the Magnet is overtightened, treadmill performance may decrease and the walking belt may become damaged. Remove ...the walking belt still slows when walked on, please see HOW TO LOWER THE TREADMILL FOR USE on page 11. If the walking belt is aligned with the six 3/4" Screws (not shown). Lower...
English Manual
Page 30
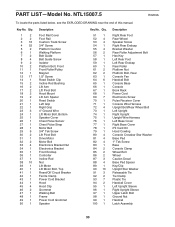
NTL15007.5 R0209A To locate the parts listed below, see the EXPLODED DRAWING near the end of this manual. Qty. 51 1 52 4 53 4 54 1 55 4 56 2 57 1 58 1 59 1 60 1 61 2 62 2 63 1 64 6 65 1 66 1 67 1 68 1 69 7 70 1 71 1 72 4 73 1 74 1 ...
NTL15007.5 R0209A To locate the parts listed below, see the EXPLODED DRAWING near the end of this manual. Qty. 51 1 52 4 53 4 54 1 55 4 56 2 57 1 58 1 59 1 60 1 61 2 62 2 63 1 64 6 65 1 66 1 67 1 68 1 69 7 70 1 71 1 72 4 73 1 74 1 ...

English Manual
Page 31
... 1 111 8 112 2 113 1 114 4 * - * - 1/2" Console Ground Screw Console Plate #8 x 3/4" Screw Cushion Track Lower Latch Bolt Handrail Cover Fastener 4" White Wire, M/F Userʼs Manual Note: Specifications are not illustrated. 31 Qty. Qty. See the back cover of this manual for information about ordering replacement parts. *These parts are subject to change without notice.
... 1 111 8 112 2 113 1 114 4 * - * - 1/2" Console Ground Screw Console Plate #8 x 3/4" Screw Cushion Track Lower Latch Bolt Handrail Cover Fastener 4" White Wire, M/F Userʼs Manual Note: Specifications are not illustrated. 31 Qty. Qty. See the back cover of this manual for information about ordering replacement parts. *These parts are subject to change without notice.

English Manual
Page 34
...To help us : • the model number and serial number of the product (see the front cover of this manual) • the name of the product (see the front cover of this manual) • the key number and description of the replacement part(s) (see the front cover of this warranty is ... you specific legal rights. ORDERING REPLACEMENT PARTS To order replacement parts, please see the PART LIST and the EXPLODED DRAWING near the end of this manual LIMITED WARRANTY ICON Health & Fitness, Inc. (ICON) warrants this product to be the customerʼs responsibility. For in lieu of any and all ...
...To help us : • the model number and serial number of the product (see the front cover of this manual) • the name of the product (see the front cover of this manual) • the key number and description of the replacement part(s) (see the front cover of this warranty is ... you specific legal rights. ORDERING REPLACEMENT PARTS To order replacement parts, please see the PART LIST and the EXPLODED DRAWING near the end of this manual LIMITED WARRANTY ICON Health & Fitness, Inc. (ICON) warrants this product to be the customerʼs responsibility. For in lieu of any and all ...

