
User Manual
Page 2
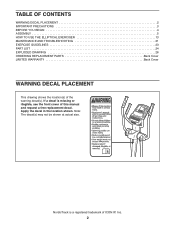
... WARNING DECAL PLACEMENT 2 IMPORTANT PRECAUTIONS 3 BEFORE YOU BEGIN 4 ASSEMBLY 5 HOW TO USE THE ELLIPTICAL EXERCISER 13 MAINTENANCE AND TROUBLESHOOTING 21 EXERCISE GUIDELINES 23 PART LIST 24 EXPLODED DRAWING 26 ORDERING REPLACEMENT PARTS Back Cover LIMITED WARRANTY Back Cover ...WARNING DECAL PLACEMENT This drawing shows the location(s) of this manual and request a free replacement decal. If a decal is a registered trademark of ICON IP, Inc. 2 NordicTrack...
... WARNING DECAL PLACEMENT 2 IMPORTANT PRECAUTIONS 3 BEFORE YOU BEGIN 4 ASSEMBLY 5 HOW TO USE THE ELLIPTICAL EXERCISER 13 MAINTENANCE AND TROUBLESHOOTING 21 EXERCISE GUIDELINES 23 PART LIST 24 EXPLODED DRAWING 26 ORDERING REPLACEMENT PARTS Back Cover LIMITED WARRANTY Back Cover ...WARNING DECAL PLACEMENT This drawing shows the location(s) of this manual and request a free replacement decal. If a decal is a registered trademark of ICON IP, Inc. 2 NordicTrack...
User Manual
Page 3
... important for home use only. Do not use of the owner to protect the floor or carpet. Wear appropriate exercise clothes while using the elliptical exerciser. 11. Always wear athletic shoes for personal injury or property damage sustained by persons weighing more than 300 lbs....to ensure that there is not a medical device. Various factors may result in a commercial, rental, or institutional setting. 5. Place the elliptical exerciser on each side. 6. Inspect and properly tighten all precautions. 4. Keep children under age 12 and pets away from moisture and dust....
... important for home use only. Do not use of the owner to protect the floor or carpet. Wear appropriate exercise clothes while using the elliptical exerciser. 11. Always wear athletic shoes for personal injury or property damage sustained by persons weighing more than 300 lbs....to ensure that there is not a medical device. Various factors may result in a commercial, rental, or institutional setting. 5. Place the elliptical exerciser on each side. 6. Inspect and properly tighten all precautions. 4. Keep children under age 12 and pets away from moisture and dust....
User Manual
Page 4
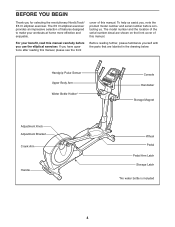
... selection of this manual carefully before contacting us assist you, note the product model number and serial number before you for selecting the revolutionary NordicTrack® E5 VI elliptical exerciser. For your workouts at home more effective and enjoyable. Handgrip Pulse Sensor Upper Body Arm Water Bottle Holder* Console Handlebar Storage Magnet Adjustment... Storage Latch *No water bottle is included 4 cover of features designed to make your benefit, read this manual. BEFORE YOU BEGIN Thank you use the elliptical exerciser. To help us .
... selection of this manual carefully before contacting us assist you, note the product model number and serial number before you for selecting the revolutionary NordicTrack® E5 VI elliptical exerciser. For your workouts at home more effective and enjoyable. Handgrip Pulse Sensor Upper Body Arm Water Bottle Holder* Console Handlebar Storage Magnet Adjustment... Storage Latch *No water bottle is included 4 cover of features designed to make your benefit, read this manual. BEFORE YOU BEGIN Thank you use the elliptical exerciser. To help us .
User Manual
Page 5
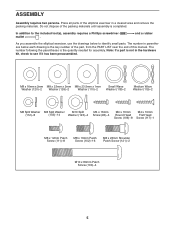
ASSEMBLY Assembly requires two persons. and a rubber As you assemble the elliptical exerciser, use the drawings below each drawing is completed. The number following the parentheses is not in parentheses below to identify small parts. Place all parts ... Patch Screw (111)-8 M8 x 16mm Patch Screw (102)-16 M8 x 23mm Shoulder Patch Screw (121)-2 M10 x 80mm Patch Screw (100)-4 5 Do not dispose of the elliptical exerciser in a cleared area and remove the packing materials. In addition to see if it has been preassembled. Note: If a part is the quantity needed for...
ASSEMBLY Assembly requires two persons. and a rubber As you assemble the elliptical exerciser, use the drawings below each drawing is completed. The number following the parentheses is not in parentheses below to identify small parts. Place all parts ... Patch Screw (111)-8 M8 x 16mm Patch Screw (102)-16 M8 x 23mm Shoulder Patch Screw (121)-2 M10 x 80mm Patch Screw (100)-4 5 Do not dispose of the elliptical exerciser in a cleared area and remove the packing materials. In addition to see if it has been preassembled. Note: If a part is the quantity needed for...

User Manual
Page 8
... (48). 4 102 126 7 118 Grease 5 6 118 Grease 48 126 102 5. Tighten an Adjustment Knob (45) onto the right Adjustment Pin (44). Apply some of the elliptical exerciser. 8 6 Grease 55 119 110 56 120 12 121 12 46 45 44 Make sure that the Right Pedal Arm latches into each side of the...
... (48). 4 102 126 7 118 Grease 5 6 118 Grease 48 126 102 5. Tighten an Adjustment Knob (45) onto the right Adjustment Pin (44). Apply some of the elliptical exerciser. 8 6 Grease 55 119 110 56 120 12 121 12 46 45 44 Make sure that the Right Pedal Arm latches into each side of the...

User Manual
Page 12
To protect the floor or carpet from damage, place a mat under the elliptical exerciser. 12 Attach the Right Front Leg Cover (30) around the Upright (5) by pressing the tabs on the Front 12 Upright Cover into the Right Rear ...). 32 31 Attach the Left Rear and Front Leg Covers 6 (31, 32) in the same way. See step 3. Make sure that all parts of the elliptical exerciser are marked with "Right" stickers. 13 Attach the Right Rear Leg Cover (29) to the Right Upper Body Leg (6) with three M4 x 16mm Round Head...
To protect the floor or carpet from damage, place a mat under the elliptical exerciser. 12 Attach the Right Front Leg Cover (30) around the Upright (5) by pressing the tabs on the Front 12 Upright Cover into the Right Rear ...). 32 31 Attach the Left Rear and Front Leg Covers 6 (31, 32) in the same way. See step 3. Make sure that all parts of the elliptical exerciser are marked with "Right" stickers. 13 Attach the Right Rear Leg Cover (29) to the Right Upper Body Leg (6) with three M4 x 16mm Round Head...
User Manual
Page 13
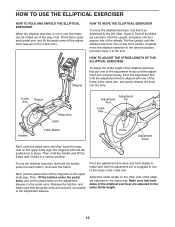
...the adjustment arm will hold the upright, and place one foot against one of the wheels. Next, stand in front of the elliptical exerciser in use the elliptical exerciser, first hold the handle and lift the frame until it as described at the left. Then, hold the handle, press the ...latch button, and lower the frame. HOW TO USE THE ELLIPTICAL EXERCISER HOW TO FOLD AND UNFOLD THE ELLIPTICAL EXERCISER When the elliptical exerciser is not in the same way. First, lift the latch under the pedal arms, and set the pedal arms on...
...the adjustment arm will hold the upright, and place one foot against one of the wheels. Next, stand in front of the elliptical exerciser in use the elliptical exerciser, first hold the handle and lift the frame until it as described at the left. Then, hold the handle, press the ...latch button, and lower the frame. HOW TO USE THE ELLIPTICAL EXERCISER HOW TO FOLD AND UNFOLD THE ELLIPTICAL EXERCISER When the elliptical exerciser is not in the same way. First, lift the latch under the pedal arms, and set the pedal arms on...

User Manual
Page 14
...begin to move until the pedals come to move with a continuous motion. HOW TO ELIMINATE FLEXING IN THE CENTER OF THE ELLIPTICAL EXERCISER If the elliptical exerciser flexes in the direction shown by the arrow; When the pedals are stationary, step off the lowest pedal. Then, step ... flywheel stops. Push the pedals until the flexing is in the lowest position. Note: The elliptical exerciser does not have a free wheel; HOW TO EXERCISE ON THE ELLIPTICAL EXERCISER To mount the elliptical exerciser, hold the upper body arms or the handlebars and step onto the pedal that you can...
...begin to move until the pedals come to move with a continuous motion. HOW TO ELIMINATE FLEXING IN THE CENTER OF THE ELLIPTICAL EXERCISER If the elliptical exerciser flexes in the direction shown by the arrow; When the pedals are stationary, step off the lowest pedal. Then, step ... flywheel stops. Push the pedals until the flexing is in the lowest position. Note: The elliptical exerciser does not have a free wheel; HOW TO EXERCISE ON THE ELLIPTICAL EXERCISER To mount the elliptical exerciser, hold the upper body arms or the handlebars and step onto the pedal that you can...
User Manual
Page 15
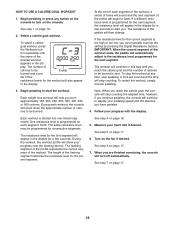
When you use the manual mode, see page 19. To purchase iFit cards, go to help you exercise. To use the manual mode of the console, you burn a set number of calories. To use an iFit workout, see page 20. While you through... your workouts. Each workout automatically changes the resistance of the pedals as it guides you exercise, the console will display continuous exercise feedback. Each workout automatically controls the resistance of the pedals while counting the approximate number of calories you through an effective workout. iFit...
When you use the manual mode, see page 19. To purchase iFit cards, go to help you exercise. To use the manual mode of the console, you burn a set number of calories. To use an iFit workout, see page 20. While you through... your workouts. Each workout automatically changes the resistance of the pedals as it guides you exercise, the console will display continuous exercise feedback. Each workout automatically controls the resistance of the pedals while counting the approximate number of calories you through an effective workout. iFit...
User Manual
Page 16
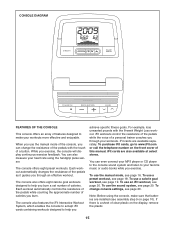
... a moment for the pedals to turn on the console. The lower left display-As you begin to be selected. A moment after you exercise, the lower left or lower right display. Each time you have burned. The lower right display-The lower right display can show the elapsed... mode by pressing the Digital Resistance increase and decrease buttons. Note: While information is selected, the display will appear in succession. As you exercise, indicators will count down the number of calories you have burned. Follow your heart rate when you use the handgrip pulse sensor (see step...
... a moment for the pedals to turn on the console. The lower left display-As you begin to be selected. A moment after you exercise, the lower left or lower right display. Each time you have burned. The lower right display-The lower right display can show the elapsed... mode by pressing the Digital Resistance increase and decrease buttons. Note: While information is selected, the display will appear in succession. As you exercise, indicators will count down the number of calories you have burned. Follow your heart rate when you use the handgrip pulse sensor (see step...

User Manual
Page 17
... a soft cloth; If the pedals do not move for several seconds, a tone will sound and the console will turn off automatically. 7. If there are finished exercising, the console will pause. Be careful not to clean the contacts. 6. Avoid moving your heart rate will turn off the fan. For the most accurate...
... a soft cloth; If the pedals do not move for several seconds, a tone will sound and the console will turn off automatically. 7. If there are finished exercising, the console will pause. Be careful not to clean the contacts. 6. Avoid moving your heart rate will turn off the fan. For the most accurate...
User Manual
Page 18
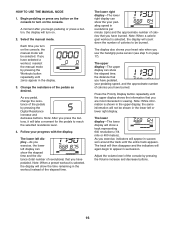
... in the display for the current segment. Begin pedaling to turn off automatically. One resistance level is too high or too low, you are finished exercising, the console will show your progress (see the drawing above). See step 5 on page 17. 18 See step 6 on the fan if desired. The workout...
... in the display for the current segment. Begin pedaling to turn off automatically. One resistance level is too high or too low, you are finished exercising, the console will show your progress (see the drawing above). See step 5 on page 17. 18 See step 6 on the fan if desired. The workout...
User Manual
Page 19
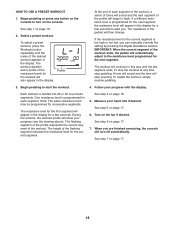
... workout is programmed for the current segment. The resistance level for a few seconds to be burned is too high or too low, you are finished exercising, the console will appear in the display. 3. The flashing segment of the profile represents the current segment of the resistance levels for the workout will...
... workout is programmed for the current segment. The resistance level for a few seconds to be burned is too high or too low, you are finished exercising, the console will appear in the display. 3. The flashing segment of the profile represents the current segment of the resistance levels for the workout will...
User Manual
Page 20
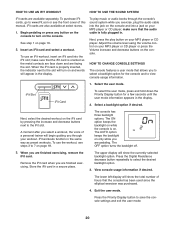
...AUTO option keeps the backlight on . The lower left display will begin guiding you through the consoleʼs sound system while you are finished exercising, remove the iFit card. Press the Priority Display button to select the desired backlight option. 3. To play button on your MP3 player or ...are face down the Priority Display button for the console and to the iFit slot. make sure that the console has been used since the elliptical exerciser was purchased. 4. Adjust the volume level using the volume control on the console. iFit Slot iFit Card To select the user mode, ...
...AUTO option keeps the backlight on . The lower left display will begin guiding you through the consoleʼs sound system while you are finished exercising, remove the iFit card. Press the Priority Display button to select the desired backlight option. 3. To play button on your MP3 player or ...are face down the Priority Display button for the console and to the iFit slot. make sure that the console has been used since the elliptical exerciser was purchased. 4. Adjust the volume level using the volume control on the console. iFit Slot iFit Card To select the user mode, ...
User Manual
Page 21
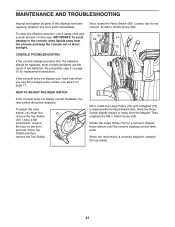
... keep liquids away from the Magnet. When the reed switch is aligned with the Reed Switch (69). Replace any worn parts immediately. To clean the elliptical exerciser, use the handgrip pulse sensor, see step 5 on the front and rear of direct sunlight. HOW TO ADJUST THE REED SWITCH If the console does... parts of low batteries. CONSOLE TROUBLESHOOTING If the console display becomes dim, the batteries should be replaced; most console problems are the result of the elliptical exerciser regularly. Then, retighten the M4 x 16mm Screw (93).
... keep liquids away from the Magnet. When the reed switch is aligned with the Reed Switch (69). Replace any worn parts immediately. To clean the elliptical exerciser, use the handgrip pulse sensor, see step 5 on the front and rear of direct sunlight. HOW TO ADJUST THE REED SWITCH If the console does... parts of low batteries. CONSOLE TROUBLESHOOTING If the console display becomes dim, the batteries should be replaced; most console problems are the result of the elliptical exerciser regularly. Then, retighten the M4 x 16mm Screw (93).
User Manual
Page 23
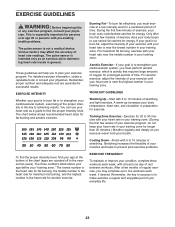
...your "training zone." Burning Fat-To burn fat effectively, you to five workouts each week, with your heart rate in your training zone. EXERCISE FREQUENCY To maintain or improve your training zone for a sustained period of time. This is especially important for persons over age 35 or ...the lowest number in your condition, complete three workouts each week, if desired. The chart below shows recommended heart rates for energy. Aerobic Exercise-If your everyday life. 23 The lowest number is the heart rate for fat burning, the middle number is the heart rate for prolonged...
...your "training zone." Burning Fat-To burn fat effectively, you to five workouts each week, with your heart rate in your training zone. EXERCISE FREQUENCY To maintain or improve your training zone for a sustained period of time. This is especially important for persons over age 35 or ...the lowest number in your condition, complete three workouts each week, if desired. The chart below shows recommended heart rates for energy. Aerobic Exercise-If your everyday life. 23 The lowest number is the heart rate for fat burning, the middle number is the heart rate for prolonged...

