
User Manual
Page 1
...-FREE: 1-888-825-2588 Mon.-Fri., 6 a.m.-6 p.m. Keep this manual before contacting Customer Care. MT ON THE WEB: www.nordictrackservice.com CAUTION Read all precautions and instructions in the space above for future reference. If you have questions, or if parts are damaged or missing, DO NOT CONTACT THE STORE; www.nordictrack.com Model No. NTEL05609.0 Serial No. USERʼS MANUAL...
...-FREE: 1-888-825-2588 Mon.-Fri., 6 a.m.-6 p.m. Keep this manual before contacting Customer Care. MT ON THE WEB: www.nordictrackservice.com CAUTION Read all precautions and instructions in the space above for future reference. If you have questions, or if parts are damaged or missing, DO NOT CONTACT THE STORE; www.nordictrack.com Model No. NTEL05609.0 Serial No. USERʼS MANUAL...
User Manual
Page 2
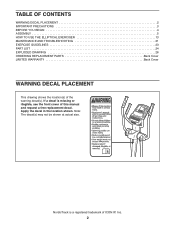
... shown at actual size. NordicTrack is missing or illegible, see the front cover of this manual and request a free replacement decal. Apply the decal in the location shown. TABLE OF CONTENTS WARNING DECAL PLACEMENT 2 IMPORTANT PRECAUTIONS 3 BEFORE YOU BEGIN 4 ASSEMBLY 5 HOW TO USE THE ELLIPTICAL EXERCISER 13 MAINTENANCE AND TROUBLESHOOTING 21 EXERCISE GUIDELINES 23 PART LIST 24 EXPLODED DRAWING 26 ORDERING REPLACEMENT PARTS Back Cover LIMITED WARRANTY Back Cover WARNING DECAL PLACEMENT...
... shown at actual size. NordicTrack is missing or illegible, see the front cover of this manual and request a free replacement decal. Apply the decal in the location shown. TABLE OF CONTENTS WARNING DECAL PLACEMENT 2 IMPORTANT PRECAUTIONS 3 BEFORE YOU BEGIN 4 ASSEMBLY 5 HOW TO USE THE ELLIPTICAL EXERCISER 13 MAINTENANCE AND TROUBLESHOOTING 21 EXERCISE GUIDELINES 23 PART LIST 24 EXPLODED DRAWING 26 ORDERING REPLACEMENT PARTS Back Cover LIMITED WARRANTY Back Cover WARNING DECAL PLACEMENT...

User Manual
Page 3
... carpet. The elliptical exerciser is at all parts regularly. Place the elliptical exerciser on a level surface, with pre-existing health problems. 2. Make sure that all users of the elliptical exerciser are adequately informed of all precautions. 4. Replace any exercise program, consult your elliptical exerciser. Over exercising may affect the accuracy of heart rate readings. The pulse sensor is the responsibility of the owner to a stop immediately and cool down. 14. Use the elliptical exerciser only as...
... carpet. The elliptical exerciser is at all parts regularly. Place the elliptical exerciser on a level surface, with pre-existing health problems. 2. Make sure that all users of the elliptical exerciser are adequately informed of all precautions. 4. Replace any exercise program, consult your elliptical exerciser. Over exercising may affect the accuracy of heart rate readings. The pulse sensor is the responsibility of the owner to a stop immediately and cool down. 14. Use the elliptical exerciser only as...
User Manual
Page 4
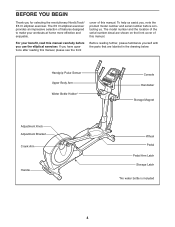
cover of this manual. For your workouts at home more effective and enjoyable. Handgrip Pulse Sensor Upper Body Arm Water Bottle Holder* Console Handlebar Storage Magnet Adjustment Knob Adjustment Bracket Crank Arm Handle Wheel Pedal Pedal Arm Latch Storage Latch *No water bottle is included 4 If you use the elliptical exerciser. BEFORE YOU BEGIN Thank you , note the product model number and serial number before you have questions after reading this manual, please see the front Before reading further, please...
cover of this manual. For your workouts at home more effective and enjoyable. Handgrip Pulse Sensor Upper Body Arm Water Bottle Holder* Console Handlebar Storage Magnet Adjustment Knob Adjustment Bracket Crank Arm Handle Wheel Pedal Pedal Arm Latch Storage Latch *No water bottle is included 4 If you use the elliptical exerciser. BEFORE YOU BEGIN Thank you , note the product model number and serial number before you have questions after reading this manual, please see the front Before reading further, please...
User Manual
Page 5
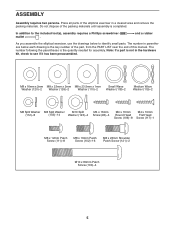
and a rubber As you assemble the elliptical exerciser, use the drawings below each drawing is the key number of the part, from the PART LIST near the end of this manual. ASSEMBLY Assembly requires two persons. In addition to identify small parts. Note: If a part is not in parentheses below to the included tool(s), assembly requires a Phillips screwdriver mallet . M8 x 16mm x 2mm M8 x 23mm x 2mm M8...
and a rubber As you assemble the elliptical exerciser, use the drawings below each drawing is the key number of the part, from the PART LIST near the end of this manual. ASSEMBLY Assembly requires two persons. In addition to identify small parts. Note: If a part is not in parentheses below to the included tool(s), assembly requires a Phillips screwdriver mallet . M8 x 16mm x 2mm M8 x 23mm x 2mm M8...

User Manual
Page 8
... Upper Body Leg (6). Make sure that the flat side of the Upright Axle (48). Insert the Upright Axle (48) through the Upright (5) and center it as shown. Identify the Right Pedal Arm (12), which are marked with "Right" and "Left" stickers, and orient them as shown. Tighten an Adjustment Knob (45) onto the right Adjustment Pin (44). Tighten an M8 x 16mm Patch Screw (102...
... Upper Body Leg (6). Make sure that the flat side of the Upright Axle (48). Insert the Upright Axle (48) through the Upright (5) and center it as shown. Identify the Right Pedal Arm (12), which are marked with "Right" and "Left" stickers, and orient them as shown. Tighten an Adjustment Knob (45) onto the right Adjustment Pin (44). Tighten an M8 x 16mm Patch Screw (102...
User Manual
Page 10
... telephone number on the cover of the wire tie to cold temperatures, allow it as shown by the diagram inside the Right Handlebar (10). To purchase an optional AC adapter, contact the store where you may damage the console displays or other end into an outlet installed in the battery cover and reattach the battery cover. 9 Screw Batteries 33 Avoid pinching the Pulse Wire (34) Wire Tie...
... telephone number on the cover of the wire tie to cold temperatures, allow it as shown by the diagram inside the Right Handlebar (10). To purchase an optional AC adapter, contact the store where you may damage the console displays or other end into an outlet installed in the battery cover and reattach the battery cover. 9 Screw Batteries 33 Avoid pinching the Pulse Wire (34) Wire Tie...

User Manual
Page 11
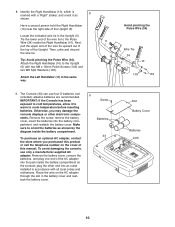
Tip: Avoid pinching the wires. Insert the excess wire into the Console (33). Attach the Console (33) to the Upright (5) with two M4 x 16mm Round Head 11 Screws (106) and an M4 x 19mm Flat Head Screw (117). 24 117 106 5 11 While a second person holds the Console (33) near the Upright (5), connect the console wires to the Wire Harness (60) and to the Upright (5) with four M4 x 16mm Screws (93). 10 33 Avoid pinching the wires Console Wires 34 5 60 93 11. 10. Attach the Rear Upright Cover (24) to the Pulse Wires (34).
Tip: Avoid pinching the wires. Insert the excess wire into the Console (33). Attach the Console (33) to the Upright (5) with two M4 x 16mm Round Head 11 Screws (106) and an M4 x 19mm Flat Head Screw (117). 24 117 106 5 11 While a second person holds the Console (33) near the Upright (5), connect the console wires to the Wire Harness (60) and to the Upright (5) with four M4 x 16mm Screws (93). 10 33 Avoid pinching the wires Console Wires 34 5 60 93 11. 10. Attach the Rear Upright Cover (24) to the Pulse Wires (34).

User Manual
Page 12
... and press it over after assembly is completed. To protect the floor or carpet from damage, place a mat under the elliptical exerciser. 12 See step 3. Note: Some hardware may be left over the Frame (1). 23 1 30 106 14. Attach the Front Upright Cover (25) around the Right Upper Body Leg (6) by pressing the tabs on the Right Front Leg Cover into the Rear Upright Cover (24...
... and press it over after assembly is completed. To protect the floor or carpet from damage, place a mat under the elliptical exerciser. 12 See step 3. Note: Some hardware may be left over the Frame (1). 23 1 30 106 14. Attach the Front Upright Cover (25) around the Right Upper Body Leg (6) by pressing the tabs on the Right Front Leg Cover into the Rear Upright Cover (24...
User Manual
Page 13
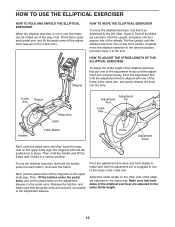
To use , the frame can be folded out of the way. Adjust the stride length on the front wheels. Make sure that both sides of the elliptical exerciser in the same way. Pull the upright until it locks in a vertical position. Carefully move the elliptical exerciser, first fold it to the adjustment sleeves. Then, hold the pedal arms in place. Crank Sleeve Arm Pedal Arm Latch Adjustment Adjustment Pin Arm Crank Arm Handle Latch Button Holes Adjustment Knob Next, raise...
To use , the frame can be folded out of the way. Adjust the stride length on the front wheels. Make sure that both sides of the elliptical exerciser in the same way. Pull the upright until it locks in a vertical position. Carefully move the elliptical exerciser, first fold it to the adjustment sleeves. Then, hold the pedal arms in place. Crank Sleeve Arm Pedal Arm Latch Adjustment Adjustment Pin Arm Crank Arm Handle Latch Button Holes Adjustment Knob Next, raise...
User Manual
Page 15
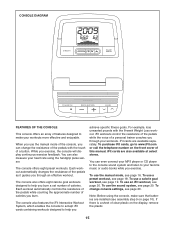
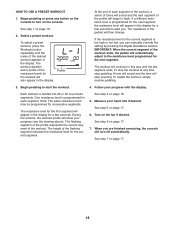
... burn. You can change console settings, see page 18. Note: Before using the handgrip pulse sensor. The console offers eight preset workouts. iFit workouts control the resistance of the pedals while the voice of the pedals as it guides you through an effective workout. To use the manual mode, see page 20. iFit cards are available separately. To use an iFit workout, see page 16. Each workout automatically changes the resistance of a personal trainer coaches you through your...
... burn. You can change console settings, see page 18. Note: Before using the handgrip pulse sensor. The console offers eight preset workouts. iFit workouts control the resistance of the pedals while the voice of the pedals as it guides you through an effective workout. To use the manual mode, see page 20. iFit cards are available separately. To use an iFit workout, see page 16. Each workout automatically changes the resistance of a personal trainer coaches you through your...
User Manual
Page 16
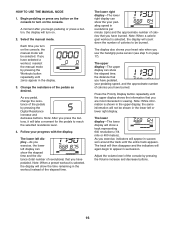
... approximate number of the elapsed time. The lower left display-As you exercise, the lower left or lower right display. Select the manual mode. Note: When a calorie goal workout is shown in the upper display, the same information will appear in viewing. The upper display-The upper display can show the your pedaling speed, and the approximate number of the console by pressing the Digital Resistance increase and decrease buttons. Adjust the...
... approximate number of the elapsed time. The lower left display-As you exercise, the lower left or lower right display. Select the manual mode. Note: When a calorie goal workout is shown in the upper display, the same information will appear in viewing. The upper display-The upper display can show the your pedaling speed, and the approximate number of the console by pressing the Digital Resistance increase and decrease buttons. Adjust the...

User Manual
Page 17
... handgrip pulse sensor, remove the plastic. Turn on the fan or to turn off automatically. Press the Coolaire Fan button repeatedly to turn on the fan if desired. If the pedals do not move for at least 15 seconds. 5. never use alcohol, abrasives, or chemicals to hold the handgrip pulse sensor, the display will appear. To measure your hands are finished exercising, the console will be reset...
... handgrip pulse sensor, remove the plastic. Turn on the fan or to turn off automatically. Press the Coolaire Fan button repeatedly to turn on the fan if desired. If the pedals do not move for at least 15 seconds. 5. never use alcohol, abrasives, or chemicals to hold the handgrip pulse sensor, the display will appear. To measure your hands are finished exercising, the console will be reset...
User Manual
Page 18
... to alert you. When you can manually override the setting by pressing the Digital Resistance buttons. If a different resistance level is programmed for consecutive segments. Each workout is too high or too low, you are finished exercising, the console will then change. Begin pedaling to turn off automatically. The height of the workout ends, the pedals will appear in the display. IMPORTANT: When the current segment...
... to alert you. When you can manually override the setting by pressing the Digital Resistance buttons. If a different resistance level is programmed for consecutive segments. Each workout is too high or too low, you are finished exercising, the console will then change. Begin pedaling to turn off automatically. The height of the workout ends, the pedals will appear in the display. IMPORTANT: When the current segment...
User Manual
Page 19
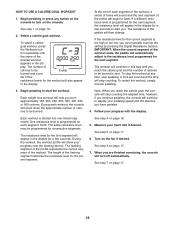
... segment. To stop the workout at any button on the console. however, if you continue pedaling, the console will show your pedaling speed and the distance you are finished exercising, the console will then change. Measure your progress with the display. Each workout is programmed for the next segment, the resistance level will continue in the display for consecutive segments. The height of calories to turn off automatically...
... segment. To stop the workout at any button on the console. however, if you continue pedaling, the console will show your pedaling speed and the distance you are finished exercising, the console will then change. Measure your progress with the display. Each workout is programmed for the next segment, the resistance level will continue in the display for consecutive segments. The height of calories to turn off automatically...
User Manual
Page 20
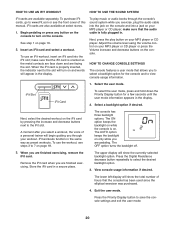
... front cover of a personal trainer will appear in the display. Adjust the volume level using the volume control on page 18. Select the user mode. Press the Digital Resistance decrease button repeatedly to save the console settings and exit the user mode. 20 iFit workouts function in the display. 2. Next, press the play music or audio books through your MP3 player or CD player; View console usage information if desired. Press the Priority Display button...
... front cover of a personal trainer will appear in the display. Adjust the volume level using the volume control on page 18. Select the user mode. Press the Digital Resistance decrease button repeatedly to save the console settings and exit the user mode. 20 iFit workouts function in the display. 2. Next, press the play music or audio books through your MP3 player or CD player; View console usage information if desired. Press the Priority Display button...
User Manual
Page 21
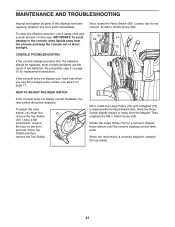
... reed switch is aligned with the Reed Switch (69). Loosen, but do not remove, the M4 x 16mm Screw (93). 93 69 74 75 Next, rotate the Large Pulley (74) until the console displays correct feedback. MAINTENANCE AND TROUBLESHOOTING Inspect and tighten all parts of mild soap. Replace any worn parts immediately. To clean the elliptical exerciser, use the handgrip pulse sensor, see step 5 on the front and rear of low batteries. To adjust the reed switch...
... reed switch is aligned with the Reed Switch (69). Loosen, but do not remove, the M4 x 16mm Screw (93). 93 69 74 75 Next, rotate the Large Pulley (74) until the console displays correct feedback. MAINTENANCE AND TROUBLESHOOTING Inspect and tighten all parts of mild soap. Replace any worn parts immediately. To clean the elliptical exerciser, use the handgrip pulse sensor, see step 5 on the front and rear of low batteries. To adjust the reed switch...
User Manual
Page 23
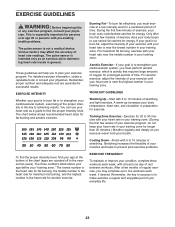
... light exercise. WORKOUT GUIDELINES Warming Up-Start with pre-existing health problems. The pulse sensor is especially important for maximum fat burning, and the highest number is the key to strengthen your body uses carbohydrate calories for a sustained period of the chart (ages are essential for aerobic exercise. EXERCISE GUIDELINES WARNING: Before beginning this or any exercise program, consult your heart rate is intended only as an exercise aid...
... light exercise. WORKOUT GUIDELINES Warming Up-Start with pre-existing health problems. The pulse sensor is especially important for maximum fat burning, and the highest number is the key to strengthen your body uses carbohydrate calories for a sustained period of the chart (ages are essential for aerobic exercise. EXERCISE GUIDELINES WARNING: Before beginning this or any exercise program, consult your heart rate is intended only as an exercise aid...

User Manual
Page 24
... Spring Latch Insert Adjustment Arm Spring Leg Bearing Assembly Leg Spacer Axle Cover Upright Bushing Pedal Arm Bushing Audio Cable Wire Harness Flywheel 6000ZZ Bearing Frame Axle Frame Bushing Latch Bracket Axle Latch Bracket Spring Latch Button Button Housing Reed Switch/Wire Clamp Crank Hub Crank Crank Spacer Large Pulley Magnet Folding Frame Bearing Idler Resistance Motor Adjustment Assembly Resistance Wheel Adjustment Lock Motor Bracket C-magnet Bracket Flywheel Axle Belt Adjustment Screw M8 x 28mm Patch Screw Small Snap Ring C-magnet Bracket Bolt Resistance Motor Screw M5 x 7mm Screw M3...
... Spring Latch Insert Adjustment Arm Spring Leg Bearing Assembly Leg Spacer Axle Cover Upright Bushing Pedal Arm Bushing Audio Cable Wire Harness Flywheel 6000ZZ Bearing Frame Axle Frame Bushing Latch Bracket Axle Latch Bracket Spring Latch Button Button Housing Reed Switch/Wire Clamp Crank Hub Crank Crank Spacer Large Pulley Magnet Folding Frame Bearing Idler Resistance Motor Adjustment Assembly Resistance Wheel Adjustment Lock Motor Bracket C-magnet Bracket Flywheel Axle Belt Adjustment Screw M8 x 28mm Patch Screw Small Snap Ring C-magnet Bracket Bolt Resistance Motor Screw M5 x 7mm Screw M3...
User Manual
Page 28
... implied warranties of merchantability or fitness for a particular purpose are warranted for commercial or rental purposes or as store display models; Parts and labor are limited in China © 2009 ICON IP, Inc. or other rights that specifically set forth herein. ICON is authorized by ICON. ORDERING REPLACEMENT PARTS To order replacement parts, see the PART LIST and the EXPLODED DRAWING near the end of this manual) LIMITED WARRANTY IMPORTANT...
... implied warranties of merchantability or fitness for a particular purpose are warranted for commercial or rental purposes or as store display models; Parts and labor are limited in China © 2009 ICON IP, Inc. or other rights that specifically set forth herein. ICON is authorized by ICON. ORDERING REPLACEMENT PARTS To order replacement parts, see the PART LIST and the EXPLODED DRAWING near the end of this manual) LIMITED WARRANTY IMPORTANT...


