
User Manual
Page 1
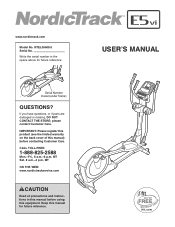
... cover of this manual) before using this manual for future reference. USERʼS MANUAL CALL TOLL-FREE: 1-888-825-2588 Mon.-Fri., 6 a.m.-6 p.m. MT Sat. 8 a.m.-4 p.m. www.nordictrack.com Model No. If you have questions, or if parts are damaged or missing, DO NOT CONTACT THE STORE; Keep this equipment.
... cover of this manual) before using this manual for future reference. USERʼS MANUAL CALL TOLL-FREE: 1-888-825-2588 Mon.-Fri., 6 a.m.-6 p.m. MT Sat. 8 a.m.-4 p.m. www.nordictrack.com Model No. If you have questions, or if parts are damaged or missing, DO NOT CONTACT THE STORE; Keep this equipment.
User Manual
Page 2
... IMPORTANT PRECAUTIONS 3 BEFORE YOU BEGIN 4 ASSEMBLY 5 HOW TO USE THE ELLIPTICAL EXERCISER 13 MAINTENANCE AND TROUBLESHOOTING 21 EXERCISE GUIDELINES 23 PART LIST 24 EXPLODED DRAWING 26 ORDERING REPLACEMENT PARTS Back Cover LIMITED WARRANTY Back Cover WARNING DECAL PLACEMENT This drawing shows the ...location(s) of this manual and request a free replacement decal. If a decal is a registered trademark of ICON IP, Inc. 2 NordicTrack ...
... IMPORTANT PRECAUTIONS 3 BEFORE YOU BEGIN 4 ASSEMBLY 5 HOW TO USE THE ELLIPTICAL EXERCISER 13 MAINTENANCE AND TROUBLESHOOTING 21 EXERCISE GUIDELINES 23 PART LIST 24 EXPLODED DRAWING 26 ORDERING REPLACEMENT PARTS Back Cover LIMITED WARRANTY Back Cover WARNING DECAL PLACEMENT This drawing shows the ...location(s) of this manual and request a free replacement decal. If a decal is a registered trademark of ICON IP, Inc. 2 NordicTrack ...
User Manual
Page 3
... this product. 1. Inspect and properly tighten all parts regularly. Keep children under age 12 and pets away from moisture and dust. Place the elliptical exerciser on your elliptical exerciser before using the elliptical exerciser; Hold the handlebars or the upper body ...heart rate readings. Keep the elliptical exerciser indoors, away from the elliptical exerciser at least 3 ft. (0.9 m) of clearance in the front and rear of the elliptical exerciser and 2 ft. (0.6 m) on each side. 6. Before beginning any worn parts immediately. 7. IMPORTANT PRECAUTIONS WARNING...
... this product. 1. Inspect and properly tighten all parts regularly. Keep children under age 12 and pets away from moisture and dust. Place the elliptical exerciser on your elliptical exerciser before using the elliptical exerciser; Hold the handlebars or the upper body ...heart rate readings. Keep the elliptical exerciser indoors, away from the elliptical exerciser at least 3 ft. (0.9 m) of clearance in the front and rear of the elliptical exerciser and 2 ft. (0.6 m) on each side. 6. Before beginning any worn parts immediately. 7. IMPORTANT PRECAUTIONS WARNING...
User Manual
Page 4
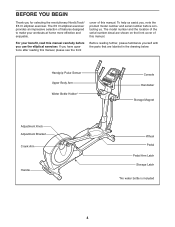
... are shown on the front cover of this manual, please see the front Before reading further, please familiarize yourself with the parts that are labeled in the drawing below. Handgrip Pulse Sensor Upper Body Arm Water Bottle Holder* Console Handlebar Storage Magnet Adjustment... workouts at home more effective and enjoyable. The E5 VI elliptical exerciser provides an impressive selection of this manual carefully before contacting us. To help us assist you for selecting the revolutionary NordicTrack® E5 VI elliptical exerciser. cover of features designed to make your benefit, read...
... are shown on the front cover of this manual, please see the front Before reading further, please familiarize yourself with the parts that are labeled in the drawing below. Handgrip Pulse Sensor Upper Body Arm Water Bottle Holder* Console Handlebar Storage Magnet Adjustment... workouts at home more effective and enjoyable. The E5 VI elliptical exerciser provides an impressive selection of this manual carefully before contacting us. To help us assist you for selecting the revolutionary NordicTrack® E5 VI elliptical exerciser. cover of features designed to make your benefit, read...
User Manual
Page 5
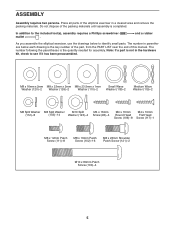
... Patch Screw (121)-2 M10 x 80mm Patch Screw (100)-4 5 Place all parts of the packing materials until assembly is not in parentheses below to identify small parts. and a rubber As you assemble the elliptical exerciser, use the drawings below each drawing is the quantity needed for assembly. ...Do not dispose of the elliptical exerciser in a cleared area and remove the packing materials...
... Patch Screw (121)-2 M10 x 80mm Patch Screw (100)-4 5 Place all parts of the packing materials until assembly is not in parentheses below to identify small parts. and a rubber As you assemble the elliptical exerciser, use the drawings below each drawing is the quantity needed for assembly. ...Do not dispose of the elliptical exerciser in a cleared area and remove the packing materials...

User Manual
Page 12
... Rear Leg Cover (29). 32 31 Attach the Left Rear and Front Leg Covers 6 (31, 32) in the same way. Make sure that all parts of the elliptical exerciser are marked with "Right" stickers. 13 Attach the Right Rear Leg Cover (29) to the Right Upper Body Leg (6) with three M4 x 16mm.... Note: Some hardware may be left over the Frame (1). 23 1 30 106 14. To protect the floor or carpet from damage, place a mat under the elliptical exerciser. 12 12. Tighten the four M8 x 16mm Patch Screws (102). 29 Then, slide the Top Cover (23) downward and press it over after assembly...
... Rear Leg Cover (29). 32 31 Attach the Left Rear and Front Leg Covers 6 (31, 32) in the same way. Make sure that all parts of the elliptical exerciser are marked with "Right" stickers. 13 Attach the Right Rear Leg Cover (29) to the Right Upper Body Leg (6) with three M4 x 16mm.... Note: Some hardware may be left over the Frame (1). 23 1 30 106 14. To protect the floor or carpet from damage, place a mat under the elliptical exerciser. 12 12. Tighten the four M8 x 16mm Patch Screws (102). 29 Then, slide the Top Cover (23) downward and press it over after assembly...
User Manual
Page 21
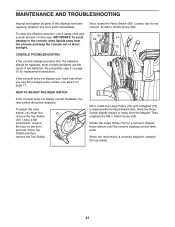
..., locate the Reed Switch (69). Repeat these actions until a Magnet (75) is correctly adjusted, reattach the top shield. 21 Replace any worn parts immediately. If the console does not display your heart rate when you must first 20 remove the Top Shield (20). Then, retighten the M4 ...M4 x 16mm Screw (93). 93 69 74 75 Next, rotate the Large Pulley (74) until the console displays correct feedback. To clean the elliptical exerciser, use the handgrip pulse sensor, see step 5 on page 17. CONSOLE TROUBLESHOOTING If the console display becomes dim, the batteries should be ...
..., locate the Reed Switch (69). Repeat these actions until a Magnet (75) is correctly adjusted, reattach the top shield. 21 Replace any worn parts immediately. If the console does not display your heart rate when you must first 20 remove the Top Shield (20). Then, retighten the M4 ...M4 x 16mm Screw (93). 93 69 74 75 Next, rotate the Large Pulley (74) until the console displays correct feedback. To clean the elliptical exerciser, use the handgrip pulse sensor, see step 5 on page 17. CONSOLE TROUBLESHOOTING If the console display becomes dim, the batteries should be ...
User Manual
Page 23
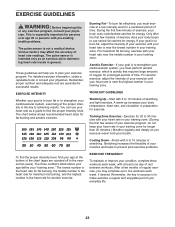
... fat burning, and the highest number is not a medical device. After a few minutes of exercise does your body begin to make exercise a regular and enjoyable part of rest between workouts. EXERCISE INTENSITY Whether your goal is to burn fat or to strengthen your age at the proper intensity is near the...
... fat burning, and the highest number is not a medical device. After a few minutes of exercise does your body begin to make exercise a regular and enjoyable part of rest between workouts. EXERCISE INTENSITY Whether your goal is to burn fat or to strengthen your age at the proper intensity is near the...

User Manual
Page 24
PART LIST-Model No. Qty. 51 2 52 2 53 2 54 4 55 2 56 2 57 2 58 4 59 1 60 1 61 1 62 1 63 1 64 2 65 1 66 1 67 1 68 1 69 1 70 1 71 1 ...
PART LIST-Model No. Qty. 51 2 52 2 53 2 54 4 55 2 56 2 57 2 58 4 59 1 60 1 61 1 62 1 63 1 64 2 65 1 66 1 67 1 68 1 69 1 70 1 71 1 ...

User Manual
Page 25
... Large Wave Washer 116 2 117 5 118 2 119 2 120 2 121 2 122 1 123 4 124 4 125 4 126 2 127 2 128 2 * - * - For information about ordering replacement parts, see the back cover of this manual. *These parts are subject to change without notice. Qty. Large Snap Ring M4 x 19mm Flat Head Screw Small Wave Washer Medium Wave Washer...
... Large Wave Washer 116 2 117 5 118 2 119 2 120 2 121 2 122 1 123 4 124 4 125 4 126 2 127 2 128 2 * - * - For information about ordering replacement parts, see the back cover of this manual. *These parts are subject to change without notice. Qty. Large Snap Ring M4 x 19mm Flat Head Screw Small Wave Washer Medium Wave Washer...
User Manual
Page 28
... or rental purposes or as store display models; This warranty gives you , please be preauthorized by an ICON authorized service center; Parts and labor are made must be prepared to provide the following information when contacting us: • the model number and serial number...Accordingly, the above limitation may not apply to avoid added fees for one of its authorized service centers. ORDERING REPLACEMENT PARTS To order replacement parts, see the PART LIST and the EXPLODED DRAWING near the end of this manual) LIMITED WARRANTY IMPORTANT: You must register this manual. ...
... or rental purposes or as store display models; This warranty gives you , please be preauthorized by an ICON authorized service center; Parts and labor are made must be prepared to provide the following information when contacting us: • the model number and serial number...Accordingly, the above limitation may not apply to avoid added fees for one of its authorized service centers. ORDERING REPLACEMENT PARTS To order replacement parts, see the PART LIST and the EXPLODED DRAWING near the end of this manual) LIMITED WARRANTY IMPORTANT: You must register this manual. ...


