
English Manual
Page 2
TABLE OF CONTENTS IMPORTANT PRECAUTIONS 3 BEFORE YOU BEGIN 4 ASSEMBLY 5 HOW TO USE THE ELLIPTICAL EXERCISER 10 MAINTENANCE AND TROUBLESHOOTING 22 CONDITIONING GUIDELINES 23 PART LIST 24 EXPLODED DRAWING 26 HOW TO ORDER REPLACEMENT PARTS Back Cover LIMITED WARRANTY Back Cover NordicTrack is a registered trademark of ICON Health & Fitness, Inc. 2
TABLE OF CONTENTS IMPORTANT PRECAUTIONS 3 BEFORE YOU BEGIN 4 ASSEMBLY 5 HOW TO USE THE ELLIPTICAL EXERCISER 10 MAINTENANCE AND TROUBLESHOOTING 22 CONDITIONING GUIDELINES 23 PART LIST 24 EXPLODED DRAWING 26 HOW TO ORDER REPLACEMENT PARTS Back Cover LIMITED WARRANTY Back Cover NordicTrack is a registered trademark of ICON Health & Fitness, Inc. 2
English Manual
Page 3
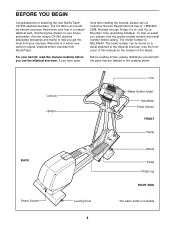
... call our Customer Service Department toll-free at all times. 7. The elliptical exerciser is the responsibility of the owner to ensure that all users of the elliptical exerciser are adequately informed of 35 or persons with a mat beneath it to order a free replacement decal. The pulse sensor is intended only as an exercise aid in determining heart rate trends in the location shown. 8. The pulse sensor is not a medical...
... call our Customer Service Department toll-free at all times. 7. The elliptical exerciser is the responsibility of the owner to ensure that all users of the elliptical exerciser are adequately informed of 35 or persons with a mat beneath it to order a free replacement decal. The pulse sensor is intended only as an exercise aid in determining heart rate trends in the location shown. 8. The pulse sensor is not a medical...
English Manual
Page 4
.... And the unique CX 990 features adjustable resistance and incline to the elliptical exerciser (see the front cover of this manual carefully before calling. tions after reading the manual, please call our Customer Service Department toll-free at 1-888-8252588, Monday through Friday, 6 a.m. The serial number can be found on your exercise. For your benefit, read this manual for selecting the new NordicTrack® CX 990 elliptical exerciser. Welcome to a whole...
.... And the unique CX 990 features adjustable resistance and incline to the elliptical exerciser (see the front cover of this manual carefully before calling. tions after reading the manual, please call our Customer Service Department toll-free at 1-888-8252588, Monday through Friday, 6 a.m. The serial number can be found on your exercise. For your benefit, read this manual for selecting the new NordicTrack® CX 990 elliptical exerciser. Welcome to a whole...

English Manual
Page 5
... Button 4, 5 Screws (84) and a Support Plate (104). Note: Some small parts may have been pre-assembled. While another person lifts the rear of the packing materials until assembly is pre-assembled. Identify the Front Stabilizer (8). If a part is not in the same way. 8 104 84 84 5 As you assemble the elliptical exerciser, use the drawings below each drawing refers to the key number of the elliptical exerciser...
... Button 4, 5 Screws (84) and a Support Plate (104). Note: Some small parts may have been pre-assembled. While another person lifts the rear of the packing materials until assembly is pre-assembled. Identify the Front Stabilizer (8). If a part is not in the same way. 8 104 84 84 5 As you assemble the elliptical exerciser, use the drawings below each drawing refers to the key number of the elliptical exerciser...

English Manual
Page 6
... the Pivot Axle (14). 3. Tighten the Patch Screw into the open end of the Incline Axle (13). Apply a small amount of the Incline Axle (13). 4. Tighten the Patch Screw into the open end of grease to the Lower Wire Harness (42). Attach the Upright with the Button Screws. Do not tighten the Button Screws yet. 2 3 Grease 48 14 76 3 3 Grease Tubes 48 76 99 99 Tubes 1 Motor Screw 76 64 13 76...
... the Pivot Axle (14). 3. Tighten the Patch Screw into the open end of the Incline Axle (13). Apply a small amount of the Incline Axle (13). 4. Tighten the Patch Screw into the open end of grease to the Lower Wire Harness (42). Attach the Upright with the Button Screws. Do not tighten the Button Screws yet. 2 3 Grease 48 14 76 3 3 Grease Tubes 48 76 99 99 Tubes 1 Motor Screw 76 64 13 76...

English Manual
Page 8
...). 8. Attach the Console to the Upright with an M8 x 79mm Bolt Set (65). Plug the Power Cord (116) into the Upright (2). The elliptical exerciser is now fully assembled. Repeat this manual. 8 Connect the Upper Wire Harness (115) to the Left Pedal Leg (4) with four M4 x 16mm Screws (98). (Note: The Screws may be shipped in the console box.) Be careful to the two smallest wires on the right side of this step...
...). 8. Attach the Console to the Upright with an M8 x 79mm Bolt Set (65). Plug the Power Cord (116) into the Upright (2). The elliptical exerciser is now fully assembled. Repeat this manual. 8 Connect the Upper Wire Harness (115) to the Left Pedal Leg (4) with four M4 x 16mm Screws (98). (Note: The Screws may be shipped in the console box.) Be careful to the two smallest wires on the right side of this step...
English Manual
Page 10
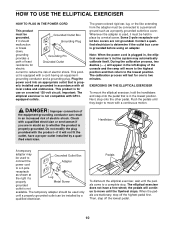
... connection of the console and the ramp will continue to the lowest position. Some 2-pole receptacle outlet box covers are stationary, step off the lowest pedal. 10 erly installed and grounded in the left display of the equipment-grounding conductor can be installed by a qualified electrician. During the calibration process, two dashes (- -) will not fit the outlet, have a free wheel; Plug the power cord...
... connection of the console and the ramp will continue to the lowest position. Some 2-pole receptacle outlet box covers are stationary, step off the lowest pedal. 10 erly installed and grounded in the left display of the equipment-grounding conductor can be installed by a qualified electrician. During the calibration process, two dashes (- -) will not fit the outlet, have a free wheel; Plug the power cord...
English Manual
Page 11
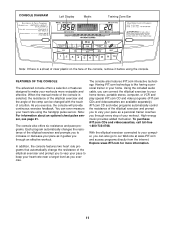
... chest pulse sensor, see page 21. The console also features iFIT.com interactive technology. Using the included audio cable, you through an effective workout. CONSOLE DIAGRAM Left Display Matrix Training Zone Bar Note: If there is selected, the resistance of the elliptical exerciser and the angle of the ramp can be changed with the touch of a button. In addition, the console features two heart rate programs that automatically change the resistance of the console, remove it guides you exercise...
... chest pulse sensor, see page 21. The console also features iFIT.com interactive technology. Using the included audio cable, you through an effective workout. CONSOLE DIAGRAM Left Display Matrix Training Zone Bar Note: If there is selected, the resistance of the elliptical exerciser and the angle of the ramp can be changed with the touch of a button. In addition, the console features two heart rate programs that automatically change the resistance of the console, remove it guides you exercise...
English Manual
Page 12
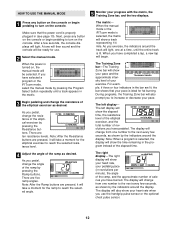
... in the bar are pressed, it will take a moment for the ramp to the next every few seconds, the console displays will also prompt you pedal, change from one number to increase or decrease your exercise. HOW TO USE THE MANUAL MODE 1 Press any button on the console or begin pedaling to turn on the console. When the power is ideal for use the handgrip pulse sensor or the optional chest pulse sensor. 12...
... in the bar are pressed, it will take a moment for the ramp to the next every few seconds, the console displays will also prompt you pedal, change from one number to increase or decrease your exercise. HOW TO USE THE MANUAL MODE 1 Press any button on the console or begin pedaling to turn on the console. When the power is ideal for use the handgrip pulse sensor or the optional chest pulse sensor. 12...
English Manual
Page 14
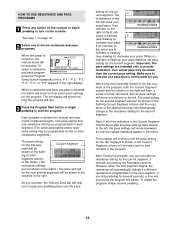
... settings for the program. As you exercise, the Training Zone bar will help you stop pedaling for the last segment is shown in the Current Segment column of tones will sound, and all of any button on the console or begin pedaling to provide motivation. a rent segment. When no time remains in the matrix. To select a resistance and pace program, press the Program Select button...
... settings for the program. As you exercise, the Training Zone bar will help you stop pedaling for the last segment is shown in the Current Segment column of tones will sound, and all of any button on the console or begin pedaling to provide motivation. a rent segment. When no time remains in the matrix. To select a resistance and pace program, press the Program Select button...
English Manual
Page 16
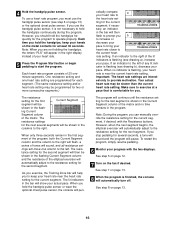
... you exercise, the Training Zone bar will be shown in the columns to the right. Important: The heart rate settings are programmed for the current segment; See step 7 on the metal contacts for at a pace that is flashing, your heart rate. 5 Press the Program Start button or begin pedaling to the resistance setting for the current segment, if desired, with the two displays. ed only to the heart rate set- The program...
... you exercise, the Training Zone bar will be shown in the columns to the right. Important: The heart rate settings are programmed for the current segment; See step 7 on the metal contacts for at a pace that is flashing, your heart rate. 5 Press the Program Start button or begin pedaling to the resistance setting for the current segment, if desired, with the two displays. ed only to the heart rate set- The program...

English Manual
Page 17
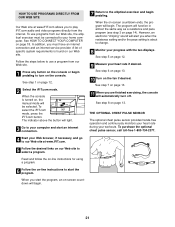
To use iFIT.com programs directly from our Web site, the elliptical exerciser must be connected to your CD player has only one end of the audio cable into the jack beneath the console. If your home computer. Plug the adapter into a 1/8" Y-adapter (available at electronics stores). A, B AUDIO OUT RIGHT LEFT Adapter Audio Cable A. Plug the other side of the cable into an AUDIO OUT jack on your stereo has only a PHONES...
To use iFIT.com programs directly from our Web site, the elliptical exerciser must be connected to your CD player has only one end of the audio cable into the jack beneath the console. If your home computer. Plug the adapter into a 1/8" Y-adapter (available at electronics stores). A, B AUDIO OUT RIGHT LEFT Adapter Audio Cable A. Plug the other side of the cable into an AUDIO OUT jack on your stereo has only a PHONES...

English Manual
Page 18
... end of the audio cable into the adapter. Plug the adapter into the adapter. Plug one end of the cable into the LINE OUT jack on your stereo. Plug the other side of the Y-adapter. Next, remove the wire that is being used, see instruction A below. A CD VCR Amp LINE OUT LINE OUT A. A LINE OUT Audio Cable Audio Adapter Cable B. HOW TO CONNECT YOUR HOME STEREO HOW TO CONNECT YOUR COMPUTER Note...
... end of the audio cable into the adapter. Plug the adapter into the adapter. Plug one end of the cable into the LINE OUT jack on your stereo. Plug the other side of the Y-adapter. Next, remove the wire that is being used, see instruction A below. A CD VCR Amp LINE OUT LINE OUT A. A LINE OUT Audio Cable Audio Adapter Cable B. HOW TO CONNECT YOUR HOME STEREO HOW TO CONNECT YOUR COMPUTER Note...
English Manual
Page 19
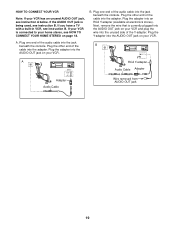
... the jack beneath the console. Next, remove the wire that is being used, see HOW TO CONNECT YOUR HOME STEREO on page 18. Plug the other end of the audio cable into the adapter. If you have a TV with a built-in VCR, see instruction A below. A. IN VIDEO AUDIO IN CH 34 OUT RF OUT AUDIO OUT RIGHT LEFT Adapter Audio Cable RCA Y-adapter Audio Cable Adapter Wire removed from AUDIO OUT jack 19 HOW...
... the jack beneath the console. Next, remove the wire that is being used, see HOW TO CONNECT YOUR HOME STEREO on page 18. Plug the other end of the audio cable into the adapter. If you have a TV with a built-in VCR, see instruction A below. A. IN VIDEO AUDIO IN CH 34 OUT RF OUT AUDIO OUT RIGHT LEFT Adapter Audio Cable RCA Y-adapter Audio Cable Adapter Wire removed from AUDIO OUT jack 19 HOW...
English Manual
Page 20
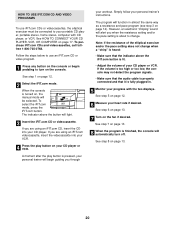
... USE IFIT.COM CD AND VIDEO PROGRAMS To use an iFIT.com CD or video program. 1 Press any button on the console or begin guiding you when the resistance setting and/or the pace setting is about to change when a "chirp" is heard: • Make sure that it is fully plugged in almost the same way as a resistance and pace program (see step 3 on page 14). If you are using an iFIT...
... USE IFIT.COM CD AND VIDEO PROGRAMS To use an iFIT.com CD or video program. 1 Press any button on the console or begin guiding you when the resistance setting and/or the pace setting is about to change when a "chirp" is heard: • Make sure that it is fully plugged in almost the same way as a resistance and pace program (see step 3 on page 14). If you are using an iFIT...
English Manual
Page 21
... workouts. To purchase the optional chest pulse sensor, call toll-free 1-800-734-2377. 4 Start your home computer. A list of specific system requirements is turned on, the manual mode will begin pedaling to turn off. To select the iFIT.com mode, press the iFIT.com button. See step 6 on page 13. 10 Turn on page 18. When you must be selected. In addition, you start the program, an on-screen countdown will be connected...
... workouts. To purchase the optional chest pulse sensor, call toll-free 1-800-734-2377. 4 Start your home computer. A list of specific system requirements is turned on, the manual mode will begin pedaling to turn off. To select the iFIT.com mode, press the iFIT.com button. See step 6 on page 13. 10 Turn on page 18. When you must be selected. In addition, you start the program, an on-screen countdown will be connected...
English Manual
Page 22
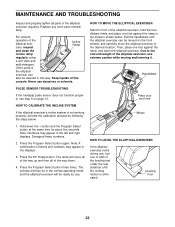
... left and right displays. Press the Program Select button three times. Leveling Foot 22 MAINTENANCE AND TROUBLESHOOTING Inspect and properly tighten all of the way down the + button and the Program Select button at the same time for use , turn one foot against the ramp, and lower the elliptical exerciser. Replace any worn parts immediately. For smooth operation of the elliptical exerciser, use abrasives or solvents. Disregard these numbers. 2. The ramp...
... left and right displays. Press the Program Select button three times. Leveling Foot 22 MAINTENANCE AND TROUBLESHOOTING Inspect and properly tighten all of the way down the + button and the Program Select button at the same time for use , turn one foot against the ramp, and lower the elliptical exerciser. Replace any worn parts immediately. For smooth operation of the elliptical exerciser, use abrasives or solvents. Disregard these numbers. 2. The ramp...

English Manual
Page 23
... minutes.) To find the proper heart rate for you exercise. For maximum fat burning, adjust the intensity of your exercise program, do not keep your heart rate in preparation for fat burning; If your training zone as an exercise aid in determining heart rate trends in your goal is to five workouts each week, with pre-existing health problems. The pulse sensor is near the bottom of...
... minutes.) To find the proper heart rate for you exercise. For maximum fat burning, adjust the intensity of your exercise program, do not keep your heart rate in preparation for fat burning; If your training zone as an exercise aid in determining heart rate trends in your goal is to five workouts each week, with pre-existing health problems. The pulse sensor is near the bottom of...
English Manual
Page 24
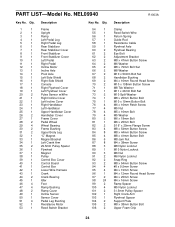
...Right Side Shield Console Right Flywheel Cover Left Flywheel Cover Pulse Sensor w/Wire Right Incline Cover Left Incline Cover Right Handlebar Left Handlebar Upper Handlebar Cover Handlebar Cover Frame Cover Pedal Wheel Wheel Bearing Frame Bushing Upper Body Leg "C" Magnet Magnet Bracket Left Crank Arm 29.5mm Pulley Spacer Flywheel Magnet Pulley Control Box Cover Control Board Control Box Lower Wire Harness Crank Crank Bearing Idler Foot Ramp Bushing Ramp Cover Incline Sensor Sensor Cover Pedal Leg Bushing Resistance Motor Reed Switch Bracket Key No. NEL09940 Key No. PART LIST-Model No. Qty...
...Right Side Shield Console Right Flywheel Cover Left Flywheel Cover Pulse Sensor w/Wire Right Incline Cover Left Incline Cover Right Handlebar Left Handlebar Upper Handlebar Cover Handlebar Cover Frame Cover Pedal Wheel Wheel Bearing Frame Bushing Upper Body Leg "C" Magnet Magnet Bracket Left Crank Arm 29.5mm Pulley Spacer Flywheel Magnet Pulley Control Box Cover Control Board Control Box Lower Wire Harness Crank Crank Bearing Idler Foot Ramp Bushing Ramp Cover Incline Sensor Sensor Cover Pedal Leg Bushing Resistance Motor Reed Switch Bracket Key No. NEL09940 Key No. PART LIST-Model No. Qty...
English Manual
Page 28
... you specific legal rights and you . Mountain Time (excluding holidays). HOW LONG IS IT COVERED-ICON Health & Fitness, Inc. ("ICON"), warrants the product for repair. USER'S MANUAL-It is covered for service. They will ship to use , costs of removal, installation or other consequential damages of this manual) • The KEY NUMBER and DESCRIPTION of the part(s) (see the front cover of this limited warranty. Include a letter explaining the product or problem...
... you specific legal rights and you . Mountain Time (excluding holidays). HOW LONG IS IT COVERED-ICON Health & Fitness, Inc. ("ICON"), warrants the product for repair. USER'S MANUAL-It is covered for service. They will ship to use , costs of removal, installation or other consequential damages of this manual) • The KEY NUMBER and DESCRIPTION of the part(s) (see the front cover of this limited warranty. Include a letter explaining the product or problem...


