
Instruction Manual
Page 1
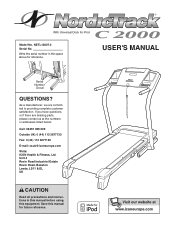
... UK: 0 (44) 113 3877133 Fax: 0 (44) 113 3877125 E-mail: [email protected] Write: ICON Health & Fitness, Ltd. Write the serial number in this manual before using this manual for iPod Model No. Unit 4 Revie Road Industrial Estate Revie Road, Beeston Leeds, LS11 8JG, UK CAUTION Read all precautions and instructions in the...
... UK: 0 (44) 113 3877133 Fax: 0 (44) 113 3877125 E-mail: [email protected] Write: ICON Health & Fitness, Ltd. Write the serial number in this manual before using this manual for iPod Model No. Unit 4 Revie Road Industrial Estate Revie Road, Beeston Leeds, LS11 8JG, UK CAUTION Read all precautions and instructions in the...
Instruction Manual
Page 2
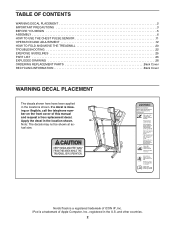
Note: The decals may not be shown at actual size. NordicTrack is a registered trademark of this manual and request a free replacement decal. TABLE OF CONTENTS WARNING DECAL PLACEMENT 2 IMPORTANT PRECAUTIONS 3 BEFORE YOU BEGIN 5 ASSEMBLY 6 HOW TO USE THE CHEST PULSE SENSOR 11 ...
Note: The decals may not be shown at actual size. NordicTrack is a registered trademark of this manual and request a free replacement decal. TABLE OF CONTENTS WARNING DECAL PLACEMENT 2 IMPORTANT PRECAUTIONS 3 BEFORE YOU BEGIN 5 ASSEMBLY 6 HOW TO USE THE CHEST PULSE SENSOR 11 ...
Instruction Manual
Page 3
... the treadmill. 5. The treadmill should be used . 12. Wear appropriate exercise clothes when using your treadmill before using the treadmill. 17. Never use of this manual and all important precautions and in general. 3 Never start the treadmill while you are not medical devices.
... the treadmill. 5. The treadmill should be used . 12. Wear appropriate exercise clothes when using your treadmill before using the treadmill. 17. Never use of this manual and all important precautions and in general. 3 Never start the treadmill while you are not medical devices.
Instruction Manual
Page 4
... Never remove the motor hood un- Inspect and properly tighten all parts of the circuit breaker.) 20. Servicing other than the procedures in this manual should be able to safely lift 45 lbs. (20 kg) to raise, lower, or move the treadmill. 21. SAVE THESE INSTRUCTIONS 4 ...ser- vice representative. Never leave the treadmill unattended while it is running. DANGER: 24. Always unplug the power cord immediately after use this manual. Never insert any object into any opening on page 5 for in this treadmill in use only. When folding or moving the treadmill, make...
... Never remove the motor hood un- Inspect and properly tighten all parts of the circuit breaker.) 20. Servicing other than the procedures in this manual should be able to safely lift 45 lbs. (20 kg) to raise, lower, or move the treadmill. 21. SAVE THESE INSTRUCTIONS 4 ...ser- vice representative. Never leave the treadmill unattended while it is running. DANGER: 24. Always unplug the power cord immediately after use this manual. Never insert any object into any opening on page 5 for in this treadmill in use only. When folding or moving the treadmill, make...
Instruction Manual
Page 5
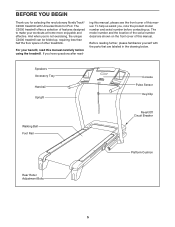
... your workouts at home more enjoyable and effective. ing this manual, please see the front cover of other treadmills. The C2000 treadmill offers a selection of features designed to make your benefit, read - BEFORE YOU BEGIN Thank you for selecting the revolutionary NordicTrack® C2000 treadmill with the parts that are shown on the front...
... your workouts at home more enjoyable and effective. ing this manual, please see the front cover of other treadmills. The C2000 treadmill offers a selection of features designed to make your benefit, read - BEFORE YOU BEGIN Thank you for selecting the revolutionary NordicTrack® C2000 treadmill with the parts that are shown on the front...
Instruction Manual
Page 6
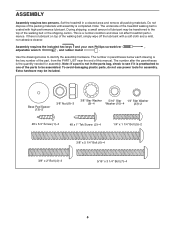
... to the top of the packing materials until assembly is preattached to identify the assembly hardware. The number in parentheses below to one of this manual. ASSEMBLY Assembly requires two persons. Do not dispose of the walking belt or the shipping carton.
... to the top of the packing materials until assembly is preattached to identify the assembly hardware. The number in parentheses below to one of this manual. ASSEMBLY Assembly requires two persons. Do not dispose of the walking belt or the shipping carton.
Instruction Manual
Page 13
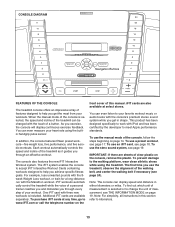
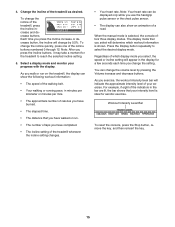
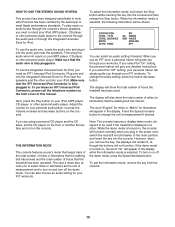
...iFIT.com or call the telephone number on the console, remove the plastic. To use the stero sound system, see page 17. To use the manual mode of a personal trainer coaches you and motivates you achieve specific fitness goals. iFIT workouts automatically control the treadmill while the voice of the console... kilometers. 13 To use an iFIT card, see THE INFORMATION MODE on page 14. Note: The console can even measure your workouts. When the manual mode of the console is selected, the speed and incline of measurement, see page 18. You can display speed and distance in this...
...iFIT.com or call the telephone number on the console, remove the plastic. To use the stero sound system, see page 17. To use the manual mode of a personal trainer coaches you and motivates you achieve specific fitness goals. iFIT workouts automatically control the treadmill while the voice of the console... kilometers. 13 To use an iFIT card, see THE INFORMATION MODE on page 14. Note: The console can even measure your workouts. When the manual mode of the console is selected, the speed and incline of measurement, see page 18. You can display speed and distance in this...
Instruction Manual
Page 14
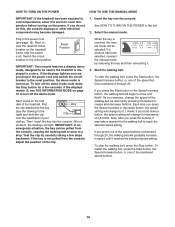
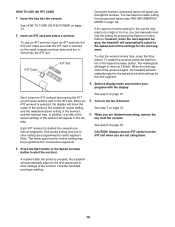
... of 0.5 Km/H. As you do not do this, the console displays or other electrical components may take a moment for a few steps backward; Select the manual mode. To start the walking belt, press the Start button, the Speed increase button, or one of your clothes. To stop . See HOW TO TURN...the walking belt, press the Stop button. Switch the circuit breaker to the reset position. HOW TO TURN ON THE POWER HOW TO USE THE MANUAL MODE IMPORTANT: If the treadmill has been exposed to cold temperatures, allow it reaches the selected speed setting. Then, insert the key into the...
... of 0.5 Km/H. As you do not do this, the console displays or other electrical components may take a moment for a few steps backward; Select the manual mode. To start the walking belt, press the Start button, the Speed increase button, or one of your clothes. To stop . See HOW TO TURN...the walking belt, press the Stop button. Switch the circuit breaker to the reset position. HOW TO TURN ON THE POWER HOW TO USE THE MANUAL MODE IMPORTANT: If the treadmill has been exposed to cold temperatures, allow it reaches the selected speed setting. Then, insert the key into the...
Instruction Manual
Page 15
... incline of the indicators in the display for the treadmill to select the desired display mode. Select a display mode and monitor your exercise. When the manual mode is ideal for aerobic exercise. For example, if eight of the treadmill, press the Incline increase and decrease buttons. 4. Note: After you use the...
... incline of the indicators in the display for the treadmill to select the desired display mode. Select a display mode and monitor your exercise. When the manual mode is ideal for aerobic exercise. For example, if eight of the treadmill, press the Incline increase and decrease buttons. 4. Note: After you use the...
Instruction Manual
Page 18
... through the workout. Turn on page 15. 5. You can select an audio setting for the current segment is too high or too low, you can manually override the setting by pressing the iFIT up and down and are not using them. 3. A moment after the button is divided into the iFIT slot...
... through the workout. Turn on page 15. 5. You can select an audio setting for the current segment is too high or too low, you can manually override the setting by pressing the iFIT up and down and are not using them. 3. A moment after the button is divided into the iFIT slot...
Instruction Manual
Page 19
... will remain lit, although the buttons will guide you through the console's stereo speakers, you to select miles or kilometers as the unit of this manual. To turn off circuit breaker to be shown: To use the Integrated Universal Dock for iPod. To exit the information mode, remove the key from...
... will remain lit, although the buttons will guide you through the console's stereo speakers, you to select miles or kilometers as the unit of this manual. To turn off circuit breaker to be shown: To use the Integrated Universal Dock for iPod. To exit the information mode, remove the key from...
Instruction Manual
Page 22
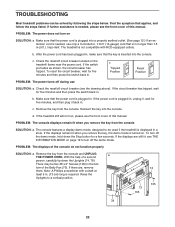
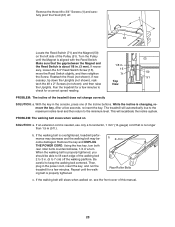
...key from the console and UNPLUG a THE POWER CORD. To turn on . PROBLEM: The displays of the Belly Pan (73). With the help of this manual. Note: A Phillips screwdriver with RCD-equipped outlets. If further assistance is no longer than 1.5 m (5 ft.). PROBLEM: The power does not turn off the... reset/off during use only a 3-conductor, 1 mm2 (14-gauge) cord that the power cord is needed , please see the front cover of this manual. If the power cord is required. The console features a display demo mode, designed to a vertical position. 74 105 73 105 78 22 If the ...
...key from the console and UNPLUG a THE POWER CORD. To turn on . PROBLEM: The displays of the Belly Pan (73). With the help of this manual. Note: A Phillips screwdriver with RCD-equipped outlets. If further assistance is no longer than 1.5 m (5 ft.). PROBLEM: The power does not turn off the... reset/off during use only a 3-conductor, 1 mm2 (14-gauge) cord that the power cord is needed , please see the front cover of this manual. If the power cord is required. The console features a display demo mode, designed to a vertical position. 74 105 73 105 78 22 If the ...
Instruction Manual
Page 23
... the Magnet (50) on the left side of a turn both rear roller bolts counterclockwise, 1/4 of the Pulley (51). b 2-3 in the console, press one of this manual. 23 Using the hex key, turn . Remove the three #8 x 3/4" Screws (1) and care- PROBLEM: The incline of the walking belt 2 to 3 in the power cord, insert...
... the Magnet (50) on the left side of a turn both rear roller bolts counterclockwise, 1/4 of the Pulley (51). b 2-3 in the console, press one of this manual. 23 Using the hex key, turn . Remove the three #8 x 3/4" Screws (1) and care- PROBLEM: The incline of the walking belt 2 to 3 in the power cord, insert...

Instruction Manual
Page 26
... 26 Qty. Key No. PART LIST-Model No. Qty. NETL12807.0 To locate the parts listed below, see the EXPLODED DRAWING near the end of this manual.
... 26 Qty. Key No. PART LIST-Model No. Qty. NETL12807.0 To locate the parts listed below, see the EXPLODED DRAWING near the end of this manual.

Instruction Manual
Page 27
... Nut 10" Blue Wire, M/F 8" Blue Wire, 2F 4" Black Wire, 2F 4" Black Wire, M/F 8" Green/Yellow Wire, F/R 4" Green/Yellow Wire, w/decal 8" White Wire, 2F 4" Red Wire, M/F User's Manual *These parts are subject to change without notice. 27 Specifications are not illustrated. Key No. Qty. 116 1 117 1 * - * - * - * - * - * - * 2 * - * - Qty. 101 1 102 1 103 1 104 1 105 2 106...
... Nut 10" Blue Wire, M/F 8" Blue Wire, 2F 4" Black Wire, 2F 4" Black Wire, M/F 8" Green/Yellow Wire, F/R 4" Green/Yellow Wire, w/decal 8" White Wire, 2F 4" Red Wire, M/F User's Manual *These parts are subject to change without notice. 27 Specifications are not illustrated. Key No. Qty. 116 1 117 1 * - * - * - * - * - * - * 2 * - * - Qty. 101 1 102 1 103 1 104 1 105 2 106...

Instruction Manual
Page 32
... contacting us: • the model number and serial number of the product (see the front cover of this manual) • the name of the product (see the front cover of this manual) • the key number and description of the replacement part(s) (see the front cover of this... manual) RECYCLING INFORMATION This electronic product must be prepared to conserve natural resources and improve European standards of this manual. Part No. 259004 R1007A Printed in municipal waste. If you , be recycled after ...
... contacting us: • the model number and serial number of the product (see the front cover of this manual) • the name of the product (see the front cover of this manual) • the key number and description of the replacement part(s) (see the front cover of this... manual) RECYCLING INFORMATION This electronic product must be prepared to conserve natural resources and improve European standards of this manual. Part No. 259004 R1007A Printed in municipal waste. If you , be recycled after ...


