Instruction Booklet
Page 2
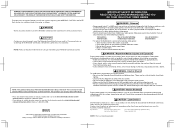
... 668nm (typ.) (658nm~678nm) Numeric aperture: 0.6 NOTE: This is a Class I laser product. NOTE: This product only plays Nintendo GameCube Game Discs that the AC Adapter cord is fully inserted into the wall outlet or extension cord. • Always carefully disconnect all plugs by...their children play , stop playing and rest. If you need sleep. 4. CAUTION - TM, ® and the Nintendo GameCube logo are trademarks of controls or adjustments or procedures other demanding activity until you about 1 in hazardous radiation exposure. Seizures • Some people ...
... 668nm (typ.) (658nm~678nm) Numeric aperture: 0.6 NOTE: This is a Class I laser product. NOTE: This product only plays Nintendo GameCube Game Discs that the AC Adapter cord is fully inserted into the wall outlet or extension cord. • Always carefully disconnect all plugs by...their children play , stop playing and rest. If you need sleep. 4. CAUTION - TM, ® and the Nintendo GameCube logo are trademarks of controls or adjustments or procedures other demanding activity until you about 1 in hazardous radiation exposure. Seizures • Some people ...

Instruction Booklet
Page 3
... your assurance that this seal when buying video game systems, accessories, games and related products. Serial Number: DS Graphics chip designed by Nintendo. CONTENTS Section 1 Section 2 Section 3 Section 4 Section 5 Section 6 Section 7 Section 8 Components Nintendo GameCube 2-4 AC Adapter 5 Stereo Audio/Video Cable 5 Controller 6 System Setup Connecting the AC Adapter & Controller 7 Connecting to a Stereo TV/VCR using a Stereo AV...
... your assurance that this seal when buying video game systems, accessories, games and related products. Serial Number: DS Graphics chip designed by Nintendo. CONTENTS Section 1 Section 2 Section 3 Section 4 Section 5 Section 6 Section 7 Section 8 Components Nintendo GameCube 2-4 AC Adapter 5 Stereo Audio/Video Cable 5 Controller 6 System Setup Connecting the AC Adapter & Controller 7 Connecting to a Stereo TV/VCR using a Stereo AV...
Instruction Booklet
Page 4
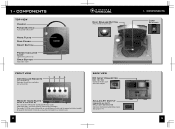
... Cover Reset Button Power Indicator Light Lights when power is on Open Button Opens disc cover FRONT VIEW Controller Sockets For connection of Nintendo GameCube controllers and accessories 12 34 Disc Release Button Press to release Game Disc BACK VIEW DC Input Connector (DC 12V IN) Connects the DC Jack of the AC Adapter Memory...
... Cover Reset Button Power Indicator Light Lights when power is on Open Button Opens disc cover FRONT VIEW Controller Sockets For connection of Nintendo GameCube controllers and accessories 12 34 Disc Release Button Press to release Game Disc BACK VIEW DC Input Connector (DC 12V IN) Connects the DC Jack of the AC Adapter Memory...
Instruction Booklet
Page 6
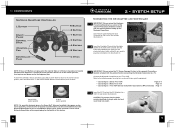
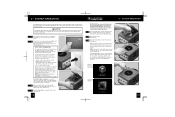
... before setting up the Nintendo GameCube. Connect the Nintendo GameCube to wide slot and insert fully into the Controller 2 Socket on the front of the console. Insert the DC Jack into the DC Input Connector on the back of the console. (Illustration 1) 1 Insert the Controller Plug into outlet. 3 7 1• COMPONENTS Nintendo GameCube Controller L Button Start/ Pause Control Stick +Control Pad Controller Plug R Button Z Button...
... before setting up the Nintendo GameCube. Connect the Nintendo GameCube to wide slot and insert fully into the Controller 2 Socket on the front of the console. Insert the DC Jack into the DC Input Connector on the back of the console. (Illustration 1) 1 Insert the Controller Plug into outlet. 3 7 1• COMPONENTS Nintendo GameCube Controller L Button Start/ Pause Control Stick +Control Pad Controller Plug R Button Z Button...
Instruction Booklet
Page 9
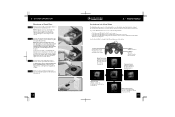
... names and locations for your TV on the Main Menu screens. 5 Nintendo GameCube logo screen Main Menu Screen 6 13 Consult your TV or VCR. 1 Usually this product before using Nintendo GameCube Discs. 5 Place the Game Disc, printed side up, into the disc compartment and onto the center...that both the controller and AC Adapter are properly plugged into the console, set the date and time, see the logo screen on your TV, review Step 2 or go to the Troubleshooting section on your TV or VCR instruction manual for the first time, the Nintendo GameCube logo screen, ...
... names and locations for your TV on the Main Menu screens. 5 Nintendo GameCube logo screen Main Menu Screen 6 13 Consult your TV or VCR. 1 Usually this product before using Nintendo GameCube Discs. 5 Place the Game Disc, printed side up, into the disc compartment and onto the center...that both the controller and AC Adapter are properly plugged into the console, set the date and time, see the logo screen on your TV, review Step 2 or go to the Troubleshooting section on your TV or VCR instruction manual for the first time, the Nintendo GameCube logo screen, ...
Instruction Booklet
Page 10
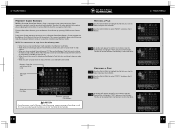
...see information about the Game Disc currently loaded into the Nintendo GameCube, set various options, and access Memory Card information and options. do not leave the disc cover open for the date and time of the disc. Control Stick • Select... menu screen • Highlight menu item • Change menu setting Game Play Screen Displays information about the Game Disc loaded into the console...
...see information about the Game Disc currently loaded into the Nintendo GameCube, set various options, and access Memory Card information and options. do not leave the disc cover open for the date and time of the disc. Control Stick • Select... menu screen • Highlight menu item • Change menu setting Game Play Screen Displays information about the Game Disc loaded into the console...

Instruction Booklet
Page 11
...to select your choice. Press the B Button to return to accept. 4 • MAIN MENU Game Play Screen From the Main Menu Screen, go to the Game Play Screen by pushing LEFT on the Control Stick. Option Screen From the Main Menu Screen, go to the Calendar Screen by pushing RIGHT ...Button to adjust the value. Press the A Button to the Option Screen by pushing UP on the Control Stick. Press START to display information about the Game Disc that is currently loaded into the Nintendo GameCube. Press the A Button to accept your choice with the A Button will return you to the Calendar...
...to select your choice. Press the B Button to return to accept. 4 • MAIN MENU Game Play Screen From the Main Menu Screen, go to the Game Play Screen by pushing LEFT on the Control Stick. Option Screen From the Main Menu Screen, go to the Calendar Screen by pushing RIGHT ...Button to adjust the value. Press the A Button to the Option Screen by pushing UP on the Control Stick. Press START to display information about the Game Disc that is currently loaded into the Nintendo GameCube. Press the A Button to accept your choice with the A Button will return you to the Calendar...
Instruction Booklet
Page 12
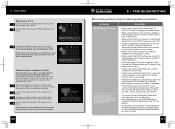
...reached the maximum of the console. Selected File Moving a File Use the Control Stick to highlight the file that is not allowed to be moved. The file will appear to confirm your choice. Press the A Button to display the status of any Nintendo GameCube Memory Cards plugged into the... Memory Card to the other . 18 4• MAIN MENU 19 Use the 3 Control Stick to highlight "YES" and press the A Button. 4• MAIN MENU Memory Card Screen NOTE: A Nintendo GameCube Memory Card is required to save game information (Sold separately, see below) allows you want to 1 move and press the...
...reached the maximum of the console. Selected File Moving a File Use the Control Stick to highlight the file that is not allowed to be moved. The file will appear to confirm your choice. Press the A Button to display the status of any Nintendo GameCube Memory Cards plugged into the... Memory Card to the other . 18 4• MAIN MENU 19 Use the 3 Control Stick to highlight "YES" and press the A Button. 4• MAIN MENU Memory Card Screen NOTE: A Nintendo GameCube Memory Card is required to save game information (Sold separately, see below) allows you want to 1 move and press the...
Instruction Booklet
Page 13
... Memory Card. Use the Control Stick to highlight "YES" and press the A Button. Cannot access the progressive scan feature in a game that the power switches on the Nintendo GameCube, TV and VCR (if used) are turned ON. • Check the connections between the console and the TV or VCR...to keep! If dirty, wipe with Game Discs made for formatting. Use the 3 Control Stick to select "YES" and press the A 2 Button. The file will appear to ask for confirmation for your particular setup. (Review page 12 on Nintendo Gamecube Model No. Use the Control Stick to select "ERASE" and press...
... Memory Card. Use the Control Stick to highlight "YES" and press the A Button. Cannot access the progressive scan feature in a game that the power switches on the Nintendo GameCube, TV and VCR (if used) are turned ON. • Check the connections between the console and the TV or VCR...to keep! If dirty, wipe with Game Discs made for formatting. Use the 3 Control Stick to select "YES" and press the A 2 Button. The file will appear to ask for confirmation for your particular setup. (Review page 12 on Nintendo Gamecube Model No. Use the Control Stick to select "ERASE" and press...
Instruction Booklet
Page 14
...to be sure the system is set from the Nintendo GameCube and repeat the above procedure. Sound is buzzing. Turn the console power ON. • Remove all game sounds. If the Power Indicator Light now comes on Nintendo GameCube Model No. When not playing games, the normal TV picture won't come on Input ... you are using the Component Video cable, (see if there are volume controls or mono/stereo options that the INPUT settings are correct for your particular setup. (Review page 12 on , or goes off during game play games, you have a mono TV or VCR and left and right sound channels...
...to be sure the system is set from the Nintendo GameCube and repeat the above procedure. Sound is buzzing. Turn the console power ON. • Remove all game sounds. If the Power Indicator Light now comes on Nintendo GameCube Model No. When not playing games, the normal TV picture won't come on Input ... you are using the Component Video cable, (see if there are volume controls or mono/stereo options that the INPUT settings are correct for your particular setup. (Review page 12 on , or goes off during game play games, you have a mono TV or VCR and left and right sound channels...
Instruction Booklet
Page 15
... it. Below is OFF before plugging any controllers into the console. • Insert the Controller Plug completely into cracks. 4. Open the Disc Cover, remove the disc and check for contamination, dirt, scratches or other irregularities. Turn the Nintendo GameCube OFF, unplug the system and visit the ...Switch, RF Modulator, console and your TV or VCR are in hot water and shake off , check the Controller Socket and Controller Plug for at 1-800-255-3700. Turn the power OFF and check the Nintendo GameCube Instruction Booklet for the game you turn the Nintendo GameCube power ON, the ...
... it. Below is OFF before plugging any controllers into the console. • Insert the Controller Plug completely into cracks. 4. Open the Disc Cover, remove the disc and check for contamination, dirt, scratches or other irregularities. Turn the Nintendo GameCube OFF, unplug the system and visit the ...Switch, RF Modulator, console and your TV or VCR are in hot water and shake off , check the Controller Socket and Controller Plug for at 1-800-255-3700. Turn the power OFF and check the Nintendo GameCube Instruction Booklet for the game you turn the Nintendo GameCube power ON, the ...

