User Manual
Page 2
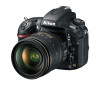
... This icon marks notes; Help Use the camera's on menu items and other pages in this manual assume that default settings are identical. Digitutor Digitutor, a series of a Nikon single-lens reflex (SLR) digital camera. This manual is available from your purchase of "watch and learn" manuals in ...movie form, is for help on -board help feature for both D800 and D800E digital cameras; Menu items, options, and ...
... This icon marks notes; Help Use the camera's on menu items and other pages in this manual assume that default settings are identical. Digitutor Digitutor, a series of a Nikon single-lens reflex (SLR) digital camera. This manual is available from your purchase of "watch and learn" manuals in ...movie form, is for help on -board help feature for both D800 and D800E digital cameras; Menu items, options, and ...

User Manual
Page 5
... off? How do I clean the camera? 393 Where should I take my camera for my camera? How do I focus the viewfinder? How do I restore default settings? Retouching Photographs 0 How do I create retouched copies of photos? 341 How do I make JPEG copies of RAW (NEF) photos? 353 Can I create a copy... of recording on the camera or save movie stills? 74 Menus and Settings How do I use ? 380 What other accessories are available for my camera? 387, 389 What software is available for servicing and repairs? 400 iii ...
... off? How do I clean the camera? 393 Where should I take my camera for my camera? How do I focus the viewfinder? How do I restore default settings? Retouching Photographs 0 How do I create retouched copies of photos? 341 How do I make JPEG copies of RAW (NEF) photos? 353 Can I create a copy... of recording on the camera or save movie stills? 74 Menus and Settings How do I use ? 380 What other accessories are available for my camera? 387, 389 What software is available for servicing and repairs? 400 iii ...
User Manual
Page 7
... Movie Live View 59 Indices 63 The Live View Display: Movie Live View 64 The Information Display: Movie Live View 66 Image Area 67 Movie Settings 70 Viewing Movies 72 Editing Movies 74 Trimming Movies 74 Saving Selected Frames 77 Image Recording Options 79 Image Area 79 Image Quality 84 Image...
... Movie Live View 59 Indices 63 The Live View Display: Movie Live View 64 The Information Display: Movie Live View 66 Image Area 67 Movie Settings 70 Viewing Movies 72 Editing Movies 74 Trimming Movies 74 Saving Selected Frames 77 Image Recording Options 79 Image Area 79 Image Quality 84 Image...
User Manual
Page 9
... 181 Using the Built-in Flash 181 Flash Modes 183 Flash Compensation 188 FV Lock 190 Other Shooting Options 193 Two-Button Reset: Restoring Default Settings 193 Multiple Exposure 195 Interval Timer Photography 201 Time-Lapse Photography 207 Non-CPU Lenses 212 Using a GPS Unit 215 vii
... 181 Using the Built-in Flash 181 Flash Modes 183 Flash Compensation 188 FV Lock 190 Other Shooting Options 193 Two-Button Reset: Restoring Default Settings 193 Multiple Exposure 195 Interval Timer Photography 201 Time-Lapse Photography 207 Non-CPU Lenses 212 Using a GPS Unit 215 vii
User Manual
Page 10
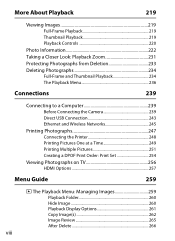
... Wireless Networks 245 Printing Photographs 247 Connecting the Printer 248 Printing Pictures One at a Time 249 Printing Multiple Pictures 251 Creating a DPOF Print Order: Print Set 254 Viewing Photographs on TV 256 HDMI Options 257 Menu Guide 259 D The Playback Menu: Managing Images 259 Playback Folder 260 Hide Image 260 Playback...
... Wireless Networks 245 Printing Photographs 247 Connecting the Printer 248 Printing Pictures One at a Time 249 Printing Multiple Pictures 251 Creating a DPOF Print Order: Print Set 254 Viewing Photographs on TV 256 HDMI Options 257 Menu Guide 259 D The Playback Menu: Managing Images 259 Playback Folder 260 Hide Image 260 Playback...

User Manual
Page 11
... Color Space 274 Vignette Control 275 Auto Distortion Control 276 Long Exposure NR (Long Exposure Noise Reduction 277 High ISO NR 277 A Custom Settings: Fine-Tuning Camera Settings 278 Custom Settings Bank 280 a: Autofocus 281 a1: AF-C Priority Selection 281 a2: AF-S Priority Selection 282 a3: Focus Tracking with Lock-On 283 a4...
... Color Space 274 Vignette Control 275 Auto Distortion Control 276 Long Exposure NR (Long Exposure Noise Reduction 277 High ISO NR 277 A Custom Settings: Fine-Tuning Camera Settings 278 Custom Settings Bank 280 a: Autofocus 281 a1: AF-C Priority Selection 281 a2: AF-S Priority Selection 282 a3: Focus Tracking with Lock-On 283 a4...

User Manual
Page 12
... e1: Flash Sync Speed 299 e2: Flash Shutter Speed 300 e3: Flash Cntrl for Built-in Flash 301 e4: Modeling Flash 307 e5: Auto Bracketing Set 307 e6: Auto Bracketing (Mode M 308 e7: Bracketing Order 308 f: Controls 309 f1: D Switch 309 f2: Multi Selector Center Button 309 f3: Multi Selector 310...
... e1: Flash Sync Speed 299 e2: Flash Shutter Speed 300 e3: Flash Cntrl for Built-in Flash 301 e4: Modeling Flash 307 e5: Auto Bracketing Set 307 e6: Auto Bracketing (Mode M 308 e7: Bracketing Order 308 f: Controls 309 f1: D Switch 309 f2: Multi Selector Center Button 309 f3: Multi Selector 310...
User Manual
Page 13
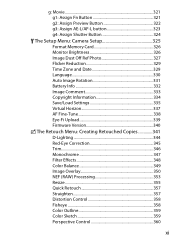
... Flicker Reduction 329 Time Zone and Date 329 Language 330 Auto Image Rotation 331 Battery Info 332 Image Comment 333 Copyright Information 334 Save/Load Settings 335 Virtual Horizon 337 AF Fine-Tune 338 Eye-Fi Upload 339 Firmware Version 340 N The Retouch Menu: Creating Retouched Copies 341 D-Lighting 344 Red...
... Flicker Reduction 329 Time Zone and Date 329 Language 330 Auto Image Rotation 331 Battery Info 332 Image Comment 333 Copyright Information 334 Save/Load Settings 335 Virtual Horizon 337 AF Fine-Tune 338 Eye-Fi Upload 339 Firmware Version 340 N The Retouch Menu: Creating Retouched Copies 341 D-Lighting 344 Red...

User Manual
Page 14
Miniature Effect 361 Selective Color 362 Side-by-Side Comparison 364 O My Menu/m Recent Settings 366 Technical Notes 371 Compatible Lenses 371 Optional Flash Units (Speedlights 380 The Nikon Creative Lighting System (CLS 381 Other Accessories 387 Attaching a Power Connector and AC Adapter 391 Caring for the Camera 393 Storage 393 Cleaning 393...
Miniature Effect 361 Selective Color 362 Side-by-Side Comparison 364 O My Menu/m Recent Settings 366 Technical Notes 371 Compatible Lenses 371 Optional Flash Units (Speedlights 380 The Nikon Creative Lighting System (CLS 381 Other Accessories 387 Attaching a Power Connector and AC Adapter 391 Caring for the Camera 393 Storage 393 Cleaning 393...
User Manual
Page 24
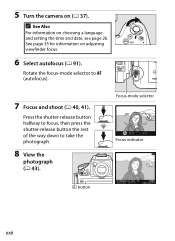
See page 35 for information on choosing a language and setting the time and date, see page 26. Focus-mode selector Focus indicator K button xxii Press the shutter-release button halfway to focus, then press the shutter-release button the rest of the way down to AF (autofocus). 7 Focus and shoot (0 40, 41). A See Also For information on adjusting viewfinder focus. 6 Select autofocus (0 91). Rotate the focus-mode selector to take the photograph. 8 View the photograph (0 43). 5 Turn the camera on (0 37).
See page 35 for information on choosing a language and setting the time and date, see page 26. Focus-mode selector Focus indicator K button xxii Press the shutter-release button halfway to focus, then press the shutter-release button the rest of the way down to AF (autofocus). 7 Focus and shoot (0 40, 41). A See Also For information on adjusting viewfinder focus. 6 Select autofocus (0 91). Rotate the focus-mode selector to take the photograph. 8 View the photograph (0 43). 5 Turn the camera on (0 37).

User Manual
Page 31
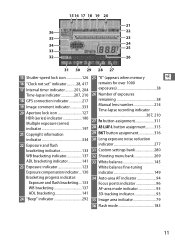
... 22 27 26 25 23 24 X 16 Flash compensation indicator ..... 188 17 GPS connection indicator 217 18 Shutter-speed lock icon 126 19 "Clock not set" indicator.......... 28, 417 20 Interval timer indicator..........201, 204 Time-lapse indicator 207, 210 21 AF-area mode indicator 93, 95 Auto-area AF indicator...
... 22 27 26 25 23 24 X 16 Flash compensation indicator ..... 188 17 GPS connection indicator 217 18 Shutter-speed lock icon 126 19 "Clock not set" indicator.......... 28, 417 20 Interval timer indicator..........201, 204 Time-lapse indicator 207, 210 21 AF-area mode indicator 93, 95 Auto-area AF indicator...

User Manual
Page 32
The Viewfinder Display 1 2 4 X 3 5 6 7 8 9 10 11 12 13 14 15 16 17 18 19 20 21 22 23 24 25 1 Framing grid (displayed when On is selected for Custom Setting d6 295 2 Focus points 40, 96, 284, 285 AF-area mode 93, 94 3 AF area brackets 35, 223 4 Virtual horizon display 313 5 Focus indicator 40, 102 6 Metering 115 7 Autoexposure (AE) lock 128 8 Shutter speed lock icon 126 9 Shutter speed 119, 122 Autofocus mode 91 10 Aperture lock icon 127 11 Aperture (f-number)...........120, 122 Aperture (number of stops 121, 374 8
The Viewfinder Display 1 2 4 X 3 5 6 7 8 9 10 11 12 13 14 15 16 17 18 19 20 21 22 23 24 25 1 Framing grid (displayed when On is selected for Custom Setting d6 295 2 Focus points 40, 96, 284, 285 AF-area mode 93, 94 3 AF area brackets 35, 223 4 Virtual horizon display 313 5 Focus indicator 40, 102 6 Metering 115 7 Autoexposure (AE) lock 128 8 Shutter speed lock icon 126 9 Shutter speed 119, 122 Autofocus mode 91 10 Aperture lock icon 127 11 Aperture (f-number)...........120, 122 Aperture (number of stops 121, 374 8
User Manual
Page 35
... 33 32 26 31 30 29 28 27 15 Shutter-speed lock icon 126 25 "K" (appears when memory X 16 "Clock not set" indicator.......... 28, 417 17 Interval timer indicator..........201, 204 Time-lapse indicator 207, 210 18 GPS connection indicator 217 19 Image comment... assignment 311 28 AE-L/AF-L button assignment......... 315 29 D button assignment 316 30 Long exposure noise reduction indicator 277 31 Custom settings bank 280 WB bracketing indicator 137 ADL bracketing indicator 141 23 Exposure indicator 123 Exposure compensation indicator ...130 Bracketing progress indicator: Exposure ...
... 33 32 26 31 30 29 28 27 15 Shutter-speed lock icon 126 25 "K" (appears when memory X 16 "Clock not set" indicator.......... 28, 417 17 Interval timer indicator..........201, 204 Time-lapse indicator 207, 210 18 GPS connection indicator 217 19 Image comment... assignment 311 28 AE-L/AF-L button assignment......... 315 29 D button assignment 316 30 Long exposure noise reduction indicator 277 31 Custom settings bank 280 WB bracketing indicator 137 ADL bracketing indicator 141 23 Exposure indicator 123 Exposure compensation indicator ...130 Bracketing progress indicator: Exposure ...

User Manual
Page 36
For information on , see Custom Setting d9 (Information display, 0 296). 12 The Information Display (Continued) 37 38 39 40 50 41 42 43 49 44 48 45 47 46 X 37 FV ........... 297 38 Release mode indicator 103 MB-D12 battery indicator 298 Continuous shooting speed 45 Depth-of the lettering in the information display, see Custom Setting c4 (Monitor off automatically if no operations are performed for about 10 seconds. The monitor will turn off delay, 0 292). A See Also For information on...
For information on , see Custom Setting d9 (Information display, 0 296). 12 The Information Display (Continued) 37 38 39 40 50 41 42 43 49 44 48 45 47 46 X 37 FV ........... 297 38 Release mode indicator 103 MB-D12 battery indicator 298 Continuous shooting speed 45 Depth-of the lettering in the information display, see Custom Setting c4 (Monitor off automatically if no operations are performed for about 10 seconds. The monitor will turn off delay, 0 292). A See Also For information on...
User Manual
Page 37
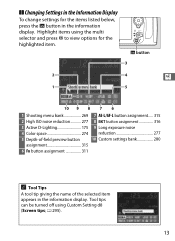
...-of-field preview button assignment 315 6 Fn button assignment 311 7 AE-L/AF-L button assignment..... 315 8 D button assignment 316 9 Long exposure noise reduction 277 10 Custom settings bank 280 A Tool Tips A tool tip giving the name of the selected item appears in the information display. Tool tips can be turned off using... the multi selector and press J to view options for the items listed below, press the R button in the information display. Highlight items using Custom Setting d8 (Screen tips; 0 295). 13 ❚❚ Changing...
...-of-field preview button assignment 315 6 Fn button assignment 311 7 AE-L/AF-L button assignment..... 315 8 D button assignment 316 9 Long exposure noise reduction 277 10 Custom settings bank 280 A Tool Tips A tool tip giving the name of the selected item appears in the information display. Tool tips can be turned off using... the multi selector and press J to view options for the items listed below, press the R button in the information display. Highlight items using Custom Setting d8 (Screen tips; 0 295). 13 ❚❚ Changing...

User Manual
Page 39
s G button Tabs Choose from the camera menus. Current settings are shown by pressing L (Z/Q) button (0 18). 15 To view the menus, press the G button. d If d icon is displayed, help for current item can be viewed ... menu. sTutorial Camera Menus Most shooting, playback, and setup options can be accessed from the following menus: • D: Playback (0 259) • C: Shooting (0 268) • A: Custom Settings (0 278) • B: Setup (0 325) • N: Retouch (0 341) • O/m: My Menu or Recent settings (defaults to My Menu; 0 366) Slider shows position in current menu.
s G button Tabs Choose from the camera menus. Current settings are shown by pressing L (Z/Q) button (0 18). 15 To view the menus, press the G button. d If d icon is displayed, help for current item can be viewed ... menu. sTutorial Camera Menus Most shooting, playback, and setup options can be accessed from the following menus: • D: Playback (0 259) • C: Shooting (0 268) • A: Custom Settings (0 278) • B: Setup (0 325) • N: Retouch (0 341) • O/m: My Menu or Recent settings (defaults to My Menu; 0 366) Slider shows position in current menu.
User Manual
Page 49
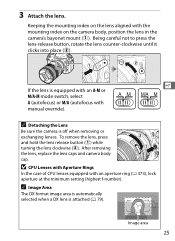
... lenses. s If the lens is equipped with an A-M or M/A-M mode switch, select A (autofocus) or M/A (autofocus with an aperture ring (0 373), lock aperture at the minimum setting (highest f-number). D CPU Lenses with Aperture Rings In the case of CPU lenses equipped with manual override). Image area 25 To remove the lens, press...
... lenses. s If the lens is equipped with an A-M or M/A-M mode switch, select A (autofocus) or M/A (autofocus with an aperture ring (0 373), lock aperture at the minimum setting (highest f-number). D CPU Lenses with Aperture Rings In the case of CPU lenses equipped with manual override). Image area 25 To remove the lens, press...

User Manual
Page 50
Choose a language and set , B will blink in the monitor and the time and date recorded with photographs will be incorrect. 1 Turn the camera on using menus, see "Using Camera ... 3 Select a language. J button 26 For information on . Basic Setup The language option in the setup menu is automatically highlighted the first time menus are not set the time and date. Power switch s 2 Select Language in the setup menu.
Choose a language and set , B will blink in the monitor and the time and date recorded with photographs will be incorrect. 1 Turn the camera on using menus, see "Using Camera ... 3 Select a language. J button 26 For information on . Basic Setup The language option in the setup menu is automatically highlighted the first time menus are not set the time and date. Power switch s 2 Select Language in the setup menu.

User Manual
Page 51
... is in effect in hours) and press J. 6 Turn daylight saving time on or off by default; if daylight saving time is set to change. Select Time zone and date and press 2. 5 Set time zone. Press 4 or 2 to highlight the local time zone (the UTC field shows the difference between the selected time... zone and s Coordinated Universal Time, or UTC, in the local time zone, press 1 to highlight On and press J. 7 Set the date and time. Select Date and time and press 2. 4 Select Time zone and date.
... is in effect in hours) and press J. 6 Turn daylight saving time on or off by default; if daylight saving time is set to change. Select Time zone and date and press 2. 5 Set time zone. Press 4 or 2 to highlight the local time zone (the UTC field shows the difference between the selected time... zone and s Coordinated Universal Time, or UTC, in the local time zone, press 1 to highlight On and press J. 7 Set the date and time. Select Date and time and press 2. 4 Select Time zone and date.

User Manual
Page 52
... the time and date provided by an optional EP-5B power connector and EH-5b AC adapter (0 387). Set the clock to shooting mode. s A The Clock Battery The camera clock is powered by an independent, rechargeable power source, which the year, month, and day ... reset. If the B icon flashes in which is charged as necessary. A GPS Units (0 215) If a GPS unit is powered by the GPS unit (0 218). 28 8 Set date format. Check the clock regularly against more accurate time pieces and reset as necessary when the main battery is installed or the camera is...
... the time and date provided by an optional EP-5B power connector and EH-5b AC adapter (0 387). Set the clock to shooting mode. s A The Clock Battery The camera clock is powered by an independent, rechargeable power source, which the year, month, and day ... reset. If the B icon flashes in which is charged as necessary. A GPS Units (0 215) If a GPS unit is powered by the GPS unit (0 218). 28 8 Set date format. Check the clock regularly against more accurate time pieces and reset as necessary when the main battery is installed or the camera is...


