
User Manual
Page 6
Table of Contents Q&A Index ii For Your Safety xiii Notices...xvi Quick Start Guide xxi Introduction 1 Package Contents 1 Getting to Know the Camera 2 Camera Body 2 The Control Panel 6 The Viewfinder Display 8 The Information Display 10 The BM-12 Monitor Cover 14 Tutorial 15 Camera Menus 15 Using Camera Menus 16 Help ...18 First Steps 19 Charge the Battery 19 Insert the Battery 21 Attach a Lens 24 Basic Setup 26 Insert a Memory Card 29 Format the Memory Card 32 Adjust Viewfinder Focus 35 iv
Table of Contents Q&A Index ii For Your Safety xiii Notices...xvi Quick Start Guide xxi Introduction 1 Package Contents 1 Getting to Know the Camera 2 Camera Body 2 The Control Panel 6 The Viewfinder Display 8 The Information Display 10 The BM-12 Monitor Cover 14 Tutorial 15 Camera Menus 15 Using Camera Menus 16 Help ...18 First Steps 19 Charge the Battery 19 Insert the Battery 21 Attach a Lens 24 Basic Setup 26 Insert a Memory Card 29 Format the Memory Card 32 Adjust Viewfinder Focus 35 iv

User Manual
Page 25
... 0 19) • UC-E14 USB cable (0 243, 248) • USB cable clip (0 243) • Strap (AN-DC6 for D800, AN-DC6E for D800E; 0 xxi) • Warranty • User's Manual (this guide) • Quick Guide • ViewNX 2 installer CD (0 239) 1 Memory cards are sold separately.... • BF-1B body cap (0 24, 389) • BS-1 accessory shoe cover (0 380) • BM-12 monitor X cover (0 14) • D800/D800E digital camera (0 2) • EN-EL15 rechargeable Li-ion battery with your camera. XIntroduction Package Contents...
... 0 19) • UC-E14 USB cable (0 243, 248) • USB cable clip (0 243) • Strap (AN-DC6 for D800, AN-DC6E for D800E; 0 xxi) • Warranty • User's Manual (this guide) • Quick Guide • ViewNX 2 installer CD (0 239) 1 Memory cards are sold separately.... • BF-1B body cap (0 24, 389) • BS-1 accessory shoe cover (0 380) • BM-12 monitor X cover (0 14) • D800/D800E digital camera (0 2) • EN-EL15 rechargeable Li-ion battery with your camera. XIntroduction Package Contents...

User Manual
Page 26
... to Know the Camera Take a few moments to it helpful to bookmark this section and refer to familiarize yourself with camera controls and displays. Camera Body 1 10 11 2 12 X 3 13 4 14 5 4 6 7 15 8 16 9 1 Release mode dial 103 8 Accessory shoe 2 Release mode dial (for optional flash unit 380 lock release 103 9 Accessory...
... to Know the Camera Take a few moments to it helpful to bookmark this section and refer to familiarize yourself with camera controls and displays. Camera Body 1 10 11 2 12 X 3 13 4 14 5 4 6 7 15 8 16 9 1 Release mode dial 103 8 Accessory shoe 2 Release mode dial (for optional flash unit 380 lock release 103 9 Accessory...

User Manual
Page 28
Camera Body (Continued) 1 2 11 10 3 4 X 5 9 6 7 8 12 1 AF-assist illuminator 286 6 Battery-chamber cover latch....... 21 Self-timer lamp 107 7 Battery-chamber cover 21 Red-eye reduction lamp ...-field preview button 9 Tripod socket 63, 117, 315, 322 10 Lens mount 25, 102 4 Fn (function) button 11 CPU contacts 83, 191, 311, 321 12 Body cap 24, 389 5 Power connector cover 391 A LCD Illuminators Rotating the power switch toward D again. 4
Camera Body (Continued) 1 2 11 10 3 4 X 5 9 6 7 8 12 1 AF-assist illuminator 286 6 Battery-chamber cover latch....... 21 Self-timer lamp 107 7 Battery-chamber cover 21 Red-eye reduction lamp ...-field preview button 9 Tripod socket 63, 117, 315, 322 10 Lens mount 25, 102 4 Fn (function) button 11 CPU contacts 83, 191, 311, 321 12 Body cap 24, 389 5 Power connector cover 391 A LCD Illuminators Rotating the power switch toward D again. 4

User Manual
Page 48
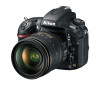
Focal length scale index Focal length scale Lens hood Lens cap s Mounting index CPU contacts (0 373) Rear lens cap Zoom ring Focus mode switch (0 25, 101) Vibration reduction ON/OFF switch Vibration reduction mode switch Focus ring (0 101) 1 Turn the camera off. 2 Remove the rear lens cap and the camera body cap. 24 The lens generally used in this manual for illustrative purposes is removed. Attach a Lens Care should be taken to prevent dust from entering the camera when the lens is an AF-S NIKKOR 24-120mm f/4G ED VR.
Focal length scale index Focal length scale Lens hood Lens cap s Mounting index CPU contacts (0 373) Rear lens cap Zoom ring Focus mode switch (0 25, 101) Vibration reduction ON/OFF switch Vibration reduction mode switch Focus ring (0 101) 1 Turn the camera off. 2 Remove the rear lens cap and the camera body cap. 24 The lens generally used in this manual for illustrative purposes is removed. Attach a Lens Care should be taken to prevent dust from entering the camera when the lens is an AF-S NIKKOR 24-120mm f/4G ED VR.
User Manual
Page 49
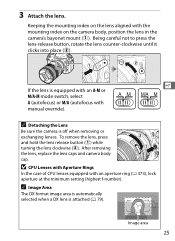
... Image area 25 A Detaching the Lens Be sure the camera is attached (0 79). After removing the lens, replace the lens caps and camera body cap. A Image Area The DX format image area is automatically selected when a DX lens is off when removing or exchanging lenses. Being careful not...-clockwise until it clicks into place (w). D CPU Lenses with Aperture Rings In the case of CPU lenses equipped with the mounting index on the camera body, position the lens in the camera's bayonet mount (q). s If the lens is equipped with an A-M or M/A-M mode switch, select A (autofocus) or M/A (...
... Image area 25 A Detaching the Lens Be sure the camera is attached (0 79). After removing the lens, replace the lens caps and camera body cap. A Image Area The DX format image area is automatically selected when a DX lens is off when removing or exchanging lenses. Being careful not...-clockwise until it clicks into place (w). D CPU Lenses with Aperture Rings In the case of CPU lenses equipped with the mounting index on the camera body, position the lens in the camera's bayonet mount (q). s If the lens is equipped with an A-M or M/A-M mode switch, select A (autofocus) or M/A (...

User Manual
Page 63
Ready the Camera When framing photographs in the viewfinder, hold the camera as shown in your right hand and cradle the camera body or lens with your torso for support and place one foot half a pace ahead of the three illustrations at right. s 39 When framing photographs in portrait (tall) orientation, hold the handgrip in the bottom of the other to keep your upper body stable. Keep your elbows propped lightly against your left.
Ready the Camera When framing photographs in the viewfinder, hold the camera as shown in your right hand and cradle the camera body or lens with your torso for support and place one foot half a pace ahead of the three illustrations at right. s 39 When framing photographs in portrait (tall) orientation, hold the handgrip in the bottom of the other to keep your upper body stable. Keep your elbows propped lightly against your left.
User Manual
Page 126
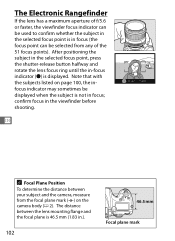
... is in focus (the focus point can be displayed when the subject is not in focus; Note that with the subjects listed on the camera body (0 2). N A Focal Plane Position To determine the distance between the lens mounting flange and the focal plane is 46.5 mm (1.83 in the viewfinder before shooting...
... is in focus (the focus point can be displayed when the subject is not in focus; Note that with the subjects listed on the camera body (0 2). N A Focal Plane Position To determine the distance between the lens mounting flange and the focal plane is 46.5 mm (1.83 in the viewfinder before shooting...
User Manual
Page 396
... shifting and/or tilting the lens, or when an aperture other than flash sync speed by one step or more. 17 Exposure determined by camera body. Use spot or center-weighted metering if desired results are specified using lens aperture ring and determine exposure before shifting lens. 18 Exposure compensation required...
... shifting and/or tilting the lens, or when an aperture other than flash sync speed by one step or more. 17 Exposure determined by camera body. Use spot or center-weighted metering if desired results are specified using lens aperture ring and determine exposure before shifting lens. 18 Exposure compensation required...

User Manual
Page 413
... filters. Use the C-PL or C-PLII circular polarizing filter instead. • Use NC filters to protect the lens. • To prevent ghosting, use of Nikon software; PC card adapters PC Card Adapter EC-AD1: The EC-AD1 PC card adapter allows Type I CompactFlash memory cards to be used with movies... during autofocus. Body Cap BF-1B/Body Cap BF-1A: The body cap keeps the mirror, Body caps viewfinder screen, and low-pass filter free of dust when a lens is found. See the filter manual for...
... filters. Use the C-PL or C-PLII circular polarizing filter instead. • Use NC filters to protect the lens. • To prevent ghosting, use of Nikon software; PC card adapters PC Card Adapter EC-AD1: The EC-AD1 PC card adapter allows Type I CompactFlash memory cards to be used with movies... during autofocus. Body Cap BF-1B/Body Cap BF-1A: The body cap keeps the mirror, Body caps viewfinder screen, and low-pass filter free of dust when a lens is found. See the filter manual for...

User Manual
Page 417
... distilled water and dry thoroughly. These glass elements are exposed to temperatures above 50 °C (122 °F) or below -10 °C (14 °F) Cleaning Camera body Use a blower to equipment that : • are poorly ventilated or subject to humidities of over 60% • are next to remove dust and lint, then...
... distilled water and dry thoroughly. These glass elements are exposed to temperatures above 50 °C (122 °F) or below -10 °C (14 °F) Cleaning Camera body Use a blower to equipment that : • are poorly ventilated or subject to humidities of over 60% • are next to remove dust and lint, then...

User Manual
Page 423
... off. The mirror will return to Step 8. 7 Clean the filter. Remove any dust and lint from the filter with a blower can only be removed by Nikon-authorized service personnel. Do not use a blower-brush, as the bristles could damage the filter. n 399 6 Examine the low-pass filter. Holding the camera so... not be removed with a blower. Dirt that light falls on the low-pass filter, examine the filter for dust or lint. Replace the lens or body cap. Under no foreign objects are present, proceed to the down position and the shutter curtain will close.
... off. The mirror will return to Step 8. 7 Clean the filter. Remove any dust and lint from the filter with a blower can only be removed by Nikon-authorized service personnel. Do not use a blower-brush, as the bristles could damage the filter. n 399 6 Examine the low-pass filter. Holding the camera so... not be removed with a blower. Dirt that light falls on the low-pass filter, examine the filter for dust or lint. Replace the lens or body cap. Under no foreign objects are present, proceed to the down position and the shutter curtain will close.
User Manual
Page 424
...described above, or have the filter cleaned by the original retailer or Nikon service representative once every one to two years, and that it may be sure to replace the body cap provided with the camera, being careful to the body cap. The D800, however, is raised, the curtain will be ... matter find its way onto the low-pass filter, clean the filter as lenses or optional flash units, should be inspected by authorized Nikon service personnel. Frequent inspection and servicing are removed or exchanged. Photographs affected by the presence of foreign matter on the Low-Pass Filter...
...described above, or have the filter cleaned by the original retailer or Nikon service representative once every one to two years, and that it may be sure to replace the body cap provided with the camera, being careful to the body cap. The D800, however, is raised, the curtain will be ... matter find its way onto the low-pass filter, clean the filter as lenses or optional flash units, should be inspected by authorized Nikon service personnel. Frequent inspection and servicing are removed or exchanged. Photographs affected by the presence of foreign matter on the Low-Pass Filter...

User Manual
Page 426
..., as this has no circumstances should you are easily damaged. Note that desiccant gradually loses its capacity to prevent fire. Cleaning: When cleaning the camera body, use a blower to be used for information on the curtain, poke it with cleaning tools, or subject it away. Do not touch the shutter curtain...
..., as this has no circumstances should you are easily damaged. Note that desiccant gradually loses its capacity to prevent fire. Cleaning: When cleaning the camera body, use a blower to be used for information on the curtain, poke it with cleaning tools, or subject it away. Do not touch the shutter curtain...

User Manual
Page 455
...; 3.2 in.) Weight Approx. 1,000 g (2 lb 3.3 oz) with a fully-charged battery operating at an ambient temperature of 20 °C (68 °F). • Nikon reserves the right to change the specifications of the hardware and software described in this manual may result from any time and without... g/1 lb 15.7 oz (camera body only) Operating environment Temperature 0-40 °C (+32-104 °F) Humidity Less than 85% (no condensation) • Unless otherwise stated, all figures are for damages that this manual at any mistakes that may contain. Nikon will not be held liable for ...
...; 3.2 in.) Weight Approx. 1,000 g (2 lb 3.3 oz) with a fully-charged battery operating at an ambient temperature of 20 °C (68 °F). • Nikon reserves the right to change the specifications of the hardware and software described in this manual may result from any time and without... g/1 lb 15.7 oz (camera body only) Operating environment Temperature 0-40 °C (+32-104 °F) Humidity Less than 85% (no condensation) • Unless otherwise stated, all figures are for damages that this manual at any mistakes that may contain. Nikon will not be held liable for ...
User Manual
Page 466
..., 387 Beep 292 Bit depth for NEF (RAW) images ....... 86 D button 133, 137, 141, 180, 197, 316 Black-and-white (Monochrome).... 347 Blue intensifier 348 Body cap 1, 24, 389 Border 250 Bracketing 132, 307, 308 Bracketing order 308 Brightness 166 Built-in AF-assist Illuminator 286 Built-in flash 181, 375...
..., 387 Beep 292 Bit depth for NEF (RAW) images ....... 86 D button 133, 137, 141, 180, 197, 316 Black-and-white (Monochrome).... 347 Blue intensifier 348 Body cap 1, 24, 389 Border 250 Bracketing 132, 307, 308 Bracketing order 308 Brightness 166 Built-in AF-assist Illuminator 286 Built-in flash 181, 375...

